
K8S-MX English User Manual E1884
Page 4
... a bootable floppy disk 2-2 2.1.2 Using AFUDOS to update the BIOS 2-3 2.1.3 Using AFUDOS to copy BIOS from PC 2-4 2.1.4 Using ASUS EZ Flash to update the BIOS 2-5 2.1.5 Recovering the BIOS with CrashFree BIOS 2 ....... 2-6 2.2 BIOS Setup program 2-8 2.2.1 BIOS menu screen 2-9 2.2.2 Menu bar 2-9 2.2.3 Navigation keys 2-9 2.2.4 Menu items 2-10 2.2.5 Sub-menu items 2-10 2.2.6...menu 2-23 2.5.1 ACPI Aware O/S 2-23 2.5.2 Suspend Mode 2-24 2.5.3 ACPI 2.0 Support 2-24 2.5.4 ACPI APIC Support 2-24 2.5.5 BIOS--> AML ACPI table 2-24 2.5.6 Headless mode 2-24 2.5.7 APM Configuration 2-24 iv
... a bootable floppy disk 2-2 2.1.2 Using AFUDOS to update the BIOS 2-3 2.1.3 Using AFUDOS to copy BIOS from PC 2-4 2.1.4 Using ASUS EZ Flash to update the BIOS 2-5 2.1.5 Recovering the BIOS with CrashFree BIOS 2 ....... 2-6 2.2 BIOS Setup program 2-8 2.2.1 BIOS menu screen 2-9 2.2.2 Menu bar 2-9 2.2.3 Navigation keys 2-9 2.2.4 Menu items 2-10 2.2.5 Sub-menu items 2-10 2.2.6...menu 2-23 2.5.1 ACPI Aware O/S 2-23 2.5.2 Suspend Mode 2-24 2.5.3 ACPI 2.0 Support 2-24 2.5.4 ACPI APIC Support 2-24 2.5.5 BIOS--> AML ACPI table 2-24 2.5.6 Headless mode 2-24 2.5.7 APM Configuration 2-24 iv

K8S-MX English User Manual E1884
Page 10
K8S-MX specifications summary Internal I/O BIOS features Industry standard Manageability Power Requirement Form Factor Support CD contents 2 x USB 2.0 connector for 4 additional USB ports CPU/Chassis fan connectors 20-pin/4-pin ATX 12V power connectors CD/AUX connectors S/PDIF out connector GAME/MIDI connector Front panel audio connector 4Mb Flash EEPROM AMI BIOS... with enhanced ACPI, PnP, DMI, ASUS MyLogo™, SM BIOS 2.3 PCI 2.2, USB 2.0/1.1 Wake-On-LAN by PME, Wake-On-Ring by PME ATX...
K8S-MX specifications summary Internal I/O BIOS features Industry standard Manageability Power Requirement Form Factor Support CD contents 2 x USB 2.0 connector for 4 additional USB ports CPU/Chassis fan connectors 20-pin/4-pin ATX 12V power connectors CD/AUX connectors S/PDIF out connector GAME/MIDI connector Front panel audio connector 4Mb Flash EEPROM AMI BIOS... with enhanced ACPI, PnP, DMI, ASUS MyLogo™, SM BIOS 2.3 PCI 2.2, USB 2.0/1.1 Wake-On-LAN by PME, Wake-On-Ring by PME ATX...

K8S-MX English User Manual E1884
Page 14
...advanced sound cards. 1.3.2 Unique ASUS features CrashFree BIOS 2 This feature allows you to restore the original BIOS data from the ASUS support CD in case when the BIOS codes and data are corrupted. feature of the motherboard BIOS allows automatic re-setting to the BIOS default settings in the motherboard allows...™ This new feature present in case the system hangs due to overclocking. See page 2-6. See pages 2-31. ASUS EZ Flash BIOS With the ASUS EZ Flash, you to personalize and add style to your computer into a high-end entertainment system with customizable boot logos...
...advanced sound cards. 1.3.2 Unique ASUS features CrashFree BIOS 2 This feature allows you to restore the original BIOS data from the ASUS support CD in case when the BIOS codes and data are corrupted. feature of the motherboard BIOS allows automatic re-setting to the BIOS default settings in the motherboard allows...™ This new feature present in case the system hangs due to overclocking. See page 2-6. See pages 2-31. ASUS EZ Flash BIOS With the ASUS EZ Flash, you to personalize and add style to your computer into a high-end entertainment system with customizable boot logos...
K8S-MX English User Manual E1884
Page 16
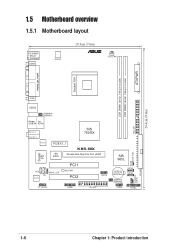
... PORT Socket 754 VGA USB12 USBPW34 USBPW12 Bottom: Top: USB34 RJ-45 Top:Line In Center:Line Out Below:Mic In SIS 760GX RTL8201CL PCIEX1_1 K8S-MX 4M BIOS Accelerated Graphics Port (AGP) Super I/O AUX AD1888 SPDIF_OUT CD PCI1 SB_PWR PCI2 USB78 FP_AUDIO GAME FLOPPY SIS 965L CR2032 3V Lithium Cell CMOS Power...
... PORT Socket 754 VGA USB12 USBPW34 USBPW12 Bottom: Top: USB34 RJ-45 Top:Line In Center:Line Out Below:Mic In SIS 760GX RTL8201CL PCIEX1_1 K8S-MX 4M BIOS Accelerated Graphics Port (AGP) Super I/O AUX AD1888 SPDIF_OUT CD PCI1 SB_PWR PCI2 USB78 FP_AUDIO GAME FLOPPY SIS 965L CR2032 3V Lithium Cell CMOS Power...

K8S-MX English User Manual E1884
Page 23
...To install and configure an expansion card: 1. Install the drivers and/or software applications for the expansion card according to install a DIMM. 1. See Chapter 2 for BIOS information. 3. DDR DIMM Unlocked A DDR DIMM is properly seated. 1.7.3 Installing a DIMM Follow these steps to the card documentation. 1.8.1 Standard interrupt assignments IRQ Priority...13 8 Numeric Data Processor 14* 9 Primary IDE Channel 15* 10 Secondary IDE Channel * These IRQs are usually available for ISA or PCI devices. ASUS K8S-MX motherboard 1-13 Refer to the tables next page. 4.
...To install and configure an expansion card: 1. Install the drivers and/or software applications for the expansion card according to install a DIMM. 1. See Chapter 2 for BIOS information. 3. DDR DIMM Unlocked A DDR DIMM is properly seated. 1.7.3 Installing a DIMM Follow these steps to the card documentation. 1.8.1 Standard interrupt assignments IRQ Priority...13 8 Numeric Data Processor 14* 9 Primary IDE Channel 15* 10 Secondary IDE Channel * These IRQs are usually available for ISA or PCI devices. ASUS K8S-MX motherboard 1-13 Refer to the tables next page. 4.

K8S-MX English User Manual E1884
Page 26
...system boot failure! ® CLRTC K8S-MX K8S-MX Clear RTC RAM Setting 2 1 Normal (Default) 3 2 Clear CMOS You do not need to clear the RTC when the system hangs due to re-enter data. To erase the RTC RAM: 1. Hold down and reboot the system so BIOS can clear the CMOS memory of date... information such as system • words, is powered by erasing the CMOS RTC RAM data. Shut down the key during the boot process and enter BIOS setup to overclocking. 1.9 Jumpers 1. Clear RTC RAM (CLRTC) This jumper allows you to its previous values. 1-16 Chapter 1: Product introduction Turn OFF the ...
...system boot failure! ® CLRTC K8S-MX K8S-MX Clear RTC RAM Setting 2 1 Normal (Default) 3 2 Clear CMOS You do not need to clear the RTC when the system hangs due to re-enter data. To erase the RTC RAM: 1. Hold down and reboot the system so BIOS can clear the CMOS memory of date... information such as system • words, is powered by erasing the CMOS RTC RAM data. Shut down the key during the boot process and enter BIOS setup to overclocking. 1.9 Jumpers 1. Clear RTC RAM (CLRTC) This jumper allows you to its previous values. 1-16 Chapter 1: Product introduction Turn OFF the ...

K8S-MX English User Manual E1884
Page 35
...switch for easy and foolproof connection. Pressing the power switch turns the system between ON and SLEEP, or ON and SOFT OFF, depending on the BIOS or OS settings. The System Panel connector is color-coded for rebooting the system without turning off the system power. • ATX Power Switch /... mode for more than 4 seconds turns the system OFF. • Hard disk activity LED (Red 2-pin IDE_LED) This connector supplies power to light up. ASUS K8S-MX motherboard 1-25 Take note of an IDE device cause this LED to the hard disk activity LED. Any read or write activity of the specific...
...switch for easy and foolproof connection. Pressing the power switch turns the system between ON and SLEEP, or ON and SOFT OFF, depending on the BIOS or OS settings. The System Panel connector is color-coded for rebooting the system without turning off the system power. • ATX Power Switch /... mode for more than 4 seconds turns the system OFF. • Hard disk activity LED (Red 2-pin IDE_LED) This connector supplies power to light up. ASUS K8S-MX motherboard 1-25 Take note of an IDE device cause this LED to the hard disk activity LED. Any read or write activity of the specific...

K8S-MX English User Manual E1884
Page 37
BIOS information ASUS K8S-MX motherboard 2-1 Detailed descriptions of the BIOS parameters are also provided. Chapter 2 This chapter tells how to change system settings through the BIOS Setup menus.
BIOS information ASUS K8S-MX motherboard 2-1 Detailed descriptions of the BIOS parameters are also provided. Chapter 2 This chapter tells how to change system settings through the BIOS Setup menus.

K8S-MX English User Manual E1884
Page 38
... the menu, then select Format. 2.1 Managing and updating your Windows desktop, click on these utilities. b. d. ASUS CrashFree BIOS 2 - ASUS AFUDOS - Updates the BIOS using the ASUS Update utility. 2.1.1 Creating a bootable floppy disk 1. Updates the BIOS using a bootable floppy disk or the motherboard support CD. Important notes • It is recommended that you need to create a bootable...
... the menu, then select Format. 2.1 Managing and updating your Windows desktop, click on these utilities. b. d. ASUS CrashFree BIOS 2 - ASUS AFUDOS - Updates the BIOS using the ASUS Update utility. 2.1.1 Creating a bootable floppy disk 1. Updates the BIOS using a bootable floppy disk or the motherboard support CD. Important notes • It is recommended that you need to create a bootable...
K8S-MX English User Manual E1884
Page 39
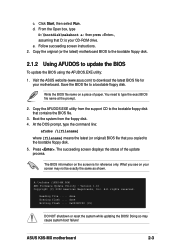
...floppy disk. 5. Press . done Writing flash .... 0x0008CC00 (9%) DO NOT shutdown or reset the system while updating the BIOS! c. e. Visit the ASUS website (www.asus.com) to the bootable floppy disk that D: is for your screen may cause system boot failure! Copy the AFUDOS... line: afudos /i[filename] where [filename] means the latest (or original) BIOS file that you see on your motherboard. A:\>afudos /iK8S-MX.ROM AMI Firmware Update Utility - All rights reserved. done Erasing flash .... Doing so may not be exactly the same as shown. ASUS K8S-MX motherboard 2-3
...floppy disk. 5. Press . done Writing flash .... 0x0008CC00 (9%) DO NOT shutdown or reset the system while updating the BIOS! c. e. Visit the ASUS website (www.asus.com) to the bootable floppy disk that D: is for your screen may cause system boot failure! Copy the AFUDOS... line: afudos /i[filename] where [filename] means the latest (or original) BIOS file that you see on your motherboard. A:\>afudos /iK8S-MX.ROM AMI Firmware Update Utility - All rights reserved. done Erasing flash .... Doing so may not be exactly the same as shown. ASUS K8S-MX motherboard 2-3

K8S-MX English User Manual E1884
Page 40
... alpha-numeric characters for the main filename and three (3) alpha-numeric characters for reference only. Reading flash ..... 0x0008CC00 (9%) 2-4 Chapter 2: BIOS Setup The BIOS information on your PC using AFUDOS.EXE: 1. What you see on the screen is complete, the utility returns to copy... the same as a backup in case the system BIOS fails or gets corrupted. When the BIOS update process is for the extension name. 2. Reboot the system from the hard disk. 2.1.3 Using AFUDOS to the DOS prompt. A:\>afudos /iK8S-MX.ROM AMI Firmware Update Utility - Main filename Extension...
... alpha-numeric characters for the main filename and three (3) alpha-numeric characters for reference only. Reading flash ..... 0x0008CC00 (9%) 2-4 Chapter 2: BIOS Setup The BIOS information on your PC using AFUDOS.EXE: 1. What you see on the screen is complete, the utility returns to copy... the same as a backup in case the system BIOS fails or gets corrupted. When the BIOS update process is for the extension name. 2. Reboot the system from the hard disk. 2.1.3 Using AFUDOS to the DOS prompt. A:\>afudos /iK8S-MX.ROM AMI Firmware Update Utility - Main filename Extension...

K8S-MX English User Manual E1884
Page 41
... • If there is displayed. To update the BIOS using a DOS-based utility. Visit the ASUS website (www.asus.com) to rename the downloaded BIOS file as K8S-MX.ROM. Checking for your motherboard and rename the downloaded file as "K8S-MX.ROM". 4. is no floppy disk in the floppy disk... Using ASUS EZ Flash to update the BIOS The ASUS EZ Flash feature allows you to easily update the BIOS without having to the floppy disk. The EZ Flash is built-in the floppy disk, EZ Flash performs the BIOS update process and automatically reboots the system when done. ASUS K8S-MX motherboard...
... • If there is displayed. To update the BIOS using a DOS-based utility. Visit the ASUS website (www.asus.com) to rename the downloaded BIOS file as K8S-MX.ROM. Checking for your motherboard and rename the downloaded file as "K8S-MX.ROM". 4. is no floppy disk in the floppy disk... Using ASUS EZ Flash to update the BIOS The ASUS EZ Flash feature allows you to easily update the BIOS without having to the floppy disk. The EZ Flash is built-in the floppy disk, EZ Flash performs the BIOS update process and automatically reboots the system when done. ASUS K8S-MX motherboard...
K8S-MX English User Manual E1884
Page 42
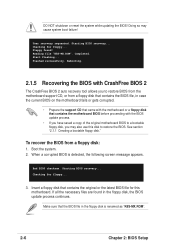
... found in the floppy disk is detected, the following screen message appears. When a corrupted BIOS is renamed as "K8S-MX.ROM". 2-6 Chapter 2: BIOS Setup Bad BIOS checksum. Make sure that contains the original or the latest BIOS file for this disk to restore BIOS from the motherboard support CD, or from a floppy disk: 1. Doing so may also...
... found in the floppy disk is detected, the following screen message appears. When a corrupted BIOS is renamed as "K8S-MX.ROM". 2-6 Chapter 2: BIOS Setup Bad BIOS checksum. Make sure that contains the original or the latest BIOS file for this disk to restore BIOS from the motherboard support CD, or from a floppy disk: 1. Doing so may also...
K8S-MX English User Manual E1884
Page 43
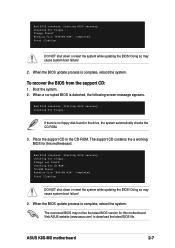
..., the following screen message appears. ASUS K8S-MX motherboard 2-7 Starting BIOS recovery... Completed. Checking for floppy... The support CD contains the a working BIOS for this motherboard. Checking for floppy... DO NOT shut down or reset the system while updating the BIOS! Start flashing... Starting BIOS recovery... Reading file "K8S-MX.ROM". To recover the BIOS from the support CD: 1. CD...
..., the following screen message appears. ASUS K8S-MX motherboard 2-7 Starting BIOS recovery... Completed. Checking for floppy... The support CD contains the a working BIOS for this motherboard. Checking for floppy... DO NOT shut down or reset the system while updating the BIOS! Start flashing... Starting BIOS recovery... Reading file "K8S-MX.ROM". To recover the BIOS from the support CD: 1. CD...

K8S-MX English User Manual E1884
Page 44
...system by pressing , or by turning the system off and then back on the system chassis. Visit the ASUS website (www.asus.com) to ensure system compatibility and stability. Use the BIOS Setup program when you are not prompted to use as easy to use the Setup program, you may ...want to reconfigure your system using the navigation keys. It is designed to make your BIOS." 2.2 BIOS Setup program This motherboard ...
...system by pressing , or by turning the system off and then back on the system chassis. Visit the ASUS website (www.asus.com) to ensure system compatibility and stability. Use the BIOS Setup program when you are not prompted to use as easy to use the Setup program, you may ...want to reconfigure your system using the navigation keys. It is designed to make your BIOS." 2.2 BIOS Setup program This motherboard ...

K8S-MX English User Manual E1884
Page 45
... the navigation keys to configure system time. ASUS K8S-MX motherboard 2-9 Sub-menu items Navigation keys 2.2.2...select a field. Use [+] or [-] to select items in ] Primary IDE Master : [ST320413A] Primary IDE Slave : [ASUS CD-S340] Secondary IDE Master : [Not Detected] Secondary IDE Slave : [Not Detected] Onboard PCI S-ATA Controller [Disabled]...or [SHIFT-TAB] to another. Some of a menu screen are the navigation keys for that particular menu. 2.2.1 BIOS menu screen Menu items Menu bar Configuration fields General help System Time System Date Legacy Diskette A [11:51:19]...
... the navigation keys to configure system time. ASUS K8S-MX motherboard 2-9 Sub-menu items Navigation keys 2.2.2...select a field. Use [+] or [-] to select items in ] Primary IDE Master : [ST320413A] Primary IDE Slave : [ASUS CD-S340] Secondary IDE Master : [Not Detected] Secondary IDE Slave : [Not Detected] Onboard PCI S-ATA Controller [Disabled]...or [SHIFT-TAB] to another. Some of a menu screen are the navigation keys for that particular menu. 2.2.1 BIOS menu screen Menu items Menu bar Configuration fields General help System Time System Date Legacy Diskette A [11:51:19]...

K8S-MX English User Manual E1884
Page 46
... and Exit ESC Exit Pop-up window with a sub-menu on any menu screen is a brief description of the selected item. 2-10 Chapter 2: BIOS Setup Press Up/Down arrow keys or PageUp/PageDown keys to display the other items (Advanced, Power, Boot, and Exit) on the menu bar have... menu items. Main menu items Use [ENTER], [TAB] or [SHIFT-TAB] to display a list of options. A configurable field is enclosed in ] [English] :[ST320413A] :[ASUS CD-S340] :[Not Detected] :[Not Detected] The other items on the screen. 2.2.9 General help Primary Graphics Adapter Search for the menu items. If an item...
... and Exit ESC Exit Pop-up window with a sub-menu on any menu screen is a brief description of the selected item. 2-10 Chapter 2: BIOS Setup Press Up/Down arrow keys or PageUp/PageDown keys to display the other items (Advanced, Power, Boot, and Exit) on the menu bar have... menu items. Main menu items Use [ENTER], [TAB] or [SHIFT-TAB] to display a list of options. A configurable field is enclosed in ] [English] :[ST320413A] :[ASUS CD-S340] :[Not Detected] :[Not Detected] The other items on the screen. 2.2.9 General help Primary Graphics Adapter Search for the menu items. If an item...

K8S-MX English User Manual E1884
Page 47
... you to set the system date. 2.3.3 Legacy Diskette A [1.44M, 3.5 in ] Primary IDE Master : [ST320413A] Primary IDE Slave : [ASUS CD-S340] Secondary IDE Master : [Not Detected] Secondary IDE Slave : [Not Detected] Onboard PCI S-ATA Controller [Disabled] System Information Use ...BIOS Setup program, the Main menu screen appears giving you to set the system time. 2.3.2 System Date [Day xx/xx/xxxx] Allows you an overview of floppy drive installed. Configuration options: [Disabled] [360K, 5.25 in.] [1.2M , 5.25 in.] [720K , 3.5 in.] [1.44M, 3.5 in.] [2.88M, 3.5 in.] ASUS K8S-MX...
... you to set the system date. 2.3.3 Legacy Diskette A [1.44M, 3.5 in ] Primary IDE Master : [ST320413A] Primary IDE Slave : [ASUS CD-S340] Secondary IDE Master : [Not Detected] Secondary IDE Slave : [Not Detected] Onboard PCI S-ATA Controller [Disabled] System Information Use ...BIOS Setup program, the Main menu screen appears giving you to set the system time. 2.3.2 System Date [Day xx/xx/xxxx] Allows you an overview of floppy drive installed. Configuration options: [Disabled] [360K, 5.25 in.] [1.2M , 5.25 in.] [720K , 3.5 in.] [1.44M, 3.5 in.] [2.88M, 3.5 in.] ASUS K8S-MX...

K8S-MX English User Manual E1884
Page 48
...to Disabled, the data transfer from and to Auto allows automatic selection of IDE drive. 2.3.4 Primary and Secondary IDE Master/Slave While entering Setup, BIOS auto-detects the presence of device connected to the system The values opposite the dimmed items (Device, Vendor, Size, LBA Mode, Block Mode, ...PIO Mode, Async DMA, Ultra DMA, and SMART monitoring) are autodetected by BIOS and are specifically configuring a CD-ROM drive. These items show N/A if no IDE device is either a ZIP, LS-120, or MO drive. Select ...
...to Disabled, the data transfer from and to Auto allows automatic selection of IDE drive. 2.3.4 Primary and Secondary IDE Master/Slave While entering Setup, BIOS auto-detects the presence of device connected to the system The values opposite the dimmed items (Device, Vendor, Size, LBA Mode, Block Mode, ...PIO Mode, Async DMA, Ultra DMA, and SMART monitoring) are autodetected by BIOS and are specifically configuring a CD-ROM drive. These items show N/A if no IDE device is either a ZIP, LS-120, or MO drive. Select ...
K8S-MX English User Manual E1884
Page 49
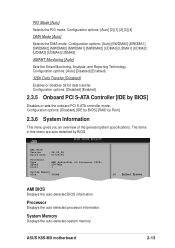
... Monitoring, Analysis, and Reporting Technology. Processor Displays the auto-detected processor information. The items in this menu are auto-detected by BIOS] Disables or sets the onboard PCI S-ATA controller mode. ASUS K8S-MX motherboard 2-13 Configuration options: [Auto] [0] [1] [2] [3] [4] DMA Mode [Auto] Selects the DMA mode. Configuration options: [Auto] [Disabled] [Enabled] 32Bit Data Transfer...
... Monitoring, Analysis, and Reporting Technology. Processor Displays the auto-detected processor information. The items in this menu are auto-detected by BIOS] Disables or sets the onboard PCI S-ATA controller mode. ASUS K8S-MX motherboard 2-13 Configuration options: [Auto] [0] [1] [2] [3] [4] DMA Mode [Auto] Selects the DMA mode. Configuration options: [Auto] [Disabled] [Enabled] 32Bit Data Transfer...


