
H81M-PLUS User's Manual
Page 28
... contents of the Support DVD are subject to avail all motherboard features. Visit the ASUS website at any time without notice. To run the DVD. 1-20 Chapter 1: Product introduction Click an icon to display Support DVD/motherboard information Click an item to install If Autorun is NOT enabled in...Support DVD that comes with the motherboard package contains the drivers, software applications, and utilities that you can install to change at www.asus.com for reference only. Always install the latest OS version and corresponding updates to run the Support DVD Place the Support DVD into ...
... contents of the Support DVD are subject to avail all motherboard features. Visit the ASUS website at any time without notice. To run the DVD. 1-20 Chapter 1: Product introduction Click an icon to display Support DVD/motherboard information Click an item to install If Autorun is NOT enabled in...Support DVD that comes with the motherboard package contains the drivers, software applications, and utilities that you can install to change at www.asus.com for reference only. Always install the latest OS version and corresponding updates to run the Support DVD Place the Support DVD into ...

H81M-PLUS User's Manual
Page 31
... BIOS 3 is not supported under DOS environment. Download the latest BIOS file from the ASUS website at www.asus.com. Doing so can use as shown. The actual utility screen displays may not be same as a backup when the BIOS fails or gets corrupted during the updating process. Before ... them on the system. 2. Download the latest BIOS file and BIOS Updater from the ASUS website at http://support.asus.com and save the BIOS file and BIOS Updater to recover BIOS settings. ASUS H81M-PLUS 2-3 DO NOT shut down or reset the system while updating the BIOS! Recovering the ...
... BIOS 3 is not supported under DOS environment. Download the latest BIOS file from the ASUS website at www.asus.com. Doing so can use as shown. The actual utility screen displays may not be same as a backup when the BIOS fails or gets corrupted during the updating process. Before ... them on the system. 2. Download the latest BIOS file and BIOS Updater from the ASUS website at http://support.asus.com and save the BIOS file and BIOS Updater to recover BIOS settings. ASUS H81M-PLUS 2-3 DO NOT shut down or reset the system while updating the BIOS! Recovering the ...

H81M-PLUS User's Manual
Page 35
...The boot device options vary depending on the devices you to the system. The default screen for details. ASUS H81M-PLUS 2-7 To access the EZ Mode, click Exit, then select ASUS EZ Mode or press F7. Refer to configure the BIOS settings. The EZ Mode provides you an ... enters the Advanced Mode Selects the Advanced Normal mode mode functions ASUS Optimal Selects the boot mode device priority Power saving mode Displays the Advanced mode menus Selects the boot device priority Loads optimized default Displays the system properties of the Advanced Mode. EZ Mode By default...
...The boot device options vary depending on the devices you to the system. The default screen for details. ASUS H81M-PLUS 2-7 To access the EZ Mode, click Exit, then select ASUS EZ Mode or press F7. Refer to configure the BIOS settings. The EZ Mode provides you an ... enters the Advanced Mode Selects the Advanced Normal mode mode functions ASUS Optimal Selects the boot mode device priority Power saving mode Displays the Advanced mode menus Selects the boot device priority Loads optimized default Displays the system properties of the Advanced Mode. EZ Mode By default...

H81M-PLUS User's Manual
Page 36
Submenu items A greater than sign (>) before each item on any menu screen means that menu. To display the submenu, select the item and press . 2-8 Chapter 2: Getting started Press or use the USB mouse to click this button to return to ...the frequently-used system settings and configuration For changing the basic system configuration For changing the overclocking settings For changing the advanced system settings For displaying the system temperature, power status, and changing the fan settings For changing the system boot configuration For configuring options for special functions For ...
Submenu items A greater than sign (>) before each item on any menu screen means that menu. To display the submenu, select the item and press . 2-8 Chapter 2: Getting started Press or use the USB mouse to click this button to return to ...the frequently-used system settings and configuration For changing the basic system configuration For changing the overclocking settings For changing the advanced system settings For displaying the system temperature, power status, and changing the fan settings For changing the system boot configuration For configuring options for special functions For ...

H81M-PLUS User's Manual
Page 37
... the items that you can only use the English letters to type your next system bootup. For the navigation key, it and press to display a list of the field opposite the item. Configuration fields These fields show the values for the menu items. If an item is user-...You cannot select an item that item. Pop-up window Select a menu item and press to display a pop-up window with the configuration options for that is not user-configurable. To change the settings. ASUS H81M-PLUS 2-9 Navigation keys At the bottom right corner of a menu screen when there are the navigation ...
... the items that you can only use the English letters to type your next system bootup. For the navigation key, it and press to display a list of the field opposite the item. Configuration fields These fields show the values for the menu items. If an item is user-...You cannot select an item that item. Pop-up window Select a menu item and press to display a pop-up window with the configuration options for that is not user-configurable. To change the settings. ASUS H81M-PLUS 2-9 Navigation keys At the bottom right corner of a menu screen when there are the navigation ...

H81M-PLUS User's Manual
Page 41
Scroll down to malfunction. The configuration options for this section vary depending on the CPU and DIMM model you to configure overclocking-related items. Be cautious when changing the settings of the Ai Tweaker menu items. Incorrect field values can cause the system to display the following items: ASUS H81M-PLUS 2-13 2.5 Ai Tweaker menu The Ai Tweaker menu items allow you installed on the motherboard.
Scroll down to malfunction. The configuration options for this section vary depending on the CPU and DIMM model you to configure overclocking-related items. Be cautious when changing the settings of the Ai Tweaker menu items. Incorrect field values can cause the system to display the following items: ASUS H81M-PLUS 2-13 2.5 Ai Tweaker menu The Ai Tweaker menu items allow you installed on the motherboard.

H81M-PLUS User's Manual
Page 42
...Technology, select this item to achieve the desired CPU internal frequency. Target DRAM Speed : xxxxMHz Displays the target DRAM speed. Target Cache Speed : xxxxMHz Displays the target Cache speed. Scroll down to automatically optimize the CPU ratio, BCLK frequency, and ...memory parameters. Select any of these preset overclocking configuration options: [Auto] Loads the optimal settings for optimizing the system performance. 2.5.2 ASUS MultiCore Enhancement [Auto...
...Technology, select this item to achieve the desired CPU internal frequency. Target DRAM Speed : xxxxMHz Displays the target DRAM speed. Target Cache Speed : xxxxMHz Displays the target Cache speed. Scroll down to automatically optimize the CPU ratio, BCLK frequency, and ...memory parameters. Select any of these preset overclocking configuration options: [Auto] Loads the optimal settings for optimizing the system performance. 2.5.2 ASUS MultiCore Enhancement [Auto...

H81M-PLUS User's Manual
Page 57
...of Active State Power Management on SA side of the iGPU/PCIE Graphics device should be fixed at present. ASUS H81M-PLUS 2-29 The iGPU shared system memory size will be the Primary Display. Primary Display [Auto] Allows you to enable or disable Intel® Graphics Render Standby support to reduce iGPU power use... or disable Memory Scrambler support. Graphics Configuration Allows you to enable or disable DMI Gen 2. DMI Gen 2 [Auto] Allows you to select a primary display from iGPU, and PCIe graphical devices. Configuration options: [Auto] [Disabled] [L0s] [L1] [L0sL1] PEG -
...of Active State Power Management on SA side of the iGPU/PCIE Graphics device should be fixed at present. ASUS H81M-PLUS 2-29 The iGPU shared system memory size will be the Primary Display. Primary Display [Auto] Allows you to enable or disable Intel® Graphics Render Standby support to reduce iGPU power use... or disable Memory Scrambler support. Graphics Configuration Allows you to enable or disable DMI Gen 2. DMI Gen 2 [Auto] Allows you to select a primary display from iGPU, and PCIe graphical devices. Configuration options: [Auto] [Disabled] [L0s] [L1] [L0sL1] PEG -

H81M-PLUS User's Manual
Page 61
... [xxxx RPM] or [Ignore] / [N/A] The onboard hardware monitor automatically detects and displays the CPU / chassis fan speeds in rotations per minute (RPM). ASUS H81M-PLUS 2-33 2.7 Monitor menu The Monitor menu displays the system temperature/power status, and allows you do not wish to display the detected speed. 2.7.3 CPU Input Voltage (VCCIN), 3.3V Voltage, 5V Voltage...
... [xxxx RPM] or [Ignore] / [N/A] The onboard hardware monitor automatically detects and displays the CPU / chassis fan speeds in rotations per minute (RPM). ASUS H81M-PLUS 2-33 2.7 Monitor menu The Monitor menu displays the system temperature/power status, and allows you do not wish to display the detected speed. 2.7.3 CPU Input Voltage (VCCIN), 3.3V Voltage, 5V Voltage...

H81M-PLUS User's Manual
Page 62
... Low Limit [200 RPM] This item appears only when you enable the CPU Q-Fan Control feature and allows you to 100%. CPU Lower Temperature [20] Displays the lower limit of the chassis fan. 2-34 Chapter 2: Getting started When the CPU temperature is under the lower limit, the CPU fan will operate...
... Low Limit [200 RPM] This item appears only when you enable the CPU Q-Fan Control feature and allows you to 100%. CPU Lower Temperature [20] Displays the lower limit of the chassis fan. 2-34 Chapter 2: Getting started When the CPU temperature is under the lower limit, the CPU fan will operate...

H81M-PLUS User's Manual
Page 63
.... Chassis Lower Temperature [40] Displays the lower limit of the chassis temperature. When the chassis temperature is under 40ºC, the chassis fan will operate at the minimum duty cycle. 2.7.6 Anti Surge Support [Enabled] This item allows you to adjust the upper limit of the chassis temperature. ASUS H81M-PLUS 2-35 Chassis Fan Min...
.... Chassis Lower Temperature [40] Displays the lower limit of the chassis temperature. When the chassis temperature is under 40ºC, the chassis fan will operate at the minimum duty cycle. 2.7.6 Anti Surge Support [Enabled] This item allows you to adjust the upper limit of the chassis temperature. ASUS H81M-PLUS 2-35 Chassis Fan Min...

H81M-PLUS User's Manual
Page 64
... will not be available until your computer enters the operating system. 2-36 Chapter 2: Getting started Select to go back to normal boot. Scroll down to display the following five items appear when you disconnect or change PS/2 devices before restarting the system, PS/2 devices will not be available and BIOS setup...
... will not be available until your computer enters the operating system. 2-36 Chapter 2: Getting started Select to go back to normal boot. Scroll down to display the following five items appear when you disconnect or change PS/2 devices before restarting the system, PS/2 devices will not be available and BIOS setup...
H81M-PLUS User's Manual
Page 65
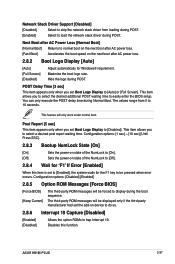
...this item is set Boot Logo Display to [Disabled]. This item allows you set to [Enabled], the system waits for Windows® requrement. POST Delay Time [3 sec] This item appears only when you to select a desired post report waiting time. ASUS H81M-PLUS 2-37 Next Boot after AC ...Power Loss [Normal Boot] [Normal Boot] Returns to normal boot on the next boot after AC power loss. [Fast Boot] Accelerates the boot speed on the next boot after AC power loss. 2.8.2 Boot Logo Display [Auto] [Auto] ...
...this item is set Boot Logo Display to [Disabled]. This item allows you set to [Enabled], the system waits for Windows® requrement. POST Delay Time [3 sec] This item appears only when you to select a desired post report waiting time. ASUS H81M-PLUS 2-37 Next Boot after AC ...Power Loss [Normal Boot] [Normal Boot] Returns to normal boot on the next boot after AC power loss. [Fast Boot] Accelerates the boot speed on the next boot after AC power loss. 2.8.2 Boot Logo Display [Auto] [Auto] ...

H81M-PLUS User's Manual
Page 68
DBX Management The dbx (Revoked Signature database) lists the forbidden images of the following: • Press when ASUS Logo appears. • Press after POST. 2.8.11 Boot Override These items displays the available devices. Click an item to load the downloaded DBX from a USB storage device. Configuration options: ... available devices. The number of devices installed in the system. • To select the boot device during system startup, press when ASUS Logo appears. • To access Windows OS in the system. The DB file must be formatted as a UEFI variable structure with...
DBX Management The dbx (Revoked Signature database) lists the forbidden images of the following: • Press when ASUS Logo appears. • Press after POST. 2.8.11 Boot Override These items displays the available devices. Click an item to load the downloaded DBX from a USB storage device. Configuration options: ... available devices. The number of devices installed in the system. • To select the boot device during system startup, press when ASUS Logo appears. • To access Windows OS in the system. The DB file must be formatted as a UEFI variable structure with...

H81M-PLUS User's Manual
Page 69
...store or load multiple BIOS settings. Profile This item allows you to launch the ASUS EZ Flash 2 screen. Label Allows you to USB drive. 2.9.3 ASUS SPD Information DIMM Slot Number [DIMM_A1] Displays the Serial Presence Detect (SPD) information of the setup profile. Load/Save ...DIMM_B1] ASUS H81M-PLUS 2-41 For more details, see section 2.1.2 ASUS EZ Flash 2. 2.9.2 ASUS O.C. Load from Profile Allows you update the BIOS file only coming from /to input the label of the DIMM module installed on the selected slot. Select an item then press to display the submenu. 2.9.1 ASUS EZ ...
...store or load multiple BIOS settings. Profile This item allows you to launch the ASUS EZ Flash 2 screen. Label Allows you to USB drive. 2.9.3 ASUS SPD Information DIMM Slot Number [DIMM_A1] Displays the Serial Presence Detect (SPD) information of the setup profile. Load/Save ...DIMM_B1] ASUS H81M-PLUS 2-41 For more details, see section 2.1.2 ASUS EZ Flash 2. 2.9.2 ASUS O.C. Load from Profile Allows you update the BIOS file only coming from /to input the label of the DIMM module installed on the selected slot. Select an item then press to display the submenu. 2.9.1 ASUS EZ ...


