
User Guide
Page 1
H81M-P PLUS Motherboard
H81M-P PLUS Motherboard
User Guide
Page 3
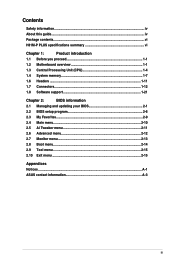
Contents Safety information...iv About this guide...iv Package contents...vi H81M-P PLUS specifications summary vi Chapter 1: Product introduction 1.1 Before you proceed 1-1 1.2 Motherboard overview 1-1 1.3 Central Processing Unit (CPU 1-4 1.4 System memory 1-7 1.6 Headers...1-11 1.7 Connectors 1-12 1.8 Software support 1-21 Chapter 2: BIOS information 2.1 Managing and updating your BIOS... menu 2-11 2.6 Advanced menu 2-12 2.7 Monitor menu 2-13 2.8 Boot menu...2-14 2.9 Tool menu...2-15 2.10 Exit menu...2-15 Appendices Notices...A-1 ASUS contact information A-3 iii
Contents Safety information...iv About this guide...iv Package contents...vi H81M-P PLUS specifications summary vi Chapter 1: Product introduction 1.1 Before you proceed 1-1 1.2 Motherboard overview 1-1 1.3 Central Processing Unit (CPU 1-4 1.4 System memory 1-7 1.6 Headers...1-11 1.7 Connectors 1-12 1.8 Software support 1-21 Chapter 2: BIOS information 2.1 Managing and updating your BIOS... menu 2-11 2.6 Advanced menu 2-12 2.7 Monitor menu 2-13 2.8 Boot menu...2-14 2.9 Tool menu...2-15 2.10 Exit menu...2-15 Appendices Notices...A-1 ASUS contact information A-3 iii

User Guide
Page 6
Supports DVI-D with max. resolution 1920x1200@60Hz - H81M-P PLUS specifications summary CPU Chipset Memory Graphics Expansion slots LGA1150 socket for the 4th Generation and New 4th Generation Intel® CoreTM i7/ ...Dual-channel memory architecture Supports Intel® Extreme Memory Profile (XMP) * Hyper DIMM support is damaged or missing, contact your motherboard package for the following items. Motherboard Cables Accessories Application DVD Documentation ASUS H81M-P PLUS motherboard 2 x Serial ATA 6.0 Gb/s cables 1 x I/O Shield Support DVD User Guide If any of the above items is...
Supports DVI-D with max. resolution 1920x1200@60Hz - H81M-P PLUS specifications summary CPU Chipset Memory Graphics Expansion slots LGA1150 socket for the 4th Generation and New 4th Generation Intel® CoreTM i7/ ...Dual-channel memory architecture Supports Intel® Extreme Memory Profile (XMP) * Hyper DIMM support is damaged or missing, contact your motherboard package for the following items. Motherboard Cables Accessories Application DVD Documentation ASUS H81M-P PLUS motherboard 2 x Serial ATA 6.0 Gb/s cables 1 x I/O Shield Support DVD User Guide If any of the above items is...

User Guide
Page 9
... the image below. ASUS H81M-P PLUS 1-1 Product introduction 1 1.1 Before you proceed Take note of the chassis as the power supply case, to avoid damaging them . • Whenever you install the motherboard, study the configuration of your chassis to the rear part of the following precautions before you install motherboard components or change any motherboard settings. •...
... the image below. ASUS H81M-P PLUS 1-1 Product introduction 1 1.1 Before you proceed Take note of the chassis as the power supply case, to avoid damaging them . • Whenever you install the motherboard, study the configuration of your chassis to the rear part of the following precautions before you install motherboard components or change any motherboard settings. •...

User Guide
Page 10
1.2.2 Screw holes Place six screws into the holes indicated by circles to secure the motherboard to the chassis. Doing so can damage the motherboard. Do not overtighten the screws! Place this side towards the rear of the chassis H81M-P PLUS 1-2 Chapter 1: Product introduction
1.2.2 Screw holes Place six screws into the holes indicated by circles to secure the motherboard to the chassis. Doing so can damage the motherboard. Do not overtighten the screws! Place this side towards the rear of the chassis H81M-P PLUS 1-2 Chapter 1: Product introduction

User Guide
Page 12
...17 1-11 1-19 1-16 1-17 1-18 1-14 1-13 1.3 Central Processing Unit (CPU) This motherboard comes with the cap on the socket and the socket contacts are not bent. H81M-P PLUS H81M-P PLUS CPU socket LGA1150 Unplug all power cables before installing the CPU. • Upon purchase of the ... not cover damage to the PnP cap/socket contacts/motherboard components. • Keep the cap after installing the motherboard. Intel® LGA1150 CPU socket 5. ASUS will process Return Merchandise Authorization (RMA) requests only if the motherboard comes with a surface mount LGA1150 socket designed for...
...17 1-11 1-19 1-16 1-17 1-18 1-14 1-13 1.3 Central Processing Unit (CPU) This motherboard comes with the cap on the socket and the socket contacts are not bent. H81M-P PLUS H81M-P PLUS CPU socket LGA1150 Unplug all power cables before installing the CPU. • Upon purchase of the ... not cover damage to the PnP cap/socket contacts/motherboard components. • Keep the cap after installing the motherboard. Intel® LGA1150 CPU socket 5. ASUS will process Return Merchandise Authorization (RMA) requests only if the motherboard comes with a surface mount LGA1150 socket designed for...

User Guide
Page 15
DO NOT install a DDR or DDR2 memory module to protect the CPU. A DDR3 module is recommended to the DDR3 slot. DIMM_A1 DIMM_B1 H81M-P PLUS Channel Channel A Channel B Sockets DIMM_A1 DIMM_B1 H81M-P PLUS 240-pin DDR3 DIMM sockets ASUS H81M-P PLUS 1-7 According to Intel® CPU spec, DIMM voltage below 1.65V is notched differently from a DDR or DDR2 module. To uninstall the CPU heatsink and fan assembly 1 2 A B B A 1.4 System memory 1.4.1 Overview This motherboard comes with two Double Data Rate 3 (DDR3) Dual Inline Memory Module (DIMM) sockets.
DO NOT install a DDR or DDR2 memory module to protect the CPU. A DDR3 module is recommended to the DDR3 slot. DIMM_A1 DIMM_B1 H81M-P PLUS Channel Channel A Channel B Sockets DIMM_A1 DIMM_B1 H81M-P PLUS 240-pin DDR3 DIMM sockets ASUS H81M-P PLUS 1-7 According to Intel® CPU spec, DIMM voltage below 1.65V is notched differently from a DDR or DDR2 module. To uninstall the CPU heatsink and fan assembly 1 2 A B B A 1.4 System memory 1.4.1 Overview This motherboard comes with two Double Data Rate 3 (DDR3) Dual Inline Memory Module (DIMM) sockets.
User Guide
Page 22
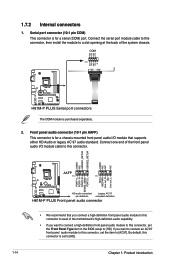
...module cable to this connector, set the item to [HD]. 1-14 Chapter 1: Product introduction COM PIN 1 RXD DTR DSR CTS DCD TXD GND RTS RI H81M-P PLUS H81M-P PLUS Serial port connectors The COM module is set the Front Panel Type item in the BIOS setup to this connector is purchased separately. 2. 1.7.2 Internal connectors... to connect an AC'97 front panel audio module to this connector, then install the module to a slot opening at the back of the motherboard's high-definition audio capability. • If you want to connect a high-definition front panel audio module to [HD].
...module cable to this connector, set the item to [HD]. 1-14 Chapter 1: Product introduction COM PIN 1 RXD DTR DSR CTS DCD TXD GND RTS RI H81M-P PLUS H81M-P PLUS Serial port connectors The COM module is set the Front Panel Type item in the BIOS setup to this connector is purchased separately. 2. 1.7.2 Internal connectors... to connect an AC'97 front panel audio module to this connector, then install the module to a slot opening at the back of the motherboard's high-definition audio capability. • If you want to connect a high-definition front panel audio module to [HD].

User Guide
Page 23
... cables to the fan connectors. Insufficient air flow inside the system may damage the motherboard components. The CPU_FAN connector supports a CPU fan of the connector. Only the 4-pin CPU fan and chassis fan support the ASUS Fan Xpert feature. ASUS H81M-P PLUS 1-15 These are not jumpers! 3. CPU_FAN CPU FAN PWM CPU FAN IN CPU...
... cables to the fan connectors. Insufficient air flow inside the system may damage the motherboard components. The CPU_FAN connector supports a CPU fan of the connector. Only the 4-pin CPU fan and chassis fan support the ASUS Fan Xpert feature. ASUS H81M-P PLUS 1-15 These are not jumpers! 3. CPU_FAN CPU FAN PWM CPU FAN IN CPU...

User Guide
Page 24
....0 connectors Never connect a 1394 cable to 480Mbps connection speed. Doing so will damage the motherboard! USB3_12 USB3+5V IntA_P1_SSRXIntA_P1_SSRX+ IntA_P1_SSTXGND IntA_P1_SSTX+ GND IntA_P1_DIntA_P1_D+ GND H81M-P PLUS PIN 1 USB3+5V IntA_P2_SSRXIntA_P2_SSRX+ GND IntA_P2_SSTXIntA_P2_SSTX+ GND IntA_P2_DIntA_P2_D+ H81M-P PLUS USB3.0 Front panel connector The USB 3.0 module is purchased separately. 5. 4. USB 3.0 connector (20-1 pin USB3_12) This connector allows you...
....0 connectors Never connect a 1394 cable to 480Mbps connection speed. Doing so will damage the motherboard! USB3_12 USB3+5V IntA_P1_SSRXIntA_P1_SSRX+ IntA_P1_SSTXGND IntA_P1_SSTX+ GND IntA_P1_DIntA_P1_D+ GND H81M-P PLUS PIN 1 USB3+5V IntA_P2_SSRXIntA_P2_SSRX+ GND IntA_P2_SSTXIntA_P2_SSTX+ GND IntA_P2_DIntA_P2_D+ H81M-P PLUS USB3.0 Front panel connector The USB 3.0 module is purchased separately. 5. 4. USB 3.0 connector (20-1 pin USB3_12) This connector allows you...

User Guide
Page 29
... information. 1.8.2 Support DVD information The Support DVD that comes with the motherboard package contains the drivers, software applications, and utilities that you can install to avail all motherboard features. ASUS H81M-P PLUS 1-21 Motherboard settings and hardware options vary. The contents of the Support DVD to ... DVD automatically displays the Specials screen which lists the unique features of your ASUS motherboard. Click Drivers, Utilities, AHCI Driver, Manual, Contact and Specials tabs to change at www.asus.com for updates. To run the DVD. Always install the latest OS ...
... information. 1.8.2 Support DVD information The Support DVD that comes with the motherboard package contains the drivers, software applications, and utilities that you can install to avail all motherboard features. ASUS H81M-P PLUS 1-21 Motherboard settings and hardware options vary. The contents of the Support DVD to ... DVD automatically displays the Specials screen which lists the unique features of your ASUS motherboard. Click Drivers, Utilities, AHCI Driver, Manual, Contact and Specials tabs to change at www.asus.com for updates. To run the DVD. Always install the latest OS ...

User Guide
Page 31
... Internet connection either through a network or an ISP (Internet Service Provider). With this utlity, you to automatically update your motherboard's softwares, drivers and the BIOS version easily. ASUS H81M-P PLUS 2-1 Copy the original motherboard BIOS using the ASUS Update utility. 2.1.1 EZ Update EZ Update is a utility that allows you can also manually update the saved BIOS...
... Internet connection either through a network or an ISP (Internet Service Provider). With this utlity, you to automatically update your motherboard's softwares, drivers and the BIOS version easily. ASUS H81M-P PLUS 2-1 Copy the original motherboard BIOS using the ASUS Update utility. 2.1.1 EZ Update EZ Update is a utility that allows you can also manually update the saved BIOS...

User Guide
Page 33
... only and may not be exactly the same as actually shown on the system. 2. Doing so can restore a corrupted BIOS file using the motherboard support DVD or a USB flash drive that contains the updated BIOS file. • Before using this section are for the BIOS file. Ensure...BIOS file to load default BIOS values. Before updating BIOS • Prepare the motherboard support DVD and a USB flash drive. • Download the latest BIOS file and BIOS Updater from the ASUS website at www.asus.com. ASUS H81M-P PLUS 2-3 DO NOT shut down or reset the system while updating the BIOS! Insert...
... only and may not be exactly the same as actually shown on the system. 2. Doing so can restore a corrupted BIOS file using the motherboard support DVD or a USB flash drive that contains the updated BIOS file. • Before using this section are for the BIOS file. Ensure...BIOS file to load default BIOS values. Before updating BIOS • Prepare the motherboard support DVD and a USB flash drive. • Download the latest BIOS file and BIOS Updater from the ASUS website at www.asus.com. ASUS H81M-P PLUS 2-3 DO NOT shut down or reset the system while updating the BIOS! Insert...

User Guide
Page 35
... stability. ASUS H81M-P PLUS 2-5 When BIOS update is not supported due to select the BIOS file and press . 4. Drives panel ASUSTeK BIOS Updater for details. Press to switch from Drives panel to Files panel then press keys to security regulations. 5. Restart your motherboard user guide... for DOS V1.30 [2014/01/01] Current ROM BOARD: H81M-P PLUS VER: 0302 (H :00 B :00) DATE: 07/15/2014 PATH: C:\ Update ROM BOARD: Unknown VER...
... stability. ASUS H81M-P PLUS 2-5 When BIOS update is not supported due to select the BIOS file and press . 4. Drives panel ASUSTeK BIOS Updater for details. Press to switch from Drives panel to Files panel then press keys to security regulations. 5. Restart your motherboard user guide... for DOS V1.30 [2014/01/01] Current ROM BOARD: H81M-P PLUS VER: 0302 (H :00 B :00) DATE: 07/15/2014 PATH: C:\ Update ROM BOARD: Unknown VER...

User Guide
Page 37
... Displays the CPU/motherboard temperature, CPU core voltage, DRAM information, CPU/chassis fan speed Exits the BIOS setup program without saving the changes, saves the changes and resets the system, or enters the Advanced Mode Power Saving mode Selects the boot device ASUS Optimal mode Loads... default Selects the priority Displays the system properties Advanced mode Normal mode of the basic system information, and allows you to the system. ASUS H81M-P PLUS 2-7 EZ Mode By default, the EZ Mode screen appears when you installed to the system. • The Boot Menu(F8) button...
... Displays the CPU/motherboard temperature, CPU core voltage, DRAM information, CPU/chassis fan speed Exits the BIOS setup program without saving the changes, saves the changes and resets the system, or enters the Advanced Mode Power Saving mode Selects the boot device ASUS Optimal mode Loads... default Selects the priority Displays the system properties Advanced mode Normal mode of the basic system information, and allows you to the system. ASUS H81M-P PLUS 2-7 EZ Mode By default, the EZ Mode screen appears when you installed to the system. • The Boot Menu(F8) button...

User Guide
Page 41
Scroll down to malfunction. 2.5 Ai Tweaker menu The Ai Tweaker menu items allow you installed on the motherboard. The configuration options for this section vary depending on the CPU and DIMM model you to configure overclocking-related items. Be cautious when changing the settings of the Ai Tweaker menu items. Incorrect field values can cause the system to display the following items: ASUS H81M-P PLUS 2-11
Scroll down to malfunction. 2.5 Ai Tweaker menu The Ai Tweaker menu items allow you installed on the motherboard. The configuration options for this section vary depending on the CPU and DIMM model you to configure overclocking-related items. Be cautious when changing the settings of the Ai Tweaker menu items. Incorrect field values can cause the system to display the following items: ASUS H81M-P PLUS 2-11

User Guide
Page 52
...ASUSTeK COMPUTER INC. 4F, No. 150, LI-TE Rd., PEITOU, TAIPEI 112, TAIWAN ASUS COMPUTER GmbH HARKORT STR. 21-23, 40880 RATINGEN GERMANY Product name : Motherboard Model name : H81M-P PLUS conform with the essential requirements of the following specifications: FCC Part 15, Subpart B, Unintentional Radiators...harmful interference, and (2) this device must accept any interference received, including interference that the product Product Name : Motherboard Model Number : H81M-P PLUS Conforms to the following directives: 2004/108/EC-EMC Directive EN 55022:2010+AC:2011 EN 61000-3-2:2006+A2:...
...ASUSTeK COMPUTER INC. 4F, No. 150, LI-TE Rd., PEITOU, TAIPEI 112, TAIWAN ASUS COMPUTER GmbH HARKORT STR. 21-23, 40880 RATINGEN GERMANY Product name : Motherboard Model name : H81M-P PLUS conform with the essential requirements of the following specifications: FCC Part 15, Subpart B, Unintentional Radiators...harmful interference, and (2) this device must accept any interference received, including interference that the product Product Name : Motherboard Model Number : H81M-P PLUS Conforms to the following directives: 2004/108/EC-EMC Directive EN 55022:2010+AC:2011 EN 61000-3-2:2006+A2:...


