

User Guide
Page 3
Contents Safety information...iv About this guide...iv Package contents...vi H81M-E R2.0 specifications summary vi Product introduction 1.1 Before you proceed 1-1 1.2 Motherboard overview 1-1 1.3 Central Processing Unit (CPU 1-4 1.4 System memory 1-7 1.5 Expansion slots 1-9 1.6 Headers...1-11 1.7 Connectors 1-12 1.8 Software support 1-19 ... 2-1 2.2 BIOS setup program 2-6 2.3 Main menu...2-9 2.4 Ai Tweaker menu 2-9 2.5 Advanced menu 2-11 2.6 Monitor menu 2-12 2.7 Boot menu...2-13 2.8 Tools menu 2-14 2.9 Exit menu...2-14 Appendices Notices...A-1 ASUS contact information A-3 iii
Contents Safety information...iv About this guide...iv Package contents...vi H81M-E R2.0 specifications summary vi Product introduction 1.1 Before you proceed 1-1 1.2 Motherboard overview 1-1 1.3 Central Processing Unit (CPU 1-4 1.4 System memory 1-7 1.5 Expansion slots 1-9 1.6 Headers...1-11 1.7 Connectors 1-12 1.8 Software support 1-19 ... 2-1 2.2 BIOS setup program 2-6 2.3 Main menu...2-9 2.4 Ai Tweaker menu 2-9 2.5 Advanced menu 2-11 2.6 Monitor menu 2-12 2.7 Boot menu...2-13 2.8 Tools menu 2-14 2.9 Exit menu...2-14 Appendices Notices...A-1 ASUS contact information A-3 iii

User Guide
Page 6
...resolution 1920x1200@60Hz - Please refer to Memory QVL for details. ** Refer to www.asus.com for the latest Memory QVL (Qualified Vendors List). *** Due to www.asus.com for the following items. Motherboard ASUS H81M-E R2.0 motherboard Cables 2 x Serial ATA 6.0 Gb/s cables Accessories 1 x I/O Shield ...mode will work depending on the CPU installed. Package contents Check your motherboard package for Intel® CPU support list. H81M-E R2.0 specifications summary CPU Chipset Memory Graphics Expansion slots Storage LAN LGA1150 socket for Intel® New 4th/4th Generation CoreTM...
...resolution 1920x1200@60Hz - Please refer to Memory QVL for details. ** Refer to www.asus.com for the latest Memory QVL (Qualified Vendors List). *** Due to www.asus.com for the following items. Motherboard ASUS H81M-E R2.0 motherboard Cables 2 x Serial ATA 6.0 Gb/s cables Accessories 1 x I/O Shield ...mode will work depending on the CPU installed. Package contents Check your motherboard package for Intel® CPU support list. H81M-E R2.0 specifications summary CPU Chipset Memory Graphics Expansion slots Storage LAN LGA1150 socket for Intel® New 4th/4th Generation CoreTM...

User Guide
Page 7
... 5K Solid Capacitors, and Stainless Steel Back I /O - 3x More durable corrosion-resistant coating ASUS Exclusive Features: - ASUS 3 Phase Power Design - ASUS AI Suite 3 - H81M-E R2.0 specifications summary Audio USB ASUS unique features Realtek® ALC887 7.1-Channel High Definition Audio CODEC - Special layout design - ASUS EPU - Premium Japanese-made audio capacitors: Provide warm, natural and immersive sound with...
... 5K Solid Capacitors, and Stainless Steel Back I /O - 3x More durable corrosion-resistant coating ASUS Exclusive Features: - ASUS 3 Phase Power Design - ASUS AI Suite 3 - H81M-E R2.0 specifications summary Audio USB ASUS unique features Realtek® ALC887 7.1-Channel High Definition Audio CODEC - Special layout design - ASUS EPU - Premium Japanese-made audio capacitors: Provide warm, natural and immersive sound with...

User Guide
Page 9
... any component. • Before handling components, use a grounded wrist strap or touch a safely grounded object or a metal object, such as indicated in the correct orientation. ASUS H81M-E R2.0 1-1 Ensure that you unplug the power cord before touching any component, ensure that came with external ports goes to the rear part of the chassis...
... any component. • Before handling components, use a grounded wrist strap or touch a safely grounded object or a metal object, such as indicated in the correct orientation. ASUS H81M-E R2.0 1-1 Ensure that you unplug the power cord before touching any component, ensure that came with external ports goes to the rear part of the chassis...
User Guide
Page 11
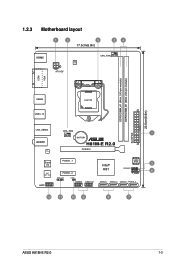
VD2 PCIEX1_2 SPDIF_OUT CLRTC Intel® H81 64Mb BIOS 5 SPEAKER 6 F_PANEL AAFP USB910 USB1112 SATA6G_1 SATA6G_2 SATA3G_1 SATA3G_2 12 11 10 9 8 7 ASUS H81M-E R2.0 1-3 1.2.3 Motherboard layout 1 2 3 17.5cm(6.9in) 24 KBMS ATX12V DIGI +VRM CPU_FAN COM VGA DDR3 DIMM_A1 (64bit, 240-pin module) DDR3 DIMM_B1 (64bit, 240-pin module) USB56 USB3_12 LGA1150 22.6cm(8.9in) LAN_USB34 CHA_FAN 1 EATXPWR BATTERY AUDIO H81M-E R2.0 RTL 8111GR PCIEX16 Super I/O PCIEX1_1 ALC 887-
VD2 PCIEX1_2 SPDIF_OUT CLRTC Intel® H81 64Mb BIOS 5 SPEAKER 6 F_PANEL AAFP USB910 USB1112 SATA6G_1 SATA6G_2 SATA3G_1 SATA3G_2 12 11 10 9 8 7 ASUS H81M-E R2.0 1-3 1.2.3 Motherboard layout 1 2 3 17.5cm(6.9in) 24 KBMS ATX12V DIGI +VRM CPU_FAN COM VGA DDR3 DIMM_A1 (64bit, 240-pin module) DDR3 DIMM_B1 (64bit, 240-pin module) USB56 USB3_12 LGA1150 22.6cm(8.9in) LAN_USB34 CHA_FAN 1 EATXPWR BATTERY AUDIO H81M-E R2.0 RTL 8111GR PCIEX16 Super I/O PCIEX1_1 ALC 887-

User Guide
Page 13
1.3.1 Installing the CPU 1 2 3 A B 4 C 5 A B ASUS H81M-E R2.0 1-5
1.3.1 Installing the CPU 1 2 3 A B 4 C 5 A B ASUS H81M-E R2.0 1-5
User Guide
Page 15
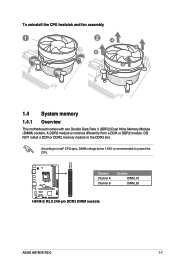
To uninstall the CPU heatsink and fan assembly 1 2 A B B A 1.4 System memory 1.4.1 Overview This motherboard comes with two Double Data Rate 3 (DDR3) Dual Inline Memory Module (DIMM) sockets. DO NOT install a DDR or DDR2 memory module to protect the CPU. DIMM_A1 DIMM_B1 H81M-E R2.0 Channel Channel A Channel B Sockets DIMM_A1 DIMM_B1 H81M-E R2.0 240-pin DDR3 DIMM sockets ASUS H81M-E R2.0 1-7 A DDR3 module is recommended to the DDR3 slot. According to Intel® CPU spec, DIMM voltage below 1.65V is notched differently from a DDR or DDR2 module.
To uninstall the CPU heatsink and fan assembly 1 2 A B B A 1.4 System memory 1.4.1 Overview This motherboard comes with two Double Data Rate 3 (DDR3) Dual Inline Memory Module (DIMM) sockets. DO NOT install a DDR or DDR2 memory module to protect the CPU. DIMM_A1 DIMM_B1 H81M-E R2.0 Channel Channel A Channel B Sockets DIMM_A1 DIMM_B1 H81M-E R2.0 240-pin DDR3 DIMM sockets ASUS H81M-E R2.0 1-7 A DDR3 module is recommended to the DDR3 slot. According to Intel® CPU spec, DIMM voltage below 1.65V is notched differently from a DDR or DDR2 module.

User Guide
Page 17
2 3 To remove a DIMM B A A 1.5 Expansion slots In the future, you physical injury and damage motherboard components. Failure to do so may cause you may need to install expansion cards. ASUS H81M-E R2.0 1-9 The following sub‑sections describe the slots and the expansion cards that they support. Unplug the power cord before adding or removing expansion cards.
2 3 To remove a DIMM B A A 1.5 Expansion slots In the future, you physical injury and damage motherboard components. Failure to do so may cause you may need to install expansion cards. ASUS H81M-E R2.0 1-9 The following sub‑sections describe the slots and the expansion cards that they support. Unplug the power cord before adding or removing expansion cards.

User Guide
Page 19
... powers the RAM data in CMOS. Turn OFF the computer and unplug the power cord. 2. Use a metal object such as system passwords. +3V_BAT GND H81M-E R2.0 CLRTC PIN 1 H81M-E R2.0 Clear RTC RAM To erase the RTC RAM: 1. Shut down the key during the boot process and enter BIOS setup to reenter data. •... allows you to clear the Real Time Clock (RTC) RAM in CMOS, which include system setup information such as a screwdriver to short the two pins. 3. ASUS H81M-E R2.0 1-11
... powers the RAM data in CMOS. Turn OFF the computer and unplug the power cord. 2. Use a metal object such as system passwords. +3V_BAT GND H81M-E R2.0 CLRTC PIN 1 H81M-E R2.0 Clear RTC RAM To erase the RTC RAM: 1. Shut down the key during the boot process and enter BIOS setup to reenter data. •... allows you to clear the Real Time Clock (RTC) RAM in CMOS, which include system setup information such as a screwdriver to short the two pins. 3. ASUS H81M-E R2.0 1-11

User Guide
Page 21
.... 11. These two 4-pin Universal Serial Bus (USB) ports are for USB 2.0/1.1 devices. 8. This port is for faster and better performance from your USB 3.0 devices. 9. ASUS H81M-E R2.0 1-13 PS/2 keyboard port (purple). USB 2.0 ports 3 and 4. These two 4-pin Universal Serial Bus (USB) ports are for a PS/2 keyboard.
.... 11. These two 4-pin Universal Serial Bus (USB) ports are for USB 2.0/1.1 devices. 8. This port is for faster and better performance from your USB 3.0 devices. 9. ASUS H81M-E R2.0 1-13 PS/2 keyboard port (purple). USB 2.0 ports 3 and 4. These two 4-pin Universal Serial Bus (USB) ports are for a PS/2 keyboard.
User Guide
Page 23
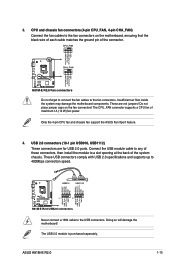
... is purchased separately. These USB connectors comply with USB 2.0 specifications and supports up to the USB connectors. Doing so will damage the motherboard! ASUS H81M-E R2.0 1-15 Connect the USB module cable to any of the system chassis. 3. CPU_FAN CPU FAN PWM CPU FAN IN CPU FAN PWR GND...FAN IN CHA FAN PWR GND H81M-E R2.0 Fan connectors Do not forget to connect the fan cables to a slot opening at the back of these connectors, then install the module to the fan connectors. Only the 4-pin CPU fan and chassis fan support the ASUS Fan Xpert feature. 4. Insufficient ...
... is purchased separately. These USB connectors comply with USB 2.0 specifications and supports up to the USB connectors. Doing so will damage the motherboard! ASUS H81M-E R2.0 1-15 Connect the USB module cable to any of the system chassis. 3. CPU_FAN CPU FAN PWM CPU FAN IN CPU FAN PWR GND...FAN IN CHA FAN PWR GND H81M-E R2.0 Fan connectors Do not forget to connect the fan cables to a slot opening at the back of these connectors, then install the module to the fan connectors. Only the 4-pin CPU fan and chassis fan support the ASUS Fan Xpert feature. 4. Insufficient ...

User Guide
Page 25
GND RSATA_RXP1 RSATA_RXN1 GND RSATA_TXN1 RSATA_TXP1 GND GND RSATA_RXP2 RSATA_RXN2 GND RSATA_TXN2 RSATA_TXP2 GND H81M-E R2.0 SATA3G_1 SATA3G_2 H81M-E R2.0 SATA 3.0Gb/s connectors When using hot-plug and NCQ, set the SATA Mode Selection item in the BIOS to Serial...GND RSATA_RXP2 RSATA_RXN2 GND RSATA_TXN2 RSATA_TXP2 GND H81M-E R2.0 SATA6G_1 SATA6G_2 H81M-E R2.0 SATA 6.0Gb/s connectors When using hot-plug and NCQ, set the SATA Mode Selection item in the BIOS to Serial ATA 3.0 Gb/s hard disk drives via Serial ATA 6.0 Gb/s signal cables. ASUS H81M-E R2.0 1-17 7. Intel® H81 ...
GND RSATA_RXP1 RSATA_RXN1 GND RSATA_TXN1 RSATA_TXP1 GND GND RSATA_RXP2 RSATA_RXN2 GND RSATA_TXN2 RSATA_TXP2 GND H81M-E R2.0 SATA3G_1 SATA3G_2 H81M-E R2.0 SATA 3.0Gb/s connectors When using hot-plug and NCQ, set the SATA Mode Selection item in the BIOS to Serial...GND RSATA_RXP2 RSATA_RXN2 GND RSATA_TXN2 RSATA_TXP2 GND H81M-E R2.0 SATA6G_1 SATA6G_2 H81M-E R2.0 SATA 6.0Gb/s connectors When using hot-plug and NCQ, set the SATA Mode Selection item in the BIOS to Serial ATA 3.0 Gb/s hard disk drives via Serial ATA 6.0 Gb/s signal cables. ASUS H81M-E R2.0 1-17 7. Intel® H81 ...

User Guide
Page 27
..., Utilities, AHCI Driver, Manual, Contact and Specials tabs to run the Support DVD Place the Support DVD into the optical drive. ASUS H81M-E R2.0 1-19 Always install the latest OS version and corresponding updates to maximize the features of the Support DVD are subject to avail all... DVD that comes with the motherboard package contains the drivers, software applications, and utilities that you can install to change at www.asus.com for reference only. Motherboard settings and hardware options vary. If Autorun is NOT enabled in your computer, the DVD automatically displays...
..., Utilities, AHCI Driver, Manual, Contact and Specials tabs to run the Support DVD Place the Support DVD into the optical drive. ASUS H81M-E R2.0 1-19 Always install the latest OS version and corresponding updates to maximize the features of the Support DVD are subject to avail all... DVD that comes with the motherboard package contains the drivers, software applications, and utilities that you can install to change at www.asus.com for reference only. Motherboard settings and hardware options vary. If Autorun is NOT enabled in your computer, the DVD automatically displays...

User Guide
Page 29
... file to a USB flash disk in case you can also manually update the saved BIOS and select a boot logo when the system goes into POST. ASUS H81M-E R2.0 2-1 BIOS information 2.1 Managing and updating your motherboard's softwares, drivers and the BIOS version easily. To launch EZ Update, click EZ Update on the AI Suite...
... file to a USB flash disk in case you can also manually update the saved BIOS and select a boot logo when the system goes into POST. ASUS H81M-E R2.0 2-1 BIOS information 2.1 Managing and updating your motherboard's softwares, drivers and the BIOS version easily. To launch EZ Update, click EZ Update on the AI Suite...

User Guide
Page 31
... updating process. DO NOT shut down or reset the system while updating the BIOS! Ensure that your computer has a DVD optical drive. 2.1.3 ASUS CrashFree BIOS 3 utility The ASUS CrashFree BIOS 3 is an auto recovery tool that allows you to enter BIOS Setup to recover BIOS setting. To ensure system compatibility and... FreeDOS environment. The utility automatically checks the devices for reference only and may not be exactly the same as actually shown on the system. 2. ASUS H81M-E R2.0 2-3 Turn on your USB flash drive. When found, the utility reads the BIOS file and enters...
... updating process. DO NOT shut down or reset the system while updating the BIOS! Ensure that your computer has a DVD optical drive. 2.1.3 ASUS CrashFree BIOS 3 utility The ASUS CrashFree BIOS 3 is an auto recovery tool that allows you to enter BIOS Setup to recover BIOS setting. To ensure system compatibility and... FreeDOS environment. The utility automatically checks the devices for reference only and may not be exactly the same as actually shown on the system. 2. ASUS H81M-E R2.0 2-3 Turn on your USB flash drive. When found, the utility reads the BIOS file and enters...

User Guide
Page 33
...shut down or reset the system while updating the BIOS to update the BIOS? Select the Load Optimized Defaults item under the Exit BIOS menu. ASUS H81M-E R2.0 2-5 Yes No The BIOS Backup feature is done, press to exit BIOS Updater. 6. Are you sure you want to prevent system boot ... the BIOS update. Drives panel ASUSTeK BIOS Updater for details. Restart your motherboard user guide for DOS V1.30 [2014/01/01] Current ROM BOARD: H81M-E R2.0 VER: 0306 (H :00 B :00) DATE: 08/08/2014 PATH: C:\ Update ROM BOARD: Unknown VER: Unknown DATE: Unknown C: FORMAN~1 D: H81MER2.CAP 8390656 ...
...shut down or reset the system while updating the BIOS to update the BIOS? Select the Load Optimized Defaults item under the Exit BIOS menu. ASUS H81M-E R2.0 2-5 Yes No The BIOS Backup feature is done, press to exit BIOS Updater. 6. Are you sure you want to prevent system boot ... the BIOS update. Drives panel ASUSTeK BIOS Updater for details. Restart your motherboard user guide for DOS V1.30 [2014/01/01] Current ROM BOARD: H81M-E R2.0 VER: 0306 (H :00 B :00) DATE: 08/08/2014 PATH: C:\ Update ROM BOARD: Unknown VER: Unknown DATE: Unknown C: FORMAN~1 D: H81MER2.CAP 8390656 ...

User Guide
Page 35
...Mode By default, the EZ Mode screen appears when you to select the display language, system performance mode and boot device priority. ASUS H81M-E R2.0 2-7 The EZ Mode provides you an overview of the selected mode on the functions Selects the boot device priority right hand side... saving the changes, saves the changes and resets the system, or enters the Advanced Mode Power Saving mode Selects the boot device ASUS Optimal mode Loads optimized default Selects the priority Displays the system properties Advanced mode Normal mode of the basic system information, and allows...
...Mode By default, the EZ Mode screen appears when you to select the display language, system performance mode and boot device priority. ASUS H81M-E R2.0 2-7 The EZ Mode provides you an overview of the selected mode on the functions Selects the boot device priority right hand side... saving the changes, saves the changes and resets the system, or enters the Advanced Mode Power Saving mode Selects the boot device ASUS Optimal mode Loads optimized default Selects the priority Displays the system properties Advanced mode Normal mode of the basic system information, and allows...

User Guide
Page 37
... BIOS password. See section 1.6 Jumpers for this section vary depending on the CPU and DIMM model you installed on top of the BIOS Setup program. ASUS H81M-E R2.0 2-9 The configuration options for information on how to erase the RTC RAM. • The Administrator or User Password items on the motherboard. After you set...
... BIOS password. See section 1.6 Jumpers for this section vary depending on the CPU and DIMM model you installed on top of the BIOS Setup program. ASUS H81M-E R2.0 2-9 The configuration options for information on how to erase the RTC RAM. • The Administrator or User Password items on the motherboard. After you set...
User Guide
Page 39
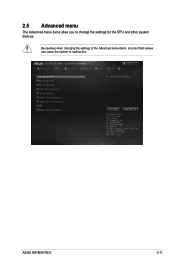
Be cautious when changing the settings of the Advanced menu items. Incorrect field values can cause the system to change the settings for the CPU and other system devices. 2.5 Advanced menu The Advanced menu items allow you to malfunction. ASUS H81M-E R2.0 2-11
Be cautious when changing the settings of the Advanced menu items. Incorrect field values can cause the system to change the settings for the CPU and other system devices. 2.5 Advanced menu The Advanced menu items allow you to malfunction. ASUS H81M-E R2.0 2-11
User Guide
Page 41
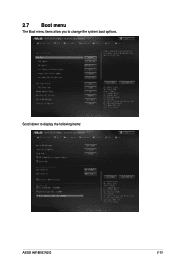
Scroll down to change the system boot options. 2.7 Boot menu The Boot menu items allow you to display the following items: ASUS H81M-E R2.0 2-13
Scroll down to change the system boot options. 2.7 Boot menu The Boot menu items allow you to display the following items: ASUS H81M-E R2.0 2-13

