H61M-D User's Manual
Page 2
... Rights Reserved. SPECIFICATIONS AND INFORMATION CONTAINED IN THIS MANUAL ARE FURNISHED FOR INFORMATIONAL USE ONLY, AND ARE SUBJECT TO CHANGE AT ANY TIME WITHOUT NOTICE, AND SHOULD NOT BE CONSTRUED AS A COMMITMENT BY ASUS. or (2) the serial number of alteration is licensed under the General Public License ("GPL"), under the Lesser General Public License Version ("LGPL") and...
... Rights Reserved. SPECIFICATIONS AND INFORMATION CONTAINED IN THIS MANUAL ARE FURNISHED FOR INFORMATIONAL USE ONLY, AND ARE SUBJECT TO CHANGE AT ANY TIME WITHOUT NOTICE, AND SHOULD NOT BE CONSTRUED AS A COMMITMENT BY ASUS. or (2) the serial number of alteration is licensed under the General Public License ("GPL"), under the Lesser General Public License Version ("LGPL") and...
H61M-D User's Manual
Page 4
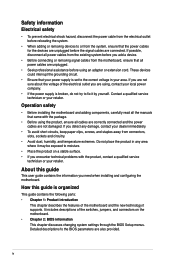
... the features of the switches, jumpers, and connectors on a stable surface. • If you add a device. • Before connecting or removing signal cables from the motherboard, ensure that the power cables for the devices are unplugged before the signal cables are unplugged. • Seek professional assistance before using an adapter or extension cord. About this guide is set to the correct voltage in any damage, contact...
... the features of the switches, jumpers, and connectors on a stable surface. • If you add a device. • Before connecting or removing signal cables from the motherboard, ensure that the power cables for the devices are unplugged before the signal cables are unplugged. • Seek professional assistance before using an adapter or extension cord. About this guide is set to the correct voltage in any damage, contact...

H61M-D User's Manual
Page 6
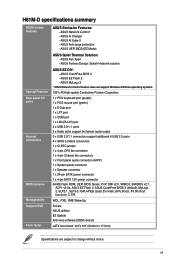
... x16 slot 2 x PCI Express 2.0 x1 slots * PCIe 3.0 speed is damaged or missing, contact your motherboard package for the following items. Motherboard Cables Accessories Application DVD Documentation ASUS H61M-D motherboard 2 x Serial ATA 3.0 Gb/s cables 1 x I/O Shield Support DVD User Guide If any of 4GB capacity or more, Windows® 32-bit operating system may only recognize less than 3GB. H61M-D specifications summary CPU Chipset Memory Expansion slots Graphics Storage LAN Audio USB LGA1155 socket for Intel® CPU support list. Intel® H61 Express Chipset 2 x DIMM, max. 16GB...
... x16 slot 2 x PCI Express 2.0 x1 slots * PCIe 3.0 speed is damaged or missing, contact your motherboard package for the following items. Motherboard Cables Accessories Application DVD Documentation ASUS H61M-D motherboard 2 x Serial ATA 3.0 Gb/s cables 1 x I/O Shield Support DVD User Guide If any of 4GB capacity or more, Windows® 32-bit operating system may only recognize less than 3GB. H61M-D specifications summary CPU Chipset Memory Expansion slots Graphics Storage LAN Audio USB LGA1155 socket for Intel® CPU support list. Intel® H61 Express Chipset 2 x DIMM, max. 16GB...
H61M-D User's Manual
Page 7
...x COM port 1 x LAN (RJ-45) port 4 x USB 2.0/1.1 ports 3 x Audio jacks support 8-channel audio output 3 x USB 2.0/1.1 connectors support additional 6 USB 2.0 ports 4 x SATA 3.0 Gb/s connectors 1 x CLRTC jumper 1 x 4-pin CPU fan connector 1 x 4-pin Chassis fan connectors 1 x Front panel audio connector (AAFP) 1 x System panel connector 1 x Speaker connector 1 x 24-pin EATX power connector 1 x 4-pin EATX 12V power connector 64 Mb Flash ROM, UEFI BIOS, Green, PnP, DMI v2.0, WfM2.0, SM BIOS v2.7, ACPI: v2.0a, ASUS EZ Flash 2, ASUS CrashFree BIOS 3 (default), MyLogo 2, SLP2.1, SLP3.0, iGPU+PEG (dual...
...x COM port 1 x LAN (RJ-45) port 4 x USB 2.0/1.1 ports 3 x Audio jacks support 8-channel audio output 3 x USB 2.0/1.1 connectors support additional 6 USB 2.0 ports 4 x SATA 3.0 Gb/s connectors 1 x CLRTC jumper 1 x 4-pin CPU fan connector 1 x 4-pin Chassis fan connectors 1 x Front panel audio connector (AAFP) 1 x System panel connector 1 x Speaker connector 1 x 24-pin EATX power connector 1 x 4-pin EATX 12V power connector 64 Mb Flash ROM, UEFI BIOS, Green, PnP, DMI v2.0, WfM2.0, SM BIOS v2.7, ACPI: v2.0a, ASUS EZ Flash 2, ASUS CrashFree BIOS 3 (default), MyLogo 2, SLP2.1, SLP3.0, iGPU+PEG (dual...

H61M-D User's Manual
Page 8
... bag that came with external ports goes to the rear part of the chassis as the power supply case, to the chassis. ASUS H61M-D 1-1 Product introduction 1 1.1 Before you proceed Take note of the following precautions before you install motherboard components or change any motherboard settings. • Unplug the power cord from the power supply. The edge with the component. • Before you install or remove any component, ensure that...
... bag that came with external ports goes to the rear part of the chassis as the power supply case, to the chassis. ASUS H61M-D 1-1 Product introduction 1 1.1 Before you proceed Take note of the following precautions before you install motherboard components or change any motherboard settings. • Unplug the power cord from the power supply. The edge with the component. • Before you install or remove any component, ensure that...
H61M-D User's Manual
Page 14
... effective use of memory, we recommend that you install 4GB or more on the motherboard. • This motherboard does not support DIMMs made up of the lower-sized channel for the dual-channel configuration. ASUS H61M-D 1-7 A DDR3 module is recommended to Intel® CPU spec, DIMM voltage below 1.65V is notched differently from a DDR or DDR2 module. According to protect the CPU. DIMM_A1 DIMM_B1 Channel Channel A Channel B Sockets DIMM_A1 DIMM_B1 H61M-D H61M-D 240-pin...
... effective use of memory, we recommend that you install 4GB or more on the motherboard. • This motherboard does not support DIMMs made up of the lower-sized channel for the dual-channel configuration. ASUS H61M-D 1-7 A DDR3 module is recommended to Intel® CPU spec, DIMM voltage below 1.65V is notched differently from a DDR or DDR2 module. According to protect the CPU. DIMM_A1 DIMM_B1 Channel Channel A Channel B Sockets DIMM_A1 DIMM_B1 H61M-D H61M-D 240-pin...

H61M-D User's Manual
Page 16
... screw for the card. 2. Assign an IRQ to use . 4. When using PCI cards on shared slots, ensure that the drivers support "Share IRQ" or that came with extra force. 1 1 2. Turn on the system and change the necessary BIOS settings, if any. ASUS H61M-D 1-9 Install the software drivers for information on BIOS setup. 2. DIMM notch 1.5 Expansion slots In the future, you may cause you removed earlier. 6. Before installing the expansion card, read the documentation...
... screw for the card. 2. Assign an IRQ to use . 4. When using PCI cards on shared slots, ensure that the drivers support "Share IRQ" or that came with extra force. 1 1 2. Turn on the system and change the necessary BIOS settings, if any. ASUS H61M-D 1-9 Install the software drivers for information on BIOS setup. 2. DIMM notch 1.5 Expansion slots In the future, you may cause you removed earlier. 6. Before installing the expansion card, read the documentation...

H61M-D User's Manual
Page 17
... jumper allows you to pins 2-3. shared - - The onboard button cell battery powers the RAM data in CMOS. FG H -- - -- - -- - -- - -- - - H61M-D CLRTC 12 23 Normal (Default) H61M-D Clear RTC RAM Clear RTC To erase the RTC RAM: 1. Turn OFF the computer and unplug the power cord. 2. PCIe 3.0 speed is supported by erasing the CMOS RTC RAM data. shared - - - - shared - -- 1.5.3 PCI Express 2.0 x1 slots This motherboard supports PCI Express x1 network cards, SCSI cards, and other cards that comply with the PCI Express specifications. 1.5.4 PCI Express...
... jumper allows you to pins 2-3. shared - - The onboard button cell battery powers the RAM data in CMOS. FG H -- - -- - -- - -- - -- - - H61M-D CLRTC 12 23 Normal (Default) H61M-D Clear RTC RAM Clear RTC To erase the RTC RAM: 1. Turn OFF the computer and unplug the power cord. 2. PCIe 3.0 speed is supported by erasing the CMOS RTC RAM data. shared - - - - shared - -- 1.5.3 PCI Express 2.0 x1 slots This motherboard supports PCI Express x1 network cards, SCSI cards, and other cards that comply with the PCI Express specifications. 1.5.4 PCI Express...

H61M-D User's Manual
Page 18
... CLRTC jumper default position. PS2_USBPW1-4 12 23 H61M-D +5V +5VSB (Default) H61M-D Keyboard Power Setting • The USB device wake-up . • The total current consumed must NOT exceed the power supply capability (+5VSB) whether under normal condition or in low power mode) using the connected USB devices. Shut down the key during the boot process and enter BIOS setup to re- PS2 and USB device wake-up (PS2_USBPW1~4) Set this jumper to +5V to clear the CMOS RTC RAM data. ASUS H61M-D 1-11 enter...
... CLRTC jumper default position. PS2_USBPW1-4 12 23 H61M-D +5V +5VSB (Default) H61M-D Keyboard Power Setting • The USB device wake-up . • The total current consumed must NOT exceed the power supply capability (+5VSB) whether under normal condition or in low power mode) using the connected USB devices. Shut down the key during the boot process and enter BIOS setup to re- PS2 and USB device wake-up (PS2_USBPW1~4) Set this jumper to +5V to clear the CMOS RTC RAM data. ASUS H61M-D 1-11 enter...

H61M-D User's Manual
Page 19
... port allows Gigabit connection to enable or disable the USB device wake-up from S5 mode Speed LED Status Description OFF 10Mbps connection ORANGE 100Mbps connection GREEN 1Gbps connection LAN port 1-12 Chapter 1: Product introduction H61M-D USBPW5-10 12 23 +5V +5VSB (Default) H61M-D USB Device Wake Up 1.7 Connectors 1.7.1 Rear panel connectors 1 2 3 45 11 10 9 8 7 6 1. Parallel port. PS/2 mouse port (green). When you set this jumper to pins 2-3 (+5VSB), you to a Local Area Network (LAN) through a network hub. This feature requires an ATX power supply...
... port allows Gigabit connection to enable or disable the USB device wake-up from S5 mode Speed LED Status Description OFF 10Mbps connection ORANGE 100Mbps connection GREEN 1Gbps connection LAN port 1-12 Chapter 1: Product introduction H61M-D USBPW5-10 12 23 +5V +5VSB (Default) H61M-D USB Device Wake Up 1.7 Connectors 1.7.1 Rear panel connectors 1 2 3 45 11 10 9 8 7 6 1. Parallel port. PS/2 mouse port (green). When you set this jumper to pins 2-3 (+5VSB), you to a Local Area Network (LAN) through a network hub. This feature requires an ATX power supply...

H61M-D User's Manual
Page 20
Line In port (light blue). This port connects to the tape, CD, DVD player, or other serial devices. 11. Microphone port (pink). PS/2 keyboard port (purple). These two 4-pin Universal Serial Bus (USB) ports are for USB 2.0/1.1 devices. 8. Video Graphics Adapter (VGA) port. Serial port. This port is for a PS/2 keyboard. Line Out port (lime). This 15-pin port is for a VGA monitor or other VGA-compatible devices. 10. ASUS H61M-D 1-13 This port connects to a headphone or a speaker. In the 4, 6 and 8-channel configurations, the function of the audio ports in the...
Line In port (light blue). This port connects to the tape, CD, DVD player, or other serial devices. 11. Microphone port (pink). PS/2 keyboard port (purple). These two 4-pin Universal Serial Bus (USB) ports are for USB 2.0/1.1 devices. 8. Video Graphics Adapter (VGA) port. Serial port. This port is for a PS/2 keyboard. Line Out port (lime). This 15-pin port is for a VGA monitor or other VGA-compatible devices. 10. ASUS H61M-D 1-13 This port connects to a headphone or a speaker. In the 4, 6 and 8-channel configurations, the function of the audio ports in the...
H61M-D User's Manual
Page 22
.../s hard disk drives via Serial ATA 3.0 Gb/s signal cables. Connect one end of the motherboard's high-definition audio capability. • If you want to connect a high-definition front panel audio module to [HD]. By default, this connector is for a chassis-mounted front panel audio I/O module that you connect a high-definition front panel audio module to this connector to avail of the front panel audio I/O module cable to this connector, set the SATA Mode Selection item in the BIOS setup to this connector. ASUS H61M-D 1-15...
.../s hard disk drives via Serial ATA 3.0 Gb/s signal cables. Connect one end of the motherboard's high-definition audio capability. • If you want to connect a high-definition front panel audio module to [HD]. By default, this connector is for a chassis-mounted front panel audio I/O module that you connect a high-definition front panel audio module to this connector to avail of the front panel audio I/O module cable to this connector, set the SATA Mode Selection item in the BIOS setup to this connector. ASUS H61M-D 1-15...

H61M-D User's Manual
Page 23
... USB connectors comply with USB 2.0 specifications and supports up to a slot opening at the back of maximum 1A (12 W) fan power. Doing so will damage the motherboard! These are for USB 2.0 ports. USB 2.0 connectors (10-1 pin USB56, USB78, USB910) These connectors are not jumpers! CPU_FAN CPU FAN PWM CPU FAN IN +12V GND H61M-D CHA_FAN CHA FAN PWM CHA FAN IN +12V GND H61M-D Fan connectors Do not forget to connect the fan cables to the fan connectors. Only the 4-pin CPU fan supports the ASUS Fan...
... USB connectors comply with USB 2.0 specifications and supports up to a slot opening at the back of maximum 1A (12 W) fan power. Doing so will damage the motherboard! These are for USB 2.0 ports. USB 2.0 connectors (10-1 pin USB56, USB78, USB910) These connectors are not jumpers! CPU_FAN CPU FAN PWM CPU FAN IN +12V GND H61M-D CHA_FAN CHA FAN PWM CHA FAN IN +12V GND H61M-D Fan connectors Do not forget to connect the fan cables to the fan connectors. Only the 4-pin CPU fan supports the ASUS Fan...

H61M-D User's Manual
Page 24
... any motherboard component. The system power LED lights up when you should shut down the system and unplug the power cable before removing or plugging in sleep mode. • Hard disk drive activity LED (2-pin HDD_LED) This 2-pin connector is for the system power LED. The HDD LED lights up to the HDD. • ATX power button/soft-off the system power. 1.8 Onboard LEDs 1. PWR BTN PLED+ PLEDPWRBTN# GND HDD_LED+ HDD_LED- The illustration below shows the location of the onboard LED. RESET H61M-D System panel connector...
... any motherboard component. The system power LED lights up when you should shut down the system and unplug the power cable before removing or plugging in sleep mode. • Hard disk drive activity LED (2-pin HDD_LED) This 2-pin connector is for the system power LED. The HDD LED lights up to the HDD. • ATX power button/soft-off the system power. 1.8 Onboard LEDs 1. PWR BTN PLED+ PLEDPWRBTN# GND HDD_LED+ HDD_LED- The illustration below shows the location of the onboard LED. RESET H61M-D System panel connector...
H61M-D User's Manual
Page 25
...; Motherboard settings and hardware options vary. Double-click the ASSETUP.EXE to change at www.asus.com for better compatibility and system stability. 1.9.2 Support DVD information The Support DVD that comes with the motherboard package contains the drivers, software applications, and utilities that you install Windows® XP Service Pack 3 or later version / Windows® Vista Service Pack 1 or later versions before installing the drivers for updates. Always install the latest OS version and corresponding updates to display...
...; Motherboard settings and hardware options vary. Double-click the ASSETUP.EXE to change at www.asus.com for better compatibility and system stability. 1.9.2 Support DVD information The Support DVD that comes with the motherboard package contains the drivers, software applications, and utilities that you install Windows® XP Service Pack 3 or later version / Windows® Vista Service Pack 1 or later versions before installing the drivers for updates. Always install the latest OS version and corresponding updates to display...
H61M-D User's Manual
Page 26
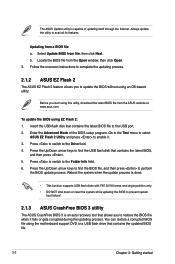
.... 2. Place the support DVD in the optical drive. BIOS information 2.1 Managing and updating your BIOS 2 Save a copy of the original motherboard BIOS file to a USB flash disk in case you to manage, save, and update the motherboard BIOS in Windows® environment. • ASUS Update requires an Internet connection either of the following methods: Updating from the Internet a. Copy the original motherboard BIOS using this utility. Updating the BIOS To update the BIOS: 1. Select Update BIOS from the popup menu. From the...
.... 2. Place the support DVD in the optical drive. BIOS information 2.1 Managing and updating your BIOS 2 Save a copy of the original motherboard BIOS file to a USB flash disk in case you to manage, save, and update the motherboard BIOS in Windows® environment. • ASUS Update requires an Internet connection either of the following methods: Updating from the Internet a. Copy the original motherboard BIOS using this utility. Updating the BIOS To update the BIOS: 1. Select Update BIOS from the popup menu. From the...
H61M-D User's Manual
Page 27
... utility. Insert the USB flash disk that allows you start using the motherboard support DVD or a USB flash drive that contains the latest BIOS, and then press . 5. You can restore a corrupted BIOS file using this utility, download the latest BIOS file from the Open window, then click Open. 3. Enter the Advanced Mode of updating itself through the Internet. Press to switch to restore the BIOS file when it . 3. The ASUS Update utility is an auto recovery tool that contains the latest BIOS file to enable...
... utility. Insert the USB flash disk that allows you start using the motherboard support DVD or a USB flash drive that contains the latest BIOS, and then press . 5. You can restore a corrupted BIOS file using this utility, download the latest BIOS file from the Open window, then click Open. 3. Enter the Advanced Mode of updating itself through the Internet. Press to switch to restore the BIOS file when it . 3. The ASUS Update utility is an auto recovery tool that contains the latest BIOS file to enable...
H61M-D User's Manual
Page 28
... boot failure! 2.1.4 ASUS BIOS Updater The ASUS BIOS Updater allows you to copy the current BIOS file that you to enter BIOS Setup to the USB port. 3. NTFS is not supported under DOS environment. Turn off the computer and disconnect all SATA hard disk drives (optional). • Before using this utility, rename the BIOS file in the removable device into H61MD.CAP. • The BIOS file in the support DVD may not be the latest version. Download the latest BIOS file from the ASUS website at www.asus...
... boot failure! 2.1.4 ASUS BIOS Updater The ASUS BIOS Updater allows you to copy the current BIOS file that you to enter BIOS Setup to the USB port. 3. NTFS is not supported under DOS environment. Turn off the computer and disconnect all SATA hard disk drives (optional). • Before using this utility, rename the BIOS file in the removable device into H61MD.CAP. • The BIOS file in the support DVD may not be the latest version. Download the latest BIOS file from the ASUS website at www.asus...
H61M-D User's Manual
Page 29
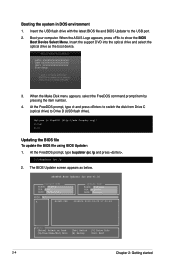
... BIOS file To update the BIOS file using BIOS Updater: 1. The BIOS Updater screen appears as the boot device. 3. At the FreeDOS prompt, type bupdater /pc /g and press . 2. ASUSTek BIOS Updater for DOS V1.30 BOARD: H61M-D VER: 0302 DATE: 06/02/2013 H61MD.CAP 4194304 2013-06-02 17:30:48 2-4 Chapter 2: Getting started At the FreeDOS prompt, type d: and press to switch the disk from Drive C (optical drive) to the USB port. 2. When the ASUS...
... BIOS file To update the BIOS file using BIOS Updater: 1. The BIOS Updater screen appears as the boot device. 3. At the FreeDOS prompt, type bupdater /pc /g and press . 2. ASUSTek BIOS Updater for DOS V1.30 BOARD: H61M-D VER: 0302 DATE: 06/02/2013 H61MD.CAP 4194304 2013-06-02 17:30:48 2-4 Chapter 2: Getting started At the FreeDOS prompt, type d: and press to switch the disk from Drive C (optical drive) to the USB port. 2. When the ASUS...
H61M-D User's Manual
Page 30
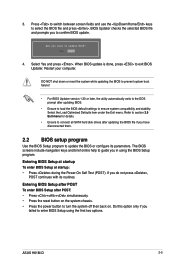
... system boot failure! • For BIOS Updater version 1.30 or later, the utility automatically exits to the DOS prompt after updating the BIOS file if you failed to confirm BIOS update. 4. The BIOS screens include navigation keys and brief online help to ensure system compatibility and stability. ASUS H61M-D 2-5 Refer to section 2.9 Exit menu for details. • Ensure to connect all SATA hard disk drives after updating BIOS. • Ensure to load the BIOS default settings to guide you in using...
... system boot failure! • For BIOS Updater version 1.30 or later, the utility automatically exits to the DOS prompt after updating the BIOS file if you failed to confirm BIOS update. 4. The BIOS screens include navigation keys and brief online help to ensure system compatibility and stability. ASUS H61M-D 2-5 Refer to section 2.9 Exit menu for details. • Ensure to connect all SATA hard disk drives after updating BIOS. • Ensure to load the BIOS default settings to guide you in using...


