
User Manual
Page 2
... 2 Contents Table of Contents Table of Contents 1. Introducing the Notebook PC About This User's Manual 6 Notes For This Manual 6 Preparing your Notebook PC 9 2. Knowing the Parts Top Side...12 Bottom Side ...14 Right Side ...16 Left Side ...18 Front Side ...19 Rear Side...20 3.
... 2 Contents Table of Contents Table of Contents 1. Introducing the Notebook PC About This User's Manual 6 Notes For This Manual 6 Preparing your Notebook PC 9 2. Knowing the Parts Top Side...12 Bottom Side ...14 Right Side ...16 Left Side ...18 Front Side ...19 Rear Side...20 3.

User Manual
Page 6
... tasks. Using the Notebook PC Gives you information on the Notebook PC's components. 3. do not actually type the [ ] < > or [ ] and the enclosed letters. 6 Knowing the Parts Gives you to use them. Appendix Introduces you information on getting started with the Notebook PC. 4.
... tasks. Using the Notebook PC Gives you information on the Notebook PC's components. 3. do not actually type the [ ] < > or [ ] and the enclosed letters. 6 Knowing the Parts Gives you to use them. Appendix Introduces you information on getting started with the Notebook PC. 4.

User Manual
Page 7
... in this manual, refer all precautions and instructions. Do not use damaged power cords, accessories, or other chemicals on top and do not shove any part of warm water and remove any materials that may scratch or enter the Notebook PC. IMPORTANT! Wipe the Notebook PC using a clean cellulose sponge or...
... in this manual, refer all precautions and instructions. Do not use damaged power cords, accessories, or other chemicals on top and do not shove any part of warm water and remove any materials that may scratch or enter the Notebook PC. IMPORTANT! Wipe the Notebook PC using a clean cellulose sponge or...

User Manual
Page 11
Knowing the Parts Basic sides of the Notebook PC NOTE: Photos and icons in this manual are used for artistic purposes only and do not show what is actually used in the product itself. 11 2.
Knowing the Parts Basic sides of the Notebook PC NOTE: Photos and icons in this manual are used for artistic purposes only and do not show what is actually used in the product itself. 11 2.

User Manual
Page 12
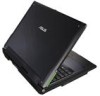
encing and other interactive applications. 12 NOTE: The keyboard will be used with video confer- 2 Knowing the Parts Top Side Refer to the diagram below to identify the components on selected models) The built-in camera allows picture taking or video recording. Can be different for each territory. 2 1 3 4 12 11 5 6 7 8 10 9 1 Camera (on this side of the Notebook PC.
encing and other interactive applications. 12 NOTE: The keyboard will be used with video confer- 2 Knowing the Parts Top Side Refer to the diagram below to identify the components on selected models) The built-in camera allows picture taking or video recording. Can be different for each territory. 2 1 3 4 12 11 5 6 7 8 10 9 1 Camera (on this side of the Notebook PC.
User Manual
Page 13
... the keys can be depressed) and palm rest for more information). 11 Direct Messenger Direct console allows user-defined status indications. 2 Knowing the Parts 2 Camera Indicator The camera indicator shows when the built-in camera is in use plain water if necessary) to clean the display panel. 5 Instant Keys...
... the keys can be depressed) and palm rest for more information). 11 Direct Messenger Direct console allows user-defined status indications. 2 Knowing the Parts 2 Camera Indicator The camera indicator shows when the built-in camera is in use plain water if necessary) to clean the display panel. 5 Instant Keys...
User Manual
Page 14
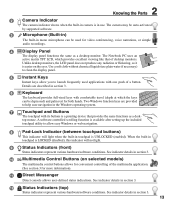
...authorized service center or retailer for compactness and may block the vents. WARNING! DO NOT PUT THE NOTEBOOK PC ON YOUR LAP OR OTHER PARTS OF THE BODY TO AVOID INJURY FROM THE HEAT. 1 Central Processor Unit (CPU) Compartment Some Notebook PC models feature a socketed-processor ...design to allow upgrading to identify the components on this side of the Notebook PC. 2 Knowing the Parts Bottom Side Refer to the diagram below to faster processors in the future. High temperatures are normal during charging or operation. End-user removal...
...authorized service center or retailer for compactness and may block the vents. WARNING! DO NOT PUT THE NOTEBOOK PC ON YOUR LAP OR OTHER PARTS OF THE BODY TO AVOID INJURY FROM THE HEAT. 1 Central Processor Unit (CPU) Compartment Some Notebook PC models feature a socketed-processor ...design to allow upgrading to identify the components on this side of the Notebook PC. 2 Knowing the Parts Bottom Side Refer to the diagram below to faster processors in the future. High temperatures are normal during charging or operation. End-user removal...
User Manual
Page 15
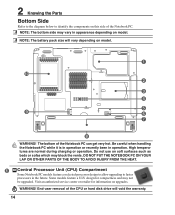
... lock is connected to an AC power source and maintains power to insert or remove the battery pack. Additional memory will automatically lock. 2 Knowing the Parts 2 Memory (RAM) Compartment The memory compartment provides expansion capabilities for your Notebook PC. tomatically detects the amount of the Notebook PC to hold identifi...
... lock is connected to an AC power source and maintains power to insert or remove the battery pack. Additional memory will automatically lock. 2 Knowing the Parts 2 Memory (RAM) Compartment The memory compartment provides expansion capabilities for your Notebook PC. tomatically detects the amount of the Notebook PC to hold identifi...

User Manual
Page 16
... system allows you can use IrDA technology to share a printer between several closely placed Notebook PCs and even send files to printers. 2 Knowing the Parts Right Side Refer to the diagram below to identify the components on this manual. 3 ExpressCard Slot One 26pin Express card slot is available to support...
... system allows you can use IrDA technology to share a printer between several closely placed Notebook PCs and even send files to printers. 2 Knowing the Parts Right Side Refer to the diagram below to identify the components on this manual. 3 ExpressCard Slot One 26pin Express card slot is available to support...

User Manual
Page 17
... Flash Indicator The direct flash indicator blinks when Microsoft DirectX 9/10 (used to connect a stereo audio source to the Notebook PC. Combo 2 Knowing the Parts 6 SPDIF Output Jack This jack provides connection to SPDIF (Sony/Philips Digital Interface) compliant devices for standard video devices. Using this jack automatically disables the...
... Flash Indicator The direct flash indicator blinks when Microsoft DirectX 9/10 (used to connect a stereo audio source to the Notebook PC. Combo 2 Knowing the Parts 6 SPDIF Output Jack This jack provides connection to SPDIF (Sony/Philips Digital Interface) compliant devices for standard video devices. Using this jack automatically disables the...

User Manual
Page 18
... PC's optical drive may support compact discs (CD) and/or digital video discs (DVD) and may have recordable (R) or re-writable (RW) capabilities. 2 Knowing the Parts Left Side Refer to the diagram below to identify the components on each model. 3 Optical Drive Activity Indicator (location varies by model) The optical drive...
... PC's optical drive may support compact discs (CD) and/or digital video discs (DVD) and may have recordable (R) or re-writable (RW) capabilities. 2 Knowing the Parts Left Side Refer to the diagram below to identify the components on each model. 3 Optical Drive Activity Indicator (location varies by model) The optical drive...

User Manual
Page 19
Details are software controlled. 3 Multimedia Keys Multimedia keys allow you to hear audio without additional attachments. 2 Knowing the Parts Front Side Refer to the diagram below to the table or else the hinges may break! Never lift the Notebook PC by the display panel! 2 ...
Details are software controlled. 3 Multimedia Keys Multimedia keys allow you to hear audio without additional attachments. 2 Knowing the Parts Front Side Refer to the diagram below to the table or else the hinges may break! Never lift the Notebook PC by the display panel! 2 ...
User Manual
Page 20
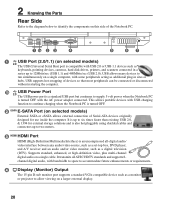
... charging when the Notebook PC is also hot pluggable using shielded cables and connectors up to 12Mbits/sec (USB 1.1) and 480Mbits/sec (USB 2.0). 2 Knowing the Parts Rear Side Refer to the diagram below to identify the components on a single cable.
... charging when the Notebook PC is also hot pluggable using shielded cables and connectors up to 12Mbits/sec (USB 1.1) and 480Mbits/sec (USB 2.0). 2 Knowing the Parts Rear Side Refer to the diagram below to identify the components on a single cable.

User Manual
Page 21
... jack supplies power to be secured using Kensington® compatible Notebook PC security products. CAUTION: MAY BECOME WARM TO HOT WHEN IN USE. 2 Knowing the Parts 5 Power (DC) Input The supplied power adapter converts AC power to sound an alarm when moved. 21 Power sup- These security products usually include a metal...
... jack supplies power to be secured using Kensington® compatible Notebook PC security products. CAUTION: MAY BECOME WARM TO HOT WHEN IN USE. 2 Knowing the Parts 5 Power (DC) Input The supplied power adapter converts AC power to sound an alarm when moved. 21 Power sup- These security products usually include a metal...

User Manual
Page 22
2 Knowing the Parts 22
2 Knowing the Parts 22
User Manual
Page 24
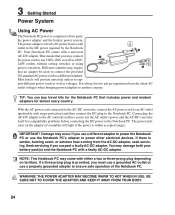
... territory. IMPORTANT! Seek servicing if you use a different adapter to power the Notebook PC or use a properly grounded adapter to ensure safe operation of two parts, the power adapter and the battery power system. It is comprised of the Notebook PC. That means that you may damage both your battery pack...
... territory. IMPORTANT! Seek servicing if you use a different adapter to power the Notebook PC or use a properly grounded adapter to ensure safe operation of two parts, the power adapter and the battery power system. It is comprised of the Notebook PC. That means that you may damage both your battery pack...
User Manual
Page 26
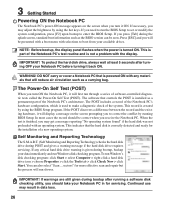
...-On Self Test (POST) When you turn it ON. The POST includes a record of the Notebook PC's hardware configuration, which is part of the Notebook PC's architecture. If the POST discovers a difference between the record and the existing hardware, it will reduce air circulation such as ... will run Windows disk checking program. Press [ESC] and you press [Tab] during the splash screen, standard boot information such as a permanent part of the Notebook PC's test routine and is given during POST and gives a warning message if the hard disk drive requires servicing. This is used...
...-On Self Test (POST) When you turn it ON. The POST includes a record of the Notebook PC's hardware configuration, which is part of the Notebook PC's architecture. If the POST discovers a difference between the record and the existing hardware, it will reduce air circulation such as ... will run Windows disk checking program. Press [ESC] and you press [Tab] during the splash screen, standard boot information such as a permanent part of the Notebook PC's test routine and is given during POST and gives a warning message if the hard disk drive requires servicing. This is used...

User Manual
Page 36
... indicator blinks when Microsoft DirectX 9/10 (used with most games) is OFF, the typed letters will be in order to allow easier navigation when only a part of the keyboard letters to act as direction keys in the lower case form (e.g. Use the provided Direct Console software (see next page) to the...
... indicator blinks when Microsoft DirectX 9/10 (used with most games) is OFF, the typed letters will be in order to allow easier navigation when only a part of the keyboard letters to act as direction keys in the lower case form (e.g. Use the provided Direct Console software (see next page) to the...

User Manual
Page 40
... left Slide finger right Slide finger backward Scroll Up Scroll Down NOTE: A software-controlled scrolling function is pressure sensitive and contains no moving parts; therefore, mechanical failures can be used in a direction to move the cursor around or select items displayed on the right side to scroll a window up...
... left Slide finger right Slide finger backward Scroll Up Scroll Down NOTE: A software-controlled scrolling function is pressure sensitive and contains no moving parts; therefore, mechanical failures can be used in a direction to move the cursor around or select items displayed on the right side to scroll a window up...

User Manual
Page 43
... mouse (top) 1 (1) In-game dpi Increase: Press button to increase dpi of tracking sensitivity. 2 (2) Scrolling and Zooming: Roll wheel up to switch between open documents. Parts of tracking sensitivity. (4) Application Switch Button: Press to scroll 3 up to scroll down. ton to release zoom. (Not all applications support zooming.) (3) In-game dpi...
... mouse (top) 1 (1) In-game dpi Increase: Press button to increase dpi of tracking sensitivity. 2 (2) Scrolling and Zooming: Roll wheel up to switch between open documents. Parts of tracking sensitivity. (4) Application Switch Button: Press to scroll 3 up to scroll down. ton to release zoom. (Not all applications support zooming.) (3) In-game dpi...


