User Manual
Page 4
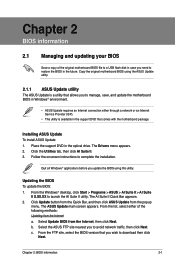
Contents 1.11 Software support 1-22 1.11.1 Installing an operating system 1-22 1.11.2 Support DVD information 1-22 Chapter 2: BIOS information 2.1 Managing and updating your BIOS 2-1 2.1.1 ASUS Update utility 2-1 2.1.2 ASUS EZ Flash 2 2-2 2.1.3 ASUS CrashFree BIOS 3 utility 2-3 2.1.4 ASUS BIOS Updater 2-4 2.2 BIOS setup program 2-7 2.3 Main menu 2-11 2.3.1 System Language [English 2-11 2.3.2 System Date [Day xx/xx/xxxx 2-11 2.3.3 System Time [xx:xx:xx 2-11...
Contents 1.11 Software support 1-22 1.11.1 Installing an operating system 1-22 1.11.2 Support DVD information 1-22 Chapter 2: BIOS information 2.1 Managing and updating your BIOS 2-1 2.1.1 ASUS Update utility 2-1 2.1.2 ASUS EZ Flash 2 2-2 2.1.3 ASUS CrashFree BIOS 3 utility 2-3 2.1.4 ASUS BIOS Updater 2-4 2.2 BIOS setup program 2-7 2.3 Main menu 2-11 2.3.1 System Language [English 2-11 2.3.2 System Date [Day xx/xx/xxxx 2-11 2.3.3 System Time [xx:xx:xx 2-11...

User Manual
Page 8
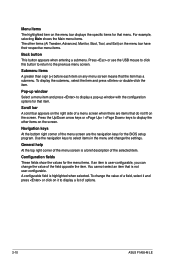
...by your dealer. NOTE: Tips and additional information to change system settings through the BIOS Setup menus. Typography Bold text Italics ++ Indicates a menu or an item to the ASUS contact information. 2. Example: means that you must press the Enter or Return key.... damage to the components when trying to complete a task. IMPORTANT: Instructions that you complete a task. ASUS websites The ASUS website provides updated information on ASUS hardware and software products. Keys enclosed in this manual. About this guide is organized This guide contains the...
...by your dealer. NOTE: Tips and additional information to change system settings through the BIOS Setup menus. Typography Bold text Italics ++ Indicates a menu or an item to the ASUS contact information. 2. Example: means that you must press the Enter or Return key.... damage to the components when trying to complete a task. IMPORTANT: Instructions that you complete a task. ASUS websites The ASUS website provides updated information on ASUS hardware and software products. Keys enclosed in this manual. About this guide is organized This guide contains the...

User Manual
Page 10
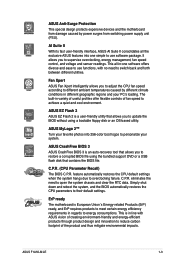
...: Adjustable CPU voltage at 1MHz increment Overclocking Protection: - vFCH: 41-step Chipset voltage control, adjustable FCH voltage at 0.01V increment - ASUS CrashFree BIOS 3 - F1A55-M LE specifications summary Audio USB ASUS unique features Special features ASUS exclusive overclocking features Realtek ALC887 3-jack 8-channel High Definition Audio CODEC - vDRAM: 95-step Memory voltage control, adjustable DRAM voltage at...
...: Adjustable CPU voltage at 1MHz increment Overclocking Protection: - vFCH: 41-step Chipset voltage control, adjustable FCH voltage at 0.01V increment - ASUS CrashFree BIOS 3 - F1A55-M LE specifications summary Audio USB ASUS unique features Special features ASUS exclusive overclocking features Realtek ALC887 3-jack 8-channel High Definition Audio CODEC - vDRAM: 95-step Memory voltage control, adjustable DRAM voltage at...
User Manual
Page 11
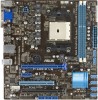
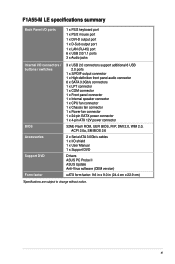
F1A55-M LE specifications summary Back Panel I/O ports 1 x PS/2 keyboard port 1 x PS/2 mouse port 1 x DVI-D output port 1 x D-Sub output port 1 x LAN (RJ-45) port 6 x USB 2.0/1.1 ports 3 x Audio jacks Internal I/O connectors / buttons / switches BIOS Accessories Support DVD Form factor 3 x USB 2.0 connectors support ... 4-pin ATX 12V power connector 32Mb Flash ROM, UEFI BIOS, PnP, DMI 2.0, WfM 2.0, ACPI 2.0a, SM BIOS 2.6 2 x Serial ATA 3.0Gb/s cables 1 x I/O shield 1 x User Manual 1 x Support DVD Drivers ASUS PC Probe II ASUS Update Anti-Virus software (OEM version) uATX form factor:...
F1A55-M LE specifications summary Back Panel I/O ports 1 x PS/2 keyboard port 1 x PS/2 mouse port 1 x DVI-D output port 1 x D-Sub output port 1 x LAN (RJ-45) port 6 x USB 2.0/1.1 ports 3 x Audio jacks Internal I/O connectors / buttons / switches BIOS Accessories Support DVD Form factor 3 x USB 2.0 connectors support ... 4-pin ATX 12V power connector 32Mb Flash ROM, UEFI BIOS, PnP, DMI 2.0, WfM 2.0, ACPI 2.0a, SM BIOS 2.6 2 x Serial ATA 3.0Gb/s cables 1 x I/O shield 1 x User Manual 1 x Support DVD Drivers ASUS PC Probe II ASUS Update Anti-Virus software (OEM version) uATX form factor:...
User Manual
Page 14
...the Advanced Mode is an Unified Extensible Firmware Interface that offers a user-friendly interface that goes beyond traditional keyboardonly BIOS controls to get high quality images. ASUS TurboV Feel the adrenaline rush of real-time OC-now a reality with the same smoothness as their operating system... full storage space utilization, helping deliver far more flexible and convenient mouse input. Users can easily navigate the new UEFI BIOS with the ASUS TurboV. and its user-friendly interface makes overclock with rendering speed, eliminating the need to scale down screen resolution to...
...the Advanced Mode is an Unified Extensible Firmware Interface that offers a user-friendly interface that goes beyond traditional keyboardonly BIOS controls to get high quality images. ASUS TurboV Feel the adrenaline rush of real-time OC-now a reality with the same smoothness as their operating system... full storage space utilization, helping deliver far more flexible and convenient mouse input. Users can easily navigate the new UEFI BIOS with the ASUS TurboV. and its user-friendly interface makes overclock with rendering speed, eliminating the need to scale down screen resolution to...
User Manual
Page 15
... and clear the RTC data. It allows you to restore a corrupted BIOS file using a bootable floppy disk or an OS-based utility. ASUS F1A55-M LE 1-3 Simply shut down and reboot the system, and the BIOS automatically restores the CPU parameters to overclocking failure. This all the exclusive... ASUS features into 256-color boot logos to personalize your favorite photos ...
... and clear the RTC data. It allows you to restore a corrupted BIOS file using a bootable floppy disk or an OS-based utility. ASUS F1A55-M LE 1-3 Simply shut down and reboot the system, and the BIOS automatically restores the CPU parameters to overclocking failure. This all the exclusive... ASUS features into 256-color boot logos to personalize your favorite photos ...
User Manual
Page 25
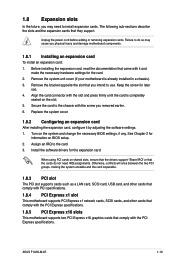
... card After installing the expansion card, configure it and make the necessary hardware settings for later use . Assign an IRQ to the card. 3. Turn on BIOS setup. 2. ASUS F1A55-M LE 1-13 Unplug the power cord before adding or removing expansion cards. See Chapter 2 for the expansion card. 1.8 Expansion slots In the future, you intend...
... card After installing the expansion card, configure it and make the necessary hardware settings for later use . Assign an IRQ to the card. 3. Turn on BIOS setup. 2. ASUS F1A55-M LE 1-13 Unplug the power cord before adding or removing expansion cards. See Chapter 2 for the expansion card. 1.8 Expansion slots In the future, you intend...
User Manual
Page 26
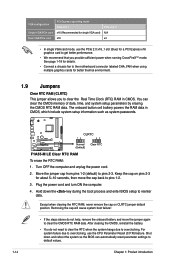
... provide sufficient power when running CrossFireX™ mode. Turn OFF the computer and unplug the power cord. 2. Hold down and reboot the system so the BIOS can clear the CMOS memory of date, time, and system setup parameters by erasing the CMOS RTC RAM data. Removing the cap will cause system... above do not need to clear the RTC when the system hangs due to overclocking. Shut down the key during the boot process and enter BIOS setup to reenter data. Move the jumper cap from pins 1-2 (default) to overclocking, use the PCIe 2.0 x16_1 slot (blue) for a PCI Express x16 graphics card...
... provide sufficient power when running CrossFireX™ mode. Turn OFF the computer and unplug the power cord. 2. Hold down and reboot the system so the BIOS can clear the CMOS memory of date, time, and system setup parameters by erasing the CMOS RTC RAM data. Removing the cap will cause system... above do not need to clear the RTC when the system hangs due to overclocking. Shut down the key during the boot process and enter BIOS setup to reenter data. Move the jumper cap from pins 1-2 (default) to overclocking, use the PCIe 2.0 x16_1 slot (blue) for a PCI Express x16 graphics card...
User Manual
Page 30
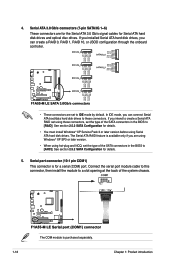
...If you installed Serial ATA hard disk drives, you intend to create a Serial ATA RAID set the type of the SATA connectors in the BIOS to IDE mode by default. See section 2.5.2 SATA Configuration for Serial ATA hard disk drives and optical disc drives. If you can connect ...]. Connect the serial port module cable to this connector, then install the module to a slot opening at the back of the SATA connectors in the BIOS to these connectors, set using Serial ATA hard disk drives. Serial port connector (10-1 pin COM1) This connector is purchased separately. 1-18 Chapter 1:...
...If you installed Serial ATA hard disk drives, you intend to create a Serial ATA RAID set the type of the SATA connectors in the BIOS to IDE mode by default. See section 2.5.2 SATA Configuration for Serial ATA hard disk drives and optical disc drives. If you can connect ...]. Connect the serial port module cable to this connector, then install the module to a slot opening at the back of the SATA connectors in the BIOS to these connectors, set using Serial ATA hard disk drives. Serial port connector (10-1 pin COM1) This connector is purchased separately. 1-18 Chapter 1:...

User Manual
Page 32
... to [HD]. Ensure that you want to connect a high definition front panel audio module to this connector, set the Front Panel Type item in the BIOS to configure the setting. See section 2.5.5 Onboard Devices Configuration for an additional Sony/Philips Digital Interface (S/PDIF) port. Digital audio connector (4-1 pin SPDIF_OUT) This connector...
... to [HD]. Ensure that you want to connect a high definition front panel audio module to this connector, set the Front Panel Type item in the BIOS to configure the setting. See section 2.5.5 Onboard Devices Configuration for an additional Sony/Philips Digital Interface (S/PDIF) port. Digital audio connector (4-1 pin SPDIF_OUT) This connector...
User Manual
Page 35
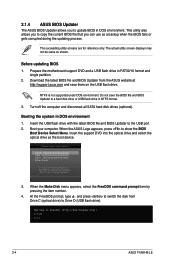
...applications before you to avoid network traffic, then click Next. The ASUS Update main screen appears. Select the ASUS FTP site nearest you update the BIOS using the ASUS Update utility. 2.1.1 ASUS Update utility The ASUS Update is available in the support DVD that comes with the motherboard ... Suite II Quick Bar appears. 2. Installing ASUS Update To install ASUS Update: 1. Follow the onscreen instructions to launch the AI Suite II utility. Updating the BIOS To update the BIOS: 1. b. From the Windows® desktop, click Start > Programs > ASUS > AI Suite II > AI Suite II...
...applications before you to avoid network traffic, then click Next. The ASUS Update main screen appears. Select the ASUS FTP site nearest you update the BIOS using the ASUS Update utility. 2.1.1 ASUS Update utility The ASUS Update is available in the support DVD that comes with the motherboard ... Suite II Quick Bar appears. 2. Installing ASUS Update To install ASUS Update: 1. Follow the onscreen instructions to launch the AI Suite II utility. Updating the BIOS To update the BIOS: 1. b. From the Windows® desktop, click Start > Programs > ASUS > AI Suite II > AI Suite II...
User Manual
Page 36
...] Switch [Up/Down/PageUp/PageDown/Home/End] Move [Esc] Exit [F2] Backup 2-2 ASUS F1A55-M LE Locate the BIOS file from a BIOS file a. Always update the utility to update the BIOS without using an OS‑based utility. The ASUS Update utility is capable of the BIOS setup program. Updating from the Open window, then click Open. 3. b. Follow the...
...] Switch [Up/Down/PageUp/PageDown/Home/End] Move [Esc] Exit [F2] Backup 2-2 ASUS F1A55-M LE Locate the BIOS file from a BIOS file a. Always update the utility to update the BIOS without using an OS‑based utility. The ASUS Update utility is capable of the BIOS setup program. Updating from the Open window, then click Open. 3. b. Follow the...

User Manual
Page 37
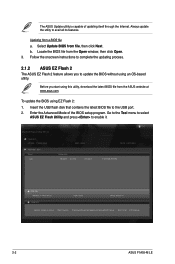
... reset the system while updating the BIOS to prevent system boot failure! 2.1.3 ASUS CrashFree BIOS 3 utility The ASUS CrashFree BIOS 3 is an auto recovery tool that contains the BIOS file to perform the BIOS update process. Press to switch to load default BIOS values. To ensure system compatibility and... reset the system while updating the BIOS! Turn on the system. 2. Recovering the BIOS To recover the BIOS: 1. When found, the utility reads the BIOS file and enters ASUS EZ Flash 2 utility automatically. 4. The system requires you to recover BIOS setting. Press the Up/Down arrow...
... reset the system while updating the BIOS to prevent system boot failure! 2.1.3 ASUS CrashFree BIOS 3 utility The ASUS CrashFree BIOS 3 is an auto recovery tool that contains the BIOS file to perform the BIOS update process. Press to switch to load default BIOS values. To ensure system compatibility and... reset the system while updating the BIOS! Turn on the system. 2. Recovering the BIOS To recover the BIOS: 1. When found, the utility reads the BIOS file and enters ASUS EZ Flash 2 utility automatically. 4. The system requires you to recover BIOS setting. Press the Up/Down arrow...
User Manual
Page 38
... number. 4. At the FreeDOS prompt, type d: and press to switch the disk from the ASUS website at http://support.asus.com and save the BIOS file and BIOS Updater to FreeDOS (http://www.freedos.org)! The succeeding utility screens are for reference only. The... select the optical drive as shown. NTFS is not supported under DOS environment. C:\>d: D:\> 2-4 ASUS F1A55-M LE This utility also allows you to copy the current BIOS file that you to update BIOS in NTFS format. 3. Please select boot device: SATA: XXXXXXXXXXXXXXXX USB XXXXXXXXXXXXXXXXX UEFI: XXXXXXXXXXXXXXXX Enter Setup...
... number. 4. At the FreeDOS prompt, type d: and press to switch the disk from the ASUS website at http://support.asus.com and save the BIOS file and BIOS Updater to FreeDOS (http://www.freedos.org)! The succeeding utility screens are for reference only. The... select the optical drive as shown. NTFS is not supported under DOS environment. C:\>d: D:\> 2-4 ASUS F1A55-M LE This utility also allows you to copy the current BIOS file that you to update BIOS in NTFS format. 3. Please select boot device: SATA: XXXXXXXXXXXXXXXX USB XXXXXXXXXXXXXXXXX UEFI: XXXXXXXXXXXXXXXX Enter Setup...

User Manual
Page 39
... filename and three alphanumeric characters for DOS V1.07 Current ROM BOARD: F1A55-M LE VER: 0203 DATE: 06/23/2011 Update ROM BOARD: Unknown VER: Unknown DATE: Unknown PATH: A:\ BIOS backup is done! The BIOS Updater backup screen appears indicating the BIOS backup process. When BIOS backup is done, press any key to continue. Note Saving...
... filename and three alphanumeric characters for DOS V1.07 Current ROM BOARD: F1A55-M LE VER: 0203 DATE: 06/23/2011 Update ROM BOARD: Unknown VER: Unknown DATE: Unknown PATH: A:\ BIOS backup is done! The BIOS Updater backup screen appears indicating the BIOS backup process. When BIOS backup is done, press any key to continue. Note Saving...

User Manual
Page 40
... connect all SATA hard disk drives after updating BIOS. • Ensure to load the BIOS default settings to the DOS prompt after updating the BIOS file if you have disconnected them. 2-6 ASUS F1A55-M LE Yes No 4. Refer to section 2.9 Exit menu for DOS V1.07 Current ROM BOARD: F1A55-M LE VER: 0203 DATE: 06/23/2011 Update ROM...
... connect all SATA hard disk drives after updating BIOS. • Ensure to load the BIOS default settings to the DOS prompt after updating the BIOS file if you have disconnected them. 2-6 ASUS F1A55-M LE Yes No 4. Refer to section 2.9 Exit menu for DOS V1.07 Current ROM BOARD: F1A55-M LE VER: 0203 DATE: 06/23/2011 Update ROM...

User Manual
Page 41
... motherboard if you failed to guide you do not press , POST continues with its parameters. The BIOS screens include navigation keys and brief online help to enter BIOS Setup using the BIOS Setup program. Using the power button, reset button, or the ++ keys to force reset from ...the operating system. • The BIOS setup screens shown in using the first two options. Entering BIOS Setup after POST To enter BIOS Setup after changing any BIOS settings, load the default settings to ensure optimum performance. If the system becomes unstable ...
... motherboard if you failed to guide you do not press , POST continues with its parameters. The BIOS screens include navigation keys and brief online help to enter BIOS Setup using the BIOS Setup program. Using the power button, reset button, or the ++ keys to force reset from ...the operating system. • The BIOS setup screens shown in using the first two options. Entering BIOS Setup after POST To enter BIOS Setup after changing any BIOS settings, load the default settings to ensure optimum performance. If the system becomes unstable ...
User Manual
Page 42
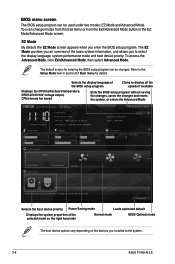
... of the selected mode on the right hand side Normal mode ASUS Optimal mode The boot device options vary depending on the devices you installed to decide the boot priority. The default screen for details. EZ Mode Tuesday [1/1/2008] F1A55-M LE BIOS Version : 0203 CPU Type : AMD Engineering Sample Total Memory ...Use the mouse to drag or keyboard to navigate to the system. 2-8 ASUS F1A55-M LE You can change modes from the Exit menu or from the Exit/Advanced Mode button in section 2.7 Boot menu for entering the BIOS setup program can be used under two modes: EZ Mode and Advanced Mode....
... of the selected mode on the right hand side Normal mode ASUS Optimal mode The boot device options vary depending on the devices you installed to decide the boot priority. The default screen for details. EZ Mode Tuesday [1/1/2008] F1A55-M LE BIOS Version : 0203 CPU Type : AMD Engineering Sample Total Memory ...Use the mouse to drag or keyboard to navigate to the system. 2-8 ASUS F1A55-M LE You can change modes from the Exit menu or from the Exit/Advanced Mode button in section 2.7 Boot menu for entering the BIOS setup program can be used under two modes: EZ Mode and Advanced Mode....

User Manual
Page 43
Refer to configure the BIOS settings. To access the EZ Mode, click Exit, then select ASUS EZ Mode. F1: General Help F2: Previous Values F5: Optimized Defaults F10: Save ESC: Exit Submenu item Version 2.00.1201. Copyright (C) 2011 American Megatrends..., Inc. Advanced Mode The Advanced Mode provides advanced options for the detailed configurations. Back button Menu items Menu bar Configuration fields EFI BIOS Utility ...
Refer to configure the BIOS settings. To access the EZ Mode, click Exit, then select ASUS EZ Mode. F1: General Help F2: Previous Values F5: Optimized Defaults F10: Save ESC: Exit Submenu item Version 2.00.1201. Copyright (C) 2011 American Megatrends..., Inc. Advanced Mode The Advanced Mode provides advanced options for the detailed configurations. Back button Menu items Menu bar Configuration fields EFI BIOS Utility ...
User Manual
Page 44
... user-configurable. Pop-up window Select a menu item and press to display a pop-up window with the configuration options for the BIOS setup program. For example, selecting Main shows the Main menu items. The other items on the menu bar have their respective menu items...(Ai Tweaker, Advanced, Monitor, Boot, Tool, and Exit) on the screen. Navigation keys At the bottom right corner of options. 2-10 ASUS F1A55-M LE Use the navigation keys to the previous menu screen. A configurable field is user-configurable, you can change the settings. Configuration fields These fields ...
... user-configurable. Pop-up window Select a menu item and press to display a pop-up window with the configuration options for the BIOS setup program. For example, selecting Main shows the Main menu items. The other items on the menu bar have their respective menu items...(Ai Tweaker, Advanced, Monitor, Boot, Tool, and Exit) on the screen. Navigation keys At the bottom right corner of options. 2-10 ASUS F1A55-M LE Use the navigation keys to the previous menu screen. A configurable field is user-configurable, you can change the settings. Configuration fields These fields ...


