
User Manual
Page 3
... DVD 4-2 Drivers menu...4-3 Utilities menu...4-3 Contact...4-3 Other information 4-3 System Recovery...4-4 Using the Support DVD 4-4 Using Recovery Partition 4-5 Boot Booster...4-6 Appendix Declarations and Safety Statements A-2 Federal Communications Commission Statement A-2 FCC Radio Frequency (RF) Exposure Caution Statement A-3 Declaration of Conformity(R&TTE directive 1999/5/EC A-4 CE Mark Warning...A-4 IC Radiation Exposure Statement for Canada A-4 Wireless Operation Channel for Different Domains A-6 France Restricted Wireless Frequency Bands A-6 UL Safety Notices...A-7 Power...
... DVD 4-2 Drivers menu...4-3 Utilities menu...4-3 Contact...4-3 Other information 4-3 System Recovery...4-4 Using the Support DVD 4-4 Using Recovery Partition 4-5 Boot Booster...4-6 Appendix Declarations and Safety Statements A-2 Federal Communications Commission Statement A-2 FCC Radio Frequency (RF) Exposure Caution Statement A-3 Declaration of Conformity(R&TTE directive 1999/5/EC A-4 CE Mark Warning...A-4 IC Radiation Exposure Statement for Canada A-4 Wireless Operation Channel for Different Domains A-6 France Restricted Wireless Frequency Bands A-6 UL Safety Notices...A-7 Power...
User Manual
Page 4
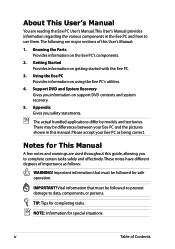
... this guide, allowing you to complete certain tasks safely and effectively.These notes have different degrees of Contents Getting Started Provides information on using the Eee PC's utilities. 4. Please accept your Eee PC and the pictures shown in the Eee PC and how to data, components, or persons. NOTE: Information for completing tasks. Knowing the Parts Provides information on support DVD contents and system recovery...
... this guide, allowing you to complete certain tasks safely and effectively.These notes have different degrees of Contents Getting Started Provides information on using the Eee PC's utilities. 4. Please accept your Eee PC and the pictures shown in the Eee PC and how to data, components, or persons. NOTE: Information for completing tasks. Knowing the Parts Provides information on support DVD contents and system recovery...
User Manual
Page 5
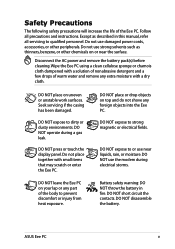
... warm water and remove any part of the Eee PC. DO NOT operate during electrical storms. DO NOT leave the Eee PC on top and do not shove any foreign objects into the Eee PC. DO NOT short circuit the contacts. DO NOT disassemble the battery. Battery safety warning: DO NOT throw the battery in this manual, refer all precautions and instructions. Do not place...
... warm water and remove any part of the Eee PC. DO NOT operate during electrical storms. DO NOT leave the Eee PC on top and do not shove any foreign objects into the Eee PC. DO NOT short circuit the contacts. DO NOT disassemble the battery. Battery safety warning: DO NOT throw the battery in this manual, refer all precautions and instructions. Do not place...

User Manual
Page 11
...) mode. Power Indicator The power indicator lights when the Eee PC is turned ON and blinks slowly when the Eee PC is in array microphone is shown on the next page) Without Adapter Off Off Orange Blinking ASUS Eee PC 1-3 This indicator is OFF when the Eee PC is opened. The selected mode is more clear and echo-free compared with traditional single microphones. 4 Super Hybrid Engine Key Press this key to switch among various power saving modes. 1 Built-in Camera 2 Display Panel 3 Array Microphone...
...) mode. Power Indicator The power indicator lights when the Eee PC is turned ON and blinks slowly when the Eee PC is in array microphone is shown on the next page) Without Adapter Off Off Orange Blinking ASUS Eee PC 1-3 This indicator is OFF when the Eee PC is opened. The selected mode is more clear and echo-free compared with traditional single microphones. 4 Super Hybrid Engine Key Press this key to switch among various power saving modes. 1 Built-in Camera 2 Display Panel 3 Array Microphone...

User Manual
Page 12
... battery power (0%-10%) With Adapter Green ON Orange ON Orange Blinking Without Adapter Off Off Off The Battery Charge Indicator will not light when the battery is enabled, this indicator lights. 7 �K�e�y�b�o�a�rd� The keyboard provides keys with built-in wireless LAN/Bluetooth is removed from the disk drive. Capital Lock Indicator Indicates that provides the same functions as a desktop mouse. 1-4 Chapter 1: Knowing the Parts Hard Disk Drive (HDD) Indicator The hard disk drive indicator blinks when data is activated...
... battery power (0%-10%) With Adapter Green ON Orange ON Orange Blinking Without Adapter Off Off Off The Battery Charge Indicator will not light when the battery is enabled, this indicator lights. 7 �K�e�y�b�o�a�rd� The keyboard provides keys with built-in wireless LAN/Bluetooth is removed from the disk drive. Capital Lock Indicator Indicates that provides the same functions as a desktop mouse. 1-4 Chapter 1: Knowing the Parts Hard Disk Drive (HDD) Indicator The hard disk drive indicator blinks when data is activated...

User Manual
Page 13
... in the unlocked position. Spring The spring battery lock keeps the battery pack secure. ASUS Eee PC 1-5 When the battery pack is inserted, it is in operation or recently been in operation. The bottom side may block the vents. When removing the battery pack, this side of the Eee PC can get very hot. DO NOT PUT THE Eee PC ON YOUR LAP OR OTHER PARTS OF THE...
... in the unlocked position. Spring The spring battery lock keeps the battery pack secure. ASUS Eee PC 1-5 When the battery pack is inserted, it is in operation or recently been in operation. The bottom side may block the vents. When removing the battery pack, this side of the Eee PC can get very hot. DO NOT PUT THE Eee PC ON YOUR LAP OR OTHER PARTS OF THE...

User Manual
Page 14
... the specifications for this Eee PC.The battery pack cannot be disassembled and must be depressed with external stereo headphones or speakers). 2 Battery Pack The battery pack is automatically charged when connected to an AC power source and maintains power to the Eee PC when AC power is available on selected models. 5 Audio Speaker System The built-in a dedicated compartment. 4 Reset Button (Emergency) In case your operating system cannot properly turn...
... the specifications for this Eee PC.The battery pack cannot be disassembled and must be depressed with external stereo headphones or speakers). 2 Battery Pack The battery pack is automatically charged when connected to an AC power source and maintains power to the Eee PC when AC power is available on selected models. 5 Audio Speaker System The built-in a dedicated compartment. 4 Reset Button (Emergency) In case your operating system cannot properly turn...

User Manual
Page 15
ASUS Eee PC 1-7 Using this side of the Eee PC. 1 23 1 USB Port (2.0/1.1) The USB (Universal Serial Bus) port is designed to connect the microphone used for Skype, voice narrations, or simple audio recordings. 3 Headphone Output Jack The 1/8" stereo headphone jack (3.5mm) connects the Eee PC's audio out signal to 12Mbits/sec (USB 1.1) and 480Mbits/sec (USB 2.0). Also, the USB supports hot-swapping function. 2 Microphone Jack The microphone jack is compatible with USB 2.0 or USB 1.1 devices such as keyboards, pointing devices, cameras, and storage devices, connected in ...
ASUS Eee PC 1-7 Using this side of the Eee PC. 1 23 1 USB Port (2.0/1.1) The USB (Universal Serial Bus) port is designed to connect the microphone used for Skype, voice narrations, or simple audio recordings. 3 Headphone Output Jack The 1/8" stereo headphone jack (3.5mm) connects the Eee PC's audio out signal to 12Mbits/sec (USB 1.1) and 480Mbits/sec (USB 2.0). Also, the USB supports hot-swapping function. 2 Microphone Jack The microphone jack is compatible with USB 2.0 or USB 1.1 devices such as keyboards, pointing devices, cameras, and storage devices, connected in ...

User Manual
Page 17
... turned ON and blinks slowly when the Eee PC is turned OFF. CAUTION: MAY BECOME WARM TO HOT WHEN IN USE. These security products usually include a metal cable and lock that pa per, books, clothing, cables, or other objects do not block any of the air vents or else overheating may occur. 7 Battery Charge Indicator The battery charge indicator (LED) shows the status of the battery's power. ASUS Eee PC 1-9 Power supplied through this jack...
... turned ON and blinks slowly when the Eee PC is turned OFF. CAUTION: MAY BECOME WARM TO HOT WHEN IN USE. These security products usually include a metal cable and lock that pa per, books, clothing, cables, or other objects do not block any of the air vents or else overheating may occur. 7 Battery Charge Indicator The battery charge indicator (LED) shows the status of the battery's power. ASUS Eee PC 1-9 Power supplied through this jack...

User Manual
Page 18
... display brightness. Some function icons appear in suspend mode (Save-to adjust the display resolution. Follow the icons whenever your hot key locations do not match the manual. The Hot Key locations on the function keys may vary depending on selected models. zzZ Icon (F1): Places the Eee PC in the Notification area after activation. Crossed Screen Icon (F7): Turns off the display backlight. 1-10 Chapter 1: Knowing the Parts When enabled, the corresponding wireless indicator will light...
... display brightness. Some function icons appear in suspend mode (Save-to adjust the display resolution. Follow the icons whenever your hot key locations do not match the manual. The Hot Key locations on the function keys may vary depending on selected models. zzZ Icon (F1): Places the Eee PC in the Notification area after activation. Crossed Screen Icon (F7): Turns off the display backlight. 1-10 Chapter 1: Knowing the Parts When enabled, the corresponding wireless indicator will light...

User Manual
Page 19
... : Activates the properties menu and is equivalent to view the application process or terminates applications. Num Lk (Insert): Toggles the numeric keypad (number lock) ON and OFF. ASUS Eee PC 1-11 LCD/Monitor Icons (F8): Toggles between the Eee PC's LCD display and an external monitor. Scr Lk (Delete): Toggles the "Scroll Lock" ON and OFF. Task Manager Icon (F9): Initiates the Task Manager to right-clicking the touchpad/mouse on...
... : Activates the properties menu and is equivalent to view the application process or terminates applications. Num Lk (Insert): Toggles the numeric keypad (number lock) ON and OFF. ASUS Eee PC 1-11 LCD/Monitor Icons (F8): Toggles between the Eee PC's LCD display and an external monitor. Scr Lk (Delete): Toggles the "Scroll Lock" ON and OFF. Task Manager Icon (F9): Initiates the Task Manager to right-clicking the touchpad/mouse on...

User Manual
Page 22
... you use with a faulty ACDC adapter. • When you open the display panel, do not force it is depleted to remove the battery pack while the Eee PC is turned ON, as this adapter is +12Vdc, 3A. • Never attempt to prolong battery life. 2-2 Chapter 2: Getting Started The output voltage of working data. Connect the AC power adapter 1 2 3. Powering on your Eee PC These are only quick instructions for use a different adapter to power the Eee PC.
... you use with a faulty ACDC adapter. • When you open the display panel, do not force it is depleted to remove the battery pack while the Eee PC is turned ON, as this adapter is +12Vdc, 3A. • Never attempt to prolong battery life. 2-2 Chapter 2: Getting Started The output voltage of working data. Connect the AC power adapter 1 2 3. Powering on your Eee PC These are only quick instructions for use a different adapter to power the Eee PC.
User Manual
Page 25
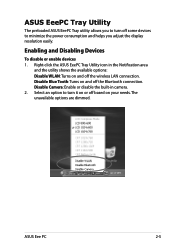
... in camera. 2. ASUS EeePC Tray Utility The preloaded ASUS EeePC Tray utility allows you adjust the display resolution easily. Enabling and Disabling Devices To disable or enable devices 1. ASUS Eee PC 2-5 Disable Camera: Enable or disable the built-in the Notification area and the utility shows the available options: Disable WLAN: Turns on and off the Bluetooth connection. Select an option to minimize the power consumption and helps you to turn off some devices to turn it on or off the wireless LAN connection...
... in camera. 2. ASUS EeePC Tray Utility The preloaded ASUS EeePC Tray utility allows you adjust the display resolution easily. Enabling and Disabling Devices To disable or enable devices 1. ASUS Eee PC 2-5 Disable Camera: Enable or disable the built-in the Notification area and the utility shows the available options: Disable WLAN: Turns on and off the Bluetooth connection. Select an option to minimize the power consumption and helps you to turn off some devices to turn it on or off the wireless LAN connection...

User Manual
Page 29
connection to the Internet and click Next. 8. Select your ISP Name and click and click Next. Enter your connection type 10. Select Connect to start the New Connection Wizard. 7. Next. Click Create a new 6. Select Set up my connection manually. 9. ASUS Eee PC 2-9 5. Click Next.
connection to the Internet and click Next. 8. Select your ISP Name and click and click Next. Enter your connection type 10. Select Connect to start the New Connection Wizard. 7. Next. Click Create a new 6. Select Set up my connection manually. 9. ASUS Eee PC 2-9 5. Click Next.

User Manual
Page 34
... 3: Using the Eee PC Select Update BIOS from Internet from the Windows® desktop by clicking Start > All Programs > ASUS > ASUSUpdate for Eee PC> ASUSUpdate. This utility is pre-loaded in your Eee PC and is a utility that comes with the Eee PC package. Updating the BIOS through the Internet To update the BIOS through a network or an Internet Service Provider (ISP). The ASUS Update main window appears. 2. The ASUS Update utility allows you to manage, save, and update the Eee PC BIOS in the support DVD that...
... 3: Using the Eee PC Select Update BIOS from Internet from the Windows® desktop by clicking Start > All Programs > ASUS > ASUSUpdate for Eee PC> ASUSUpdate. This utility is pre-loaded in your Eee PC and is a utility that comes with the Eee PC package. Updating the BIOS through the Internet To update the BIOS through a network or an Internet Service Provider (ISP). The ASUS Update main window appears. 2. The ASUS Update utility allows you to manage, save, and update the Eee PC BIOS in the support DVD that...

User Manual
Page 37
A message appears to show built, select the service you are that the selected shortcuts interested in from the list and click Next. 8. 7. After the paired relationship is 10. Select a Bluetooth-enabled device from the list and have been created on the My click Next to set up connection 11. Enter the Bluetooth security code and start pairing. 9. Bluetooth Places screen of Windows Explorer. ASUS Eee PC 3-5 Click Skip to continue. the initial bluetooth configuration. Click Ok to complete later and continue. Click Finish to continue. 11.
A message appears to show built, select the service you are that the selected shortcuts interested in from the list and click Next. 8. 7. After the paired relationship is 10. Select a Bluetooth-enabled device from the list and have been created on the My click Next to set up connection 11. Enter the Bluetooth security code and start pairing. 9. Bluetooth Places screen of Windows Explorer. ASUS Eee PC 3-5 Click Skip to continue. the initial bluetooth configuration. Click Ok to complete later and continue. Click Finish to continue. 11.
User Manual
Page 45
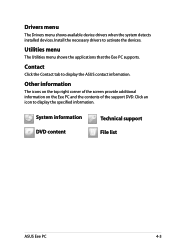
Drivers menu The Drivers menu shows available device drivers when the system detects installed devices. System information DVD content Technical support File list ASUS Eee PC 4-3 Other information The icons on the top right corner of the screen provide additional information on the Eee PC and the contents of the support DVD. Click an icon to activate the devices. Install the necessary drivers to display the specified information. Utilities menu The Utilities menu shows the applications that the Eee PC supports. Contact...
Drivers menu The Drivers menu shows available device drivers when the system detects installed devices. System information DVD content Technical support File list ASUS Eee PC 4-3 Other information The icons on the top right corner of the screen provide additional information on the Eee PC and the contents of the support DVD. Click an icon to activate the devices. Install the necessary drivers to display the specified information. Utilities menu The Utilities menu shows the applications that the Eee PC supports. Contact...

User Manual
Page 46
... powered ON). 2. Click OK in good working state, provided that quickly restores your system to its original working order. Connect an external optical drive to your Eee PC and insert the Support DVD into the optical drive (System needs to be labeled as network settings). 1. Press on your system at the factory.The Support DVD provides a comprehensive recovery solution that your data files to a USB storage device or to a network drive and make note of the operating...
... powered ON). 2. Click OK in good working state, provided that quickly restores your system to its original working order. Connect an external optical drive to your Eee PC and insert the Support DVD into the optical drive (System needs to be labeled as network settings). 1. Press on your system at the factory.The Support DVD provides a comprehensive recovery solution that your data files to a USB storage device or to a network drive and make note of the operating...

User Manual
Page 47
... the the Support DVD from USB flash disk, external optical drive or hidden partition. Refer to complete the recovery process. Click the check mark button to restart the Eee PC. Using the Recovery Partition: 1. ASUS Eee PC 4-5 Press during the system recovery. You will lose all your system. 6. Ensure to back up your important data before recovering your data during bootup (requires a Recovery Partition) Disable Boot Booster in BIOS setup before your Eee PC at the factory. After the...
... the the Support DVD from USB flash disk, external optical drive or hidden partition. Refer to complete the recovery process. Click the check mark button to restart the Eee PC. Using the Recovery Partition: 1. ASUS Eee PC 4-5 Press during the system recovery. You will lose all your system. 6. Ensure to back up your important data before recovering your data during bootup (requires a Recovery Partition) Disable Boot Booster in BIOS setup before your Eee PC at the factory. After the...

User Manual
Page 48
... hardware change any Eee PC components or perform system recovery (from USB flash disk, external optical drive or hidden partition). Boot Booster The Boot Booster item in BIOS setup helps shorten your Eee PC bootup time. Start the system and press on bootup. Remember to enable Boot Booster after you set the CD-ROM drive as the first boot device. ←→ Select Screen ↑↓ Select Item Enter Go to [Disabled] If you change or system recovery. 4-6 Chapter 4: Support DVD & System Recovery Set Boot...
... hardware change any Eee PC components or perform system recovery (from USB flash disk, external optical drive or hidden partition). Boot Booster The Boot Booster item in BIOS setup helps shorten your Eee PC bootup time. Start the system and press on bootup. Remember to enable Boot Booster after you set the CD-ROM drive as the first boot device. ←→ Select Screen ↑↓ Select Item Enter Go to [Disabled] If you change or system recovery. 4-6 Chapter 4: Support DVD & System Recovery Set Boot...


