User Manual
Page 2
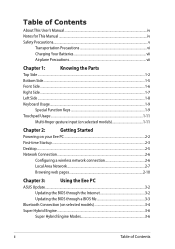
... the Parts Top Side...1-2 Bottom Side...1-5 Front Side...1-6 Right Side...1-7 Left Side...1-8 Keyboard Usage...1-9 Special Function Keys 1-9 Touchpad Usage...1-11 Multi-finger gesture input (on selected models 1-11 Chapter 2: Getting Started Powering on your Eee PC...2-2 First-time Startup...2-3 Desktop...2-5 Network Connection...2-6 Configuring a wireless network connection 2-6 Local Area Network 2-7 Browsing web pages 2-10 Chapter 3: Using the Eee PC ASUS Update...3-2 Updating the BIOS through the Internet 3-2 Updating the BIOS through a BIOS file 3-3 Bluetooth...
... the Parts Top Side...1-2 Bottom Side...1-5 Front Side...1-6 Right Side...1-7 Left Side...1-8 Keyboard Usage...1-9 Special Function Keys 1-9 Touchpad Usage...1-11 Multi-finger gesture input (on selected models 1-11 Chapter 2: Getting Started Powering on your Eee PC...2-2 First-time Startup...2-3 Desktop...2-5 Network Connection...2-6 Configuring a wireless network connection 2-6 Local Area Network 2-7 Browsing web pages 2-10 Chapter 3: Using the Eee PC ASUS Update...3-2 Updating the BIOS through the Internet 3-2 Updating the BIOS through a BIOS file 3-3 Bluetooth...
User Manual
Page 3
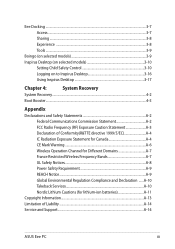
... A-4 IC Radiation Exposure Statement for Canada A-4 CE Mark Warning...A-6 Wireless Operation Channel for Different Domains A-7 France Restricted Wireless Frequency Bands A-7 UL Safety Notices...A-8 Power Safety Requirement A-9 REACH Notice...A-9 Global Environmental Regulation Compliance and Declaration ......A-10 Takeback Services A-10 Nordic Lithium Cautions (for lithium-ion batteries A-11 Copyright Information...A-13 Limitation of Liability...A-14 Service and Support...A-14 ASUS Eee PC iii
... A-4 IC Radiation Exposure Statement for Canada A-4 CE Mark Warning...A-6 Wireless Operation Channel for Different Domains A-7 France Restricted Wireless Frequency Bands A-7 UL Safety Notices...A-8 Power Safety Requirement A-9 REACH Notice...A-9 Global Environmental Regulation Compliance and Declaration ......A-10 Takeback Services A-10 Nordic Lithium Cautions (for lithium-ion batteries A-11 Copyright Information...A-13 Limitation of Liability...A-14 Service and Support...A-14 ASUS Eee PC iii

User Manual
Page 4
... using the Eee PC's utilities. 4. The actual bundled applications differ by models and territories. Please accept your Eee PC and the pictures shown in the Eee PC and how to use them.The following are used throughout this guide, allowing you to data, components, or persons. TIP: Tips for safe operation. Using the Eee PC Provides information on the Eee PC's components. 2. Appendix Gives you safety statements. About This User's Manual...
... using the Eee PC's utilities. 4. The actual bundled applications differ by models and territories. Please accept your Eee PC and the pictures shown in the Eee PC and how to use them.The following are used throughout this guide, allowing you to data, components, or persons. TIP: Tips for safe operation. Using the Eee PC Provides information on the Eee PC's components. 2. Appendix Gives you safety statements. About This User's Manual...
User Manual
Page 5
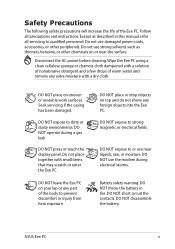
... touch the display panel. DO NOT expose to dirty or dusty environments. DO NOT use strong solvents such as described in fire. DO NOT short circuit the contacts. DO NOT operate during electrical storms. Battery safety warning: DO NOT throw the battery in this manual, refer all precautions and instructions. Seek servicing if the casing has been damaged. DO NOT disassemble...
... touch the display panel. DO NOT expose to dirty or dusty environments. DO NOT use strong solvents such as described in fire. DO NOT short circuit the contacts. DO NOT operate during electrical storms. Battery safety warning: DO NOT throw the battery in this manual, refer all precautions and instructions. Seek servicing if the casing has been damaged. DO NOT disassemble...

User Manual
Page 11
... keyboard provides keys with comfortable travel (depth at which the keys can be depressed) and palm rest for each territory. 6 Touchpad and Buttons The touchpad and its buttons comprises a pointing device that provides the same functions as follows: ASUS Eee PC 1-3 Power Indicator The power indicator lights when the Eee PC is turned ON and blinks slowly when the Eee PC is in Camera 3 Display Panel 4 Power Switch The power switch allows powering ON and OFF the Eee PC and recovering from STR. Battery Charge Indicator The battery charge indicator (LED...
... keyboard provides keys with comfortable travel (depth at which the keys can be depressed) and palm rest for each territory. 6 Touchpad and Buttons The touchpad and its buttons comprises a pointing device that provides the same functions as follows: ASUS Eee PC 1-3 Power Indicator The power indicator lights when the Eee PC is turned ON and blinks slowly when the Eee PC is in Camera 3 Display Panel 4 Power Switch The power switch allows powering ON and OFF the Eee PC and recovering from STR. Battery Charge Indicator The battery charge indicator (LED...

User Manual
Page 14
... battery pack. 4 Memory Compartment The memory module is not connected. Audio features are software controlled. 1-6 Chapter 1: Knowing the Parts 1 Battery Lock - Manual The manual battery lock is inserted, it will automatically lock. Spring The spring battery lock keeps the battery pack secure. When removing the battery pack, this spring lock must be retained in the unlocked position. 2 Battery Pack The battery pack is automatically charged when connected to an AC power source and maintains power to the Eee PC when AC power...
... battery pack. 4 Memory Compartment The memory module is not connected. Audio features are software controlled. 1-6 Chapter 1: Knowing the Parts 1 Battery Lock - Manual The manual battery lock is inserted, it will automatically lock. Spring The spring battery lock keeps the battery pack secure. When removing the battery pack, this spring lock must be retained in the unlocked position. 2 Battery Pack The battery pack is automatically charged when connected to an AC power source and maintains power to the Eee PC when AC power...

User Manual
Page 15
... jack automatically disables the built-in connector allows convenient use without additional adapters. Also, the USB supports hot-swapping function. 3 Kensington® Lock port The Kensington® lock port allows the Eee PC to be removed from a fixed object. 4 LAN Port The eight-pin RJ-45 LAN port (10/100M bit) supports a standard Ethernet cable for Skype, voice narrations, or simple audio recordings. 2 USB Port (2.0/1.1) The USB (Universal Serial Bus) port is compatible with USB 2.0 or USB 1.1 devices such as keyboards, pointing devices, cameras...
... jack automatically disables the built-in connector allows convenient use without additional adapters. Also, the USB supports hot-swapping function. 3 Kensington® Lock port The Kensington® lock port allows the Eee PC to be removed from a fixed object. 4 LAN Port The eight-pin RJ-45 LAN port (10/100M bit) supports a standard Ethernet cable for Skype, voice narrations, or simple audio recordings. 2 USB Port (2.0/1.1) The USB (Universal Serial Bus) port is compatible with USB 2.0 or USB 1.1 devices such as keyboards, pointing devices, cameras...

User Manual
Page 16
... else overheating may occur. 5 Memory Card Slot The built-in memory card reader can read SD/SDHC/MMC cards. 1-8 Chapter 1: Knowing the Parts THE ADAPTER MAY BECOME WARM TO HOT WHEN IN USE. Power supplied through this jack. BE SURE NOT TO COVER THE ADAPTER AND KEEP IT AWAY FROM YOUR BODY. 2 Display (Monitor) Output The 15-pin D-sub monitor port supports a standard VGAcompatible device such as a monitor or projector to allow...
... else overheating may occur. 5 Memory Card Slot The built-in memory card reader can read SD/SDHC/MMC cards. 1-8 Chapter 1: Knowing the Parts THE ADAPTER MAY BECOME WARM TO HOT WHEN IN USE. Power supplied through this jack. BE SURE NOT TO COVER THE ADAPTER AND KEEP IT AWAY FROM YOUR BODY. 2 Display (Monitor) Output The 15-pin D-sub monitor port supports a standard VGAcompatible device such as a monitor or projector to allow...

User Manual
Page 17
... suspend mode (Save-to-RAM). Crossed Screen Icon (F7): Turns off the display backlight. Volume Down Icon (F11): Decreases speaker volume. Sun Up Icon (F6): Increases the display brightness. LCD/Monitor Icons (F8): Toggles between the Eee PC's LCD display and an external monitor. The colored commands can only be accessed by first pressing and holding the function key while pressing a key with an on the Eee PC's keyboard. ASUS Eee PC 1-9 When enabled, the corresponding wireless indicator will light. Resolution...
... suspend mode (Save-to-RAM). Crossed Screen Icon (F7): Turns off the display backlight. Volume Down Icon (F11): Decreases speaker volume. Sun Up Icon (F6): Increases the display brightness. LCD/Monitor Icons (F8): Toggles between the Eee PC's LCD display and an external monitor. The colored commands can only be accessed by first pressing and holding the function key while pressing a key with an on the Eee PC's keyboard. ASUS Eee PC 1-9 When enabled, the corresponding wireless indicator will light. Resolution...
User Manual
Page 22
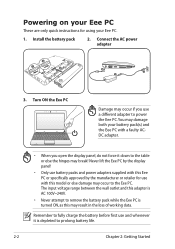
...-220V 3. Powering on your Eee PC These are only quick instructions for use with this model or else damage may occur to the Eee PC. Remember to fully charge the battery before first use and whenever it down to the table or else the hinges may occur if you open the display panel, do not force it is depleted to remove the battery pack while the Eee PC is...
...-220V 3. Powering on your Eee PC These are only quick instructions for use with this model or else damage may occur to the Eee PC. Remember to fully charge the battery before first use and whenever it down to the table or else the hinges may occur if you open the display panel, do not force it is depleted to remove the battery pack while the Eee PC is...

User Manual
Page 23
... you are in, and the keyboard type you use . Next to continue. 2. Select the language you use . Type your user account name 4. Click then click Next to finish the initialization: 1. Follow the wizard instructions to continue. Click Next to continue. 3. First-time Startup For the first time you start your Eee PC, the Windows wizard will launch automatically and lead you want. ASUS Eee PC 2-3
... you are in, and the keyboard type you use . Next to continue. 2. Select the language you use . Type your user account name 4. Click then click Next to finish the initialization: 1. Follow the wizard instructions to continue. Click Next to continue. 3. First-time Startup For the first time you start your Eee PC, the Windows wizard will launch automatically and lead you want. ASUS Eee PC 2-3
User Manual
Page 32
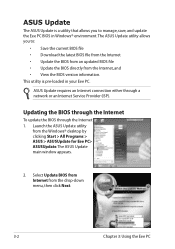
Updating the BIOS through the Internet To update the BIOS through a network or an Internet Service Provider (ISP). Launch the ASUS Update utility from the drop‑down menu, then click Next. 3-2 Chapter 3: Using the Eee PC The ASUS Update main window appears. 2. Select Update BIOS from Internet from the Windows® desktop by clicking Start > All Programs > ASUS > ASUSUpdate for Eee PC> ASUSUpdate. The ASUS Update utility allows you to : • Save the current BIOS file • Download the latest BIOS file...
Updating the BIOS through the Internet To update the BIOS through a network or an Internet Service Provider (ISP). Launch the ASUS Update utility from the drop‑down menu, then click Next. 3-2 Chapter 3: Using the Eee PC The ASUS Update main window appears. 2. Select Update BIOS from Internet from the Windows® desktop by clicking Start > All Programs > ASUS > ASUSUpdate for Eee PC> ASUSUpdate. The ASUS Update utility allows you to : • Save the current BIOS file • Download the latest BIOS file...
User Manual
Page 33
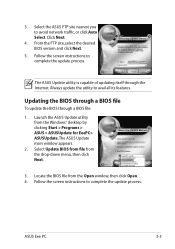
.... 3. Select the ASUS FTP site nearest you to complete the update process. Launch the ASUS Update utility from the Windows® desktop by clicking Start > Programs > ASUS > ASUSUpdate for EeePC> ASUSUpdate. Follow the screen instructions to avail all its features. ASUS Eee PC 3-3 The ASUS Update utility is capable of updating itself through a BIOS file: 1. Updating the BIOS through a BIOS file To update the BIOS through the Internet. Click Next. 4. Always update the utility to complete...
.... 3. Select the ASUS FTP site nearest you to complete the update process. Launch the ASUS Update utility from the Windows® desktop by clicking Start > Programs > ASUS > ASUSUpdate for EeePC> ASUSUpdate. Follow the screen instructions to avail all its features. ASUS Eee PC 3-3 The ASUS Update utility is capable of updating itself through a BIOS file: 1. Updating the BIOS through a BIOS file To update the BIOS through the Internet. Click Next. 4. Always update the utility to complete...

User Manual
Page 35
Click Close to look for 5. ASUS Eee PC 3-5 device from the list and click Next. 6. Enter the Bluetooth security code into your device and start pairing. 7. The paired relationship is successfully built. 4. Click Add a device to finish the setting. Select a Bluetooth-enabled new devices.
Click Close to look for 5. ASUS Eee PC 3-5 device from the list and click Next. 6. Enter the Bluetooth security code into your device and start pairing. 7. The paired relationship is successfully built. 4. Click Add a device to finish the setting. Select a Bluetooth-enabled new devices.

User Manual
Page 39
... updates. Docking Setting Docking Setting allows you to global Wi-Fi services with a special price via the Boingo utility. Boingo (on selected models) Boingo gives you to -date by multiple categories all over the world. ASUS Eee PC 3-9 Font Resizer Font Resizer allows you easy access to configure the appearance and the position of the Eee Docking tool bar. Tools Live Update Live Update...
... updates. Docking Setting Docking Setting allows you to global Wi-Fi services with a special price via the Boingo utility. Boingo (on selected models) Boingo gives you to -date by multiple categories all over the world. ASUS Eee PC 3-9 Font Resizer Font Resizer allows you easy access to configure the appearance and the position of the Eee Docking tool bar. Tools Live Update Live Update...

User Manual
Page 42
... administrator password. Click OK to create a new Windows user account for the account. These two password can be set the same. 8. Enter a user name and a password for the account of your child and select a picture for your desired master password in the Password field and enter again in case you forget yours. • The Master Password, which allows you to continue. 3-12 Chapter 3: Using the Eee PC
... administrator password. Click OK to create a new Windows user account for the account. These two password can be set the same. 8. Enter a user name and a password for the account of your child and select a picture for your desired master password in the Password field and enter again in case you forget yours. • The Master Password, which allows you to continue. 3-12 Chapter 3: Using the Eee PC

User Manual
Page 43
You can go step-by-step account setup by selecting an age group to remove the program. Or, you can add or remove programs to or from the approved list whenever you may use Easy configuration by clicking Next. 11. Click an unwanted program in the All programs field to add to . In the Account Settings window, you want to the Approved programs field. ASUS Eee PC 3-13 Click a desired program in the Approved programs field and select Remove This Title to quickly set up the child's account with default programs, permissions, and a desktop background and click Finish. 10.
You can go step-by-step account setup by selecting an age group to remove the program. Or, you can add or remove programs to or from the approved list whenever you may use Easy configuration by clicking Next. 11. Click an unwanted program in the All programs field to add to . In the Account Settings window, you want to the Approved programs field. ASUS Eee PC 3-13 Click a desired program in the Approved programs field and select Remove This Title to quickly set up the child's account with default programs, permissions, and a desktop background and click Finish. 10.

User Manual
Page 52
Using recovery partition (F9 Recovery) 1. Ensure to connect your Eee PC to the AC power adapter before you use and click to avoid recovery failure. Press during bootup. 2. Select the language you perform system recovery from USB flash disk, external optical drive or hidden partition. The system starts system recovery automatically and follow the onscreen instructions to press only once during bootup. Ensure to complete the recovery process. 4-2 Chapter 4: System Recovery Click Recovery in BIOS setup before...
Using recovery partition (F9 Recovery) 1. Ensure to connect your Eee PC to the AC power adapter before you use and click to avoid recovery failure. Press during bootup. 2. Select the language you perform system recovery from USB flash disk, external optical drive or hidden partition. The system starts system recovery automatically and follow the onscreen instructions to press only once during bootup. Ensure to complete the recovery process. 4-2 Chapter 4: System Recovery Click Recovery in BIOS setup before...

User Manual
Page 53
... device will lose all your Eee PC. 3. ASUS Eee PC 4-3 Select a desired USB storage device if more than 16GB. • Memory cards are not supported for this function. • A dialog box appears as a reminder if you have not connected the USB storage device for system recovery backup to your data on the selected USB storage device. Click Continue to start the recovery files backup. • The size of the connected USB storage device should be cleared...
... device will lose all your Eee PC. 3. ASUS Eee PC 4-3 Select a desired USB storage device if more than 16GB. • Memory cards are not supported for this function. • A dialog box appears as a reminder if you have not connected the USB storage device for system recovery backup to your data on the selected USB storage device. Click Continue to start the recovery files backup. • The size of the connected USB storage device should be cleared...

User Manual
Page 55
...If you complete hardware change any Eee PC components or perform system recovery (from USB flash disk, external optical drive or hidden partition). Press to enter the BIOS setup. 2. Boot Booster The Boot Booster item in BIOS setup helps shorten your Eee PC bootup time. Press again to save the configuration and restart Eee PC. Main BIOS SETUP UTILITY Advanced Security Boot Exit Boot Device Priority Boot Settings Configuration OnBoard LAN Boot ROM [Enabled] Boot Booster [Disabled] Specifies the Boot Device Priority sequence. A virtual floppy disk drive (Floppy Drive B: ) may...
...If you complete hardware change any Eee PC components or perform system recovery (from USB flash disk, external optical drive or hidden partition). Press to enter the BIOS setup. 2. Boot Booster The Boot Booster item in BIOS setup helps shorten your Eee PC bootup time. Press again to save the configuration and restart Eee PC. Main BIOS SETUP UTILITY Advanced Security Boot Exit Boot Device Priority Boot Settings Configuration OnBoard LAN Boot ROM [Enabled] Boot Booster [Disabled] Specifies the Boot Device Priority sequence. A virtual floppy disk drive (Floppy Drive B: ) may...


