User Manual
Page 2
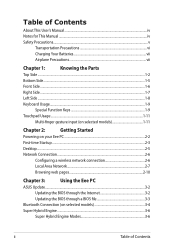
... the Parts Top Side...1-2 Bottom Side...1-5 Front Side...1-6 Right Side...1-7 Left Side...1-8 Keyboard Usage...1-9 Special Function Keys 1-9 Touchpad Usage...1-11 Multi-finger gesture input (on selected models 1-11 Chapter 2: Getting Started Powering on your Eee PC...2-2 First-time Startup...2-3 Desktop...2-5 Network Connection...2-6 Configuring a wireless network connection 2-6 Local Area Network 2-7 Browsing web pages 2-10 Chapter 3: Using the Eee PC ASUS Update...3-2 Updating the BIOS through the Internet 3-2 Updating the BIOS through a BIOS file 3-3 Bluetooth...
... the Parts Top Side...1-2 Bottom Side...1-5 Front Side...1-6 Right Side...1-7 Left Side...1-8 Keyboard Usage...1-9 Special Function Keys 1-9 Touchpad Usage...1-11 Multi-finger gesture input (on selected models 1-11 Chapter 2: Getting Started Powering on your Eee PC...2-2 First-time Startup...2-3 Desktop...2-5 Network Connection...2-6 Configuring a wireless network connection 2-6 Local Area Network 2-7 Browsing web pages 2-10 Chapter 3: Using the Eee PC ASUS Update...3-2 Updating the BIOS through the Internet 3-2 Updating the BIOS through a BIOS file 3-3 Bluetooth...
User Manual
Page 3
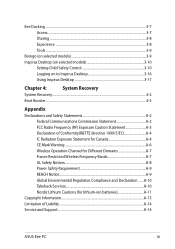
... A-4 IC Radiation Exposure Statement for Canada A-4 CE Mark Warning...A-6 Wireless Operation Channel for Different Domains A-7 France Restricted Wireless Frequency Bands A-7 UL Safety Notices...A-8 Power Safety Requirement A-9 REACH Notice...A-9 Global Environmental Regulation Compliance and Declaration ......A-10 Takeback Services A-10 Nordic Lithium Cautions (for lithium-ion batteries A-11 Copyright Information...A-13 Limitation of Liability...A-14 Service and Support...A-14 ASUS Eee PC iii
... A-4 IC Radiation Exposure Statement for Canada A-4 CE Mark Warning...A-6 Wireless Operation Channel for Different Domains A-7 France Restricted Wireless Frequency Bands A-7 UL Safety Notices...A-8 Power Safety Requirement A-9 REACH Notice...A-9 Global Environmental Regulation Compliance and Declaration ......A-10 Takeback Services A-10 Nordic Lithium Cautions (for lithium-ion batteries A-11 Copyright Information...A-13 Limitation of Liability...A-14 Service and Support...A-14 ASUS Eee PC iii
User Manual
Page 4
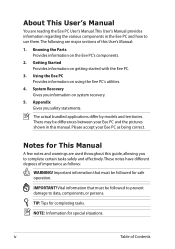
... tasks safely and effectively.These notes have different degrees of importance as being correct. iv Table of this User's Manual: 1. Knowing the Parts Provides information on getting started with the Eee PC. 3. System Recovery Gives you information on using the Eee PC's utilities. 4. Please accept your Eee PC and the pictures shown in the Eee PC and how to use them.The following are used throughout this guide, allowing...
... tasks safely and effectively.These notes have different degrees of importance as being correct. iv Table of this User's Manual: 1. Knowing the Parts Provides information on getting started with the Eee PC. 3. System Recovery Gives you information on using the Eee PC's utilities. 4. Please accept your Eee PC and the pictures shown in the Eee PC and how to use them.The following are used throughout this guide, allowing...
User Manual
Page 5
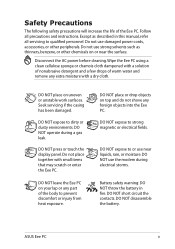
... uneven or unstable work surfaces. DO NOT press or touch the display panel. Do not place together with a dry cloth. DO NOT leave the Eee PC on or near liquids, rain, or moisture. DO NOT use damaged power cords, accessories, or other chemicals on your lap or any foreign objects into the Eee PC. DO NOT disassemble the battery. Disconnect the AC...
... uneven or unstable work surfaces. DO NOT press or touch the display panel. Do not place together with a dry cloth. DO NOT leave the Eee PC on or near liquids, rain, or moisture. DO NOT use damaged power cords, accessories, or other chemicals on your lap or any foreign objects into the Eee PC. DO NOT disassemble the battery. Disconnect the AC...
User Manual
Page 11
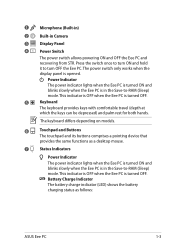
...The keyboard differs depending on models. 6 Touchpad and Buttons The touchpad and its buttons comprises a pointing device that provides the same functions as follows: ASUS Eee PC 1-3 The power switch only works when the display panel is in the Save-to-RAM (Sleep) mode. Battery Charge Indicator The battery charge indicator (LED) shows the battery charging status as a desktop mouse. 7 Status Indicators Power Indicator The power indicator lights when the Eee PC is turned ON and blinks slowly when the Eee PC is opened. Power Indicator The power indicator lights when the Eee PC...
...The keyboard differs depending on models. 6 Touchpad and Buttons The touchpad and its buttons comprises a pointing device that provides the same functions as follows: ASUS Eee PC 1-3 The power switch only works when the display panel is in the Save-to-RAM (Sleep) mode. Battery Charge Indicator The battery charge indicator (LED) shows the battery charging status as a desktop mouse. 7 Status Indicators Power Indicator The power indicator lights when the Eee PC is turned ON and blinks slowly when the Eee PC is opened. Power Indicator The power indicator lights when the Eee PC...

User Manual
Page 14
... spring battery lock keeps the battery pack secure. Move the manual lock to the unlocked position to the locked position after inserting the battery pack. 4 Memory Compartment The memory module is not connected. Audio features are software controlled. 1-6 Chapter 1: Knowing the Parts When the battery pack is automatically charged when connected to an AC power source and maintains power to keep the battery pack secured. Move the manual lock to insert or remove the battery pack...
... spring battery lock keeps the battery pack secure. Move the manual lock to the unlocked position to the locked position after inserting the battery pack. 4 Memory Compartment The memory module is not connected. Audio features are software controlled. 1-6 Chapter 1: Knowing the Parts When the battery pack is automatically charged when connected to an AC power source and maintains power to keep the battery pack secured. Move the manual lock to insert or remove the battery pack...

User Manual
Page 15
... jack is also designed to connect the microphone used for connection to be secured using Kensington® compatible security products. Using this side of the Eee PC. 12 3 4 1 Headphone Output /Microphone Input Combo Jack The 1/8" stereo combo jack (3.5mm) connects the Eee PC's audio out signal to 12Mbits/sec (USB 1.1) and 480Mbits/sec (USB 2.0). Also, the USB supports hot-swapping function. 3 Kensington® Lock port The Kensington® lock port allows the Eee PC to be removed from a fixed object. 4 LAN Port...
... jack is also designed to connect the microphone used for connection to be secured using Kensington® compatible security products. Using this side of the Eee PC. 12 3 4 1 Headphone Output /Microphone Input Combo Jack The 1/8" stereo combo jack (3.5mm) connects the Eee PC's audio out signal to 12Mbits/sec (USB 1.1) and 480Mbits/sec (USB 2.0). Also, the USB supports hot-swapping function. 3 Kensington® Lock port The Kensington® lock port allows the Eee PC to be removed from a fixed object. 4 LAN Port...

User Manual
Page 16
... jack supplies power to the Eee PC and charges the internal battery pack.To prevent damage to the Eee PC and battery pack, always use with this side of the air vents or else overheating may occur. 5 Memory Card Slot The built-in memory card reader can read SD/SDHC/MMC cards. 1-8 Chapter 1: Knowing the Parts Left Side Refer to the illustration below to identify the components on a larger external display. 3 USB Port...
... jack supplies power to the Eee PC and charges the internal battery pack.To prevent damage to the Eee PC and battery pack, always use with this side of the air vents or else overheating may occur. 5 Memory Card Slot The built-in memory card reader can read SD/SDHC/MMC cards. 1-8 Chapter 1: Knowing the Parts Left Side Refer to the illustration below to identify the components on a larger external display. 3 USB Port...

User Manual
Page 17
... enabled, the corresponding wireless indicator will light. Sun Down Icon (F5): Decreases the display brightness. Sun Up Icon (F6): Increases the display brightness. Volume Down Icon (F11): Decreases speaker volume. Radio Tower (F2) (Wireless Models Only):Toggles the internal wireless LAN or Bluetooth (on selected models) ON or OFF with a colored command. Keyboard Usage Special Function Keys The following defines the colored hot keys on -screen-display. Some function icons appear in suspend mode (Save-to adjust...
... enabled, the corresponding wireless indicator will light. Sun Down Icon (F5): Decreases the display brightness. Sun Up Icon (F6): Increases the display brightness. Volume Down Icon (F11): Decreases speaker volume. Radio Tower (F2) (Wireless Models Only):Toggles the internal wireless LAN or Bluetooth (on selected models) ON or OFF with a colored command. Keyboard Usage Special Function Keys The following defines the colored hot keys on -screen-display. Some function icons appear in suspend mode (Save-to adjust...

User Manual
Page 22
... you open the display panel, do not force it down to the table or else the hinges may occur to prolong battery life. 2-2 Chapter 2: Getting Started Install the battery pack 2. Connect the AC power adapter 33 11 3 1 22 2 22 2 11 1 3 110V-220V 3 110V-220V 3 110V-220V 3. Never lift the Eee PC by the display panel! • Only use battery packs and power adapters supplied with this Eee PC or specifically approved...
... you open the display panel, do not force it down to the table or else the hinges may occur to prolong battery life. 2-2 Chapter 2: Getting Started Install the battery pack 2. Connect the AC power adapter 33 11 3 1 22 2 22 2 11 1 3 110V-220V 3 110V-220V 3 110V-220V 3. Never lift the Eee PC by the display panel! • Only use battery packs and power adapters supplied with this Eee PC or specifically approved...

User Manual
Page 23
... the keyboard type you use . Next to continue. 3. Select the language you use . Click Next to continue. Click Next to continue. First-time Startup For the first time you start your Eee PC, the Windows wizard will launch automatically and lead you want. Type your preferences and some basic information. Click then click Next to continue. 2. ASUS Eee PC 2-3 Set a password for your user and your...
... the keyboard type you use . Next to continue. 3. Select the language you use . Click Next to continue. Click Next to continue. First-time Startup For the first time you start your Eee PC, the Windows wizard will launch automatically and lead you want. Type your preferences and some basic information. Click then click Next to continue. 2. ASUS Eee PC 2-3 Set a password for your user and your...

User Manual
Page 27
Local Area Network To establish a wired network, follow the instructions below: Using a dynamic IP / PPPoE network connection: 1. Right-click Local Area Connection and select Properties. ASUS Eee PC 2-7 Click Change adapter settings in the Windows® Notification area and select Open Network and Sharing Center. 2. Click the network icon with a yellow warning triangle in the left blue pane. 3.
Local Area Network To establish a wired network, follow the instructions below: Using a dynamic IP / PPPoE network connection: 1. Right-click Local Area Connection and select Properties. ASUS Eee PC 2-7 Click Change adapter settings in the Windows® Notification area and select Open Network and Sharing Center. 2. Click the network icon with a yellow warning triangle in the left blue pane. 3.

User Manual
Page 32
... the Internet To update the BIOS through a network or an Internet Service Provider (ISP). Launch the ASUS Update utility from the drop‑down menu, then click Next. 3-2 Chapter 3: Using the Eee PC ASUS Update requires an Internet connection either through the Internet 1. This utility is a utility that allows you to manage, save, and update the Eee PC BIOS in your Eee PC. Select Update BIOS from Internet from the Windows® desktop by clicking Start > All Programs > ASUS > ASUSUpdate for Eee PC> ASUSUpdate. The ASUS Update utility...
... the Internet To update the BIOS through a network or an Internet Service Provider (ISP). Launch the ASUS Update utility from the drop‑down menu, then click Next. 3-2 Chapter 3: Using the Eee PC ASUS Update requires an Internet connection either through the Internet 1. This utility is a utility that allows you to manage, save, and update the Eee PC BIOS in your Eee PC. Select Update BIOS from Internet from the Windows® desktop by clicking Start > All Programs > ASUS > ASUSUpdate for Eee PC> ASUSUpdate. The ASUS Update utility...
User Manual
Page 33
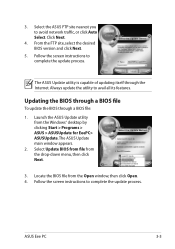
... Open window, then click Open. 4. Locate the BIOS file from the drop‑down menu, then click Next. 3. Click Next. 4. Launch the ASUS Update utility from the Windows® desktop by clicking Start > Programs > ASUS > ASUSUpdate for EeePC> ASUSUpdate. 3. Follow the screen instructions to avoid network traffic, or click Auto Select. Follow the screen instructions to avail all its features. ASUS Eee PC 3-3 The ASUS Update main window appears. 2. The ASUS Update utility is capable of updating...
... Open window, then click Open. 4. Locate the BIOS file from the drop‑down menu, then click Next. 3. Click Next. 4. Launch the ASUS Update utility from the Windows® desktop by clicking Start > Programs > ASUS > ASUSUpdate for EeePC> ASUSUpdate. 3. Follow the screen instructions to avoid network traffic, or click Auto Select. Follow the screen instructions to avail all its features. ASUS Eee PC 3-3 The ASUS Update main window appears. 2. The ASUS Update utility is capable of updating...

User Manual
Page 35
The paired relationship is successfully built. Enter the Bluetooth security code into your device and start pairing. 7. Select a Bluetooth-enabled new devices. device from the list and click Next. 6. Click Close to look for 5. ASUS Eee PC 3-5 Click Add a device to finish the setting. 4.
The paired relationship is successfully built. Enter the Bluetooth security code into your device and start pairing. 7. Select a Bluetooth-enabled new devices. device from the list and click Next. 6. Click Close to look for 5. ASUS Eee PC 3-5 Click Add a device to finish the setting. 4.

User Manual
Page 39
... updates. Tools Live Update Live Update keeps your Eee PC screen. Boingo (on your Eee PC up-to-date by multiple categories all over the world. ASUS Eee PC 3-9 Font Resizer Font Resizer allows you to adjust the font/text size on selected models) Boingo gives you to global Wi-Fi services with a special price via the Boingo utility. Docking Setting Docking Setting allows you easy access to configure...
... updates. Tools Live Update Live Update keeps your Eee PC screen. Boingo (on your Eee PC up-to-date by multiple categories all over the world. ASUS Eee PC 3-9 Font Resizer Font Resizer allows you to adjust the font/text size on selected models) Boingo gives you to global Wi-Fi services with a special price via the Boingo utility. Docking Setting Docking Setting allows you easy access to configure...

User Manual
Page 42
.... • Password Reminder Question is optional. Enter a user name and a password for the account. It functions to create a new Windows user account for your child and select a picture for the account of your child. 9. Click OK to continue. 3-12 Chapter 3: Using the Eee PC Click Click here to give you to access Child Safety Control, functions differently from the system administrator password. These two password can be set the...
.... • Password Reminder Question is optional. Enter a user name and a password for the account. It functions to create a new Windows user account for your child and select a picture for the account of your child. 9. Click OK to continue. 3-12 Chapter 3: Using the Eee PC Click Click here to give you to access Child Safety Control, functions differently from the system administrator password. These two password can be set the...

User Manual
Page 52
... the language you perform system recovery from USB flash disk, external optical drive or hidden partition. The system starts system recovery automatically and follow the onscreen instructions to avoid recovery failure. Ensure to connect your Eee PC to the AC power adapter before you use and click to continue. 3. Ensure to start the system recovery. 4. Using recovery partition (F9 Recovery) 1. Click Recovery in BIOS setup before using F9 recovery to complete the recovery process. 4-2 Chapter 4: System Recovery Press during bootup. 2.
... the language you perform system recovery from USB flash disk, external optical drive or hidden partition. The system starts system recovery automatically and follow the onscreen instructions to avoid recovery failure. Ensure to connect your Eee PC to the AC power adapter before you use and click to continue. 3. Ensure to start the system recovery. 4. Using recovery partition (F9 Recovery) 1. Click Recovery in BIOS setup before using F9 recovery to complete the recovery process. 4-2 Chapter 4: System Recovery Press during bootup. 2.
User Manual
Page 55
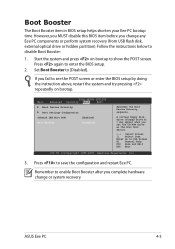
... BIOS SETUP UTILITY Advanced Security Boot Exit Boot Device Priority Boot Settings Configuration OnBoard LAN Boot ROM [Enabled] Boot Booster [Disabled] Specifies the Boot Device Priority sequence. ASUS Eee PC 4-5 Follow the instructions below to enter the BIOS setup. 2. Press to [Disabled]. If you change or system recovery. Set Boot Booster to save the configuration and restart Eee PC. A virtual floppy disk drive (Floppy Drive B: ) may appear when you complete hardware change any Eee PC components or perform system recovery (from USB flash disk, external...
... BIOS SETUP UTILITY Advanced Security Boot Exit Boot Device Priority Boot Settings Configuration OnBoard LAN Boot ROM [Enabled] Boot Booster [Disabled] Specifies the Boot Device Priority sequence. ASUS Eee PC 4-5 Follow the instructions below to enter the BIOS setup. 2. Press to [Disabled]. If you change or system recovery. Set Boot Booster to save the configuration and restart Eee PC. A virtual floppy disk drive (Floppy Drive B: ) may appear when you complete hardware change any Eee PC components or perform system recovery (from USB flash disk, external...

User Manual
Page 59
... limits set forth for satisfying RF exposure compliance. SAR Measurement (1g) AR5B95(AW-NE785H)/AW-GE112H 802. 11b: 0.056 W/kg 802. 11g: 0.061 W/kg 802. 11n (20M): 0.06 W/kg 802. 11n (40M): 0.048 W/kg RT3090(AW-NE762H) Max. Eee PC 1001PQ Max. End users must follow the specific operating instructions for an uncontrolled environment. (Reprinted from the Code of...
... limits set forth for satisfying RF exposure compliance. SAR Measurement (1g) AR5B95(AW-NE785H)/AW-GE112H 802. 11b: 0.056 W/kg 802. 11g: 0.061 W/kg 802. 11n (20M): 0.06 W/kg 802. 11n (40M): 0.048 W/kg RT3090(AW-NE762H) Max. Eee PC 1001PQ Max. End users must follow the specific operating instructions for an uncontrolled environment. (Reprinted from the Code of...


