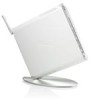

User Manual
Page 2
...any language in it, may be registered trademarks or copyrights of their respective owners. However, the manufacturer makes no guarantee regarding the accuracy of ASUSTeK COMPUTER, INC. ("ASUS"). No part of this manual are correct and up to ensure that the contents of their respective companies... this manual, including the products and software described in any form or by any means, except documentation kept by the purchaser for identification purposes only. English E6173 Third Edition V3 October 2010 Copyright © 2010 ASUSTeK COMPUTER INC. All trademarks are used for...
...any language in it, may be registered trademarks or copyrights of their respective owners. However, the manufacturer makes no guarantee regarding the accuracy of ASUSTeK COMPUTER, INC. ("ASUS"). No part of this manual are correct and up to ensure that the contents of their respective companies... this manual, including the products and software described in any form or by any means, except documentation kept by the purchaser for identification purposes only. English E6173 Third Edition V3 October 2010 Copyright © 2010 ASUSTeK COMPUTER INC. All trademarks are used for...
User Manual
Page 3
... 25 EeeBox PC Position Warning 26 Installing your EeeBox PC to a monitor 27 Setting up your EeeBox PC 28 Connecting to a display 28 Connecting to USB devices 28 Connecting to a network device 29 Turning on the system 30 Using your EeeBox PC 31 Configuring wireless connection 31 Configuring wired connection 32 Bluetooth wireless connection (on selected models 36 Configuring audio output via an HDMI device 38 ASUS Easy Update 40 TotalMedia Center 41 Main menu 41 Game...41 Movie...42...
... 25 EeeBox PC Position Warning 26 Installing your EeeBox PC to a monitor 27 Setting up your EeeBox PC 28 Connecting to a display 28 Connecting to USB devices 28 Connecting to a network device 29 Turning on the system 30 Using your EeeBox PC 31 Configuring wireless connection 31 Configuring wired connection 32 Bluetooth wireless connection (on selected models 36 Configuring audio output via an HDMI device 38 ASUS Easy Update 40 TotalMedia Center 41 Main menu 41 Game...41 Movie...42...
User Manual
Page 5
... a residential installation.This equipment generates, uses and can be determined by turning the equipment off and on a circuit different from that to which can radiate radio frequency energy and, if not installed and used in a particular installation. However, there is connected. • Consult the dealer or an experienced radio/TV technician for a Class B digital device, pursuant to Part 15...
... a residential installation.This equipment generates, uses and can be determined by turning the equipment off and on a circuit different from that to which can radiate radio frequency energy and, if not installed and used in a particular installation. However, there is connected. • Consult the dealer or an experienced radio/TV technician for a Class B digital device, pursuant to Part 15...
User Manual
Page 9
...device must follow the specific operating instructions for satisfying RF exposure compliance. Operation is likely to change over time, allowing you to the transmitting antenna during transmitting. Please check with the REACH (Registration, Evaluation, Authorization, and Restriction of Chemicals) regulatory framework, we publish the chemical substances in our products at ASUS... exposure limits set out in more than 100mW, but more areas within France. To maintain compliance with IC RF exposure compliance requirements, please avoid direct contact to use your wireless LAN card in the ...
...device must follow the specific operating instructions for satisfying RF exposure compliance. Operation is likely to change over time, allowing you to the transmitting antenna during transmitting. Please check with the REACH (Registration, Evaluation, Authorization, and Restriction of Chemicals) regulatory framework, we publish the chemical substances in our products at ASUS... exposure limits set out in more than 100mW, but more areas within France. To maintain compliance with IC RF exposure compliance requirements, please avoid direct contact to use your wireless LAN card in the ...
User Manual
Page 10
... following technical problems with the provided stand. • Openings on the chassis are for information technology equipment. Always unplug all instructions in environments with ambient temperatures between 0˚C and 35˚C. • If you encounter the following safety instructions. Setting up the system on a stable surface with the product, unplug the power cord and contact a qualified service technician...
... following technical problems with the provided stand. • Openings on the chassis are for information technology equipment. Always unplug all instructions in environments with ambient temperatures between 0˚C and 35˚C. • If you encounter the following safety instructions. Setting up the system on a stable surface with the product, unplug the power cord and contact a qualified service technician...

User Manual
Page 16
... audio recordings. 16 EeeBox PC RW player provides a convenient and quick way to write files to a disc. 4 Memory card slot The built-in memory card reader reads MMC/SD/SDHC cards used in devices like digital cameras, MP3 players, mobile phones, and PDAs. 5 USB port The USB (Universal Serial Bus) port is compatible with some peripheral acting as keyboards, mouse devices, cameras, and hard disk drives. English 3 Slot-in DVD+- RW player The slot-in DVD...
... audio recordings. 16 EeeBox PC RW player provides a convenient and quick way to write files to a disc. 4 Memory card slot The built-in memory card reader reads MMC/SD/SDHC cards used in devices like digital cameras, MP3 players, mobile phones, and PDAs. 5 USB port The USB (Universal Serial Bus) port is compatible with some peripheral acting as keyboards, mouse devices, cameras, and hard disk drives. English 3 Slot-in DVD+- RW player The slot-in DVD...
User Manual
Page 17
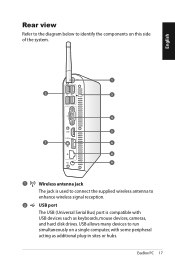
English ANT. 1 2 3 4 HDMI 5 E-SATA 7 6 8 9 1 Wireless antenna jack The jack is used to connect the supplied wireless antenna to enhance wireless signal reception. 2 USB port The USB (Universal Serial Bus) port is compatible with some peripheral acting as keyboards, mouse devices, cameras, and hard disk drives. EeeBox PC 17 USB allows many devices to identify the components on a single computer, with USB devices such as additional plug-in sites or hubs. Rear view Refer to the diagram below to run simultaneously on this side of the system.
English ANT. 1 2 3 4 HDMI 5 E-SATA 7 6 8 9 1 Wireless antenna jack The jack is used to connect the supplied wireless antenna to enhance wireless signal reception. 2 USB port The USB (Universal Serial Bus) port is compatible with some peripheral acting as keyboards, mouse devices, cameras, and hard disk drives. EeeBox PC 17 USB allows many devices to identify the components on a single computer, with USB devices such as additional plug-in sites or hubs. Rear view Refer to the diagram below to run simultaneously on this side of the system.
User Manual
Page 18
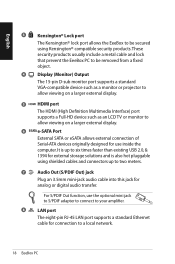
... than existing USB 2.0, & 1394 for external storage solutions and is also hot pluggable using shielded cables and connectors up to be removed from a fixed object. 4 Display (Monitor) Output The 15-pin D-sub monitor port supports a standard VGA-compatible device such as a monitor or projector to allow viewing on a larger external display. 5 HDMI port The HDMI (High Definition Multimedia Interface) port supports a Full-HD device such as an LCD TV or monitor to a local network. 18...
... than existing USB 2.0, & 1394 for external storage solutions and is also hot pluggable using shielded cables and connectors up to be removed from a fixed object. 4 Display (Monitor) Output The 15-pin D-sub monitor port supports a standard VGA-compatible device such as a monitor or projector to allow viewing on a larger external display. 5 HDMI port The HDMI (High Definition Multimedia Interface) port supports a Full-HD device such as an LCD TV or monitor to a local network. 18...

User Manual
Page 19
Do not cover the adapter and keep it away from your disc into the slot-in use the supplied power adapter. English 9 Power input (DC 19V) The supplied power adapter converts AC power to DC power for use with the disc's printed side facing left. Power supplied through this jack. The power adapter may become warm to hot when in DVD player with this jack supplies power to the PC, always use . Disc's printed side EeeBox PC 19 Using the slot-in DVD player Insert your body. To prevent damage to the PC.
Do not cover the adapter and keep it away from your disc into the slot-in use the supplied power adapter. English 9 Power input (DC 19V) The supplied power adapter converts AC power to DC power for use with the disc's printed side facing left. Power supplied through this jack. The power adapter may become warm to hot when in DVD player with this jack supplies power to the PC, always use . Disc's printed side EeeBox PC 19 Using the slot-in DVD player Insert your body. To prevent damage to the PC.
User Manual
Page 28
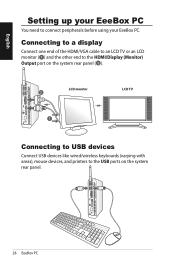
English Setting up your EeeBox PC. LCD TV Connecting to USB devices Connect USB devices like wired/wireless keyboards (varying with areas), mouse devices, and printers to connect peripherals before using your EeeBox PC You need to the USB ports on the system rear panel ( 2 ). 2 -or- 1 LCD monitor -or- Connecting to a display Connect one end of the HDMI/VGA cable to an LCD TV or an LCD monitor ( 1 ) and the other end to the HDMI/Display (Monitor) Output port on the system rear panel. 28 EeeBox PC
English Setting up your EeeBox PC. LCD TV Connecting to USB devices Connect USB devices like wired/wireless keyboards (varying with areas), mouse devices, and printers to connect peripherals before using your EeeBox PC You need to the USB ports on the system rear panel ( 2 ). 2 -or- 1 LCD monitor -or- Connecting to a display Connect one end of the HDMI/VGA cable to an LCD TV or an LCD monitor ( 1 ) and the other end to the HDMI/Display (Monitor) Output port on the system rear panel. 28 EeeBox PC
User Manual
Page 29
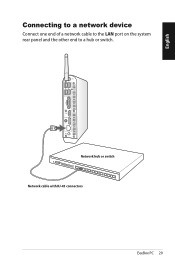
English Connecting to a network device Connect one end of a network cable to the LAN port on the system rear panel and the other end to a hub or switch. Network hub or switch Network cable with RJ-45 connectors EeeBox PC 29
English Connecting to a network device Connect one end of a network cable to the LAN port on the system rear panel and the other end to a hub or switch. Network hub or switch Network cable with RJ-45 connectors EeeBox PC 29
User Manual
Page 30
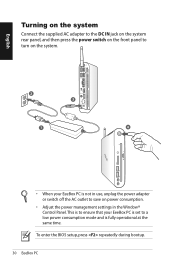
To enter the BIOS setup, press repeatedly during bootup. 30 EeeBox PC This is to ensure that your EeeBox PC is set to a low power consumption mode and is not in use, unplug the power adapter or switch off the AC outlet to turn on power consumption. • Adjust the power management settings in the Window® Control Panel. English Turning on the system Connect the supplied AC adapter to the DC IN jack on the system rear panel, and then press the power switch on the front panel to save on the system. 2 3 1 4 • When your EeeBox PC is fully operational at the same time.
To enter the BIOS setup, press repeatedly during bootup. 30 EeeBox PC This is to ensure that your EeeBox PC is set to a low power consumption mode and is not in use, unplug the power adapter or switch off the AC outlet to turn on power consumption. • Adjust the power management settings in the Window® Control Panel. English Turning on the system Connect the supplied AC adapter to the DC IN jack on the system rear panel, and then press the power switch on the front panel to save on the system. 2 3 1 4 • When your EeeBox PC is fully operational at the same time.

User Manual
Page 32
Right-click Local Area Connection and select Properties. 32 EeeBox PC Click Change adapter settings in the Windows® Notification area and select Open Network and Sharing Center. 2. Click the network icon with a yellow warning triangle in the left blue pane. 3. English Configuring wired connection To establish a wired network, follow the instructions below: Using a dynamic IP / PPPoE network connection: 1.
Right-click Local Area Connection and select Properties. 32 EeeBox PC Click Change adapter settings in the Windows® Notification area and select Open Network and Sharing Center. 2. Click the network icon with a yellow warning triangle in the left blue pane. 3. English Configuring wired connection To establish a wired network, follow the instructions below: Using a dynamic IP / PPPoE network connection: 1.
User Manual
Page 36
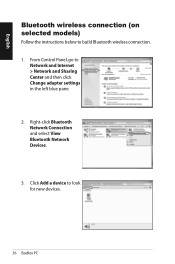
Click Add a device to Network and Internet > Network and Sharing Center and then click Change adapter settings in the left blue pane. 2. From Control Panel, go to look for new devices. 36 EeeBox PC Right-click Bluetooth Network Connection and select View Bluetooth Network Devices. 3. English Bluetooth wireless connection (on selected models) Follow the instructions below to build Bluetooth wireless connection. 1.
Click Add a device to Network and Internet > Network and Sharing Center and then click Change adapter settings in the left blue pane. 2. From Control Panel, go to look for new devices. 36 EeeBox PC Right-click Bluetooth Network Connection and select View Bluetooth Network Devices. 3. English Bluetooth wireless connection (on selected models) Follow the instructions below to build Bluetooth wireless connection. 1.
User Manual
Page 38
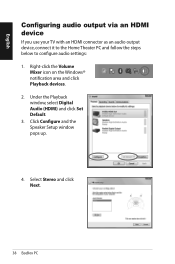
Click Configure and the Speaker Setup window pops up. 4. Under the Playback window, select Digital Audio (HDMI) and click Set Default. 3. Select Stereo and click Next. 38 EeeBox PC Right-click the Volume Mixer icon on the Windows® notification area and click Playback devices. 2. English Configuring audio output via an HDMI device If you use your TV with an HDMI connector as an audio output device, connect it to the Home Theater PC and follow the steps below to configure audio settings: 1.
Click Configure and the Speaker Setup window pops up. 4. Under the Playback window, select Digital Audio (HDMI) and click Set Default. 3. Select Stereo and click Next. 38 EeeBox PC Right-click the Volume Mixer icon on the Windows® notification area and click Playback devices. 2. English Configuring audio output via an HDMI device If you use your TV with an HDMI connector as an audio output device, connect it to the Home Theater PC and follow the steps below to configure audio settings: 1.

User Manual
Page 42
Music The Music function allows you to music files or audio CDs with models. English Movie The Movie function allows you to listen to play DVDs. The built-in optical disk drive and the supported format may vary with visualizations and create playlists for your favorite songs. 42 EeeBox PC
Music The Music function allows you to music files or audio CDs with models. English Movie The Movie function allows you to listen to play DVDs. The built-in optical disk drive and the supported format may vary with visualizations and create playlists for your favorite songs. 42 EeeBox PC
User Manual
Page 44
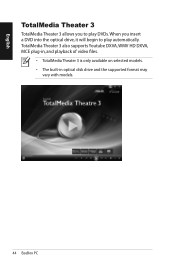
When you to play DVDs. TotalMedia Theater 3 also supports Youtube DXVA, WMV HD DXVA, MCE plug-in, and playback of video files. • TotalMedia Theater 3 is only available on selected models. • The built-in optical disk drive and the supported format may vary with models. 44 EeeBox PC English TotalMedia Theater 3 TotalMedia Theater 3 allows you insert a DVD into the optical drive, it will begin to play automatically.
When you to play DVDs. TotalMedia Theater 3 also supports Youtube DXVA, WMV HD DXVA, MCE plug-in, and playback of video files. • TotalMedia Theater 3 is only available on selected models. • The built-in optical disk drive and the supported format may vary with models. 44 EeeBox PC English TotalMedia Theater 3 TotalMedia Theater 3 allows you insert a DVD into the optical drive, it will begin to play automatically.
User Manual
Page 45
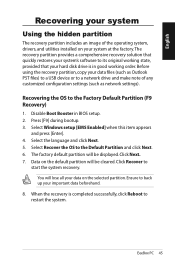
... system Using the hidden partition The recovery partition includes an image of any customized configuration settings (such as Outlook PST files) to a USB device or to a network drive and make note of the operating system, drivers, and utilities installed on the selected partition. Disable Boot Booster in good working order. Data on the default partition will lose all your data on your system at the factory.The recovery partition provides a comprehensive recovery solution that your hard disk drive is...
... system Using the hidden partition The recovery partition includes an image of any customized configuration settings (such as Outlook PST files) to a USB device or to a network drive and make note of the operating system, drivers, and utilities installed on the selected partition. Disable Boot Booster in good working order. Data on the default partition will lose all your data on your system at the factory.The recovery partition provides a comprehensive recovery solution that your hard disk drive is...
User Manual
Page 47
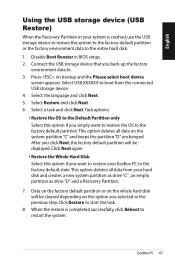
... Default Partition only Select this option if you selected in BIOS setup. 2. After you click Next, the factory default partition will be displayed. Click Next again. • Restore the Whole Hard Disk Select this option if you back up the factory environment data to. 3. Click Restore to boot from your hard disk and creates a new system partition as drive "C" , an empty partition as drive "D" and a Recovery Partition. 7. EeeBox PC 47 English Using the USB storage device (USB Restore) When the Recovery Partition...
... Default Partition only Select this option if you selected in BIOS setup. 2. After you click Next, the factory default partition will be displayed. Click Next again. • Restore the Whole Hard Disk Select this option if you back up the factory environment data to. 3. Click Restore to boot from your hard disk and creates a new system partition as drive "C" , an empty partition as drive "D" and a Recovery Partition. 7. EeeBox PC 47 English Using the USB storage device (USB Restore) When the Recovery Partition...
User Manual
Page 48
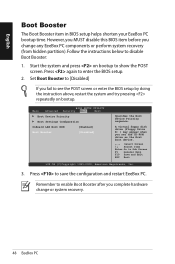
... enter the BIOS setup. 2. Press again to show the POST screen. However, you MUST disable this BIOS item before you fail to [Disabled] If you change or system recovery. 48 EeeBox PC Press to disable Boot Booster: 1. Main BIOS SETUP UTILITY Advanced Security Boot Exit Boot Device Priority Boot Settings Configuration OnBoard LAN Boot ROM [Enabled] Boot Booster [Disabled] Specifies the Boot Device Priority sequence. Follow the instructions below to save the configuration and restart EeeBox PC. English Boot Booster The Boot...
... enter the BIOS setup. 2. Press again to show the POST screen. However, you MUST disable this BIOS item before you fail to [Disabled] If you change or system recovery. 48 EeeBox PC Press to disable Boot Booster: 1. Main BIOS SETUP UTILITY Advanced Security Boot Exit Boot Device Priority Boot Settings Configuration OnBoard LAN Boot ROM [Enabled] Boot Booster [Disabled] Specifies the Boot Device Priority sequence. Follow the instructions below to save the configuration and restart EeeBox PC. English Boot Booster The Boot...


