Users Manual
Page 3
...Connecting microphone and speakers 27 Changing to the external audio output 30 Chapter 3: Using your computer Proper posture when using your Desktop PC 31 Using the memory card reader (Optional 32 Using the optical drive (on selected models only 33 Configuring the USB... Configuring the HDD security setting using the BIOS 35 Chapter 4: Connecting to the Internet Wired connection...37 Chapter 5: Using ASUS Business Manager ASUS Business Manager...43 Chapter 6: Troubleshooting Troubleshooting...53 Appendix: Windows® 10 User Manual Starting for the first time...63 ...
...Connecting microphone and speakers 27 Changing to the external audio output 30 Chapter 3: Using your computer Proper posture when using your Desktop PC 31 Using the memory card reader (Optional 32 Using the optical drive (on selected models only 33 Configuring the USB... Configuring the HDD security setting using the BIOS 35 Chapter 4: Connecting to the Internet Wired connection...37 Chapter 5: Using ASUS Business Manager ASUS Business Manager...43 Chapter 6: Troubleshooting Troubleshooting...53 Appendix: Windows® 10 User Manual Starting for the first time...63 ...

Users Manual
Page 9
... and the power management feature is set to sleep after 10 and 30 minutes of warm water then remove any foreign objects into the Desktop PC. • DO NOT expose to strong magnetic or electrical fields. • DO NOT expose to the correct voltage in fire....professional assistance before cleaning. Department of the U.S. In addition, please visit http://www. To wake your retailer. 9 Environmental Protection Agency and the U.S. All ASUS products with the ENERGY STAR logo comply with ambient temperatures between 5˚C (41˚F) and 40˚C (104˚F). • DO NOT cover ...
... and the power management feature is set to sleep after 10 and 30 minutes of warm water then remove any foreign objects into the Desktop PC. • DO NOT expose to strong magnetic or electrical fields. • DO NOT expose to the correct voltage in fire....professional assistance before cleaning. Department of the U.S. In addition, please visit http://www. To wake your retailer. 9 Environmental Protection Agency and the U.S. All ASUS products with the ENERGY STAR logo comply with ambient temperatures between 5˚C (41˚F) and 40˚C (104˚F). • DO NOT cover ...

Users Manual
Page 10
... sources for additional information and for the contact information of local Technical Support Engineer. 10 ASUS websites The ASUS website provides updated information on ASUS hardware and software products. Where to find more information Refer to the following symbols used ...: Information to prevent injury to yourself when trying to the ASUS website www.asus.com. Desktop should only be completely shutdown before servicing product. ASUS Local Technical Support Visit ASUS website at https://www.asus.com/support/contact for product and software updates. CAUTION: Information...
... sources for additional information and for the contact information of local Technical Support Engineer. 10 ASUS websites The ASUS website provides updated information on ASUS hardware and software products. Where to find more information Refer to the following symbols used ...: Information to prevent injury to yourself when trying to the ASUS website www.asus.com. Desktop should only be completely shutdown before servicing product. ASUS Local Technical Support Visit ASUS website at https://www.asus.com/support/contact for product and software updates. CAUTION: Information...
Users Manual
Page 11
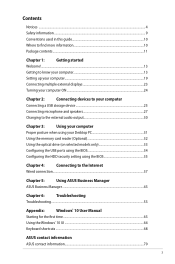
Package contents ASUS Desktop PC Keyboard x1 Mouse x1 Power cord x1 Support DVD x1 Installation Guide Recovery DVD x1 (Optional) Nero burning software DVD x1 (Optional) Installation Guide x1 Warranty card x1 ASUS mouse pad x 1 (Optional) • If any of the above items is damaged or missing, contact your retailer. • The illustrated items above are for reference only. Actual product specifications may vary with different models. 11
Package contents ASUS Desktop PC Keyboard x1 Mouse x1 Power cord x1 Support DVD x1 Installation Guide Recovery DVD x1 (Optional) Nero burning software DVD x1 (Optional) Installation Guide x1 Warranty card x1 ASUS mouse pad x 1 (Optional) • If any of the above items is damaged or missing, contact your retailer. • The illustrated items above are for reference only. Actual product specifications may vary with different models. 11
Users Manual
Page 13
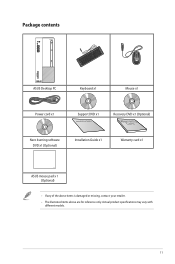
Thank you for reference only. Getting to know your ASUS Desktop PC. The ports and their locations, and the chassis color vary with different models. Read the ASUS Warranty Card before setting up your computer Illustrations are encapsulated in a stunningly futuristic and stylish system casing. ASUS Desktop PC 13 Chapter 1 Getting started Welcome! All these values are for purchasing the ASUS Desktop PC! The ASUS Desktop PC provides cutting-edge performance, uncompromised reliability, and usercentric utilities.
Thank you for reference only. Getting to know your ASUS Desktop PC. The ports and their locations, and the chassis color vary with different models. Read the ASUS Warranty Card before setting up your computer Illustrations are encapsulated in a stunningly futuristic and stylish system casing. ASUS Desktop PC 13 Chapter 1 Getting started Welcome! All these values are for purchasing the ASUS Desktop PC! The ASUS Desktop PC provides cutting-edge performance, uncompromised reliability, and usercentric utilities.

Users Manual
Page 15
... card reader slots. These 9-pin Universal Serial Bus (USB) ports are for data transfer only. USB 3.1 Gen 1 Type-C port. This Mic (pink) port connects a microphone. ASUS Desktop PC 15 Press this button to eject the optical disk drive tray. Flashing: The HDD is for 5.25 inch DVD-ROM / CD-RW / DVD-RW...
... card reader slots. These 9-pin Universal Serial Bus (USB) ports are for data transfer only. USB 3.1 Gen 1 Type-C port. This Mic (pink) port connects a microphone. ASUS Desktop PC 15 Press this button to eject the optical disk drive tray. Flashing: The HDD is for 5.25 inch DVD-ROM / CD-RW / DVD-RW...

Users Manual
Page 17
... HDCP compliant allowing playback of the audio ports in the 2.1, 4.1, 5.1, or 7.1-channel configuration. Line Out port (lime). Power connector. ASUS Desktop PC 17 These Universal Serial Bus 2.0 (USB 2.0) ports connect to a microphone. This port connects to the audio configuration table below for...such as a mouse, printer, scanner, camera, PDA, and others. HDMI port. PS/2 mouse port (green). ENGLISH ASUS Graphics Card (on this optional ASUS Graphics Card may vary with different models. The display output ports on selected models only). Line In port (light blue...
... HDCP compliant allowing playback of the audio ports in the 2.1, 4.1, 5.1, or 7.1-channel configuration. Line Out port (lime). Power connector. ASUS Desktop PC 17 These Universal Serial Bus 2.0 (USB 2.0) ports connect to a microphone. This port connects to the audio configuration table below for...such as a mouse, printer, scanner, camera, PDA, and others. HDMI port. PS/2 mouse port (green). ENGLISH ASUS Graphics Card (on this optional ASUS Graphics Card may vary with different models. The display output ports on selected models only). Line In port (light blue...

Users Manual
Page 19
Connect a monitor to a display output port on the ASUS Graphics Card may vary with different models. D641MD D641SC ASUS Desktop PC 19 ENGLISH Setting up your computer This section guides you through connecting the main hardware devices, such as the external monitor, ...keyboard, mouse, and power cord, to your monitor to the display output port on the discrete ASUS Graphics Card. Plug the...
Connect a monitor to a display output port on the ASUS Graphics Card may vary with different models. D641MD D641SC ASUS Desktop PC 19 ENGLISH Setting up your computer This section guides you through connecting the main hardware devices, such as the external monitor, ...keyboard, mouse, and power cord, to your monitor to the display output port on the discrete ASUS Graphics Card. Plug the...

Users Manual
Page 21
ENGLISH Connecting a USB keyboard and a USB mouse Connect a USB keyboard and a USB mouse to the USB ports on the rear panel of your computer. D641MD ` D641SC ` ASUS Desktop PC 21
ENGLISH Connecting a USB keyboard and a USB mouse Connect a USB keyboard and a USB mouse to the USB ports on the rear panel of your computer. D641MD ` D641SC ` ASUS Desktop PC 21

Users Manual
Page 23
... modes. Connect the two monitors to your computer and connect the power cords to enlarge your Windows desktop. Turn off your computer. 2. Setting up multiple displays When using multiple monitors, you to connect multiple external displays. D641MD D641SC ASUS Desktop PC 23 Refer to Setting up multiple displays: 1. ENGLISH Connecting multiple external displays Your...
... modes. Connect the two monitors to your computer and connect the power cords to enlarge your Windows desktop. Turn off your computer. 2. Setting up multiple displays When using multiple monitors, you to connect multiple external displays. D641MD D641SC ASUS Desktop PC 23 Refer to Setting up multiple displays: 1. ENGLISH Connecting multiple external displays Your...

Users Manual
Page 25
... rear USB 2.0, USB 3.1 Gen 1 and USB 3.1 Gen 2 ports individually from the BIOS Setup. Refer to connect USB devices such as storage devices. Front panel D641MD D641SC ASUS Desktop PC 25 ENGLISH Chapter 2 Connecting devices to your computer. To connect a USB storage device: • Insert the USB storage device to your computer Connecting a USB...
... rear USB 2.0, USB 3.1 Gen 1 and USB 3.1 Gen 2 ports individually from the BIOS Setup. Refer to connect USB devices such as storage devices. Front panel D641MD D641SC ASUS Desktop PC 25 ENGLISH Chapter 2 Connecting devices to your computer. To connect a USB storage device: • Insert the USB storage device to your computer Connecting a USB...

Users Manual
Page 27
... comes with microphone ports and speaker ports on both the front and rear panels. Connecting Headphone and Mic D641MD D641SC ASUS Desktop PC 27 ENGLISH Connecting microphone and speakers This desktop PC comes with an internal speaker, the audio output will be from the Control Panel. The audio I/O ports located on the rear panel...
... comes with microphone ports and speaker ports on both the front and rear panels. Connecting Headphone and Mic D641MD D641SC ASUS Desktop PC 27 ENGLISH Connecting microphone and speakers This desktop PC comes with an internal speaker, the audio output will be from the Control Panel. The audio I/O ports located on the rear panel...

Users Manual
Page 29
Connecting 5.1-channel Speakers ENGLISH LINE OUT Connecting 7.1-channel Speakers LINE OUT ASUS Desktop PC 29
Connecting 5.1-channel Speakers ENGLISH LINE OUT Connecting 7.1-channel Speakers LINE OUT ASUS Desktop PC 29

Users Manual
Page 30
... a clear audio quality. Tick Line In, then click OK. ENGLISH Changing to the external audio output When you connect an external audio device to your Desktop PC, enable the audio device output to the external audio output: 1. Connect an external audio device such as earphone or speaker to your computer. 2. The...
... a clear audio quality. Tick Line In, then click OK. ENGLISH Changing to the external audio output When you connect an external audio device to your Desktop PC, enable the audio device output to the external audio output: 1. Connect an external audio device such as earphone or speaker to your computer. 2. The...

Users Manual
Page 31
... the PC. • Place the monitor directly in front of glare such as windows and straight sunlight. • Take regular mini-breaks from using your Desktop PC. ASUS Desktop PC 31 If necessary, use a wrist rest for support to reduce the pressure on your wrists while typing. • Use your...
... the PC. • Place the monitor directly in front of glare such as windows and straight sunlight. • Take regular mini-breaks from using your Desktop PC. ASUS Desktop PC 31 If necessary, use a wrist rest for support to reduce the pressure on your wrists while typing. • Use your...

Users Manual
Page 33
... to open the tray. 2. Select a program from the AutoPlay window to close it. 4. Removing an optical disc To remove an optical disc: 1. ASUS Desktop PC 33 While your system is NOT enabled in your files. Remove the disc from the Start menu, and then double-click the CD/DVD... tray. While the system is positioned horizontally. 3. Place the disc on the optical drive with the label side outward if the desktop is positioned vertically and the label side up if the desktop is on selected models only) D641MD D641SC ENGLISH Inserting an optical disc To insert an optical disc: 1.
... to open the tray. 2. Select a program from the AutoPlay window to close it. 4. Removing an optical disc To remove an optical disc: 1. ASUS Desktop PC 33 While your system is NOT enabled in your files. Remove the disc from the Start menu, and then double-click the CD/DVD... tray. While the system is positioned horizontally. 3. Place the disc on the optical drive with the label side outward if the desktop is positioned vertically and the label side up if the desktop is on selected models only) D641MD D641SC ENGLISH Inserting an optical disc To insert an optical disc: 1.

Users Manual
Page 35
... to create/confirm the password. Select the Set User Password item and press . 4. To change the password for your HDD. Confirm the password when prompted. 6. ASUS Desktop PC 35
... to create/confirm the password. Select the Set User Password item and press . 4. To change the password for your HDD. Confirm the password when prompted. 6. ASUS Desktop PC 35

Users Manual
Page 37
Set up your computer and the other end to a DSL/cable modem. Connecting via a DSL/cable modem To connect via a DSL/cable modem: 1. D641MD Modem RJ-45 cable ASUS Desktop PC 37 Connect one end of an RJ-45 cable to the LAN (RJ-45) port on the rear panel of your DSL/cable modem. Refer to the documentation that came with your computer to a DSL/cable modem or a local area network (LAN). ENGLISH Chapter 4 Connecting to the Internet Wired connection Use an RJ-45 cable to connect your DSL/cable modem. 2.
Set up your computer and the other end to a DSL/cable modem. Connecting via a DSL/cable modem To connect via a DSL/cable modem: 1. D641MD Modem RJ-45 cable ASUS Desktop PC 37 Connect one end of an RJ-45 cable to the LAN (RJ-45) port on the rear panel of your DSL/cable modem. Refer to the documentation that came with your computer to a DSL/cable modem or a local area network (LAN). ENGLISH Chapter 4 Connecting to the Internet Wired connection Use an RJ-45 cable to connect your DSL/cable modem. 2.

Users Manual
Page 39
Connecting via a local area network (LAN) To connect via a LAN: 1. Turn on the rear panel of your computer and the other end to your computer. 3. ASUS Desktop PC 39 Connect one end of an RJ-45 cable to the sections Configuring a dynamic IP/PPPoE network connection or Configuring a static IP network connection. ... details or assistance in setting up your Internet connection. • For more details, refer to the LAN (RJ-45) port on your LAN. D641MD ENGLISH D641SC RJ-45 cable LAN RJ-45 cable LAN 2.
Connecting via a local area network (LAN) To connect via a LAN: 1. Turn on the rear panel of your computer and the other end to your computer. 3. ASUS Desktop PC 39 Connect one end of an RJ-45 cable to the sections Configuring a dynamic IP/PPPoE network connection or Configuring a static IP network connection. ... details or assistance in setting up your Internet connection. • For more details, refer to the LAN (RJ-45) port on your LAN. D641MD ENGLISH D641SC RJ-45 cable LAN RJ-45 cable LAN 2.

Users Manual
Page 41
... the following IP address. 3. If needed, enter the preferred DNS Server address and alternative address. 5. When done, click OK. Select Broadband (PPPoE) and click Next. 9. ASUS Desktop PC 41 Repeat steps 1 to the Network and Sharing Center and then click Set up a new connection or network. 7. Follow the next onscreen instructions to...
... the following IP address. 3. If needed, enter the preferred DNS Server address and alternative address. 5. When done, click OK. Select Broadband (PPPoE) and click Next. 9. ASUS Desktop PC 41 Repeat steps 1 to the Network and Sharing Center and then click Set up a new connection or network. 7. Follow the next onscreen instructions to...


