A7V400-MX SE user's manual for English version
Page 3
...vi About this guide vii A7V400-MX SE specifications summary viii Chapter 1: Product introduction 1.1 1.2 1.3 1.4 1.5 1.6 1.7 1.8 1.9 1.10 Welcome 1-2 Package contents 1-2 Special features 1-2 1.3.1 Product highlights 1-2 1.3.2 Innovative ASUS features 1-4 Before you proceed 1-5 Motherboard overview 1-6 1.5.1 Motherboard layout 1-6 1.5.2 Placement direction 1-7 1.5.3 Screw holes 1-7 Central Processing Unit (CPU 1-8 1.6.1 Overview 1-8 1.6.2 Installing the CPU 1-8 System memory 1-9 1.7.1 Overview 1-9 1.7.2 Memory configurations 1-9 1.7.3 Installing a DIMM 1-13 1.7.4 Removing...
...vi About this guide vii A7V400-MX SE specifications summary viii Chapter 1: Product introduction 1.1 1.2 1.3 1.4 1.5 1.6 1.7 1.8 1.9 1.10 Welcome 1-2 Package contents 1-2 Special features 1-2 1.3.1 Product highlights 1-2 1.3.2 Innovative ASUS features 1-4 Before you proceed 1-5 Motherboard overview 1-6 1.5.1 Motherboard layout 1-6 1.5.2 Placement direction 1-7 1.5.3 Screw holes 1-7 Central Processing Unit (CPU 1-8 1.6.1 Overview 1-8 1.6.2 Installing the CPU 1-8 System memory 1-9 1.7.1 Overview 1-9 1.7.2 Memory configurations 1-9 1.7.3 Installing a DIMM 1-13 1.7.4 Removing...
A7V400-MX SE user's manual for English version
Page 4
... and updating your BIOS 2-2 2.1.1 Creating a bootable floppy disk 2-2 2.1.2 AwardBIOS Flash Utility 2-3 2.1.3 ASUS CrashFree BIOS utility 2-4 2.1.4 ASUS EZ Flash utility 2-4 2.1.5 ASUS Update utility 2-5 2.2 BIOS beep codes 2-7 2.3 BIOS setup program 2-7 2.3.1 BIOS menu bar 2-8 2.3.2 Legend bar 2-8 2.4 Main menu 2-10 2.5 Advanced menu 2-15 2.5.1 CPU Configuration 2-15 2.5.2 Memory Configuration 2-16 2.5.3 Chipset 2-17 2.5.4 PCIPnP 2-19 2.5.5 Onboard Devices Configuration 2-20 2.5.6 USB...
... and updating your BIOS 2-2 2.1.1 Creating a bootable floppy disk 2-2 2.1.2 AwardBIOS Flash Utility 2-3 2.1.3 ASUS CrashFree BIOS utility 2-4 2.1.4 ASUS EZ Flash utility 2-4 2.1.5 ASUS Update utility 2-5 2.2 BIOS beep codes 2-7 2.3 BIOS setup program 2-7 2.3.1 BIOS menu bar 2-8 2.3.2 Legend bar 2-8 2.4 Main menu 2-10 2.5 Advanced menu 2-15 2.5.1 CPU Configuration 2-15 2.5.2 Memory Configuration 2-16 2.5.3 Chipset 2-17 2.5.4 PCIPnP 2-19 2.5.5 Onboard Devices Configuration 2-20 2.5.6 USB...

A7V400-MX SE user's manual for English version
Page 8
A7V400-MX SE specifications summary CPU Socket A for AMD Athlon™ XP/Sempron™ processors Thoroughbred/Barton core support Chipset VIA KM400A VIA VT8237 (no RAID support) Front Side Bus (FSB) 400/333/266/200 MHz Memory 2 x 184-pin DDR DIMM sockets support up to maximum 2 GB unbuffered DDR400*/333/266/200 non-ECC DDR... SDRAM memory *may run only at 333 MHz (DDR333) Expansion slots 3 x PCI 1 x AGP 8X/4X (1.5V only) Storage • 2 x IDE connectors support up to four UltraATA133/100/...
A7V400-MX SE specifications summary CPU Socket A for AMD Athlon™ XP/Sempron™ processors Thoroughbred/Barton core support Chipset VIA KM400A VIA VT8237 (no RAID support) Front Side Bus (FSB) 400/333/266/200 MHz Memory 2 x 184-pin DDR DIMM sockets support up to maximum 2 GB unbuffered DDR400*/333/266/200 non-ECC DDR... SDRAM memory *may run only at 333 MHz (DDR333) Expansion slots 3 x PCI 1 x AGP 8X/4X (1.5V only) Storage • 2 x IDE connectors support up to four UltraATA133/100/...

A7V400-MX SE user's manual for English version
Page 13
...details. SoundMAX Digital Audio System can output 5.1 channel surround sound and features state-of system memory using DDR 333/266/ 200 DIMMs. The fast 333 MHz memory bus delivers the required bandwidth for the latest 3D graphics, multimedia, and Internet applications. The...memory technology, the motherboard supports up to 150 MB/s data transfer rate. See page 1-22 for business professionals, audiophiles, musicians, and gamers. The SoundMAX Digital Audio System is the ADI SoundMax 5.1-channel audio CODEC. See page 1-9 for thinner, more flexible cables with USB 1.1. ASUS A7V400-MX SE...
...details. SoundMAX Digital Audio System can output 5.1 channel surround sound and features state-of system memory using DDR 333/266/ 200 DIMMs. The fast 333 MHz memory bus delivers the required bandwidth for the latest 3D graphics, multimedia, and Internet applications. The...memory technology, the motherboard supports up to 150 MB/s data transfer rate. See page 1-22 for business professionals, audiophiles, musicians, and gamers. The SoundMAX Digital Audio System is the ADI SoundMax 5.1-channel audio CODEC. See page 1-9 for thinner, more flexible cables with USB 1.1. ASUS A7V400-MX SE...
A7V400-MX SE user's manual for English version
Page 19
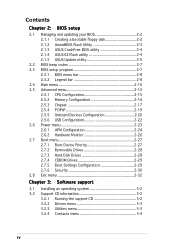
... run at speeds of qualified DDR400 and DDR333 DIMM vendors. 104 Pins 80 Pins 1.7 System memory 1.7.1 Overview The motherboard has two Double Data Rate (DDR) DIMM sockets that you obtain memory modules from qualified vendors. See the next page for a list of up to 2 GB ... support up to 333 MHz (DDR333). 1.7.2 Memory configurations You may install single or double-sided 64 MB, 128 MB, 256 MB, 512 MB, and 1 GB DDR DIMMs to the sockets. For optimum compatibility, it is double-sided. DIMM1 DIMM2 ASUS A7V400-MX SE 1-9 A7V400-MX SE A7V400-MX SE 184-pin DDR DIMM sockets * You can...
... run at speeds of qualified DDR400 and DDR333 DIMM vendors. 104 Pins 80 Pins 1.7 System memory 1.7.1 Overview The motherboard has two Double Data Rate (DDR) DIMM sockets that you obtain memory modules from qualified vendors. See the next page for a list of up to 2 GB ... support up to 333 MHz (DDR333). 1.7.2 Memory configurations You may install single or double-sided 64 MB, 128 MB, 256 MB, 512 MB, and 1 GB DDR DIMMs to the sockets. For optimum compatibility, it is double-sided. DIMM1 DIMM2 ASUS A7V400-MX SE 1-9 A7V400-MX SE A7V400-MX SE 184-pin DDR DIMM sockets * You can...

A7V400-MX SE user's manual for English version
Page 28
... the jumper cap from pins 2-3 (default) to re-enter data. Reinstall the battery. 5. Plug the power cord and turn ON the computer. 6. A7V400-MX SE CLRTC 12 23 Clear CMOS Normal A7V400-MX SE Clear RTC RAM (Default) 1-18 Chapter 1: Product introduction Clear RTC RAM (CLRTC) This jumper allows you to pins 2-3. 4. To erase the RTC... cap will cause system boot failure! Hold down the key during the boot process and enter BIOS setup to pins 1-2. 2. You can clear the CMOS memory of date, time, and system setup parameters by erasing the CMOS RTC RAM data.
... the jumper cap from pins 2-3 (default) to re-enter data. Reinstall the battery. 5. Plug the power cord and turn ON the computer. 6. A7V400-MX SE CLRTC 12 23 Clear CMOS Normal A7V400-MX SE Clear RTC RAM (Default) 1-18 Chapter 1: Product introduction Clear RTC RAM (CLRTC) This jumper allows you to pins 2-3. 4. To erase the RTC... cap will cause system boot failure! Hold down the key during the boot process and enter BIOS setup to pins 1-2. 2. You can clear the CMOS memory of date, time, and system setup parameters by erasing the CMOS RTC RAM data.
A7V400-MX SE user's manual for English version
Page 39
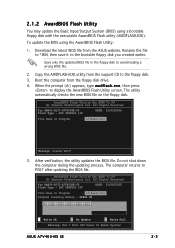
...from the floppy disk drive. 4. The computer returns to Program : a7v4se02.bin Program Flashing Memory - 0FE00 OK 111122223333444455556666777788889999000011112222333344445555666677778888999900001111222233334444555566667777888899990000111122221111222233334444555566667777888899990000111122223333 111122223333 Write OK 111122223333 No Update 111122223333 Write Fail Warning: Don't... avoid loading a wrong BIOS file. 2. ASUS A7V400-MX SE 2-3 Save only the updated BIOS file in the floppy disk to the floppy disk. 3. AwardBIOS Flash Utility for ASUS V1.09 (C) Phoenix Technologies Ltd. e ...
...from the floppy disk drive. 4. The computer returns to Program : a7v4se02.bin Program Flashing Memory - 0FE00 OK 111122223333444455556666777788889999000011112222333344445555666677778888999900001111222233334444555566667777888899990000111122221111222233334444555566667777888899990000111122223333 111122223333 Write OK 111122223333 No Update 111122223333 Write Fail Warning: Don't... avoid loading a wrong BIOS file. 2. ASUS A7V400-MX SE 2-3 Save only the updated BIOS file in the floppy disk to the floppy disk. 3. AwardBIOS Flash Utility for ASUS V1.09 (C) Phoenix Technologies Ltd. e ...
A7V400-MX SE user's manual for English version
Page 43
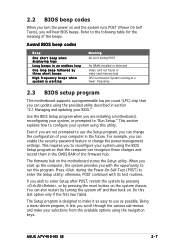
... to reconfigure your system using the navigation keys. Press during POST No DRAM installed or detected Video card not found or video card memory bad CPU overheated; For example, you are not prompted to run this last option only if the first two failed. Use the ...the future. Do this program. The Setup program is working Meaning No error during the Power-On-Self-Test (POST) to configure your BIOS." ASUS A7V400-MX SE 2-7 System running at a lower frequency 2.3 BIOS setup program This motherboard supports a programmable low pin count (LPC) chip that the computer can ...
... to reconfigure your system using the navigation keys. Press during POST No DRAM installed or detected Video card not found or video card memory bad CPU overheated; For example, you are not prompted to run this last option only if the first two failed. Use the ...the future. Do this program. The Setup program is working Meaning No error during the Power-On-Self-Test (POST) to configure your BIOS." ASUS A7V400-MX SE 2-7 System running at a lower frequency 2.3 BIOS setup program This motherboard supports a programmable low pin count (LPC) chip that the computer can ...
A7V400-MX SE user's manual for English version
Page 45
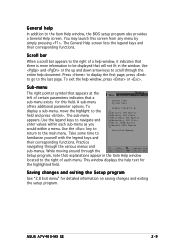
... corresponding functions. To exit the help text for the highlighted field. To display a sub-menu, move the highlight to the last page. ASUS A7V400-MX SE 2-9 Scroll bar When a scroll bar appears to the right of a help window, it indicates that there is more information to the right... Help screen. This window displays the help window, press or . The sub-menu appears. Use the key to return to Installed Memory familiarize yourself with the legend keys and their corresponding functions. While moving around through the entire help In addition to navigate and enter ...
... corresponding functions. To exit the help text for the highlighted field. To display a sub-menu, move the highlight to the last page. ASUS A7V400-MX SE 2-9 Scroll bar When a scroll bar appears to the right of a help window, it indicates that there is more information to the right... Help screen. This window displays the help window, press or . The sub-menu appears. Use the key to return to Installed Memory familiarize yourself with the legend keys and their corresponding functions. While moving around through the entire help In addition to navigate and enter ...

A7V400-MX SE user's manual for English version
Page 46
...minute, second. Configuration options: [None] [360K, 5.25 in.] [1.2M , 5.25 in.] [720K , 3.5 in.] [1.44M, 3.5 in.] [2.88M, 3.5 in.] Installed Memory [XXX MB] This field automatically displays the amount of floppy drive installed. Valid values for hour, minute and second are Month: (1 to 12), Day: (1 to... dd yyyy] Sets the system to the time that you specify (usually the current time). Legacy Diskette A [1.44M, 3.5 in .] [ST321122A] [ASUS CDS520/A] [None] [None] [None] [None] 256MB Select Menu Item Specific Help Change the internal clock. Use the key to move between the ...
...minute, second. Configuration options: [None] [360K, 5.25 in.] [1.2M , 5.25 in.] [720K , 3.5 in.] [1.44M, 3.5 in.] [2.88M, 3.5 in.] Installed Memory [XXX MB] This field automatically displays the amount of floppy drive installed. Valid values for hour, minute and second are Month: (1 to 12), Day: (1 to... dd yyyy] Sets the system to the time that you specify (usually the current time). Legacy Diskette A [1.44M, 3.5 in .] [ST321122A] [ASUS CDS520/A] [None] [None] [None] [None] 256MB Select Menu Item Specific Help Change the internal clock. Use the key to move between the ...

A7V400-MX SE user's manual for English version
Page 51
... Value F5 : Setup Defaults ESC : Exit →← : Select Menu Enter : Select Sub-menu F10 : Save and Exit ASUS A7V400-MX SE 2-15 2.5 Advanced menu The Advanced menu items allow you to set. CPU Configuration Memory Configuration Chipset PCIPnP Onboard Devices Configuration USB Configuration Select Menu Item Specific Help Press [Enter] to change the settings...
... Value F5 : Setup Defaults ESC : Exit →← : Select Menu Enter : Select Sub-menu F10 : Save and Exit ASUS A7V400-MX SE 2-15 2.5 Advanced menu The Advanced menu items allow you to set. CPU Configuration Memory Configuration Chipset PCIPnP Onboard Devices Configuration USB Configuration Select Menu Item Specific Help Press [Enter] to change the settings...
A7V400-MX SE user's manual for English version
Page 52
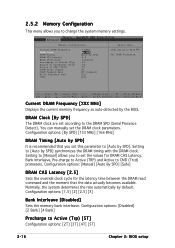
...determines the rate automatically by SPD] 2.5 Disabled 5T 7T 5T [4] [2T Command] [3T] [2T] Select Menu Item Specific Help Set DRAM frequency. 2.5.2 Memory Configuration This menu allows you set this parameter to [Auto by SPD]. Configuration options: [Disabled] [2 Bank] [4 Bank] Precharge to the DRAM SPD (... and Active to CMD (Trcd) DRAM Burst Length DRAM Command Rate Write Recovery Time tWTR 133MHz [By SPD] [Auto by default. Memory Configuration Current DRAM Frequency DRAM Clock DRAM Timing DRAM CAS Latency Bank Interleave Pre-charge to Active (Trp) Active to Precharge (Tras) ...
...determines the rate automatically by SPD] 2.5 Disabled 5T 7T 5T [4] [2T Command] [3T] [2T] Select Menu Item Specific Help Set DRAM frequency. 2.5.2 Memory Configuration This menu allows you set this parameter to [Auto by SPD]. Configuration options: [Disabled] [2 Bank] [4 Bank] Precharge to the DRAM SPD (... and Active to CMD (Trcd) DRAM Burst Length DRAM Command Rate Write Recovery Time tWTR 133MHz [By SPD] [Auto by default. Memory Configuration Current DRAM Frequency DRAM Clock DRAM Timing DRAM CAS Latency Bank Interleave Pre-charge to Active (Trp) Active to Precharge (Tras) ...
A7V400-MX SE user's manual for English version
Page 54
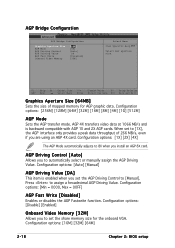
...Select Sub-menu F10 : Save and Exit Graphics Aperture Size [64MB] Sets the size of 266 MB/s, even if you to set the share memory size for AGP graphic data. Configuration options: [Auto] [Manual] AGP Driving Value [DA] This item is backward compatible with AGP 1X and 2X... AGP Fastwrite function. AGP Bridge Configuration AGP Bridge Configuration Graphics Aperture Size AGP Mode AGP Driving Control AGP Driving Value AGP Fast Write Onboard Video Memory [64M] [4X] [Auto] DA [Disabled] [32M] Select Menu Item Specific Help Select AGP aperture size. Configuration options: [1X] [2X] [4X] ...
...Select Sub-menu F10 : Save and Exit Graphics Aperture Size [64MB] Sets the size of 266 MB/s, even if you to set the share memory size for AGP graphic data. Configuration options: [Auto] [Manual] AGP Driving Value [DA] This item is backward compatible with AGP 1X and 2X... AGP Fastwrite function. AGP Bridge Configuration AGP Bridge Configuration Graphics Aperture Size AGP Mode AGP Driving Control AGP Driving Value AGP Fast Write Onboard Video Memory [64M] [4X] [Auto] DA [Disabled] [32M] Select Menu Item Specific Help Select AGP aperture size. Configuration options: [1X] [2X] [4X] ...


