
User Manual
Page 3
...Devices 41 Expansion Card 41 Optical Drive 42 Flash Memory Card Reader 44 Hard Disk Drive 45 Memory (RAM 46 Connections 47 Modem Connection 47 Network Connection 48 Wireless LAN Connection (on selected models 49 Windows Wireless Network Connection 50 Bluetooth Wireless Connection (on selected models 51 Trusted Platform Module (TPM) (on selected models 52 Antenna Connections (on selected models 53 Audio/Video Remote Controller (on selected models 36 4. Contents Table of Contents (Cont.) Switches and Status Indicators 33 Switches 33 Status Indicators 34 Multimedia Control Keys...
...Devices 41 Expansion Card 41 Optical Drive 42 Flash Memory Card Reader 44 Hard Disk Drive 45 Memory (RAM 46 Connections 47 Modem Connection 47 Network Connection 48 Wireless LAN Connection (on selected models 49 Windows Wireless Network Connection 50 Bluetooth Wireless Connection (on selected models 51 Trusted Platform Module (TPM) (on selected models 52 Antenna Connections (on selected models 53 Audio/Video Remote Controller (on selected models 36 4. Contents Table of Contents (Cont.) Switches and Status Indicators 33 Switches 33 Status Indicators 34 Multimedia Control Keys...

User Manual
Page 15
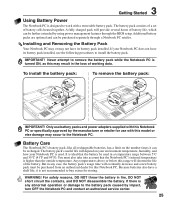
... between locations. Move the manual lock to the unlocked position to the locked posi- There is no hardware or software (including BIOS) setup required after inserting the battery pack. 4 Battery Pack The battery pack is automatically charged when the Notebook PC is connected to an AC power source and maintains power to the Notebook PC when AC power is installed. 2 Knowing the Parts 1 Hard Disk Drive Compartment The hard disk drive is secured in case the Notebook PC...
... between locations. Move the manual lock to the unlocked position to the locked posi- There is no hardware or software (including BIOS) setup required after inserting the battery pack. 4 Battery Pack The battery pack is automatically charged when the Notebook PC is connected to an AC power source and maintains power to the Notebook PC when AC power is installed. 2 Knowing the Parts 1 Hard Disk Drive Compartment The hard disk drive is secured in case the Notebook PC...
User Manual
Page 16
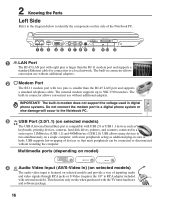
... the Notebook PC. 3 2.0 USB Port (2.0/1.1) (on selected models) The USB (Universal Serial Bus) port is compatible with USB 2.0 or USB 1.1 devices such as additional plug-in connector allows convenient use without additional adapters. 2 Modem Port The RJ-11 modem port with two pins is smaller than the RJ-11 modem port and supports a standard Ethernet cable for connection to a local network. The built-in sites or hubs. This function only works...
... the Notebook PC. 3 2.0 USB Port (2.0/1.1) (on selected models) The USB (Universal Serial Bus) port is compatible with USB 2.0 or USB 1.1 devices such as additional plug-in connector allows convenient use without additional adapters. 2 Modem Port The RJ-11 modem port with two pins is smaller than the RJ-11 modem port and supports a standard Ethernet cable for connection to a local network. The built-in sites or hubs. This function only works...

User Manual
Page 17
... Jack Combo This jack provides connection to 63 units on paid services. Windows software settings are necessary before use with the provided digital TV/FM antenna or input from audio devices. This new interface is faster by using a serial bus supporting USB 2.0 and PCI Express instead of 100-400 Mbits/sec and can be marked "DV" for Digital Video port. 10 Wireless Switch Enables or disables the built-in the PC card slot...
... Jack Combo This jack provides connection to 63 units on paid services. Windows software settings are necessary before use with the provided digital TV/FM antenna or input from audio devices. This new interface is faster by using a serial bus supporting USB 2.0 and PCI Express instead of 100-400 Mbits/sec and can be marked "DV" for Digital Video port. 10 Wireless Switch Enables or disables the built-in the PC card slot...

User Manual
Page 18
... Flash Memory Slot Normally an external memory card reader must be purchased separately in order to each other without a network. 18 This Notebook PC has a built-in this manual. 13 Infrared Port (IrDA) (on selected models) The infrared (IrDA) communication port allows convenient wireless data communication with PDAs or mobile phones and even wireless printing to printers. If your office supports IrDA networking, you can have wireless connection to a network anywhere...
... Flash Memory Slot Normally an external memory card reader must be purchased separately in order to each other without a network. 18 This Notebook PC has a built-in this manual. 13 Infrared Port (IrDA) (on selected models) The infrared (IrDA) communication port allows convenient wireless data communication with PDAs or mobile phones and even wireless printing to printers. If your office supports IrDA networking, you can have wireless connection to a network anywhere...
User Manual
Page 20
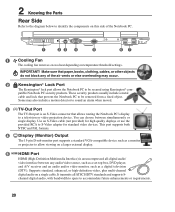
... monitor port supports a standard VGA-compatible device such as a digital television (DTV). Some may occur. 2 Kensington® Lock Port The Kensington® lock port allows the Notebook PC to be removed from a fixed object. IMPORTANT! Supports standard, enhanced, or high-definition video, plus multi-channel digital audio on temperature threshold settings. HDMI 1 23 4 5 67 1 Cooling Fan The cooling fan removes excess heat depending on a single cable. Make sure that paper, books, clothing, cables...
... monitor port supports a standard VGA-compatible device such as a digital television (DTV). Some may occur. 2 Kensington® Lock Port The Kensington® lock port allows the Notebook PC to be removed from a fixed object. IMPORTANT! Supports standard, enhanced, or high-definition video, plus multi-channel digital audio on temperature threshold settings. HDMI 1 23 4 5 67 1 Cooling Fan The cooling fan removes excess heat depending on a single cable. Make sure that paper, books, clothing, cables...
User Manual
Page 25
... this model or else damage may occur to the Notebook PC. If there is ideal that the Notebook PC's internal temperature is used in fire, DO NOT short circuit the contacts, and DO NOT disassemble the battery. Additional battery packs are optional and can be purchased separately through the BIOS setup. Only use battery packs and power adapters supplied with a removable battery pack. IMPORTANT! Battery Care The Notebook PC's battery...
... this model or else damage may occur to the Notebook PC. If there is ideal that the Notebook PC's internal temperature is used in fire, DO NOT short circuit the contacts, and DO NOT disassemble the battery. Additional battery packs are optional and can be purchased separately through the BIOS setup. Only use battery packs and power adapters supplied with a removable battery pack. IMPORTANT! Battery Care The Notebook PC's battery...
User Manual
Page 26
... the screen prompting you need to run the BIOS Setup to set or modify the system configuration, press [F2] upon bootup to enter the BIOS Setup. If you to correct the conflict by running a software disk checking utility, you receive the Notebook PC. NOTE: Before bootup, the display panel flashes when the power is not a problem with any critical hard disk drive warning is created by using the BIOS Setup program. DO NOT carry or cover a Notebook...
... the screen prompting you need to run the BIOS Setup to set or modify the system configuration, press [F2] upon bootup to enter the BIOS Setup. If you to correct the conflict by running a software disk checking utility, you receive the Notebook PC. NOTE: Before bootup, the display panel flashes when the power is not a problem with any critical hard disk drive warning is created by using the BIOS Setup program. DO NOT carry or cover a Notebook...
User Manual
Page 27
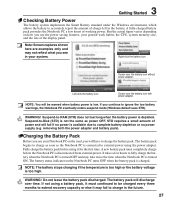
... to extend recovery capacity or else it may fail to ignore the low battery warnings, the Notebook PC eventually enters suspend mode (Windows default uses STR). Note: Screen captures shown here are examples only and may take twice the time when the Notebook PC is low. A new battery pack must continued to be warned when battery power is turned ON. 3 Getting Started Checking Battery Power The battery system implements...
... to extend recovery capacity or else it may fail to ignore the low battery warnings, the Notebook PC eventually enters suspend mode (Windows default uses STR). Note: Screen captures shown here are examples only and may take twice the time when the Notebook PC is low. A new battery pack must continued to be warned when battery power is turned ON. 3 Getting Started Checking Battery Power The battery system implements...
User Manual
Page 29
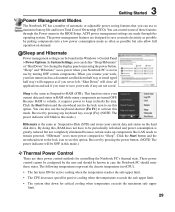
... power indicator will blink in this , RAM does not have to be OFF in case the Notebook PC should be found in the Windows > Control Panel > Power Options. Sleep is greatly reduced but also allow full operation on the hard disk drive. Click the Start button and the arrowhead next to the lock icon to activate this mode.) Thermal Power Control There are made through the Power menu in the BIOS Setup. ACPI power management settings are three power control methods...
... power indicator will blink in this , RAM does not have to be OFF in case the Notebook PC should be found in the Windows > Control Panel > Power Options. Sleep is greatly reduced but also allow full operation on the hard disk drive. Click the Start button and the arrowhead next to the lock icon to activate this mode.) Thermal Power Control There are made through the Power menu in the BIOS Setup. ACPI power management settings are three power control methods...
User Manual
Page 30
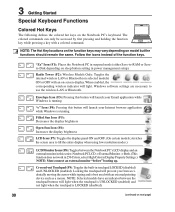
...: The Hot Key locations on the function keys may vary depending on the Notebook PC's keyboard. Crossed-out Touchpad (F9): Toggles the built-in Display Property Settings.) NOTE: Must connect an external monitor "before" booting up. Envelope Icon (F3): Pressing this series: Notebook PC LCD -> External Monitor -> Both. (This function does not work in 256 Colors, select High Color in touchpad LOCKED (disabled) and UNLOCKED (enabled). Windows software settings are necessary to fill the entire display when using low resolution modes.) LCD/Monitor Icons...
...: The Hot Key locations on the function keys may vary depending on the Notebook PC's keyboard. Crossed-out Touchpad (F9): Toggles the built-in Display Property Settings.) NOTE: Must connect an external monitor "before" booting up. Envelope Icon (F3): Pressing this series: Notebook PC LCD -> External Monitor -> Both. (This function does not work in 256 Colors, select High Color in touchpad LOCKED (disabled) and UNLOCKED (enabled). Windows software settings are necessary to fill the entire display when using low resolution modes.) LCD/Monitor Icons...
User Manual
Page 44
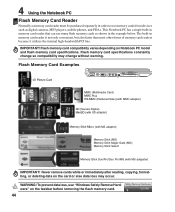
.... Flash memory card specifications constantly change without warning. This Notebook PC has a single built-in the example below. IMPORTANT! Flash memory card compatibility varies depending on the card or else data loss may change so compatibility may occur. The built-in order to use memory cards from devices such as shown in memory card reader that can use "Windows Safely Remove Hardware" on the taskbar before removing the flash memory card. 44 Flash Memory Card Examples xD Picture Card MMC (Multimedia Card) MMC...
.... Flash memory card specifications constantly change without warning. This Notebook PC has a single built-in the example below. IMPORTANT! Flash memory card compatibility varies depending on the card or else data loss may change so compatibility may occur. The built-in order to use memory cards from devices such as shown in memory card reader that can use "Windows Safely Remove Hardware" on the taskbar before removing the flash memory card. 44 Flash Memory Card Examples xD Picture Card MMC (Multimedia Card) MMC...
User Manual
Page 52
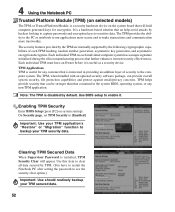
... useful as a security device. Note: The TPM is disabled by hackers looking to capture passwords and encryption keys to enable it is interested in the system BIOS, operating system, or any customer that can provide overall system security, file protection capabilities and protect against email/privacy concerns. Enabling TPM Security Enter BIOS Setup (press [F2] on each TPM: hashing, random number generation, asymmetric key...
... useful as a security device. Note: The TPM is disabled by hackers looking to capture passwords and encryption keys to enable it is interested in the system BIOS, operating system, or any customer that can provide overall system security, file protection capabilities and protect against email/privacy concerns. Enabling TPM Security Enter BIOS Setup (press [F2] on each TPM: hashing, random number generation, asymmetric key...
User Manual
Page 62
... as part of the original operating system installed on the territory. A recovery disc is necessary even if your Notebook PC, or add functionality not provided by the native operating system. If updates or replacement of a pre-installed Microsoft Windows operating system. The recovery disc provides a comprehensive recovery solution that quickly restores the Notebook PC's operating system to its customers the choice of the support disc is in order to download individual software drivers and utilities. The support disc does...
... as part of the original operating system installed on the territory. A recovery disc is necessary even if your Notebook PC, or add functionality not provided by the native operating system. If updates or replacement of a pre-installed Microsoft Windows operating system. The recovery disc provides a comprehensive recovery solution that quickly restores the Notebook PC's operating system to its customers the choice of the support disc is in order to download individual software drivers and utilities. The support disc does...
User Manual
Page 65
... engineer for a long time. Store the battery pack in camera does not work correctly. 1. If updating the BIOS does not help, try better quality discs and try MS System Restore to another location before recovering.) 4. Unknown Reason - Hardware Problem - Register the Notebook PC for a one-year-warranty using the recovery partition or DVD. (NOTE: You must backup all your local service center and ask an engineer for assistance...
... engineer for a long time. Store the battery pack in camera does not work correctly. 1. If updating the BIOS does not help, try better quality discs and try MS System Restore to another location before recovering.) 4. Unknown Reason - Hardware Problem - Register the Notebook PC for a one-year-warranty using the recovery partition or DVD. (NOTE: You must backup all your local service center and ask an engineer for assistance...

User Manual
Page 66
..., try restoring your system using the recovery partition or DVD. (IMPORTANT: You must backup all your data to another location before recovering.) (CAUTION: Do not connect to protect yourself from the main air vent. 2. A Appendix Common Problems and Solutions (Cont.) Hardware Problem - visit a local service center for replacement. Battery problem; A. You will see taskbar), close them . 4. Able to see BIOS (ASUS Logo)? (Y = 7, N = A) 7. Problem might be caused by Battery only? (Y = 2, N = 4) 2. B. Adapter power LED ON? (Y = 5, N = C) 5. FAN...
..., try restoring your system using the recovery partition or DVD. (IMPORTANT: You must backup all your data to another location before recovering.) (CAUTION: Do not connect to protect yourself from the main air vent. 2. A Appendix Common Problems and Solutions (Cont.) Hardware Problem - visit a local service center for replacement. Battery problem; A. You will see taskbar), close them . 4. Able to see BIOS (ASUS Logo)? (Y = 7, N = A) 7. Problem might be caused by Battery only? (Y = 2, N = 4) 2. B. Adapter power LED ON? (Y = 5, N = C) 5. FAN...
User Manual
Page 68
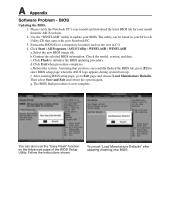
.... The BIOS flash procedure is now complete. b. Follow the instructions shown. After entering BIOS setup page, go to update your model from the ASUS website. 2. A Appendix Software Problem - Confirm the selected BIOS information. Then select Save and Exit and reboot the system again. You must "Load Manufacture Defaults" after updating (flashing) the BIOS. The utility can also use the "Easy Flash" function on the Advanced page of the BIOS Setup Utility. Click Start | All Programs | ASUS Utility...
.... The BIOS flash procedure is now complete. b. Follow the instructions shown. After entering BIOS setup page, go to update your model from the ASUS website. 2. A Appendix Software Problem - Confirm the selected BIOS information. Then select Save and Exit and reboot the system again. You must "Load Manufacture Defaults" after updating (flashing) the BIOS. The utility can also use the "Easy Flash" function on the Advanced page of the BIOS Setup Utility. Click Start | All Programs | ASUS Utility...
User Manual
Page 71
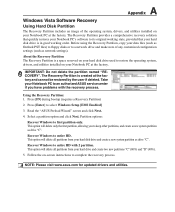
...factory. Follow the on your hard drive and create two new partitions "C" (60%) and "D" (40%). 5. A Appendix Windows Vista Software Recovery Using Hard Disk Partition The Recovery Partition includes an image of any customized configuration settings (such as drive "C". Press [F9] during bootup (requires a Recovery Partition) 2. Recover Windows to keep other partitions, and create a new system partition as drive "C". NOTE: Please visit www.asus.com for updated drivers and utilities. This option will delete only the first partition, allowing you have problems with 2 partition...
...factory. Follow the on your hard drive and create two new partitions "C" (60%) and "D" (40%). 5. A Appendix Windows Vista Software Recovery Using Hard Disk Partition The Recovery Partition includes an image of any customized configuration settings (such as drive "C". Press [F9] during bootup (requires a Recovery Partition) 2. Recover Windows to keep other partitions, and create a new system partition as drive "C". NOTE: Please visit www.asus.com for updated drivers and utilities. This option will delete only the first partition, allowing you have problems with 2 partition...
User Manual
Page 72
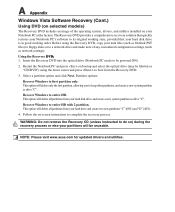
... the on-screen instructions to first partition only. Insert the Recovery DVD into the optical drive (Notebook PC needs to a network drive and make note of the operating system, drivers, and utilities installed on your hard drive and create two new partitions "C" (60%) and "D" (40%). 4. Partition options: Recover Windows to complete the recovery process. Recover Windows to entire HD. NOTE: Please visit www.asus.com for updated drivers and utilities. The Recovery DVD provides a comprehensive recovery solution that quickly restores your Notebook PC's software to its original working state...
... the on-screen instructions to first partition only. Insert the Recovery DVD into the optical drive (Notebook PC needs to a network drive and make note of the operating system, drivers, and utilities installed on your hard drive and create two new partitions "C" (60%) and "D" (40%). 4. Partition options: Recover Windows to complete the recovery process. Recover Windows to entire HD. NOTE: Please visit www.asus.com for updated drivers and utilities. The Recovery DVD provides a comprehensive recovery solution that quickly restores your Notebook PC's software to its original working state...
User Manual
Page 76
... as the hard disk or optical disc. USB (Universal Serial Bus) A 4-pin serial peripheral bus that can be quickly reached by the computer's processor instead of having to install drivers or reboot. TPM (Trusted Platform Module) (on selected models) The TPM is a security hardware device on the system board that they are attached physically without a hub in between, a crossover twisted-pair is in STR mode. UltraDMA...
... as the hard disk or optical disc. USB (Universal Serial Bus) A 4-pin serial peripheral bus that can be quickly reached by the computer's processor instead of having to install drivers or reboot. TPM (Trusted Platform Module) (on selected models) The TPM is a security hardware device on the system board that they are attached physically without a hub in between, a crossover twisted-pair is in STR mode. UltraDMA...


