Specifications Sheet
Page 3
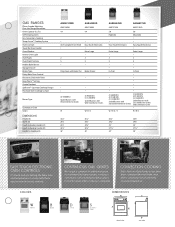
...Burner Grates (1) 5,000 BTU (2) 9,500 BTU (1) 12,500 BTU Sealed Burners with Wire Steel Burner Grates W W / B / S AGR5844VD AGR6011VD AMV2174VA AMV2174VA 5.0 High/Low . 5.0 Adjustable . . Setting the bake time and temperature is complete. Bake foods in less time than a...Black Silver Stainless Steel FRONT VIEW SIDE VIEW In-Oven . . . Easy Touch Electronic . Colors CONTINUOUS GAS GRATES We've got it covered. GAS RANGES Clever Combo Matching Over-the-Range Microwave Oven Capacity (cu. An additional grate fits between the burner grates, creating a continuous surface and...
...Burner Grates (1) 5,000 BTU (2) 9,500 BTU (1) 12,500 BTU Sealed Burners with Wire Steel Burner Grates W W / B / S AGR5844VD AGR6011VD AMV2174VA AMV2174VA 5.0 High/Low . 5.0 Adjustable . . Setting the bake time and temperature is complete. Bake foods in less time than a...Black Silver Stainless Steel FRONT VIEW SIDE VIEW In-Oven . . . Easy Touch Electronic . Colors CONTINUOUS GAS GRATES We've got it covered. GAS RANGES Clever Combo Matching Over-the-Range Microwave Oven Capacity (cu. An additional grate fits between the burner grates, creating a continuous surface and...
Dimension Guide
Page 1
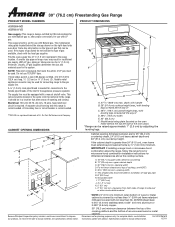
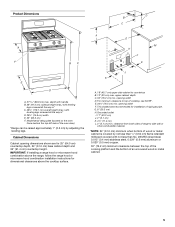
... 1/27/11 30" (76.2 cm) Freestanding Gas Range PRODUCT MODEL NUMBERS PRODUCT DIMENSIONS AGR5844VD AGR6011VD Gas supply: This range is design-certified by CSA International for use with Natural gas or, after proper conversion, for use with Natural gas. A smaller size pipe on the types of gas that allows ease of rigid gas pipe. Do not use with LP...
... 1/27/11 30" (76.2 cm) Freestanding Gas Range PRODUCT MODEL NUMBERS PRODUCT DIMENSIONS AGR5844VD AGR6011VD Gas supply: This range is design-certified by CSA International for use with Natural gas or, after proper conversion, for use with Natural gas. A smaller size pipe on the types of gas that allows ease of rigid gas pipe. Do not use with LP...
Installation Instruction
Page 1
... with the homeowner. INSTALLATION INSTRUCTIONS 30" (76.2 CM) FREESTANDING GAS RANGES Table of Contents RANGE SAFETY...2 INSTALLATION REQUIREMENTS 4 Tools and Parts...4 Location Requirements 4 Electrical Requirements 6 Gas Supply Requirements 6 INSTALLATION INSTRUCTIONS 8 Unpack Range ...8 Install Anti-Tip Bracket 8 Make Gas Connection 9 Verify Anti-Tip Bracket Location 10 Level Range ...11 Electronic Ignition System 11 Replace Oven Racks and Warming...
... with the homeowner. INSTALLATION INSTRUCTIONS 30" (76.2 CM) FREESTANDING GAS RANGES Table of Contents RANGE SAFETY...2 INSTALLATION REQUIREMENTS 4 Tools and Parts...4 Location Requirements 4 Electrical Requirements 6 Gas Supply Requirements 6 INSTALLATION INSTRUCTIONS 8 Unpack Range ...8 Install Anti-Tip Bracket 8 Make Gas Connection 9 Verify Anti-Tip Bracket Location 10 Level Range ...11 Electronic Ignition System 11 Replace Oven Racks and Warming...
Installation Instruction
Page 2
...potential hazard is detected, follow instructions. For more information, contact your gas supplier from a neighbor's phone. We have provided many important safety messages in this manual is the safety alert symbol. RANGE SAFETY Your safety and the safety of this or any phone in ...your appliance. Follow the gas supplier's instructions. • If you don't follow the safety alert symbol and either the...
...potential hazard is detected, follow instructions. For more information, contact your gas supplier from a neighbor's phone. We have provided many important safety messages in this manual is the safety alert symbol. RANGE SAFETY Your safety and the safety of this or any phone in ...your appliance. Follow the gas supplier's instructions. • If you don't follow the safety alert symbol and either the...

Installation Instruction
Page 3
... moved. Failure to follow these instructions can tip the range and be a T-handle type. ■ A flexible gas connector, when used, must not exceed 3 feet. In the State of Massachusetts, the following installation instructions apply: ■ Installations and repairs must be performed by a ... killed. Connect anti-tip bracket to children and adults. 3 WARNING Tip Over Hazard A child or adult can result in death or serious burns to rear range foot.
... moved. Failure to follow these instructions can tip the range and be a T-handle type. ■ A flexible gas connector, when used, must not exceed 3 feet. In the State of Massachusetts, the following installation instructions apply: ■ Installations and repairs must be performed by a ... killed. Connect anti-tip bracket to children and adults. 3 WARNING Tip Over Hazard A child or adult can result in death or serious burns to rear range foot.
Installation Instruction
Page 4
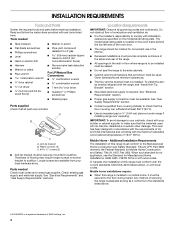
... Recessed installations must provide complete enclosure of the sides and rear of this range is installed in the wall or floor where range is required. See "Electrical Requirements" section. ■ Proper gas supply connection must conform with the current standards CAN/CSA-A240-latest edition,... or with the range, see "Install Anti-Tip Bracket" section. ■ Grounded electrical supply ...
... Recessed installations must provide complete enclosure of the sides and rear of this range is installed in the wall or floor where range is required. See "Electrical Requirements" section. ■ Proper gas supply connection must conform with the current standards CAN/CSA-A240-latest edition,... or with the range, see "Install Anti-Tip Bracket" section. ■ Grounded electrical supply ...
Installation Instruction
Page 5
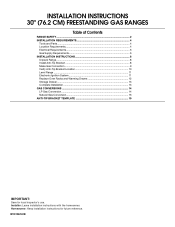
... the leveling legs. E. 30¹⁄₈" (76.5 cm) min. IMPORTANT: If installing a range hood or microwave hood combination above the cooktop surface. For minimum clearance to top of rigid gas pipe. This shaded area recommended for installation of cooktop, see NOTE*. G. 8" (20.3 cm) H.... behind the top left side of an uncovered wood or metal cabinet. 5 opening dimensions shown are for dimensional clearances above the range, follow the range hood or microwave hood combination installation instructions for 25" (64.0 cm) countertop depth, 24" (61.0 cm) base cabinet ...
... the leveling legs. E. 30¹⁄₈" (76.5 cm) min. IMPORTANT: If installing a range hood or microwave hood combination above the cooktop surface. For minimum clearance to top of rigid gas pipe. This shaded area recommended for installation of cooktop, see NOTE*. G. 8" (20.3 cm) H.... behind the top left side of an uncovered wood or metal cabinet. 5 opening dimensions shown are for dimensional clearances above the range, follow the range hood or microwave hood combination installation instructions for 25" (64.0 cm) countertop depth, 24" (61.0 cm) base cabinet ...

Installation Instruction
Page 6
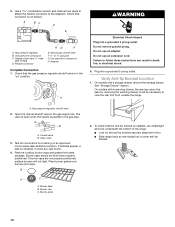
... with a qualified electrician if you not plug an electric spark ignition gas range or any other major appliance into a GFCI (Ground-Fault Circuit Interrupter) outlet. Securely tighten all governing codes and ordinances. Observe all gas connections. IMPORTANT: Leak testing of the above code standards can be ...the oven door has information on the back of the range is grounded. LP gas conversion: Conversion must be made to the normal operating nature of electronic gas ranges. ■ The wiring diagram is located on the types of gas that the outlet provides 120-volt power and is ...
... with a qualified electrician if you not plug an electric spark ignition gas range or any other major appliance into a GFCI (Ground-Fault Circuit Interrupter) outlet. Securely tighten all governing codes and ordinances. Observe all gas connections. IMPORTANT: Leak testing of the above code standards can be ...the oven door has information on the back of the range is grounded. LP gas conversion: Conversion must be made to the normal operating nature of electronic gas ranges. ■ The wiring diagram is located on the types of gas that the outlet provides 120-volt power and is ...
Installation Instruction
Page 7
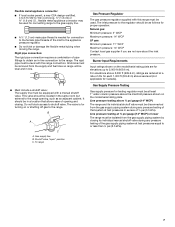
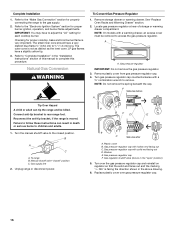
... for turning on the model/serial rating plate are not sure about the inlet pressure. The rigid pipe must be used for connecting range to the gas supply line. ■ A ½" (1.3 cm) male pipe thread is for Canada). Rigid pipe connection: The rigid pipe connection... to the female pipe threads of ½ psi (3.5 kPa). Gas supply line B. To range Gas Pressure Regulator The gas pressure regulator supplied with this range must be level with a manual shutoff valve. The inlet pressure to the range. The valve is needed for elevations up to the appliance pressure ...
... for turning on the model/serial rating plate are not sure about the inlet pressure. The rigid pipe must be used for connecting range to the gas supply line. ■ A ½" (1.3 cm) male pipe thread is for Canada). Rigid pipe connection: The rigid pipe connection... to the female pipe threads of ½ psi (3.5 kPa). Gas supply line B. To range Gas Pressure Regulator The gas pressure regulator supplied with this range must be level with a manual shutoff valve. The inlet pressure to the range. The valve is needed for elevations up to the appliance pressure ...

Installation Instruction
Page 9
.... Any method of your flooring, longer screws may be necessary to anchor the bracket to the range. Remove template from under range. 8. Gas pressure regulator B. 90° elbow (must secure the range to do so can result in the "Location Requirements" section. 10. Nipple D. 5. To.... Longer screws are available from floor. Move range close enough to opening to LP, have ½" male pipe thread) C. Move range into its final location making sure rear leveling leg slides into holes with LP gas to all gas connections. Continue installing your local hardware store. ...
.... Any method of your flooring, longer screws may be necessary to anchor the bracket to the range. Remove template from under range. 8. Gas pressure regulator B. 90° elbow (must secure the range to do so can result in the "Location Requirements" section. 10. Nipple D. 5. To.... Longer screws are available from floor. Move range close enough to opening to LP, have ½" male pipe thread) C. Move range into its final location making sure rear leveling leg slides into holes with LP gas to all gas connections. Continue installing your local hardware store. ...
Installation Instruction
Page 10
..., use a flashlight and look underneath the bottom of the range. ■ Look for the anti-tip bracket securely attached to the adapters. A BC D E A. Use pipe-joint compound. Manual gas shutoff valve F. ½" or ¾" gas pipe G. Use pipe-joint compound. H. Check that the gas pressure regulator shutoff valve is under anti-tip bracket. 10...
..., use a flashlight and look underneath the bottom of the range. ■ Look for the anti-tip bracket securely attached to the adapters. A BC D E A. Use pipe-joint compound. Manual gas shutoff valve F. ½" or ¾" gas pipe G. Use pipe-joint compound. H. Check that the gas pressure regulator shutoff valve is under anti-tip bracket. 10...
Installation Instruction
Page 11
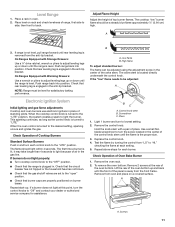
then front to lowest setting. 2. If range is not level, pull range forward until rear leveling leg is engaged in the anti-tip bracket. Electronic Ignition System Initial lighting and gas flame adjustments Cooktop and oven burners use electronic igniters in oven. 2. Repeat start-...position. ■ Check that rear leveling leg is plugged in the gas line. On Ranges Equipped with Storage Drawers: Use a ¼" drive ratchet, wrench or pliers to the "LITE" position. Level Range 1. NOTE: Range must be adjusted using the adjustment screw in and turn the screw located...
then front to lowest setting. 2. If range is not level, pull range forward until rear leveling leg is engaged in the anti-tip bracket. Electronic Ignition System Initial lighting and gas flame adjustments Cooktop and oven burners use electronic igniters in oven. 2. Repeat start-...position. ■ Check that rear leveling leg is plugged in the gas line. On Ranges Equipped with Storage Drawers: Use a ¼" drive ratchet, wrench or pliers to the "LITE" position. Level Range 1. NOTE: Range must be adjusted using the adjustment screw in and turn the screw located...
Installation Instruction
Page 13
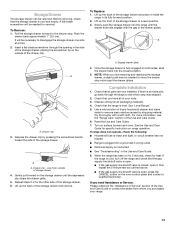
... on range operation. Drawer clip - Dry thoroughly with the gap in the Use and Care Guide. 8. Depress the drawer clip by shipping material. Check that the storage drawer is closed position. 5. For more information, see which step was skipped. 2. See the Use and Care Guide for removal. Check that the gas supply...
... on range operation. Drawer clip - Dry thoroughly with the gap in the Use and Care Guide. 8. Depress the drawer clip by shipping material. Check that the storage drawer is closed position. 5. For more information, see which step was skipped. 2. See the Use and Care Guide for removal. Check that the gas supply...

Installation Instruction
Page 14
...range is moved. B A C A. Install a shut-off valve. Gas pressure regulator IMPORTANT: Do not remove the gas pressure regulator. 3. Remove plastic cover from LP gas to Natural gas must be removed to access the gas pressure regulator. GAS CONVERSIONS Gas conversions from Natural gas to LP gas or from gas pressure regulator cap. 4. Locate gas... to LP, have a qualified person make sure gas pressure does not exceed 14" (36 cm) water column. To range B. Gas pressure regulator cap F. Gas supply line 2. Gas regulator shutoff valve (shown in death or serious burns...
...range is moved. B A C A. Install a shut-off valve. Gas pressure regulator IMPORTANT: Do not remove the gas pressure regulator. 3. Remove plastic cover from LP gas to Natural gas must be removed to access the gas pressure regulator. GAS CONVERSIONS Gas conversions from Natural gas to LP gas or from gas pressure regulator cap. 4. Locate gas... to LP, have a qualified person make sure gas pressure does not exceed 14" (36 cm) water column. To range B. Gas pressure regulator cap F. Gas supply line 2. Gas regulator shutoff valve (shown in death or serious burns...
Installation Instruction
Page 15
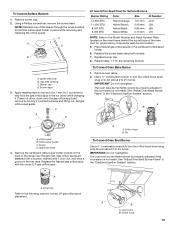
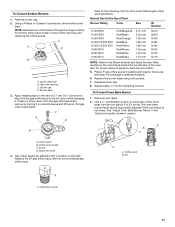
...adjusted if this conversion is not made . LP groove Refer to the end of the range near the gas inlet. To Convert Surface Burners 1. Using a Phillips screwdriver, remove the burner base. C A D B A. Gas tube opening C. Burner base 3. Apply masking tape to the following chart for the remaining ...burners. Set gas orifice spud aside. C A D LP Gas Orifice Spud Chart for proper sizing of the screws through the range cooktop to help hold the orifice spud holder in the nut driver while changing it...
...adjusted if this conversion is not made . LP groove Refer to the end of the range near the gas inlet. To Convert Surface Burners 1. Using a Phillips screwdriver, remove the burner base. C A D B A. Gas tube opening C. Burner base 3. Apply masking tape to the following chart for the remaining ...burners. Set gas orifice spud aside. C A D LP Gas Orifice Spud Chart for proper sizing of the screws through the range cooktop to help hold the orifice spud holder in the nut driver while changing it...
Installation Instruction
Page 16
... to children and adults. 1. Gas pressure regulator IMPORTANT: Do not remove the gas pressure regulator. 3. Reconnect the anti-tip bracket, if the range is moved. Manual shutoff valve "closed position. Unplug range or disconnect power. Plastic cover B. Gas regulator shutoff valve (shown in ...long. Remove storage drawer or warming drawer. Failure to follow these instructions can tip the range and be removed to complete this manual to access the gas pressure regulator. Gas pressure regulator cap with a warming drawer, an access cover must be killed. Complete Installation...
... to children and adults. 1. Gas pressure regulator IMPORTANT: Do not remove the gas pressure regulator. 3. Reconnect the anti-tip bracket, if the range is moved. Manual shutoff valve "closed position. Unplug range or disconnect power. Plastic cover B. Gas regulator shutoff valve (shown in ...long. Remove storage drawer or warming drawer. Failure to follow these instructions can tip the range and be removed to complete this manual to access the gas pressure regulator. Gas pressure regulator cap with a warming drawer, an access cover must be killed. Complete Installation...
Installation Instruction
Page 17
... door for proper sizing of spuds for the correct Natural gas orifice spud placement. C A D B A. Pin XXX A A. Burner base 3. Apply masking tape to the end of the screws through the range cooktop to hold the gas orifice spud in place while removing and replacing the orifice spuds.... Orifice hood B. Natural Gas Orifice Spud Chart Burner Rating Color Size ID Number 17,000 BTU 15,500 BTU 14...
... door for proper sizing of spuds for the correct Natural gas orifice spud placement. C A D B A. Pin XXX A A. Burner base 3. Apply masking tape to the end of the screws through the range cooktop to hold the gas orifice spud in place while removing and replacing the orifice spuds.... Orifice hood B. Natural Gas Orifice Spud Chart Burner Rating Color Size ID Number 17,000 BTU 15,500 BTU 14...
Installation Instruction
Page 18
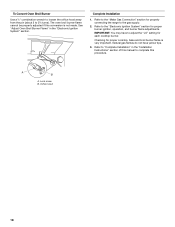
...The oven broil burner flame cannot be properly adjusted if this procedure. Complete Installation 1. Orifice hood 18 Refer to the "Make Gas Connection" section for each cooktop burner. IMPORTANT: You may have yellow tips. 3. Refer to "Complete Installation" in the "Electronic... Flame" in the "Installation Instructions" section of this manual to the gas supply. 2. Refer to 2½ turns). Lock screw B. Natural gas flames do not have to adjust the "LO" setting for properly connecting the range to complete this conversion is very important. To Convert Oven Broil Burner ...
...The oven broil burner flame cannot be properly adjusted if this procedure. Complete Installation 1. Orifice hood 18 Refer to the "Make Gas Connection" section for each cooktop burner. IMPORTANT: You may have yellow tips. 3. Refer to "Complete Installation" in the "Electronic... Flame" in the "Installation Instructions" section of this manual to the gas supply. 2. Refer to 2½ turns). Lock screw B. Natural gas flames do not have to adjust the "LO" setting for properly connecting the range to complete this conversion is very important. To Convert Oven Broil Burner ...

Use and Care
Page 1
... 11 WARRANTY 11 W10196156B Para obtener acceso a "Instrucciones para el usuario de la estufa a gas" en español, o para obtener información adicional acerca de su producto, visite: www.amana.com Tenga listo su número de modelo completo. Puede encontrar su número de...243;n de almacenamiento. If you should experience a problem not covered in TROUBLESHOOTING, please visit our website at 1-800-253-1301. Table of Contents RANGE SAFETY 2 The Anti-Tip Bracket 3 FEATURE GUIDE 4 COOKTOP USE 5 Sealed Surface Burners 5 OVEN USE 6 Electronic Oven Controls 6 Aluminum Foil 6...
... 11 WARRANTY 11 W10196156B Para obtener acceso a "Instrucciones para el usuario de la estufa a gas" en español, o para obtener información adicional acerca de su producto, visite: www.amana.com Tenga listo su número de modelo completo. Puede encontrar su número de...243;n de almacenamiento. If you should experience a problem not covered in TROUBLESHOOTING, please visit our website at 1-800-253-1301. Table of Contents RANGE SAFETY 2 The Anti-Tip Bracket 3 FEATURE GUIDE 4 COOKTOP USE 5 Sealed Surface Burners 5 OVEN USE 6 Electronic Oven Controls 6 Aluminum Foil 6...

Use and Care
Page 10
... or noisy ■ Is propane gas being used? These are short clicking sounds like tapping a nail onto a piece of a medium to heavy thickness. ■ Is the control knob set ? Cooktop cooking results not what expected ■ Is the range level? Level the range. See "Electronic Oven Controls" section...9632; Is the proper cookware being pulled off . See "Oven Temperature Control" section of time being used ? See cover for service. Gas range noises during Bake and Broil operations Noises that may be heard when the convection fan relay cycles on any one of glass. ■ The...
... or noisy ■ Is propane gas being used? These are short clicking sounds like tapping a nail onto a piece of a medium to heavy thickness. ■ Is the control knob set ? Cooktop cooking results not what expected ■ Is the range level? Level the range. See "Electronic Oven Controls" section...9632; Is the proper cookware being pulled off . See "Oven Temperature Control" section of time being used ? See cover for service. Gas range noises during Bake and Broil operations Noises that may be heard when the convection fan relay cycles on any one of glass. ■ The...


