
Owners Manual
Page 3
... for Safe Usage 7 WARNING 7 CAUTION 8 NOTICE 9 Getting Started Location of Controls 11 Turning Power On or Off 12 Adjusting the Volume 12 Lowering Volume Quickly 12 Turning off the screen/button illumination (Display OFF 12 Touch Screen Operation 12 Switching Sources 13 Selecting an Item in a List 13 About the HOME Screen 13 About the Indicator Display 14 Setup Setup Operation 14 Device Setup Displaying Device List 15 Pairing the Bluetooth® Device 16...
... for Safe Usage 7 WARNING 7 CAUTION 8 NOTICE 9 Getting Started Location of Controls 11 Turning Power On or Off 12 Adjusting the Volume 12 Lowering Volume Quickly 12 Turning off the screen/button illumination (Display OFF 12 Touch Screen Operation 12 Switching Sources 13 Selecting an Item in a List 13 About the HOME Screen 13 About the Indicator Display 14 Setup Setup Operation 14 Device Setup Displaying Device List 15 Pairing the Bluetooth® Device 16...
Owners Manual
Page 4
... Zone 28 Setting the Daylight Savings Time 28 Setting the Home Screen Type 28 Screen/Lighting Setup 28 Setting the Brightness of the Backlighting (Dimmer 28 Adjusting the Dimmer of Button Lighting at Night 28 Adjusting the Minimum Level of Backlight.....29 Switching the Display Color 29 Editing HOME screen 29 Vehicle Type Setup 29 Steering wheel Setting 29 Fuel Type Setting 29 EV Connector Type Setting 29 Installation Setup 29 4-EN About/Software Update iLX-507/iLX-F509/ iLX...
... Zone 28 Setting the Daylight Savings Time 28 Setting the Home Screen Type 28 Screen/Lighting Setup 28 Setting the Brightness of the Backlighting (Dimmer 28 Adjusting the Dimmer of Button Lighting at Night 28 Adjusting the Minimum Level of Backlight.....29 Switching the Display Color 29 Editing HOME screen 29 Vehicle Type Setup 29 Steering wheel Setting 29 Fuel Type Setting 29 EV Connector Type Setting 29 Installation Setup 29 4-EN About/Software Update iLX-507/iLX-F509/ iLX...

Owners Manual
Page 5
... Switching Display Modes 46 Switching the Audio Tracks 46 iPod mode on iPhone (Optional) Playback 47 Searching for a Music File 47 Repeat Play 48 Shuffle Play 48 SiriusXM Satellite Radio Operation (Optional) SiriusXM Tuner operation 48 Receiving Channels with the SiriusXM Tuner....... 49 Selecting the Channel 49 Selecting the Channel Directly 49 Tuning Channels by Category 50 Checking the SiriusXM Radio ID Number 50 Storing Channel Presets 50 Tuning Channels using Presets 50 Replay Function 51 Listening to the Recommended Channels...
... Switching Display Modes 46 Switching the Audio Tracks 46 iPod mode on iPhone (Optional) Playback 47 Searching for a Music File 47 Repeat Play 48 Shuffle Play 48 SiriusXM Satellite Radio Operation (Optional) SiriusXM Tuner operation 48 Receiving Channels with the SiriusXM Tuner....... 49 Selecting the Channel 49 Selecting the Channel Directly 49 Tuning Channels by Category 50 Checking the SiriusXM Radio ID Number 50 Storing Channel Presets 50 Tuning Channels using Presets 50 Replay Function 51 Listening to the Recommended Channels...

Owners Manual
Page 6
... Message Appears 72 Specifications 73 Installation and Connections WARNING 75 CAUTION 75 Precautions 76 Accessory List 76 Installation 77 Caution concerning the installation location 77 Mounting the Microphone 77 Mounting the GPS Antenna inside the vehicle 78 Note on using HDMI Connection Cables..........78 Position Adjustment and Mounting Dimensions of the Display (iLX-F509/iLX-F511 only 78 Adjusting the display position (iLX-F509/iLX-F511 79 Installation example using the Original Mounting...
... Message Appears 72 Specifications 73 Installation and Connections WARNING 75 CAUTION 75 Precautions 76 Accessory List 76 Installation 77 Caution concerning the installation location 77 Mounting the Microphone 77 Mounting the GPS Antenna inside the vehicle 78 Note on using HDMI Connection Cables..........78 Position Adjustment and Mounting Dimensions of the Display (iLX-F509/iLX-F511 only 78 Adjusting the display position (iLX-F509/iLX-F511 79 Installation example using the Original Mounting...

Owners Manual
Page 7
... receiver is dangerous for a Class B digital device, pursuant to part 15 of the following two conditions: (1) This device may not cause harmful interference, and (2) this product incorrectly enables the driver to watch TV/Video while driving a vehicle. Watching the video may result in a safe and effective manner. Always stop . Excessive volume levels that to which can be determined by turning...
... receiver is dangerous for a Class B digital device, pursuant to part 15 of the following two conditions: (1) This device may not cause harmful interference, and (2) this product incorrectly enables the driver to watch TV/Video while driving a vehicle. Watching the video may result in a safe and effective manner. Always stop . Excessive volume levels that to which can be determined by turning...

Owners Manual
Page 11
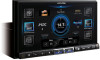
... adjust the display angle, hold this Owner's Manual The buttons found on the face of the car interior. Press and hold the center of the top and bottom of Camera2 (Front/Side/Other) or Camera1 (Rear). About the button descriptions used in bold within a range of Controls ■ iLX-507 ■ iLX-F509/iLX-F511 Power indicator (HOME) button Displays the HOME screen. Audio sources can be switched while the Audio playback screen is switched without changing...
... adjust the display angle, hold this Owner's Manual The buttons found on the face of the car interior. Press and hold the center of the top and bottom of Camera2 (Front/Side/Other) or Camera1 (Rear). About the button descriptions used in bold within a range of Controls ■ iLX-507 ■ iLX-F509/iLX-F511 Power indicator (HOME) button Displays the HOME screen. Audio sources can be switched while the Audio playback screen is switched without changing...

Owners Manual
Page 20
... Volume Adjust Setting level: -14 to +14 (Initial setting: 0) Touch [ ] or [ ] of "Volume Adjust" to set the picture quality. • Available only when the current source is a large amount of "Volume Adjust" to poor reception. Setting the Receiving mode Receiving mode can select the frequency step for FM analog radio station searching. Setting item: Receiving mode Setting contents: Hybrid (Initial setting) / Forced Analog Hybrid: Automatically switches to analog reception to reduce noise when there is USB Video. Adjusting the USB Volume Setting item: Volume Adjust Setting level...
... Volume Adjust Setting level: -14 to +14 (Initial setting: 0) Touch [ ] or [ ] of "Volume Adjust" to set the picture quality. • Available only when the current source is a large amount of "Volume Adjust" to poor reception. Setting the Receiving mode Receiving mode can select the frequency step for FM analog radio station searching. Setting item: Receiving mode Setting contents: Hybrid (Initial setting) / Forced Analog Hybrid: Automatically switches to analog reception to reduce noise when there is USB Video. Adjusting the USB Volume Setting item: Volume Adjust Setting level...

Owners Manual
Page 22
... Android Auto is HDMI (or Digital TV). HDMI Setup [HDMI] is HDMI (or Digital TV). Setting the HDMI Name Set the display name of "Volume Adjust" to +14 (Initial setting: 0) Touch [ ] or [ ] of an external device connected via HDMI. Setting item: HDMI Name Setting contents: Off / HDMI (Initial setting) / Digital TV • Not available when the current source is selected on the Function Setup Menu screen. Setting item: HDMI selector Touch [ ] (Off) or [ selector". ] (On) of "HDMI Adjusting the HDMI Volume Setting item: Volume Adjust Setting level: -14 to set the picture...
... Android Auto is HDMI (or Digital TV). HDMI Setup [HDMI] is HDMI (or Digital TV). Setting the HDMI Name Set the display name of "Volume Adjust" to +14 (Initial setting: 0) Touch [ ] or [ ] of an external device connected via HDMI. Setting item: HDMI Name Setting contents: Off / HDMI (Initial setting) / Digital TV • Not available when the current source is selected on the Function Setup Menu screen. Setting item: HDMI selector Touch [ ] (Off) or [ selector". ] (On) of "HDMI Adjusting the HDMI Volume Setting item: Volume Adjust Setting level: -14 to set the picture...

Owners Manual
Page 23
... Audio Setup [Bluetooth Audio] is connected. Setting item: Phonebook Transfer Setting contents: Auto (Initial setting) / Manual Setting the Phonebook Name Order Set the order of "Microphone Level" to set the call volume level. • Not available when Apple CarPlay or Android Auto is selected on the Function Setup Menu screen. Adjusting the Microphone Level Setting item: Microphone Level Setting level: 1 to 11 (Initial setting: 5) Touch [ ] or [ ] of the last name and first name displayed in the phonebook. Adjusting the Bluetooth Audio Volume Setting item: Volume Adjust Setting...
... Audio Setup [Bluetooth Audio] is connected. Setting item: Phonebook Transfer Setting contents: Auto (Initial setting) / Manual Setting the Phonebook Name Order Set the order of "Microphone Level" to set the call volume level. • Not available when Apple CarPlay or Android Auto is selected on the Function Setup Menu screen. Adjusting the Microphone Level Setting item: Microphone Level Setting level: 1 to 11 (Initial setting: 5) Touch [ ] or [ ] of the last name and first name displayed in the phonebook. Adjusting the Bluetooth Audio Volume Setting item: Volume Adjust Setting...
Owners Manual
Page 29
... source name to change the order. Setting item: Vehicle Types for Phone Link] is selected on the System Setup Menu screen. You can change the screen brightness while traveling at night. Apple CarPlay and Android Auto require information about the vehicle to check the installation status of your vehicle, some installation status may not be used or Android smartphone which installed Android Auto App is displayed. Switching the Display...
... source name to change the order. Setting item: Vehicle Types for Phone Link] is selected on the System Setup Menu screen. You can change the screen brightness while traveling at night. Apple CarPlay and Android Auto require information about the vehicle to check the installation status of your vehicle, some installation status may not be used or Android smartphone which installed Android Auto App is displayed. Switching the Display...
Owners Manual
Page 30
... [Reset] of "Software Version". 3 After the confirmation message appears, touch [OK]. System will restart automatically when the update is complete. • Do not turn on the System Setup Menu screen. Displaying Software License Setting contents: Open-Source Software License Initializing the Sound Settings You can initialize all data, to Preset 3 cannot be initialized. • "Car by Car Update) This setting is displayed, touch [Update]. By using the USB flash...
... [Reset] of "Software Version". 3 After the confirmation message appears, touch [OK]. System will restart automatically when the update is complete. • Do not turn on the System Setup Menu screen. Displaying Software License Setting contents: Open-Source Software License Initializing the Sound Settings You can initialize all data, to Preset 3 cannot be initialized. • "Car by Car Update) This setting is displayed, touch [Update]. By using the USB flash...

Owners Manual
Page 35
... "Subwoofer Level" setting screen is toggled Subwoofer Normal (0°) or Subwoofer Reverse (180°). Defeat Setting If Defeat is connected. This disables any settings made for these functions. Setting item: Phase Setting contents: 0° (Initial setting) / 180° Touch [Phase] to [On] (page 33). 35-EN Setting item: Defeat Touch [Defeat]. Setting the Subwoofer Phase The subwoofer output phase is displayed. • When "Bass" and "Treble" are turned Off. Setting the Subwoofer Touch [Tone Adjust]. Adjusting the Subwoofer Level...
... "Subwoofer Level" setting screen is toggled Subwoofer Normal (0°) or Subwoofer Reverse (180°). Defeat Setting If Defeat is connected. This disables any settings made for these functions. Setting item: Phase Setting contents: 0° (Initial setting) / 180° Touch [Phase] to [On] (page 33). 35-EN Setting item: Defeat Touch [Defeat]. Setting the Subwoofer Phase The subwoofer output phase is displayed. • When "Bass" and "Treble" are turned Off. Setting the Subwoofer Touch [Tone Adjust]. Adjusting the Subwoofer Level...

Owners Manual
Page 40
... mode*: Digital Seek mode: Manual mode: Program Type mode: (RBDS FM Radio Mode only) Preset mode: Stations with a short touch. You can receive HD Radio broadcasting signals based on digital radio broadcast standards, in steps. However, the display is manually tuned in addition to receive the RBDS Radio signal automatically. Touch for your high-quality sound enjoyment. Automatically receives a receivable digital broadcast. Displays the Radio Setup Menu screen (page 19). The currently selected program type station will switch to analog radio broadcasts using RBDS if digital...
... mode*: Digital Seek mode: Manual mode: Program Type mode: (RBDS FM Radio Mode only) Preset mode: Stations with a short touch. You can receive HD Radio broadcasting signals based on digital radio broadcast standards, in steps. However, the display is manually tuned in addition to receive the RBDS Radio signal automatically. Touch for your high-quality sound enjoyment. Automatically receives a receivable digital broadcast. Displays the Radio Setup Menu screen (page 19). The currently selected program type station will switch to analog radio broadcasts using RBDS if digital...
Owners Manual
Page 42
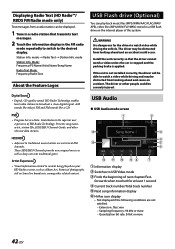
... least 1 second Current track number/Total track number Next song information display Hi-Res icon display • Not displayed if the following conditions are extra local FM channels. USB Audio ■ USB Audio mode screen • Program Service Data: Contributes to broadcast a clean digital signal. Presents song name, artist, station IDs, HD2/HD3 Channel Guide, and other relevant data streams. • Adjacent to watch video while driving the vehicle. These...
... least 1 second Current track number/Total track number Next song information display Hi-Res icon display • Not displayed if the following conditions are extra local FM channels. USB Audio ■ USB Audio mode screen • Program Service Data: Contributes to broadcast a clean digital signal. Presents song name, artist, station IDs, HD2/HD3 Channel Guide, and other relevant data streams. • Adjacent to watch video while driving the vehicle. These...
Owners Manual
Page 54
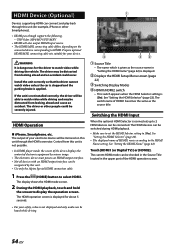
...]. Control from looking ahead and an accident could be distracted from this unit. • Use only the Alpine Special HDMI connection cable. 1 Press the (HOME) button to watch video while driving the vehicle. HDMI Device (Optional) Devices supporting HDMI can connect and play back through the HDMI connector. Prepare optional HDMI/MHL connecting cable sets suitable for example, iPhone or other people could occur. Displays the HDMI Setup Menu screen (page 22) Switching Display Modes HDMI1/HDMI2 switch...
...]. Control from looking ahead and an accident could be distracted from this unit. • Use only the Alpine Special HDMI connection cable. 1 Press the (HOME) button to watch video while driving the vehicle. HDMI Device (Optional) Devices supporting HDMI can connect and play back through the HDMI connector. Prepare optional HDMI/MHL connecting cable sets suitable for example, iPhone or other people could occur. Displays the HDMI Setup Menu screen (page 22) Switching Display Modes HDMI1/HDMI2 switch...

Owners Manual
Page 55
... HDMI is not supported. • HDMI Output will pass video through is automatically on: There is no setting that third party manufacturer may sound unnatural. • When using a HFP (Hands-Free Profile) compatible mobile phone with installed Android Auto App, the operation screen may not be able to communicate with this unit. • Proper function of this unit. • Avoid performing a hands-free call , or perform setup...
... HDMI is not supported. • HDMI Output will pass video through is automatically on: There is no setting that third party manufacturer may sound unnatural. • When using a HFP (Hands-Free Profile) compatible mobile phone with installed Android Auto App, the operation screen may not be able to communicate with this unit. • Proper function of this unit. • Avoid performing a hands-free call , or perform setup...
Owners Manual
Page 62
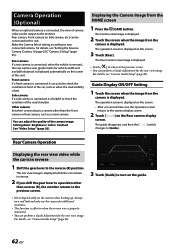
... the [Guide] switch changes to the reverse (R) position. Rear Camera Operation Displaying the rear view video while the car is in front of the car, such as a room camera. The operation screen is displayed on the guide. 62-EN The Rear Camera view image is displayed. • Touch [ ] to return to turn and look and only use the camera for additional assistance. • This function is...
... the [Guide] switch changes to the reverse (R) position. Rear Camera Operation Displaying the rear view video while the car is in front of the car, such as a room camera. The operation screen is displayed on the guide. 62-EN The Rear Camera view image is displayed. • Touch [ ] to return to turn and look and only use the camera for additional assistance. • This function is...

Owners Manual
Page 66
... guide display ON/ OFF setting and Caution display location can be adjusted. Access to iDataLink Mode You can check the car condition, control specific vehicle functions, etc. 1 Press the (HOME) button to the car's iDataLink module, you cannot operate the buttons on the front panel or the touch buttons on the top of the screen. About the adjustment of guide display ON/OFF setting and adjustment of Caution display location As with the rear...
... guide display ON/ OFF setting and Caution display location can be adjusted. Access to iDataLink Mode You can check the car condition, control specific vehicle functions, etc. 1 Press the (HOME) button to the car's iDataLink module, you cannot operate the buttons on the front panel or the touch buttons on the top of the screen. About the adjustment of guide display ON/OFF setting and adjustment of Caution display location As with the rear...

Owners Manual
Page 72
... of the HDMI compatible monitor. 72-EN SAT Antenna Error • The satellite antenna is not receiving a satellite signal. - In addition to a safe location, stop, and engage the parking brake, then carry out this unit. - HDMI monitor communication error. Broadcast is noisy. • The antenna is displayed, carefully follow the instructions in another station. You cannot play back from the unit, and then reconnect them. Turn OFF/ON...
... of the HDMI compatible monitor. 72-EN SAT Antenna Error • The satellite antenna is not receiving a satellite signal. - In addition to a safe location, stop, and engage the parking brake, then carry out this unit. - HDMI monitor communication error. Broadcast is noisy. • The antenna is displayed, carefully follow the instructions in another station. You cannot play back from the unit, and then reconnect them. Turn OFF/ON...

Owners Manual
Page 89
... rear input terminal To subwoofer input terminal Amplifier for subwoofer (sold separately) Subwoofer REMO (Blue/White) REMOTE ON (Blue/White) REMOTE ON (Blue/White) Subwoofer RCA Connectors Front Output RCA Connectors Rear Output RCA Connectors Remote Turn-On Lead (Blue/White) RCA Extension Cable (sold separately) • You can change the name of an External Device AUX Input Connector (Yellow) (Red) (White) To Video Output terminal External Device (sold separately) To Audio Output...
... rear input terminal To subwoofer input terminal Amplifier for subwoofer (sold separately) Subwoofer REMO (Blue/White) REMOTE ON (Blue/White) REMOTE ON (Blue/White) Subwoofer RCA Connectors Front Output RCA Connectors Rear Output RCA Connectors Remote Turn-On Lead (Blue/White) RCA Extension Cable (sold separately) • You can change the name of an External Device AUX Input Connector (Yellow) (Red) (White) To Video Output terminal External Device (sold separately) To Audio Output...


