Owners Manual
Page 5
... CAUTION ...4 PRECAUTIONS ...5 Setup About the Setup ...33 General Setup Operation ...34 Adjusting Brightness ...36 Adjusting Color of Picture ...36 Adjusting Tint of Picture ...37 Adjusting Display Contrast ...37 Adjusting the Sharpness ...37 Storing the Adjusted VISUAL EQ ...38 Setting the Illumination Brightness...indicators and the microphone ...7 Using the TMI-M990 with an IONBUS connection ...7 How to Read This Manual ...8 Basic Operation Using Face Cover ...9 Initial System Start-up ...9 Turning Power On or Off ...10 Opening/Closing the Monitor ...12 Adjusting the Display Back and ...
... CAUTION ...4 PRECAUTIONS ...5 Setup About the Setup ...33 General Setup Operation ...34 Adjusting Brightness ...36 Adjusting Color of Picture ...36 Adjusting Tint of Picture ...37 Adjusting Display Contrast ...37 Adjusting the Sharpness ...37 Storing the Adjusted VISUAL EQ ...38 Setting the Illumination Brightness...indicators and the microphone ...7 Using the TMI-M990 with an IONBUS connection ...7 How to Read This Manual ...8 Basic Operation Using Face Cover ...9 Initial System Start-up ...9 Turning Power On or Off ...10 Opening/Closing the Monitor ...12 Adjusting the Display Back and ...
Owners Manual
Page 12
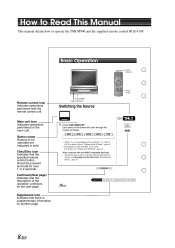
... the next page. Basic Operation V.SEL/ V.MUTE WIDE/ R.SEL Remote control icon Indicates operations performed with an IONBUS compatible head unit: • The picture source can be pressed and held for supplementary information. 16-EN Supplement 8-EN ○ ○ ○ ○ ○ ○ ○...AUX-3 DVD Button name Buttons to ON. R.SEL/WIDE V.SEL/DISP.OFF Switching the Source NAVI. For details, refer to operate the TMI-M990 and the supplied remote control RUE-4199. Continued Supplement See page 19 for over 1 or 2 seconds. is only displayed when AUX IN...
... the next page. Basic Operation V.SEL/ V.MUTE WIDE/ R.SEL Remote control icon Indicates operations performed with an IONBUS compatible head unit: • The picture source can be pressed and held for supplementary information. 16-EN Supplement 8-EN ○ ○ ○ ○ ○ ○ ○...AUX-3 DVD Button name Buttons to ON. R.SEL/WIDE V.SEL/DISP.OFF Switching the Source NAVI. For details, refer to operate the TMI-M990 and the supplied remote control RUE-4199. Continued Supplement See page 19 for over 1 or 2 seconds. is only displayed when AUX IN...

Owners Manual
Page 20
AUX-1 AUX-2 AUX-3 DVD When connected with an IONBUS compatible head unit: • The picture source can be switched from the Head Unit "Switching the Source", page 47. is only displayed when AUX IN 1, 2, 3 SIG. For details, see Operating from ...
AUX-1 AUX-2 AUX-3 DVD When connected with an IONBUS compatible head unit: • The picture source can be switched from the Head Unit "Switching the Source", page 47. is only displayed when AUX IN 1, 2, 3 SIG. For details, see Operating from ...

Owners Manual
Page 21
...; ○ ○ ○ ○ ○ ○ ○ ○ ○ ○ In Normal mode, the monitor displays a normal picture at the center of the screen with a vertical black band at least 2 seconds in a wide-screen monitor by stretching out the picture horizontally and vertically. Switching Display Modes 1 Press and hold R.SEL/WIDE for at each...
...; ○ ○ ○ ○ ○ ○ ○ ○ ○ ○ In Normal mode, the monitor displays a normal picture at the center of the screen with a vertical black band at least 2 seconds in a wide-screen monitor by stretching out the picture horizontally and vertically. Switching Display Modes 1 Press and hold R.SEL/WIDE for at each...

Owners Manual
Page 26
...not clear. Press and hold VISUAL EQ for movies with either / TILT or / TILT. Suitable when watching CG or animation. Suitable for each picture source such as DVD. (VISUAL EQ cannot be set on . HIGH CONTRAST: Increases the screen contrast. The screen returns to display "FLAT"....EQTM" (Page 23). USER 1/2: Accesses the adjustment value stored in RGB navigation mode, backup camera interruption mode.) 5 22-EN SHARP: Sharpens the picture. The VISUAL EQ SETUP screen is displayed. 3 Press OPEN/CLOSE / SETUP and select VISUAL EQ. 4 Select your preferred VISUAL EQ property with a...
...not clear. Press and hold VISUAL EQ for movies with either / TILT or / TILT. Suitable when watching CG or animation. Suitable for each picture source such as DVD. (VISUAL EQ cannot be set on . HIGH CONTRAST: Increases the screen contrast. The screen returns to display "FLAT"....EQTM" (Page 23). USER 1/2: Accesses the adjustment value stored in RGB navigation mode, backup camera interruption mode.) 5 22-EN SHARP: Sharpens the picture. The VISUAL EQ SETUP screen is displayed. 3 Press OPEN/CLOSE / SETUP and select VISUAL EQ. 4 Select your preferred VISUAL EQ property with a...

Owners Manual
Page 27
Press VISUAL EQ to two of your image adjustments. The picture brightness, color, tint, contrast and sharpness can store up to display "FLAT". 2 Press and hold VISUAL EQ for at least 2 seconds. VISUAL EQ ON OFF &#...
Press VISUAL EQ to two of your image adjustments. The picture brightness, color, tint, contrast and sharpness can store up to display "FLAT". 2 Press and hold VISUAL EQ for at least 2 seconds. VISUAL EQ ON OFF &#...

Owners Manual
Page 28
...Select the USER1 or USER2 mode by pressing / TILT. / TILT or 5 When adjusting another item, repeat steps 3 and 4. 6 When the picture settings are complete, press OPEN/CLOSE / SETUP or VISUAL EQ and select V.EQ MEMORY. Other Useful Features 3 Press OPEN/CLOSE / SETUP or VISUAL ...to move to the previous item. • For details on each item, see the General Setup Operation "Adjusting Brightness", "Adjusting Color of Picture", "Adjusting Tint of Picture", "Adjusting Display Contrast", "Adjusting the Sharpness" (page 36 to 37). 4 Adjust the selected item by pressing / TILT or / TILT....
...Select the USER1 or USER2 mode by pressing / TILT. / TILT or 5 When adjusting another item, repeat steps 3 and 4. 6 When the picture settings are complete, press OPEN/CLOSE / SETUP or VISUAL EQ and select V.EQ MEMORY. Other Useful Features 3 Press OPEN/CLOSE / SETUP or VISUAL ...to move to the previous item. • For details on each item, see the General Setup Operation "Adjusting Brightness", "Adjusting Color of Picture", "Adjusting Tint of Picture", "Adjusting Display Contrast", "Adjusting the Sharpness" (page 36 to 37). 4 Adjust the selected item by pressing / TILT or / TILT....

Owners Manual
Page 32
... or other audio source in the front, DVD can be enjoyed in the rear with the optional rear monitor and headphones. NAVI.: The picture and sound from the Navigation is output to the rear monitor. (Only when the Navigation is connected.) AUX-1*2: Any A/V source unit (TV, VCR, Video Game, etc.) AUX...: AUX OUT1, AUX OUT2 AUX OUT1*1: Select the source, from the S video output compatible Alpine head unit is output to the rear monitor. *1 If not connected to an IONBUS compatible head unit, AUX OUT1 is then used as audio output for the front (TMI-M990). *2 Only displayed when AUX IN 1,2,3 SIG.
... or other audio source in the front, DVD can be enjoyed in the rear with the optional rear monitor and headphones. NAVI.: The picture and sound from the Navigation is output to the rear monitor. (Only when the Navigation is connected.) AUX-1*2: Any A/V source unit (TV, VCR, Video Game, etc.) AUX...: AUX OUT1, AUX OUT2 AUX OUT1*1: Select the source, from the S video output compatible Alpine head unit is output to the rear monitor. *1 If not connected to an IONBUS compatible head unit, AUX OUT1 is then used as audio output for the front (TMI-M990). *2 Only displayed when AUX IN 1,2,3 SIG.

Owners Manual
Page 34
...another source while listening to your preferred source (FM, AM, CD etc.) on the head unit. 1 Change to the current source. The TMI-M990 picture source changes each time it is connected, you can watch video from the AUX or NAVI. Other Useful Features V.SEL/ V.MUTE V.SEL/DISP....OFF Switching the Visual Source Only (Simultaneous Function) When an IONBUS compatible head unit is pressed. * (Picture) (Audio) AUX-3 DVD DVD DVD AUX-2 DVD NAVI. For details, see the head unit operating instructions. DVD AUX-1 DVD * When simultaneous is ...
...another source while listening to your preferred source (FM, AM, CD etc.) on the head unit. 1 Change to the current source. The TMI-M990 picture source changes each time it is connected, you can watch video from the AUX or NAVI. Other Useful Features V.SEL/ V.MUTE V.SEL/DISP....OFF Switching the Visual Source Only (Simultaneous Function) When an IONBUS compatible head unit is pressed. * (Picture) (Audio) AUX-3 DVD DVD DVD AUX-2 DVD NAVI. For details, see the head unit operating instructions. DVD AUX-1 DVD * When simultaneous is ...

Owners Manual
Page 36
... from BRIGHT, COLOR, TINT, CONTRAST, SHARPNESS. 3 Adjust the image by pressing 4 When adjusting another item, repeat steps 2 and 3. 5 When the picture settings are stored in the selected mode. 8 After setting, press and hold OPEN/CLOSE / SETUP for at least 2 seconds. Please refer to select USER1...which switches the source of VISUAL EQ can also be turned OFF. TITLE Adjusting and Storing VISUAL EQTM Description Adjusting and storing of the rear monitor is below. The screen returns to 31. Operation from the remote control 1 Press and hold OPEN/CLOSE / SETUP for at least 2 ...
... from BRIGHT, COLOR, TINT, CONTRAST, SHARPNESS. 3 Adjust the image by pressing 4 When adjusting another item, repeat steps 2 and 3. 5 When the picture settings are stored in the selected mode. 8 After setting, press and hold OPEN/CLOSE / SETUP for at least 2 seconds. Please refer to select USER1...which switches the source of VISUAL EQ can also be turned OFF. TITLE Adjusting and Storing VISUAL EQTM Description Adjusting and storing of the rear monitor is below. The screen returns to 31. Operation from the remote control 1 Press and hold OPEN/CLOSE / SETUP for at least 2 ...

Owners Manual
Page 37
... setting positions. *1 Cannot be set in the TMI-M990. • For example, a sound is made when a switch is pressed, or a beep sound can change your preferred settings. (See page 34) Setting item Setting content Page Picture brightness adjustment Picture color adjustment*1 Picture tint adjustment*1 Display contrast adjustment Picture sharpness adjustment*1 Store the image adjustments Illumination brightness...
... setting positions. *1 Cannot be set in the TMI-M990. • For example, a sound is made when a switch is pressed, or a beep sound can change your preferred settings. (See page 34) Setting item Setting content Page Picture brightness adjustment Picture color adjustment*1 Picture tint adjustment*1 Display contrast adjustment Picture sharpness adjustment*1 Store the image adjustments Illumination brightness...

Owners Manual
Page 40
...; ○ Adjusting Brightness Setting item: BRIGHT Setting content: -15 ~ +15 1 Adjust the brightness from -15 to +15 by pressing / TILT or / TILT. Adjusting Color of Picture Setting item: COLOR Setting content: -15 ~ +15 1 Adjust the color from -15 to "Setup menu chart" on page 33 and "GENERAL setup standard operation" on...
...; ○ Adjusting Brightness Setting item: BRIGHT Setting content: -15 ~ +15 1 Adjust the brightness from -15 to +15 by pressing / TILT or / TILT. Adjusting Color of Picture Setting item: COLOR Setting content: -15 ~ +15 1 Adjust the color from -15 to "Setup menu chart" on page 33 and "GENERAL setup standard operation" on...

Owners Manual
Page 41
...; Tint adjustment cannot be made if a Navigation system with the RGB feature is connected. ○ ○ ○ ○ ○ ○ 37-EN Adjusting Tint of Picture Setting item: TINT Setting content: G15 ~ R15 1 Adjust the tint from G15 to +15 by pressing / TILT or / TILT. When decreasing sharpness, the image softens...
...; Tint adjustment cannot be made if a Navigation system with the RGB feature is connected. ○ ○ ○ ○ ○ ○ 37-EN Adjusting Tint of Picture Setting item: TINT Setting content: G15 ~ R15 1 Adjust the tint from G15 to +15 by pressing / TILT or / TILT. When decreasing sharpness, the image softens...
Owners Manual
Page 45
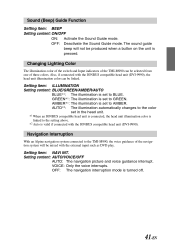
...*1: The illumination is set to the setting above. *2 Auto is set to BLUE. Setting content: AUTO/VOICE/OFF AUTO: The navigation picture and voice guidance interrupt. AMBER*1: The illumination is set in the head unit. *1 When an IONBUS compatible head unit is connected, the...off. 41-EN Navigation Interruption With an Alpine navigation system connected to AMBER. OFF: The navigation interruption mode is linked to GREEN. Setting item: NAVI INT. AUTO*2: The illumination automatically changes to the color set to the TMI-M990, the voice guidance of the TMI-M990 can be linked.
...*1: The illumination is set to the setting above. *2 Auto is set to BLUE. Setting content: AUTO/VOICE/OFF AUTO: The navigation picture and voice guidance interrupt. AMBER*1: The illumination is set in the head unit. *1 When an IONBUS compatible head unit is connected, the...off. 41-EN Navigation Interruption With an Alpine navigation system connected to AMBER. OFF: The navigation interruption mode is linked to GREEN. Setting item: NAVI INT. AUTO*2: The illumination automatically changes to the color set to the TMI-M990, the voice guidance of the TMI-M990 can be linked.

Owners Manual
Page 51
...mode, and change the AUX mode. AUX1 AUX2 AUX3 Adjusting the Volume Operation is performed from an ALPINE IONBUS compatible head unit. 1 The volume is performed from an ALPINE IONBUS compatible head unit. Operating from the Head Unit SOURCE/POWER BAND Rotary encoder This operation can ...(H/U selector switch on the rear side of possible operations from the head unit Switch SOURCE/POWER BAND Rotary encoder Operation explanation Changes the picture source Changes between AUX and Navigation mode Volume adjustment • Using the remote control supplied with the head unit, you can also ...
...mode, and change the AUX mode. AUX1 AUX2 AUX3 Adjusting the Volume Operation is performed from an ALPINE IONBUS compatible head unit. 1 The volume is performed from an ALPINE IONBUS compatible head unit. Operating from the Head Unit SOURCE/POWER BAND Rotary encoder This operation can ...(H/U selector switch on the rear side of possible operations from the head unit Switch SOURCE/POWER BAND Rotary encoder Operation explanation Changes the picture source Changes between AUX and Navigation mode Volume adjustment • Using the remote control supplied with the head unit, you can also ...

Owners Manual
Page 53
...the Brightness control. • Temperature in the vehicle is properly connected, or then consult your authorized Alpine dealer. Check the connections and firmly connect. Movement of displayed picture is abnormal. • Temperature in the following checklist. Check the connections with a ballpoint pen or...due to the DVD, CD player, navigation system are not properly or securely made . - If the unit is worn out. - Unclear picture display. • Fluorescent tube is exhausted. - Readjust the controls. • Connections are not securely made . - Increase the vehicle's ...
...the Brightness control. • Temperature in the vehicle is properly connected, or then consult your authorized Alpine dealer. Check the connections and firmly connect. Movement of displayed picture is abnormal. • Temperature in the following checklist. Check the connections with a ballpoint pen or...due to the DVD, CD player, navigation system are not properly or securely made . - If the unit is worn out. - Unclear picture display. • Fluorescent tube is exhausted. - Readjust the controls. • Connections are not securely made . - Increase the vehicle's ...

Owners Manual
Page 54
...pixel ratio is manufactured using an extremely high precision manufacturing technology. This means that there is a possibility that 0.01% of Picture Elements Illumination System 7.0" Transparent type TN LCD Low temperature p-si TFT active matrix 1,152,000 pcs. (2,400 x 480) 99.99% or more Cold cathode fluorescent... and design are subject to SYSTEM) *AUX OUT level: when the AUX IN level is 1200mV (RMS). Information Specifications MONITOR SECTION Screen Size LCD Type Operation System Number of Picture Elements Effective Number of the pixels could be either always ON or OFF. 50-EN
...pixel ratio is manufactured using an extremely high precision manufacturing technology. This means that there is a possibility that 0.01% of Picture Elements Illumination System 7.0" Transparent type TN LCD Low temperature p-si TFT active matrix 1,152,000 pcs. (2,400 x 480) 99.99% or more Cold cathode fluorescent... and design are subject to SYSTEM) *AUX OUT level: when the AUX IN level is 1200mV (RMS). Information Specifications MONITOR SECTION Screen Size LCD Type Operation System Number of Picture Elements Effective Number of the pixels could be either always ON or OFF. 50-EN
Owners Manual
Page 61
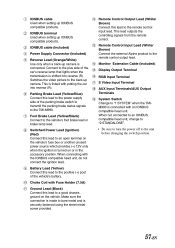
...e Remote Control Input Lead (White/ Brown) Connect the external Alpine product to the positive (+) post of the vehicle's battery. ... to the back-up camera. Switches the video picture to the plus side of the parking brake switch to transmit the parking brake status signals to the TMI-M990. 7 Foot Brake Lead (Yellow/Black) Connect...) 4 Power Supply Connector (Included) 5 Reverse Lead (Orange/White) Use only when a back-up IONBUS compatible products. r Monitor Extension Cable (Included) t Display Output Terminal y RGB Input Terminal u S Video Input Terminal i AUX Input Terminals/AUX Output ...
...e Remote Control Input Lead (White/ Brown) Connect the external Alpine product to the positive (+) post of the vehicle's battery. ... to the back-up camera. Switches the video picture to the plus side of the parking brake switch to transmit the parking brake status signals to the TMI-M990. 7 Foot Brake Lead (Yellow/Black) Connect...) 4 Power Supply Connector (Included) 5 Reverse Lead (Orange/White) Use only when a back-up IONBUS compatible products. r Monitor Extension Cable (Included) t Display Output Terminal y RGB Input Terminal u S Video Input Terminal i AUX Input Terminals/AUX Output ...

Owners Manual
Page 64
...White/Brown) • When connecting with an IONBUS compatible head unit. Switches the video picture to the remote control input lead. This is shifted into reverse (R). When not connected ... Connector 3 AUX Video/Audio Output (AUX2) Terminal Use when connecting an optional monitor etc. 4 AUX Video/Audio Output (AUX1) Terminal Use when connecting an optional monitor etc. 5 AUX Video/Audio Input (AUX1) Terminal 6 AUX Video/Audio Input... 1 System Switch Change to "1:SYSTEM" when the TMI-M990 is connected with the IONBUS compatible head unit, do not connect the ignition lead. 60-EN
...White/Brown) • When connecting with an IONBUS compatible head unit. Switches the video picture to the remote control input lead. This is shifted into reverse (R). When not connected ... Connector 3 AUX Video/Audio Output (AUX2) Terminal Use when connecting an optional monitor etc. 4 AUX Video/Audio Output (AUX1) Terminal Use when connecting an optional monitor etc. 5 AUX Video/Audio Input (AUX1) Terminal 6 AUX Video/Audio Input... 1 System Switch Change to "1:SYSTEM" when the TMI-M990 is connected with the IONBUS compatible head unit, do not connect the ignition lead. 60-EN


