
Owners Manual
Page 3
R VGA IN-DASH MONITOR • OWNER'S MANUAL Please read before using this equipment. ENGLISH TMI-M990
R VGA IN-DASH MONITOR • OWNER'S MANUAL Please read before using this equipment. ENGLISH TMI-M990
Owners Manual
Page 5
...Brightness ...38 Adjusting the Illumination Level ...39 Illumination Control ...39 Setting Automatic Opening/Closing of the Monitor ...39 Selecting the Monitor Opening Angle ...40 Adjusting the Monitor Viewing Angle ...40 Sound (Beep) Guide Function ...41 Changing Lighting Color ...41 Navigation Interruption ...41...indicators and the microphone ...7 Using the TMI-M990 with an IONBUS connection ...7 How to Read This Manual ...8 Basic Operation Using Face Cover ...9 Initial System Start-up ...9 Turning Power On or Off ...10 Opening/Closing the Monitor ...12 Adjusting the Display Back and Forwards...
...Brightness ...38 Adjusting the Illumination Level ...39 Illumination Control ...39 Setting Automatic Opening/Closing of the Monitor ...39 Selecting the Monitor Opening Angle ...40 Adjusting the Monitor Viewing Angle ...40 Sound (Beep) Guide Function ...41 Changing Lighting Color ...41 Navigation Interruption ...41...indicators and the microphone ...7 Using the TMI-M990 with an IONBUS connection ...7 How to Read This Manual ...8 Basic Operation Using Face Cover ...9 Initial System Start-up ...9 Turning Power On or Off ...10 Opening/Closing the Monitor ...12 Adjusting the Display Back and Forwards...

Owners Manual
Page 8
... observe proper polarity (+ and -) as instructed. When inserting the batteries, be sure to your authorized Alpine dealer or the nearest Alpine Service Center for other injury. KEEP FINGERS AWAY WHILE THE MOTORIZED FRONT PANEL OR MOVING MONITOR IS IN MOTION. Rupture or chemical leakage from the battery may result in injury or material...
... observe proper polarity (+ and -) as instructed. When inserting the batteries, be sure to your authorized Alpine dealer or the nearest Alpine Service Center for other injury. KEEP FINGERS AWAY WHILE THE MOTORIZED FRONT PANEL OR MOVING MONITOR IS IN MOTION. Rupture or chemical leakage from the battery may result in injury or material...

Owners Manual
Page 16
Basic Operation BAND/ SETUP /FLAT /O/C VISUAL EQ /TILT /TILT OPEN/CLOSE / SETUP Opening/Closing the Monitor 12-EN ○ ○ ○ ○ ○ ○ • The TMI-M990 is something in motion. When this happens, remove the obstruction and press OPEN/CLOSE / SETUP again. • If there is something .... • For your safety, some operation of the unit cannot be careful not to bump or apply any pressure to the monitor while it is in the way when closing the display, the display stops immediately. The unit beeps 3 times and raises (or lowers) ...
Basic Operation BAND/ SETUP /FLAT /O/C VISUAL EQ /TILT /TILT OPEN/CLOSE / SETUP Opening/Closing the Monitor 12-EN ○ ○ ○ ○ ○ ○ • The TMI-M990 is something in motion. When this happens, remove the obstruction and press OPEN/CLOSE / SETUP again. • If there is something .... • For your safety, some operation of the unit cannot be careful not to bump or apply any pressure to the monitor while it is in the way when closing the display, the display stops immediately. The unit beeps 3 times and raises (or lowers) ...

Owners Manual
Page 17
... 4 When you move to the next item, press VISUAL EQ to move , then contact your TMI-M990. • The display activates using the values stored for supplementary information. If it still does not .... 3 Press / TILT or / TILT, and select BACK or FRONT. You may damage your Alpine dealer. When you press OPEN/CLOSE / SETUP, you have finished adjusting, press and hold OPEN/CLOSE...the display. See "Adjusting the Display Back and Forwards" (this page), and "Adjusting the Monitor Viewing Angle" (page 14). ○ ○ ○ ○ ○ ○ ○ ○...
... 4 When you move to the next item, press VISUAL EQ to move , then contact your TMI-M990. • The display activates using the values stored for supplementary information. If it still does not .... 3 Press / TILT or / TILT, and select BACK or FRONT. You may damage your Alpine dealer. When you press OPEN/CLOSE / SETUP, you have finished adjusting, press and hold OPEN/CLOSE...the display. See "Adjusting the Display Back and Forwards" (this page), and "Adjusting the Monitor Viewing Angle" (page 14). ○ ○ ○ ○ ○ ○ ○ ○...

Owners Manual
Page 18
For details, see the Setup operation "Adjusting the Monitor Viewing Angle" on page 40. • The adjustment angle is stored, but depending on the motion, the position can also adjust the display angle by ...; ○ ○ ○ ○ ○ ○ ○ ○ ○ ○ ○ ○ Basic Operation /VOLUME /VOLUME /FLAT /TILT /TILT /TILT /TILT Adjusting the Monitor Viewing Angle Adjust the monitor's angle for better visibility. 1 Press / TILT and / TILT to adjust the monitor's angle so the screen will be a shifted from one of 10 levels.
For details, see the Setup operation "Adjusting the Monitor Viewing Angle" on page 40. • The adjustment angle is stored, but depending on the motion, the position can also adjust the display angle by ...; ○ ○ ○ ○ ○ ○ ○ ○ ○ ○ ○ ○ Basic Operation /VOLUME /VOLUME /FLAT /TILT /TILT /TILT /TILT Adjusting the Monitor Viewing Angle Adjust the monitor's angle for better visibility. 1 Press / TILT and / TILT to adjust the monitor's angle so the screen will be a shifted from one of 10 levels.

Owners Manual
Page 19
... changes continuously if / VOLUME or • The volume can be Flat When you want to operate some function on the back of the monitor for example, it may cause a malfunction. Supplement See page 19 for at least 2 seconds. The following operation is flat, putting an object... on the car (air conditioner, etc.) which is performed at the head unit. Moving the Monitor to be adjusted for at least 2 seconds. Adjusting the Volume The following operation is performed with the supplied remote control. 1 Press / VOLUME or...
... changes continuously if / VOLUME or • The volume can be Flat When you want to operate some function on the back of the monitor for example, it may cause a malfunction. Supplement See page 19 for at least 2 seconds. The following operation is flat, putting an object... on the car (air conditioner, etc.) which is performed at the head unit. Moving the Monitor to be adjusted for at least 2 seconds. Adjusting the Volume The following operation is performed with the supplied remote control. 1 Press / VOLUME or...

Owners Manual
Page 21
...press changes the display modes as follows: NORMAL WIDE CINEMA Supplement See page 19 for supplementary information. ○ ○ In Cinema mode, the monitor displays a normal picture by evenly stretching out the picture horizontally. ○ ○ ○ ○ ○ ○ ○ ○...; ○ ○ ○ ○ ○ In Normal mode, the monitor displays a normal picture at the center of the screen with a vertical black band at the 16 : 9 ratio. ○ ○ ○ ○ &#...
...press changes the display modes as follows: NORMAL WIDE CINEMA Supplement See page 19 for supplementary information. ○ ○ In Cinema mode, the monitor displays a normal picture by evenly stretching out the picture horizontally. ○ ○ ○ ○ ○ ○ ○ ○...; ○ ○ ○ ○ ○ In Normal mode, the monitor displays a normal picture at the center of the screen with a vertical black band at the 16 : 9 ratio. ○ ○ ○ ○ &#...

Owners Manual
Page 22
...power does not switch off . mode is switched from OFF to turn on the status of the Monitor", page 39. See "Turning Power On or Off" (page 10) to ON in NAVI. Once the LCD has warmed up, the display returns to these pages. For example, if the ignition key is... key (engine key). Opening/Closing the Monitor Page 12 Page 12 Page 12 Page 12 Page 12 18-EN mode, then the NAVI. The display automatically opens/closes depending on . In low ambient temperature conditions, the display may lose contrast temporarily. The TMI-M990 stores the state before the ignition key ...
...power does not switch off . mode is switched from OFF to turn on the status of the Monitor", page 39. See "Turning Power On or Off" (page 10) to ON in NAVI. Once the LCD has warmed up, the display returns to these pages. For example, if the ignition key is... key (engine key). Opening/Closing the Monitor Page 12 Page 12 Page 12 Page 12 Page 12 18-EN mode, then the NAVI. The display automatically opens/closes depending on . In low ambient temperature conditions, the display may lose contrast temporarily. The TMI-M990 stores the state before the ignition key ...

Owners Manual
Page 23
... the AUX mode, if you press BAND/SETUP on the supplied remote control, you can change between AUX-1, 2, 3. Page17 Page17 19-EN TITLE Adjusting the Monitor Viewing Angle Description If the monitor touches an obstacle while the angle is changed. Should this happen, remove the obstacle and press / TILT or / TILT again.
... the AUX mode, if you press BAND/SETUP on the supplied remote control, you can change between AUX-1, 2, 3. Page17 Page17 19-EN TITLE Adjusting the Monitor Viewing Angle Description If the monitor touches an obstacle while the angle is changed. Should this happen, remove the obstacle and press / TILT or / TILT again.

Owners Manual
Page 30
... operations for details. 1 Press R.SEL/WIDE. Refer to the TMI-M990, its adjustments may be set using the REAR SELECTOR screen. Other Useful Features /FLAT WIDE/R.SEL /O/C R.SEL/ WIDE VISUAL EQ OPEN/CLOSE / /TILT /TILT SETUP DISP./A.MEMO About REAR SELECTOR With a rear monitor connected to each section for the REAR SELECTOR screen.
... operations for details. 1 Press R.SEL/WIDE. Refer to the TMI-M990, its adjustments may be set using the REAR SELECTOR screen. Other Useful Features /FLAT WIDE/R.SEL /O/C R.SEL/ WIDE VISUAL EQ OPEN/CLOSE / /TILT /TILT SETUP DISP./A.MEMO About REAR SELECTOR With a rear monitor connected to each section for the REAR SELECTOR screen.

Owners Manual
Page 31
... display modes (page 17) and the VISUAL EQ property (page 21) other than the rear monitor status. Changing the setting item by pressing / TILT. / TILT or 4 LINK LINK Rear monitor 1 (AUX OUT1), Rear monitor 2 (AUX OUT2) status display. (See page 28) Remote control output display When rear... monitor remote control operation is valid, indicator is displayed. When you press OPEN/CLOSE / SETUP, ...
... display modes (page 17) and the VISUAL EQ property (page 21) other than the rear monitor status. Changing the setting item by pressing / TILT. / TILT or 4 LINK LINK Rear monitor 1 (AUX OUT1), Rear monitor 2 (AUX OUT2) status display. (See page 28) Remote control output display When rear... monitor remote control operation is valid, indicator is displayed. When you press OPEN/CLOSE / SETUP, ...

Owners Manual
Page 32
... to AUX OUT2. ON. (See page 45) 28-EN AUX OUT2: Select the source, from the S video output compatible Alpine head unit is output to the rear monitor. *1 If not connected to an IONBUS compatible head unit, AUX OUT1 is output to the radio or other audio source in the... shown on the TMIM990 is then used as audio output for the front (TMI-M990). *2 Only displayed when AUX IN 1,2,3 SIG. Other Useful Features Rear Entertainment Function The rear entertainment function independently routes different sources to the rear monitor. It is output to the front and the rear of the car.
... to AUX OUT2. ON. (See page 45) 28-EN AUX OUT2: Select the source, from the S video output compatible Alpine head unit is output to the rear monitor. *1 If not connected to an IONBUS compatible head unit, AUX OUT1 is output to the radio or other audio source in the... shown on the TMIM990 is then used as audio output for the front (TMI-M990). *2 Only displayed when AUX IN 1,2,3 SIG. Other Useful Features Rear Entertainment Function The rear entertainment function independently routes different sources to the rear monitor. It is output to the front and the rear of the car.

Owners Manual
Page 33
... REAR-1, REAR-2 FRONT: The remote control sensor on the FRONT (TMI-M990). In this case, perform operation with the buttons of the external unit (monitor, etc.), can be selected for Remote control operation from any external monitor is enabled. REAR-1*4: The remote sensor of the source selected for ... set to AUX OUT1 is enabled. Switching the Function of the Remote Sensor The remote sensors of the TMI-M990 main unit. 29-EN Remote control operation of the external monitor connected to AUX OUT2 is disabled. REAR-2: The remote sensor of the source selected for AUX OUT2 only...
... REAR-1, REAR-2 FRONT: The remote control sensor on the FRONT (TMI-M990). In this case, perform operation with the buttons of the external unit (monitor, etc.), can be selected for Remote control operation from any external monitor is enabled. REAR-1*4: The remote sensor of the source selected for ... set to AUX OUT1 is enabled. Switching the Function of the Remote Sensor The remote sensors of the TMI-M990 main unit. 29-EN Remote control operation of the external monitor connected to AUX OUT2 is disabled. REAR-2: The remote sensor of the source selected for AUX OUT2 only...

Owners Manual
Page 36
... which switches the source of VISUAL EQ can also be turned OFF. TITLE Adjusting and Storing VISUAL EQTM Description Adjusting and storing of the rear monitor is below. When using the head unit Blackout function, the main unit switches and input indicators illumination will be made from BRIGHT, COLOR, TINT, CONTRAST...
... which switches the source of VISUAL EQ can also be turned OFF. TITLE Adjusting and Storing VISUAL EQTM Description Adjusting and storing of the rear monitor is below. When using the head unit Blackout function, the main unit switches and input indicators illumination will be made from BRIGHT, COLOR, TINT, CONTRAST...
Owners Manual
Page 43
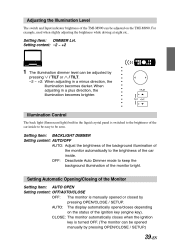
...OFF AUTO: Adjust the brightness of the background illumination of the monitor automatically to the brightness of the car inside to be easy to be seen. AUTO: The display automatically opens/closes depending on the TMI-M990. When adjusting in a plus direction, the illumination becomes brighter.... ○ ○ 39-EN CLOSE: The monitor automatically closes when the ignition key is turned OFF. (The monitor can be opened or closed by pressing OPEN/CLOSE...
...OFF AUTO: Adjust the brightness of the background illumination of the monitor automatically to the brightness of the car inside to be easy to be seen. AUTO: The display automatically opens/closes depending on the TMI-M990. When adjusting in a plus direction, the illumination becomes brighter.... ○ ○ 39-EN CLOSE: The monitor automatically closes when the ignition key is turned OFF. (The monitor can be opened or closed by pressing OPEN/CLOSE...

Owners Manual
Page 44
... chart" on page 33 and "GENERAL setup standard operation" on page 35. /TILT /TILT Selecting the Monitor Opening Angle Setting item: SLIDE Setting content: BACK/FRONT • For details, see "Adjusting the Monitor Viewing Angle", page 14. 40-EN ○ ○ ○ ○ ○ ○ ...9675; ○ Press / TILT or / TILT and adjust to an angle (10 levels) that is easily viewable. ○ ○ ○ Adjusting the Monitor Viewing Angle Setting item: TILT Setting content: 1 ~ 10 1 • The display angle can be adjusted by pushing the main unit switches / TILT or ...
... chart" on page 33 and "GENERAL setup standard operation" on page 35. /TILT /TILT Selecting the Monitor Opening Angle Setting item: SLIDE Setting content: BACK/FRONT • For details, see "Adjusting the Monitor Viewing Angle", page 14. 40-EN ○ ○ ○ ○ ○ ○ ...9675; ○ Press / TILT or / TILT and adjust to an angle (10 levels) that is easily viewable. ○ ○ ○ Adjusting the Monitor Viewing Angle Setting item: TILT Setting content: 1 ~ 10 1 • The display angle can be adjusted by pushing the main unit switches / TILT or ...

Owners Manual
Page 54
...using an extremely high precision manufacturing technology. Its effective pixel ratio is 1200mV (RMS). Information Specifications MONITOR SECTION Screen Size LCD Type Operation System Number of Picture Elements Effective Number of the pixels could be either always ON...160 mm (5-5/16") 40 mm (1-9/16") 120 mm (4-3/4") GENERAL Power Requirement Operating temperature Weight (Monitor Section) (AV-Interface Unit Section) Width Height Depth Width Height Depth CHASSIS SIZE (Monitor section) CHASSIS SIZE (AV-Interface Unit section) • Due to continuous product improvement, specifications and...
...using an extremely high precision manufacturing technology. Its effective pixel ratio is 1200mV (RMS). Information Specifications MONITOR SECTION Screen Size LCD Type Operation System Number of Picture Elements Effective Number of the pixels could be either always ON...160 mm (5-5/16") 40 mm (1-9/16") 120 mm (4-3/4") GENERAL Power Requirement Operating temperature Weight (Monitor Section) (AV-Interface Unit Section) Width Height Depth Width Height Depth CHASSIS SIZE (Monitor section) CHASSIS SIZE (AV-Interface Unit section) • Due to continuous product improvement, specifications and...

Owners Manual
Page 57
... Location Screw 2 Hex Nut (M5) Bolt Stud TMI-M990 Metal Mounting Strap Ground Lead Before deciding on the monitor. • Make sure to use another screw to install the monitor, it may cause a malfunction. If you use the supplied screw (M4 x 3) to the vehicle's chassis....into the dashboard. Chassis Front Frame (Included) Wider edge should face down. 1 Dashboard Mounting Sleeve (Included) Mounting Bracket (Included) TMI-M990 Reinforce the monitor unit with a metal mounting strap (not supplied). Secure the ground lead of within 30 degrees from the horizontal. Continued 53-EN ...
... Location Screw 2 Hex Nut (M5) Bolt Stud TMI-M990 Metal Mounting Strap Ground Lead Before deciding on the monitor. • Make sure to use another screw to install the monitor, it may cause a malfunction. If you use the supplied screw (M4 x 3) to the vehicle's chassis....into the dashboard. Chassis Front Frame (Included) Wider edge should face down. 1 Dashboard Mounting Sleeve (Included) Mounting Bracket (Included) TMI-M990 Reinforce the monitor unit with a metal mounting strap (not supplied). Secure the ground lead of within 30 degrees from the horizontal. Continued 53-EN ...

Owners Manual
Page 58
..., gently pull out on the unit while pushing the locking pin down position. Do not hang the unit from the dashboard. Lock Pin Slide the TMI-M990 into the dashboard. This can be sure to choose a flat location. AV-Interface Unit 1. If you do so. < JAPANESE CAR > To ...unit is necessary to change to "2:STANDALONE". 1:SYSTEM 2:STANDALONE (Initial Setting) Mounting Bracket 1 2 • Make sure to use another screw to install the monitor, it may cause a malfunction. • Be sure to turn the power off to the unit before unlocking the second pin. 2. Removal Protective paper 1 ...
..., gently pull out on the unit while pushing the locking pin down position. Do not hang the unit from the dashboard. Lock Pin Slide the TMI-M990 into the dashboard. This can be sure to choose a flat location. AV-Interface Unit 1. If you do so. < JAPANESE CAR > To ...unit is necessary to change to "2:STANDALONE". 1:SYSTEM 2:STANDALONE (Initial Setting) Mounting Bracket 1 2 • Make sure to use another screw to install the monitor, it may cause a malfunction. • Be sure to turn the power off to the unit before unlocking the second pin. 2. Removal Protective paper 1 ...


