
Owners Manual
Page 7
... Lights when DTS decoding is enabled CD Menu @ Function switching tab @ Shortcut switch to each function @) Status indication status display Display indication when a microphone is on the function . ALPINE PXA-H800 Sound ~ .... . ·-~-\ ~ ~ Dolby D Dolby PLII DTS (@) (@) (@) f f f CD POWER indicator Lights when Power is connected Playback format display ® Basic setting switching switch ®...
... Lights when DTS decoding is enabled CD Menu @ Function switching tab @ Shortcut switch to each function @) Status indication status display Display indication when a microphone is on the function . ALPINE PXA-H800 Sound ~ .... . ·-~-\ ~ ~ Dolby D Dolby PLII DTS (@) (@) (@) f f f CD POWER indicator Lights when Power is connected Playback format display ® Basic setting switching switch ®...

Owners Manual
Page 17
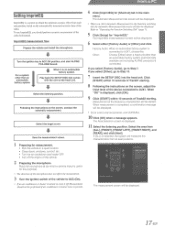
...give poor or no results. This may be drained if you use the unit for an extended period oftime without running . Use ofany other microphone will be set only when AUXIN setting is equipped with a power amplifier with the engine, air-conditioner, and heater turned off If a ... RoadEQ, and AutoTCR automatic measurement functions. ~WARNING • Do not perform automatic measurement while the vehicle is running the engine. • The microphone supplied with this product is installed in the vehicle, move them outside of the cabin, or turn offthe low-pass filter ofthe power amplifier to...
...give poor or no results. This may be drained if you use the unit for an extended period oftime without running . Use ofany other microphone will be set only when AUXIN setting is equipped with a power amplifier with the engine, air-conditioner, and heater turned off If a ... RoadEQ, and AutoTCR automatic measurement functions. ~WARNING • Do not perform automatic measurement while the vehicle is running the engine. • The microphone supplied with this product is installed in the vehicle, move them outside of the cabin, or turn offthe low-pass filter ofthe power amplifier to...
Owners Manual
Page 18
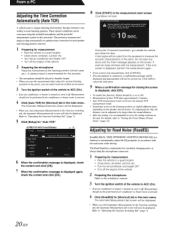
...The measurement screen will be started. From a PC Setting lmprintEQ ImprintEQ is a system to ACC ON position, and start ALPINE PXA-H800 Sound. Place the microphone at ear level (a camera tripod is connected. Click [START] within 10 seconds of the frequency characteristic will be displayed.... conduct the automatic measurement. Other: Choose [Other] when a head unit other than an automobile factory system (commercially available unit including ALPINE products) is useful for "lmprintEQ." If you want to Step 10. 7 Insert the SETUP DISC into the head unit. When "...
...The measurement screen will be started. From a PC Setting lmprintEQ ImprintEQ is a system to ACC ON position, and start ALPINE PXA-H800 Sound. Place the microphone at ear level (a camera tripod is connected. Click [START] within 10 seconds of the frequency characteristic will be displayed.... conduct the automatic measurement. Other: Choose [Other] when a head unit other than an automobile factory system (commercially available unit including ALPINE products) is useful for "lmprintEQ." If you want to Step 10. 7 Insert the SETUP DISC into the head unit. When "...

Owners Manual
Page 19
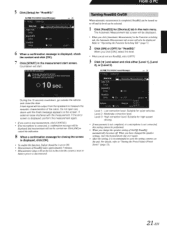
... result when the Target Curve is properly located, repeat Step 13 following the guidance on the screen. When the measurement start . When the microphone is "REFERENCE" will be displayed . The Memory selection screen will be displayed. Click [OK] to cancel the indication. • If ...the finish message appears on the screen . Refer to perform measurement again. 19 Click [Send Filter]. From a PC 12 Move the microphone to complete the entire procedure. This setting recreates the balanced sound of the curve currently selected. The result screen will start screen appears,...
... result when the Target Curve is properly located, repeat Step 13 following the guidance on the screen. When the measurement start . When the microphone is "REFERENCE" will be displayed . The Memory selection screen will be displayed. Click [OK] to cancel the indication. • If ...the finish message appears on the screen . Refer to perform measurement again. 19 Click [Send Filter]. From a PC 12 Move the microphone to complete the entire procedure. This setting recreates the balanced sound of the curve currently selected. The result screen will start screen appears,...
Owners Manual
Page 21
... Measurement tab screen will also be overcome using the included microphone and the powerful measurement system in the preset, you click [Automatic Measurement] in the Function switching tab, the Automatic Measurement tab screen will be displayed. ALPINE PXA-HSOO Sound Manager FlltoF : -X Shortcut t .u t(H .... • Turn the air-conditioner and heater OFF. • Turn off the engine of the vehicle. 2 Preparing the microphone. A vehicle poses a unique listening environment. The processor measures and analyzes data automatically to optimize time correction for each listening position...
... Measurement tab screen will also be overcome using the included microphone and the powerful measurement system in the preset, you click [Automatic Measurement] in the Function switching tab, the Automatic Measurement tab screen will be displayed. ALPINE PXA-HSOO Sound Manager FlltoF : -X Shortcut t .u t(H .... • Turn the air-conditioner and heater OFF. • Turn off the engine of the vehicle. 2 Preparing the microphone. A vehicle poses a unique listening environment. The processor measures and analyzes data automatically to optimize time correction for each listening position...
Owners Manual
Page 22
...microphone is connected, a confirmation message will be displayed and measurement will also be displayed. Suitable for "RoadEQ." The Automatic Measurement tab screen will be displayed. • When you click [Automatic Measurement] in the event the system is reset or battery power is disconnected. ALPINE PXA-H800...contents 011 the unit. rom a When automatic measurement is completed, RoadEQ can be selected. 1 Click [RoadEQ] for quiet vehicles. ALPINE PXA-H800 S()Uild Manager -X 6 When a confirmation message is displayed, check the content and click [OK]. 7 Click [STARn in the ...
...microphone is connected, a confirmation message will be displayed and measurement will also be displayed. Suitable for "RoadEQ." The Automatic Measurement tab screen will be displayed. • When you click [Automatic Measurement] in the event the system is reset or battery power is disconnected. ALPINE PXA-H800...contents 011 the unit. rom a When automatic measurement is completed, RoadEQ can be selected. 1 Click [RoadEQ] for quiet vehicles. ALPINE PXA-H800 S()Uild Manager -X 6 When a confirmation message is displayed, check the content and click [OK]. 7 Click [STARn in the ...

Owners Manual
Page 43
...acoustic characteristics of the cabin. • Be aware that do not include lmprintEQ measurement data are performed after RoadEQ, re- Place the microphone at least 2 seconds. A camera tri pod is present. 4 Press [FUNC.]. 5 Rotate the [Rotary encoder] to optimize time correction...WARNING • Do not perform automatic measurement while the vehicle is specifically designed for this type ofmeasurement. Automatic measureJ;Ilent requires microphones to be drained if you save the measurement data values for various listening positions in the powered subwoofer or the power amplifierfor ...
...acoustic characteristics of the cabin. • Be aware that do not include lmprintEQ measurement data are performed after RoadEQ, re- Place the microphone at least 2 seconds. A camera tri pod is present. 4 Press [FUNC.]. 5 Rotate the [Rotary encoder] to optimize time correction...WARNING • Do not perform automatic measurement while the vehicle is specifically designed for this type ofmeasurement. Automatic measureJ;Ilent requires microphones to be drained if you save the measurement data values for various listening positions in the powered subwoofer or the power amplifierfor ...
Owners Manual
Page 44
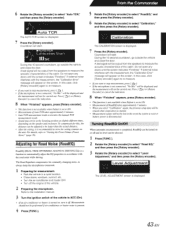
The AUTO TCR screen is displayed. 7 Press the [Rotary encoder]. Countdown will start. ,_ < ' 6 Rotate the [Rotary encoder] to select "Auto TCR," and then press the [Rotary encoder]. '· From the Commander 5 Rotate the [Rotary encoder] to select "RoadEQ;' and then press the [Rotary encoder]. 6 Rotate the [Rotary encoder] to select "Calibration," and then press the [Rotary encoder].
The AUTO TCR screen is displayed. 7 Press the [Rotary encoder]. Countdown will start. ,_ < ' 6 Rotate the [Rotary encoder] to select "Auto TCR," and then press the [Rotary encoder]. '· From the Commander 5 Rotate the [Rotary encoder] to select "RoadEQ;' and then press the [Rotary encoder]. 6 Rotate the [Rotary encoder] to select "Calibration," and then press the [Rotary encoder].

Owners Manual
Page 45
..., this should be set for each source beforehand, it automatically switches according to the previous item. • If measurement is not yet completed, or no microphone is connected, this setup is connected. Suitable tor high speed driving. • Ifyou do not use RoadEQ is not used, select "OFF". 5 When the setting...
..., this should be set for each source beforehand, it automatically switches according to the previous item. • If measurement is not yet completed, or no microphone is connected, this setup is connected. Suitable tor high speed driving. • Ifyou do not use RoadEQ is not used, select "OFF". 5 When the setting...

Owners Manual
Page 63
...back to OFF position, the unit was unplugged, the ignition key is at 1 second intervals. • A failure has occurred. - NoMic • Microphone not connected. - No Data • Settings are "OFF." - In Case of Difficulty If you encounter a problem, please tum the power off, ... • Cord connection is "ON." - Sound adjustment disabled. • Defeat is faulty. - Sources cannot be too narrow. - Consult your Alpine dealer. !calibration Error I • Automatic measurement failed for whatever reason. - Check the Gain setting. Stop all active programs, and then upgrade the...
...back to OFF position, the unit was unplugged, the ignition key is at 1 second intervals. • A failure has occurred. - NoMic • Microphone not connected. - No Data • Settings are "OFF." - In Case of Difficulty If you encounter a problem, please tum the power off, ... • Cord connection is "ON." - Sound adjustment disabled. • Defeat is faulty. - Sources cannot be too narrow. - Consult your Alpine dealer. !calibration Error I • Automatic measurement failed for whatever reason. - Check the Gain setting. Stop all active programs, and then upgrade the...
Owners Manual
Page 65
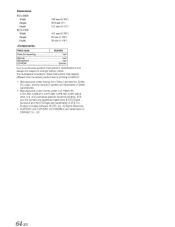
.... • Manufactured under license under license from Dolby Laboratories. Dimensions PXA-H800 Width Height Depth RUX-C800 Width Height Depth 169 mm (6-3/4") 50.8 mm (2") 215 mm (8-112") 161 mm (6-3/8") 40 mm (1-5/8") 28 mm (1-1/8") Parts name I Quantity Parts for mounting 1set Manual 1set Microphone 1set CD-ROM 2pieces Due to continuous product improvement, specifications...
.... • Manufactured under license under license from Dolby Laboratories. Dimensions PXA-H800 Width Height Depth RUX-C800 Width Height Depth 169 mm (6-3/4") 50.8 mm (2") 215 mm (8-112") 161 mm (6-3/8") 40 mm (1-5/8") 28 mm (1-1/8") Parts name I Quantity Parts for mounting 1set Manual 1set Microphone 1set CD-ROM 2pieces Due to continuous product improvement, specifications...

Owners Manual
Page 68
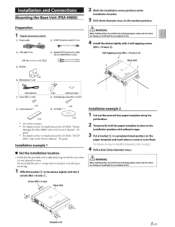
Contents WARNING WARNING 2 CAUTION 2 PRECAUTIONS 2 Installation and Connections Mounting the Base Unit (PXA-H800 3 Preparation 3 Installation example 1 3 Installation example 2 3 Mounting the Microphone 4 Mounting the Commander Unit (RUX-C800) (Sold separately 5 Preparation 5 Installing with Adhesive sheet S Installing with Commander...-NET Head Unit, External Input and External Amplifier 15 Connecting an Ai-NET compatible AV Head Unit (INA-W910), ALPINE Navigation System, Ai-NET compatible Changer and External Amplifier 16 Connecting an Ai-NET compatible Head Unit, Ai-NET compatible...
Contents WARNING WARNING 2 CAUTION 2 PRECAUTIONS 2 Installation and Connections Mounting the Base Unit (PXA-H800 3 Preparation 3 Installation example 1 3 Installation example 2 3 Mounting the Microphone 4 Mounting the Commander Unit (RUX-C800) (Sold separately 5 Preparation 5 Installing with Adhesive sheet S Installing with Commander...-NET Head Unit, External Input and External Amplifier 15 Connecting an Ai-NET compatible AV Head Unit (INA-W910), ALPINE Navigation System, Ai-NET compatible Changer and External Amplifier 16 Connecting an Ai-NET compatible Head Unit, Ai-NET compatible...
Owners Manual
Page 70
...f ire. Do not install the unit or wiring where it is sufficiently long. Installation and Connections Mounting the Base Unit (PXA-HSOO) Preparation 1 Check accessory parts. wARNING When making holes, be fixed. Installation example 2 1 Cut out the external...mm) (I ® Microphone (1 set) < M i c r o p h o n e> , 0 Screw (M3 x 6 mm) ® Self-tapping screw (M4 x 14 mm) ~ ~ (x 4) ® Velcro fastener*' (x4) @i CD-ROM*'· * 3 @) (x 2) *1 Use when necessary *2 For details on how to install and use the CD-ROM, "Sound Manager for PXA-H800," refer to damage pipes...
...f ire. Do not install the unit or wiring where it is sufficiently long. Installation and Connections Mounting the Base Unit (PXA-HSOO) Preparation 1 Check accessory parts. wARNING When making holes, be fixed. Installation example 2 1 Cut out the external...mm) (I ® Microphone (1 set) < M i c r o p h o n e> , 0 Screw (M3 x 6 mm) ® Self-tapping screw (M4 x 14 mm) ~ ~ (x 4) ® Velcro fastener*' (x4) @i CD-ROM*'· * 3 @) (x 2) *1 Use when necessary *2 For details on how to install and use the CD-ROM, "Sound Manager for PXA-H800," refer to damage pipes...
Owners Manual
Page 71
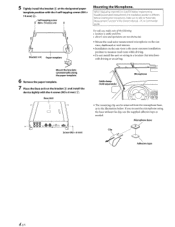
...ofthe following: • location is stable and firm. • driver's view and operations are not obstructed. • Mount the road noise measurement microphone on the sun visor, dashboard or roof interior. • Installation on the bracket® and install the device tightly with the 4 self-tapping ...screws (M4 x 14mm)@. ../ Self-tapping screw l (M4 x 14 mm) (x4) T i Bracket(x4 l Mounting the Microphone. If you mount the microphone using the base without the clip, use , make sure to refer to measure road noise while driving. • Do not install the unit...
...ofthe following: • location is stable and firm. • driver's view and operations are not obstructed. • Mount the road noise measurement microphone on the sun visor, dashboard or roof interior. • Installation on the bracket® and install the device tightly with the 4 self-tapping ...screws (M4 x 14mm)@. ../ Self-tapping screw l (M4 x 14 mm) (x4) T i Bracket(x4 l Mounting the Microphone. If you mount the microphone using the base without the clip, use , make sure to refer to measure road noise while driving. • Do not install the unit...

Owners Manual
Page 75
Connections • Left side Blue/ White Black ~ l:ii[f
Connections • Left side Blue/ White Black ~ l:ii[f
Owners Manual
Page 96
... range for satisfactory imaging. Results may exceed the PXA-H800's delay capability. Phone 1-800-ALPINE-1 (1-800-257-4631) ALPINE ELECTRONICS OF CANADA, INC. 777 Supertest Road, Toronto, Ontario M3J 2M9, Canada Phone 1-800-ALPINE-1 (1-800-257-4631) PXA-H800 68-21 057Z72-A (Y_AS) If any channel ...indicates that maximum 20ms delay was applied during automatic setup, it will be necessary to manually adjust each channel's measured impulse response at the first microphone position. In some cases...
... range for satisfactory imaging. Results may exceed the PXA-H800's delay capability. Phone 1-800-ALPINE-1 (1-800-257-4631) ALPINE ELECTRONICS OF CANADA, INC. 777 Supertest Road, Toronto, Ontario M3J 2M9, Canada Phone 1-800-ALPINE-1 (1-800-257-4631) PXA-H800 68-21 057Z72-A (Y_AS) If any channel ...indicates that maximum 20ms delay was applied during automatic setup, it will be necessary to manually adjust each channel's measured impulse response at the first microphone position. In some cases...

User Manual
Page 8
... is enabled A Menu B Function switching tab C Shortcut switch to each function D Status indication OFFLINE/ONLINE status display Display indication when a microphone is on the function. Location of Controls PXA-H800 Sound Manager for PXA-H800 Consists of two screens: the main screen and the sub screen. The sub screen varies depending on . A POWER indicator Lights...
... is enabled A Menu B Function switching tab C Shortcut switch to each function D Status indication OFFLINE/ONLINE status display Display indication when a microphone is on the function. Location of Controls PXA-H800 Sound Manager for PXA-H800 Consists of two screens: the main screen and the sub screen. The sub screen varies depending on . A POWER indicator Lights...

User Manual
Page 18
... is not recommended. • If the system is equipped with a power amplifier with this type of time without running . Use of microphones other microphone will be possible if the input level is on the connection of the cabin. • Be aware that the battery may be drained ...if you use the unit for this product is running the engine. • The microphone supplied with input level control or a powered subwoofer, the measurement may not be mixed with ImprintEQ, RoadEQ, and AutoTCR automatic measurement functions. Automatic...
... is not recommended. • If the system is equipped with a power amplifier with this type of time without running . Use of microphones other microphone will be possible if the input level is on the connection of the cabin. • Be aware that the battery may be drained ...if you use the unit for this product is running the engine. • The microphone supplied with input level control or a powered subwoofer, the measurement may not be mixed with ImprintEQ, RoadEQ, and AutoTCR automatic measurement functions. Automatic...
User Manual
Page 19
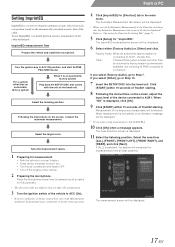
...for this . The Automatic Measurement tab screen will be displayed. • When you select [Other], go to ACC ON position, and start ALPINE PXA-H800 Sound. If you click [Automatic Measurement] in the Function switching tab, the Automatic Measurement tab screen will be displayed. Select the area from.... 3 Turn the ignition switch of the device connected to AUX1. If [ALL] is selected, the system will be started. Place the microphone at ear level (a camera tripod is useful for measurement. • Park the vehicle in the main menu. Click [START] within 10 ...
...for this . The Automatic Measurement tab screen will be displayed. • When you select [Other], go to ACC ON position, and start ALPINE PXA-H800 Sound. If you click [Automatic Measurement] in the Function switching tab, the Automatic Measurement tab screen will be displayed. Select the area from.... 3 Turn the ignition switch of the device connected to AUX1. If [ALL] is selected, the system will be started. Place the microphone at ear level (a camera tripod is useful for measurement. • Park the vehicle in the main menu. Click [START] within 10 ...

User Manual
Page 20
...measurement, click [CANCEL]. 14 Click [OK] when a completed message appears. 15 When measurement for Position 1 is completed, move the microphone to the next measuring position and secure it takes approximately 70 minutes to complete the entire procedure. Then, click [OK]. Therefore, be... sure to charge the vehicle battery while taking measurements. • If no microphone is connected, a confirmation message will be displayed and measurement will be carried out. USERS: You can make measurements from the same position...
...measurement, click [CANCEL]. 14 Click [OK] when a completed message appears. 15 When measurement for Position 1 is completed, move the microphone to the next measuring position and secure it takes approximately 70 minutes to complete the entire procedure. Then, click [OK]. Therefore, be... sure to charge the vehicle battery while taking measurements. • If no microphone is connected, a confirmation message will be displayed and measurement will be carried out. USERS: You can make measurements from the same position...

