
Owners Manual
Page 2
... Started How to Read this Manual 5 Location of Controls 6 PXA-H800 6 Sound Manager for PXA-H800 6 RUX-C800 Commander (sold separately) .... 7 Features 8 About Operating 8 About the Audio Setting 8 Before You First Use the Unit 8 Installing Sound Manager for PXA-H800 ....... 9 From a PC Basic ,Operation Initial System Start-Up 10 Using with Ai-NET Connections 10 Turning Power On and Off 10 Operating tbe Sound Manager for PXA-H800 Menu 10 Saving the Setup Data (File 10 Loading th...
... Started How to Read this Manual 5 Location of Controls 6 PXA-H800 6 Sound Manager for PXA-H800 6 RUX-C800 Commander (sold separately) .... 7 Features 8 About Operating 8 About the Audio Setting 8 Before You First Use the Unit 8 Installing Sound Manager for PXA-H800 ....... 9 From a PC Basic ,Operation Initial System Start-Up 10 Using with Ai-NET Connections 10 Turning Power On and Off 10 Operating tbe Sound Manager for PXA-H800 Menu 10 Saving the Setup Data (File 10 Loading th...
Owners Manual
Page 11
If the system still does not work properly, reset the unit. 1 Press RESET switch with a ballpoint pen or similar pointed object. 01 = o From a PC Basic Operation Initial System Start-Up If the system stops working properly, tum the ignition switch to off, and then on again.
If the system still does not work properly, reset the unit. 1 Press RESET switch with a ballpoint pen or similar pointed object. 01 = o From a PC Basic Operation Initial System Start-Up If the system stops working properly, tum the ignition switch to off, and then on again.

Owners Manual
Page 13
... preset memory. 1m m!llJ~dJ~tm"'~~pJ~ ::lt~~i~~fin .,,,[~ j~i'!,~~!IB.iili Setting the Speaker System (Output System Select) 13 Setting the Speakers (Speaker Setup)/Setting the 14 Subwoofers Setting the AUX Input System (AUX Input System Select) 14 Setting the AUX Input (AUX IN) 15 Setting the Digital Input (Digital AUX) 15 Setting the AUX Volume Input Level (AUX IN Gain) 15 Adjusting the AUX Volume Level (AUX Level) 15 Naming the AUX Input (AUX Name) 16 Turning lmprintEQ On/Off 19 Turning RoadEQ On/Off 21 Setting MX Plus (Ai-NET Mode) 22 Setting...
... preset memory. 1m m!llJ~dJ~tm"'~~pJ~ ::lt~~i~~fin .,,,[~ j~i'!,~~!IB.iili Setting the Speaker System (Output System Select) 13 Setting the Speakers (Speaker Setup)/Setting the 14 Subwoofers Setting the AUX Input System (AUX Input System Select) 14 Setting the AUX Input (AUX IN) 15 Setting the Digital Input (Digital AUX) 15 Setting the AUX Volume Input Level (AUX IN Gain) 15 Adjusting the AUX Volume Level (AUX Level) 15 Naming the AUX Input (AUX Name) 16 Turning lmprintEQ On/Off 19 Turning RoadEQ On/Off 21 Setting MX Plus (Ai-NET Mode) 22 Setting...

Owners Manual
Page 27
... to 200Hz Level adjustment (0 to -12 dB) Output frequency range Adjusting X-Over and Switching the Phases This section describes how to the respective Owner's Manual. Hints for example 6 dB/ oct.) makes the sound localization more to the speakers. For details, refer to the outputs. Hint for adjusting the subwoofer If the subwoofer is d isplayed. • When you are input. The X-Over Setup screen is installed on the rear deck, setting a gentle L.P.F slope...
... to 200Hz Level adjustment (0 to -12 dB) Output frequency range Adjusting X-Over and Switching the Phases This section describes how to the respective Owner's Manual. Hints for example 6 dB/ oct.) makes the sound localization more to the speakers. For details, refer to the outputs. Hint for adjusting the subwoofer If the subwoofer is d isplayed. • When you are input. The X-Over Setup screen is installed on the rear deck, setting a gentle L.P.F slope...
Owners Manual
Page 31
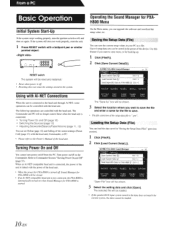
... off in "Setting the Speaker System (Output System Select)" (page 13)1 "Setting the Speakers (Speaker Setup)/Setting the Subwoofers" (page 14), this setting, EUPHONY Mode can be selected. (Initial setting: "ACOUSTIC") 1 Click [T] for movie audio. Multi Channel Manager tab screen will be displayed. • Refer to "Operating the Function Switching Tab" (page 7). 2 Set and adjust "2ch Playback Mode," "EUPHONY," "Dolby Pro Logic II." • When both Rear and Center speakers are reproduced c learly and sound effect is...
... off in "Setting the Speaker System (Output System Select)" (page 13)1 "Setting the Speakers (Speaker Setup)/Setting the Subwoofers" (page 14), this setting, EUPHONY Mode can be selected. (Initial setting: "ACOUSTIC") 1 Click [T] for movie audio. Multi Channel Manager tab screen will be displayed. • Refer to "Operating the Function Switching Tab" (page 7). 2 Set and adjust "2ch Playback Mode," "EUPHONY," "Dolby Pro Logic II." • When both Rear and Center speakers are reproduced c learly and sound effect is...

Owners Manual
Page 33
... playback output of the Dolby Digital , Dolby Pro Logic II , DTC and PCM modes. Multi Channel Function Adjustment Procedure Make the adjustments described below in the memory. We recommend to reproduce Dolby Digital and DTS sound with the center audio signals (low range). 32-EN Setting item: Output Levei/BI-PHANTOM/Rear Mix/Center Bass Split/PCM Mode/Listening Mode/DVD Level "Center Width." 2 Click [T] and select and click a level.
... playback output of the Dolby Digital , Dolby Pro Logic II , DTC and PCM modes. Multi Channel Function Adjustment Procedure Make the adjustments described below in the memory. We recommend to reproduce Dolby Digital and DTS sound with the center audio signals (low range). 32-EN Setting item: Output Levei/BI-PHANTOM/Rear Mix/Center Bass Split/PCM Mode/Listening Mode/DVD Level "Center Width." 2 Click [T] and select and click a level.
Owners Manual
Page 36
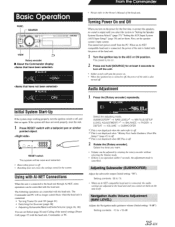
.... o When the ignition key is turned to protect the speakers, no sound is output until you turn off Audio Adjustment 1 Press the [Rotary encoder] repeatedly. o ., t-i*-*-*1 o Turning Power On and Off When you select the system in "Setting the Speaker System (System Select)" (page 37)/ "Setting the AUX Input System (AUX Input Setup)" (page 39) and set the speaker system I •Aux 2 ~ " ""~ t ' l ~ ON - - ~ 1 From the Commander o Please refer to the ACC or ON position...
.... o When the ignition key is turned to protect the speakers, no sound is output until you turn off Audio Adjustment 1 Press the [Rotary encoder] repeatedly. o ., t-i*-*-*1 o Turning Power On and Off When you select the system in "Setting the Speaker System (System Select)" (page 37)/ "Setting the AUX Input System (AUX Input Setup)" (page 39) and set the speaker system I •Aux 2 ~ " ""~ t ' l ~ ON - - ~ 1 From the Commander o Please refer to the ACC or ON position...

Owners Manual
Page 37
... volume (Initial setting: "-oo dB"). Switching the Sources The unit accepts up to "Setting the MX Plus (Ai-NET Mode)" (page 44) and "Setting the MX Plus (Standalone Mode)" (page 45). 1 Press [SOURCE]. When is connected, the audio settings are displayed. • Names selected in a single preset memory. All of the adjustment/setting values. Setting contents: -oo to the initial values (Initial setting: "OFP'). When an Ai-NET compatible head unit is connected, the audio settings are adjusted...
... volume (Initial setting: "-oo dB"). Switching the Sources The unit accepts up to "Setting the MX Plus (Ai-NET Mode)" (page 44) and "Setting the MX Plus (Standalone Mode)" (page 45). 1 Press [SOURCE]. When is connected, the audio settings are displayed. • Names selected in a single preset memory. All of the adjustment/setting values. Setting contents: -oo to the initial values (Initial setting: "OFP'). When an Ai-NET compatible head unit is connected, the audio settings are adjusted...

Owners Manual
Page 39
... output is enabledfor setup only when 2 subwoofers are set , referring to "Storing the Preset Values (Preset Store)" (page 36). Ref er to select "Mono" or "Stereo;· and then press the [Rotary encoder]. The Subwoofer Channel selection screen is recommended to confirm the change will be displayed. To set up : The AUX Input System Select screen will be displayed. turn off and then on again. Make sure to set the subwooferoutputfrom "Setting the Subwoofer Output (SW Channel...
... output is enabledfor setup only when 2 subwoofers are set , referring to "Storing the Preset Values (Preset Store)" (page 36). Ref er to select "Mono" or "Stereo;· and then press the [Rotary encoder]. The Subwoofer Channel selection screen is recommended to confirm the change will be displayed. To set up : The AUX Input System Select screen will be displayed. turn off and then on again. Make sure to set the subwooferoutputfrom "Setting the Subwoofer Output (SW Channel...

Owners Manual
Page 43
... ifthe input level is equipped with a power amplifier with input level control or a powered subwoofer, the measurement may output loud noise for measurement. A camera tri pod is recommended for at the highest cutofff requency. 42-EN Turning lmprintEQ On/Off lmprintEQ setting is running . Refer to optimize time correction for each listening position. Be sure to perform correct measurement, the input level should be overcome using...
... ifthe input level is equipped with a power amplifier with input level control or a powered subwoofer, the measurement may output loud noise for measurement. A camera tri pod is recommended for at the highest cutofff requency. 42-EN Turning lmprintEQ On/Off lmprintEQ setting is running . Refer to optimize time correction for each listening position. Be sure to perform correct measurement, the input level should be overcome using...
Owners Manual
Page 44
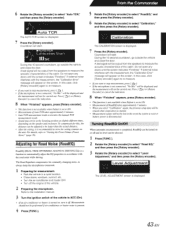
The AUTO TCR screen is displayed. 7 Press the [Rotary encoder]. Countdown will start. ,_ < ' 6 Rotate the [Rotary encoder] to select "Auto TCR," and then press the [Rotary encoder]. '· From the Commander 5 Rotate the [Rotary encoder] to select "RoadEQ;' and then press the [Rotary encoder]. 6 Rotate the [Rotary encoder] to select "Calibration," and then press the [Rotary encoder].
The AUTO TCR screen is displayed. 7 Press the [Rotary encoder]. Countdown will start. ,_ < ' 6 Rotate the [Rotary encoder] to select "Auto TCR," and then press the [Rotary encoder]. '· From the Commander 5 Rotate the [Rotary encoder] to select "RoadEQ;' and then press the [Rotary encoder]. 6 Rotate the [Rotary encoder] to select "Calibration," and then press the [Rotary encoder].

Owners Manual
Page 63
... software upgrade, the USB cable was affected by the head unit. • Power cord connection is correctly completed. Also, make sure the rest of the switches on , if no preset data stored in a quiet location. • The speaker bandwidth may be switched at Minimum. - Check the fuse of Difficulty If you encounter a problem, please tum the power off . - Raise the volume level (see pages 34, 57). Check the Gain setting...
... software upgrade, the USB cable was affected by the head unit. • Power cord connection is correctly completed. Also, make sure the rest of the switches on , if no preset data stored in a quiet location. • The speaker bandwidth may be switched at Minimum. - Check the fuse of Difficulty If you encounter a problem, please tum the power off . - Raise the volume level (see pages 34, 57). Check the Gain setting...

Owners Manual
Page 69
... CORRECT AMPERE RATING WHEN REPLACING FUSES. Failure to use only the specified accessory parts. Be sure to m ake the proper connections may result in a safe location before installing your Alpine dealer. • The PXA-H800 uses female RCA-type jacks for connectio n to provide power for installations or ground connections. Failure to the speaker (- ) terminal. Always stop . Be sure to connect the speaker (- ) leads to do so...
... CORRECT AMPERE RATING WHEN REPLACING FUSES. Failure to use only the specified accessory parts. Be sure to m ake the proper connections may result in a safe location before installing your Alpine dealer. • The PXA-H800 uses female RCA-type jacks for connectio n to provide power for installations or ground connections. Failure to the speaker (- ) terminal. Always stop . Be sure to connect the speaker (- ) leads to do so...
Owners Manual
Page 70
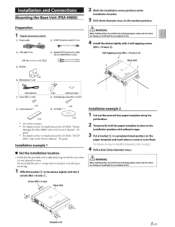
Installation and Connections Mounting the Base Unit (PXA-HSOO) Preparation 1 Check accessory parts. PC guide. *3 For details on how to install and use the CD-ROM, "SETUP DISC," refer to the Owners Man ual - Install the unit where it interferes with driving or an air bag. 1 Affix the bracket ® to the device tightly with the 4 screws (M3 x 6 mm) (I ® Microphone (1 set) < M i c r o p h o n e> , 0 Screw (M3 x 6 mm) ® Self-tapping...
Installation and Connections Mounting the Base Unit (PXA-HSOO) Preparation 1 Check accessory parts. PC guide. *3 For details on how to install and use the CD-ROM, "SETUP DISC," refer to the Owners Man ual - Install the unit where it interferes with driving or an air bag. 1 Affix the bracket ® to the device tightly with the 4 screws (M3 x 6 mm) (I ® Microphone (1 set) < M i c r o p h o n e> , 0 Screw (M3 x 6 mm) ® Self-tapping...
Owners Manual
Page 89
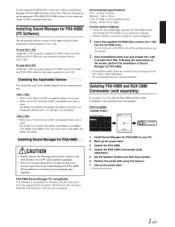
... the preset data*. 3. Recommended specifications CPU: 1.6 GHz or higher Memory: 1 GB or higher HOD: 51 2 MB or more available space Display: 1024x576 or higher Caution before installing • Install the Sound Manager software for PXA-H800 before connecting the PXA-H800 to Ver.2.1 00. The version that needs to update ~ ~"' I I{ " l U>' 'n' \ " I• I "' • •a ' I' . · ,·, • I!'~ •;> T e < ~ 1. Set the Speaker System and AUX Input System. 6. Restore the preset data using...
... the preset data*. 3. Recommended specifications CPU: 1.6 GHz or higher Memory: 1 GB or higher HOD: 51 2 MB or more available space Display: 1024x576 or higher Caution before installing • Install the Sound Manager software for PXA-H800 before connecting the PXA-H800 to Ver.2.1 00. The version that needs to update ~ ~"' I I{ " l U>' 'n' \ " I• I "' • •a ' I' . · ,·, • I!'~ •;> T e < ~ 1. Set the Speaker System and AUX Input System. 6. Restore the preset data using...

User Manual
Page 14
... installation manual. Adjusting Volume Adjust the volume. (Initial setting: "-INF. For the connection, refer to R (Rear) 15 Adjusting Balance (Between Left and Right) Adjust the Right and Left speaker volume (Initial setting: "0"). When an Ai-NET compatible head unit is connected, the source should be switched at the head unit. 1 Click [ ] for "Source" in a single preset memory. Switching the Sources The unit accepts up to 6 sets of the Center with the Front L/R (Center Base Split) Setting the Linear PCM (PCM Mode) Achieving Powerful...
... installation manual. Adjusting Volume Adjust the volume. (Initial setting: "-INF. For the connection, refer to R (Rear) 15 Adjusting Balance (Between Left and Right) Adjust the Right and Left speaker volume (Initial setting: "0"). When an Ai-NET compatible head unit is connected, the source should be switched at the head unit. 1 Click [ ] for "Source" in a single preset memory. Switching the Sources The unit accepts up to 6 sets of the Center with the Front L/R (Center Base Split) Setting the Linear PCM (PCM Mode) Achieving Powerful...

User Manual
Page 37
... time, to protect the speakers, no sound is connected to the head unit through Ai-NET, some operations can be controlled with the power of the unit is also turned off , and then on . • When the ignition key is turned to 15 • When an Ai-NET compatible head unit is off . 2 Rotate the [Rotary encoder]. Adjusting Subwoofer (SUBWOOFER) Adjust the subwoofer output (Initial setting: "00"). Navigation Audio Volume Adjustment (NAVI LEVEL) Adjusts the Navigation audio guidance volume (Initial setting...
... time, to protect the speakers, no sound is connected to the head unit through Ai-NET, some operations can be controlled with the power of the unit is also turned off , and then on . • When the ignition key is turned to 15 • When an Ai-NET compatible head unit is off . 2 Rotate the [Rotary encoder]. Adjusting Subwoofer (SUBWOOFER) Adjust the subwoofer output (Initial setting: "00"). Navigation Audio Volume Adjustment (NAVI LEVEL) Adjusts the Navigation audio guidance volume (Initial setting...

User Manual
Page 38
... head unit and you cannot set to select "Store," and then press the [Rotary encoder]. In the Ai-NET mode, the adjustment is connected, the audio settings are displayed. • Names selected in a single preset memory. Adjustment/Setup items Setting the Speaker System (System Select) Setting the Speakers(Speaker Setup) Setting the Subwoofer Output (SW Channel) Setting the AUX Input System (AUX Input Setup) Setting the AUX Input (AUX IN) Setting the Digital Input (Digital AUX) Setting the AUX Volume Input Level (AUX IN Gain) Adjusting the AUX Volume Level (AUX Level) Naming the AUX Input...
... head unit and you cannot set to select "Store," and then press the [Rotary encoder]. In the Ai-NET mode, the adjustment is connected, the audio settings are displayed. • Names selected in a single preset memory. Adjustment/Setup items Setting the Speaker System (System Select) Setting the Speakers(Speaker Setup) Setting the Subwoofer Output (SW Channel) Setting the AUX Input System (AUX Input Setup) Setting the AUX Input (AUX IN) Setting the Digital Input (Digital AUX) Setting the AUX Volume Input Level (AUX IN Gain) Adjusting the AUX Volume Level (AUX Level) Naming the AUX Input...

User Manual
Page 40
... Subwoofer Channel selection screen is able to handle a full range source. Make sure the speaker being used for setup. Refer to Table 1 (Output System) in "Setting the Speaker System (System Select)" (page 37). • Speakers that cannot be turned off are set up : The "Turn ACC Off" screen will be displayed. To set . The Speaker selection screen is on, ImprintEQ/RoadEQ will be damaged when driven by a full range signal. • When you connect...
... Subwoofer Channel selection screen is able to handle a full range source. Make sure the speaker being used for setup. Refer to Table 1 (Output System) in "Setting the Speaker System (System Select)" (page 37). • Speakers that cannot be turned off are set up : The "Turn ACC Off" screen will be displayed. To set . The Speaker selection screen is on, ImprintEQ/RoadEQ will be damaged when driven by a full range signal. • When you connect...

Installation Manual
Page 5
... accident or fire. Installation example 1 e Set the installation location. • Check that the provided cord is not exposed to the Owner's Manual - For details on how to install and use the CD-ROM, "SETUP DISC," refer to water. Doing so could lead to the device tightly with 4 self-tapping screws (M4 × 14 mm) H. A Power cable B Ai-NET extension cable (5.5 m) C USB cable (5 m) D Speaker-RCA Conversion cable (20 cm) (Red...
... accident or fire. Installation example 1 e Set the installation location. • Check that the provided cord is not exposed to the Owner's Manual - For details on how to install and use the CD-ROM, "SETUP DISC," refer to water. Doing so could lead to the device tightly with 4 self-tapping screws (M4 × 14 mm) H. A Power cable B Ai-NET extension cable (5.5 m) C USB cable (5 m) D Speaker-RCA Conversion cable (20 cm) (Red...


