Owners Manual
Page 1
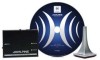
I IMPRINT SOUND MANAGER I KTX-100EQ • /I\UDYSSEY] MULTEQ XT • OWNER'S MANUAL Please read before using this equipment. • ISTRUZIONI PER ~USO Si prega di leggere prima di utilizzare il attrezzatura. • BEDIENUNGSANLEITUNG Lesen Sie diese Bedienungsanleitung bitte vor Gebrauch des Gerates. • MODE D'EMPLOI Veuillez lire avant d'utiliser cet appareil. • MANUAL DE OPERACION Lealo antes de utilizar este equipo. • ANVANDARHANDLEDNING Innan du anvander utrustningen bar du lasa igenom denna anvandarhandledning. • I&t&~SF.l~ < c~mO)MI;:J:
I IMPRINT SOUND MANAGER I KTX-100EQ • /I\UDYSSEY] MULTEQ XT • OWNER'S MANUAL Please read before using this equipment. • ISTRUZIONI PER ~USO Si prega di leggere prima di utilizzare il attrezzatura. • BEDIENUNGSANLEITUNG Lesen Sie diese Bedienungsanleitung bitte vor Gebrauch des Gerates. • MODE D'EMPLOI Veuillez lire avant d'utiliser cet appareil. • MANUAL DE OPERACION Lealo antes de utilizar este equipo. • ANVANDARHANDLEDNING Innan du anvander utrustningen bar du lasa igenom denna anvandarhandledning. • I&t&~SF.l~ < c~mO)MI;:J:
Owners Manual
Page 2
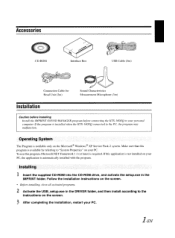
...; Windows® XP Service Pack-2 system. Follow the installation instructions on the screen. • Before installing, close all activated programs. 2 Activate the USB_setup.exe in the IMPRINT folder. Accessories CD-ROM Interface Box I USB Cable (5m) Connection Cable for Head Unit (2m) Sound Characteristics Measurement Microphone (3m) Installation Caution before Installing Install the IMPRINT SOUND MANAGER program before connecting the KTX-IOOEQ to the PC, the program may malfunction. i-EN Operating System The Program is available by...
...; Windows® XP Service Pack-2 system. Follow the installation instructions on the screen. • Before installing, close all activated programs. 2 Activate the USB_setup.exe in the IMPRINT folder. Accessories CD-ROM Interface Box I USB Cable (5m) Connection Cable for Head Unit (2m) Sound Characteristics Measurement Microphone (3m) Installation Caution before Installing Install the IMPRINT SOUND MANAGER program before connecting the KTX-IOOEQ to the PC, the program may malfunction. i-EN Operating System The Program is available by...
Owners Manual
Page 3
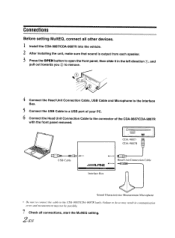
... reslIlt ill communicatioll error alld measuremel/ll/lay Ilot be possible. 7 Check all other devices. 1 Install the CDA-9887/CDA-9887R into the vehicle. 2 After Installing the unit, make sure that sound is output from each speaker. 3 Press the OPEN button to open the front panel, then slide it in the left direction G), and pull out towards you @ to remove. 4 Connect the Head Unit Connection Cable, USB Cable and Microphone...
... reslIlt ill communicatioll error alld measuremel/ll/lay Ilot be possible. 7 Check all other devices. 1 Install the CDA-9887/CDA-9887R into the vehicle. 2 After Installing the unit, make sure that sound is output from each speaker. 3 Press the OPEN button to open the front panel, then slide it in the left direction G), and pull out towards you @ to remove. 4 Connect the Head Unit Connection Cable, USB Cable and Microphone...
Owners Manual
Page 4
... function is connected and this unit. Before Setting MultEQ I.&. Making such settings may not be accurate. Measurement should not be output. When setting MuItEQ, be accurate. If a microphone other than normal level to the highest value. Therefore, they cannot be completely cleared and replaced by the new one is turned off . If a power amplifier with an input level control is turned on , turn it off . After you have a car phone...
... function is connected and this unit. Before Setting MultEQ I.&. Making such settings may not be accurate. Measurement should not be output. When setting MuItEQ, be accurate. If a microphone other than normal level to the highest value. Therefore, they cannot be completely cleared and replaced by the new one is turned off . If a power amplifier with an input level control is turned on , turn it off . After you have a car phone...

Owners Manual
Page 5
... operatioll of the IMPRINT SOUND MANAGER screen. 3 Activate IMPRINT SOUND MANAGER installed on the IMPRINT SOUND MANAGER screen. Perform PC operation outside the vehicle. • If error occurs during measurement. Afier disconnecting tlte Itead unit cable and bringing the front panel back to tlte "Message List" table described in tlte last pages. close the dialog box by double-clicking one of the Area Selection items to...
... operatioll of the IMPRINT SOUND MANAGER screen. 3 Activate IMPRINT SOUND MANAGER installed on the IMPRINT SOUND MANAGER screen. Perform PC operation outside the vehicle. • If error occurs during measurement. Afier disconnecting tlte Itead unit cable and bringing the front panel back to tlte "Message List" table described in tlte last pages. close the dialog box by double-clicking one of the Area Selection items to...

Owners Manual
Page 6
... displayed on the IMPRINT SOUND MANAGER screen. Preforming measurement from the speakers and sound characteristics are available; however, it up. III this case, be stored an the PC hard disc. If you want to finish after two measurement locations, double-clicking the Result button, alld move the microphone to the next measurement location according to the indications on the screen and set...
... displayed on the IMPRINT SOUND MANAGER screen. Preforming measurement from the speakers and sound characteristics are available; however, it up. III this case, be stored an the PC hard disc. If you want to finish after two measurement locations, double-clicking the Result button, alld move the microphone to the next measurement location according to the indications on the screen and set...
Owners Manual
Page 7
..., you can store two curve settings for one . 12 When the memory setting is complete, click x on the right side of the screen and double-clicking OK on the EXIT screen to close the IMPRINT SOUND MANAGER program. 13 After you have finished the MultEQ setting, disconnect the head unit connection cable from Audyssey Laboratories. do /lot tum power off and on with the...
..., you can store two curve settings for one . 12 When the memory setting is complete, click x on the right side of the screen and double-clicking OK on the EXIT screen to close the IMPRINT SOUND MANAGER program. 13 After you have finished the MultEQ setting, disconnect the head unit connection cable from Audyssey Laboratories. do /lot tum power off and on with the...
Owners Manual
Page 8
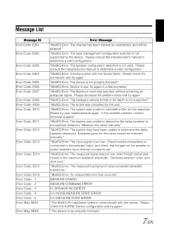
... selected input, and check that the gain on the preamp or audio hardware input channel is connected to determine a valid configuration." "MultEQ Error: The hardware sample format or bit depth is not supported by the user." If this value manually." "MultEQ Error: The measured signal was too low, even though output was reached, without achieving an adequate signal. I lEN Error Code: EOO8 Error Code: EOO9 Error Code: E010 Error Code...
... selected input, and check that the gain on the preamp or audio hardware input channel is connected to determine a valid configuration." "MultEQ Error: The hardware sample format or bit depth is not supported by the user." If this value manually." "MultEQ Error: The measured signal was too low, even though output was reached, without achieving an adequate signal. I lEN Error Code: EOO8 Error Code: EOO9 Error Code: E010 Error Code...
Owners Manual
Page 9
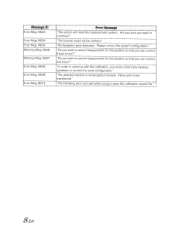
... could not be transferred. "Do you can correct these errors?" Filters will reset the measurement system. Error Msg: MOOB Error Msg: MOOg Error Msg: M010 Error Message "This action will not be verified." "No Speakers were detected. "The attached device is not properly licensed. Message 10 Error Msg: MOO3 Error Msg: MOO4 Error Msg: MOO5 Warning Msg: MOO6 Warning Msg: MOO?
... could not be transferred. "Do you can correct these errors?" Filters will reset the measurement system. Error Msg: MOOB Error Msg: MOOg Error Msg: M010 Error Message "This action will not be verified." "No Speakers were detected. "The attached device is not properly licensed. Message 10 Error Msg: MOO3 Error Msg: MOO4 Error Msg: MOO5 Warning Msg: MOO6 Warning Msg: MOO?
Owners Manual
Page 11
...; - "Settings" - "Settings" - "Advanced" on the personal computer side as ~m" • IMPRINT SOUND MANAGER o)imif~1J\.iE LJ ke, ,aeen Ie"", 100 ,moll 10 """'" corriCJII~.l""UC""rICIM,eIheDPIIOCOl'l~n"lle1oc"""",", lonl",e.llriy.c1lc~C""",~ar-.:looror""Appe.! Note/Hinweis/Remarque/Nota/ Nota/Obs/~5.ti\ • To customers using the KTX-100EQ • If the screen of IMPRINT SOUND MANAGER is not correctly displayed, set "Display Properties""Settings" -
...; - "Settings" - "Settings" - "Advanced" on the personal computer side as ~m" • IMPRINT SOUND MANAGER o)imif~1J\.iE LJ ke, ,aeen Ie"", 100 ,moll 10 """'" corriCJII~.l""UC""rICIM,eIheDPIIOCOl'l~n"lle1oc"""",", lonl",e.llriy.c1lc~C""",~ar-.:looror""Appe.! Note/Hinweis/Remarque/Nota/ Nota/Obs/~5.ti\ • To customers using the KTX-100EQ • If the screen of IMPRINT SOUND MANAGER is not correctly displayed, set "Display Properties""Settings" -


