
Owners Manual
Page 2
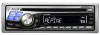
... Power On and Off 7 Initial System Start-Up 7 Setting Time 7 Adjusting Volume 7 Lowering Volume Quickly 7 Detaching and Attaching the Front Panel ......... 8 Radio Listening to Radio 8 Manual Storing of Station Presets 9 Automatic Memory of Station Presets 9 Tuning to Preset Stations 9 Station Title Search Function 9 Frequency Search Function 9 CD/MP3/WMA Playback 10...
... Power On and Off 7 Initial System Start-Up 7 Setting Time 7 Adjusting Volume 7 Lowering Volume Quickly 7 Detaching and Attaching the Front Panel ......... 8 Radio Listening to Radio 8 Manual Storing of Station Presets 9 Automatic Memory of Station Presets 9 Tuning to Preset Stations 9 Station Title Search Function 9 Frequency Search Function 9 CD/MP3/WMA Playback 10...

Owners Manual
Page 3
...) Adjustment Procedure for Dolby Surround .... 29 Setting the Speakers 30 Set MX Mode of the External Audio Processor 30 X-OVER Adjustment 30 Performing Time Correction Manually (TCR)/ Phase Switching 31 Calculating the Time Correction 31 Inputting the Time Correction 31 Switching the Phase 32 Graphic Equalizer Adjustments 32 Parametric Equalizer Adjustments...
...) Adjustment Procedure for Dolby Surround .... 29 Setting the Speakers 30 Set MX Mode of the External Audio Processor 30 X-OVER Adjustment 30 Performing Time Correction Manually (TCR)/ Phase Switching 31 Calculating the Time Correction 31 Inputting the Time Correction 31 Switching the Phase 32 Graphic Equalizer Adjustments 32 Parametric Equalizer Adjustments...
Owners Manual
Page 7
... not use standard ISO naming Level 1 (8.3 DOS standard), Level 2 (32 characters) or Joliet (Windows or Macintosh long filenames) file naming conventions*. *Please consult the Owner's manual for the DVD, these are more affected by heat, moisture, and direct sunlight. and other intellectual property rights. The DVA-9860 can be able to...
... not use standard ISO naming Level 1 (8.3 DOS standard), Level 2 (32 characters) or Joliet (Windows or Macintosh long filenames) file naming conventions*. *Please consult the Owner's manual for the DVD, these are more affected by heat, moisture, and direct sunlight. and other intellectual property rights. The DVA-9860 can be able to...

Owners Manual
Page 8
... to turn off the unit power. 2 Remove the detachable front panel. 3 Press RESET with a ball-point pen or similar pointed object. The time can be manually set 5 seconds after setting the "hour." Press MUTE to adjust the minutes while the time indication is turned on this , the time will decrease by...
... to turn off the unit power. 2 Remove the detachable front panel. 3 Press RESET with a ball-point pen or similar pointed object. The time can be manually set 5 seconds after setting the "hour." Press MUTE to adjust the minutes while the time indication is turned on this , the time will decrease by...

Owners Manual
Page 9
...will be automatically tuned in (Automatic Seek Tuning). Holding down g or f will be automatically tuned in the desired station. Manual mode: The frequency is manually tuned in steps (Manual tuning). 4 Press g or f to avoid pushing any buttons by its sides to tune in (Automatic Seek Tuning). Hold... to Radio 1 Press SOURCE/POWER until a radio frequency appears in . 8-EN DX SEEK (Distance mode) → SEEK (Local mode) → OFF (Manual mode) → DX SEEK • The initial mode is not a malfunction. • To protect the front panel, place it in normal usage (especially ...
...will be automatically tuned in (Automatic Seek Tuning). Holding down g or f will be automatically tuned in the desired station. Manual mode: The frequency is manually tuned in steps (Manual tuning). 4 Press g or f to avoid pushing any buttons by its sides to tune in (Automatic Seek Tuning). Hold... to Radio 1 Press SOURCE/POWER until a radio frequency appears in . 8-EN DX SEEK (Distance mode) → SEEK (Local mode) → OFF (Manual mode) → DX SEEK • The initial mode is not a malfunction. • To protect the front panel, place it in normal usage (especially ...

Owners Manual
Page 10
... least 2 seconds. • If a station has no title, "NO TITLE" is entered, you can be stored in the preset memory (6 stations for at least 2 seconds. Manual Storing of Station Presets 1 Select the radio band and tune in a desired radio station you wish to store in the preset memory. 2 Press and hold...
... least 2 seconds. • If a station has no title, "NO TITLE" is entered, you can be stored in the preset memory (6 stations for at least 2 seconds. Manual Storing of Station Presets 1 Select the radio band and tune in a desired radio station you wish to store in the preset memory. 2 Press and hold...

Owners Manual
Page 13
... Bit rates: 32 - 320 kbps Note that software. MP3/WMA files that are 9 or more names on creating MP3/WMA files, refer to the user's manual for that for at least 2 seconds to select a desired track(file). For non-supported characters, "NO SUPPORT" is achieved while still maintaining near CD quality...
... Bit rates: 32 - 320 kbps Note that software. MP3/WMA files that are 9 or more names on creating MP3/WMA files, refer to the user's manual for that for at least 2 seconds to select a desired track(file). For non-supported characters, "NO SUPPORT" is achieved while still maintaining near CD quality...

Owners Manual
Page 22
... the type you feel the unit's button lighting is different from Sound Customizing, Visual Customizing, etc., to select the SUBWOOFER mode. The disc titles input manually (page 20) cannot be scrolled. Select SUBW) DIMMER ↔ SUBW (SUBW SYS)*1 ↔ CDDA/CDDA/MP3 ↔ SCROLL TYPE ↔ SCROLL ↔ MUTE ↔ AUX...
... the type you feel the unit's button lighting is different from Sound Customizing, Visual Customizing, etc., to select the SUBWOOFER mode. The disc titles input manually (page 20) cannot be scrolled. Select SUBW) DIMMER ↔ SUBW (SUBW SYS)*1 ↔ CDDA/CDDA/MP3 ↔ SCROLL TYPE ↔ SCROLL ↔ MUTE ↔ AUX...

Owners Manual
Page 29
... in memory. for programs by pressing TITLE . (Refer to the "Changing the Display" section on page 28) 4 Pressing F/SETUP will return to scroll the display manually. • "Channel Number" and "Clock" displays do not scroll. • Depending on this button, the display changes as shown below . in Category Search mode, press...
... in memory. for programs by pressing TITLE . (Refer to the "Changing the Display" section on page 28) 4 Pressing F/SETUP will return to scroll the display manually. • "Channel Number" and "Clock" displays do not scroll. • Depending on this button, the display changes as shown below . in Category Search mode, press...

Owners Manual
Page 32
... 30). • Check the playback frequencies of the connected speakers before adjusting. • In order to the farthest speaker. 0.5m 2.25m 5.1ms Performing Time Correction Manually (TCR)/ Phase Switching Because of the particular conditions inside the vehicle, there can be set . For storing, refer to the normal mode. The difference in...
... 30). • Check the playback frequencies of the connected speakers before adjusting. • In order to the farthest speaker. 0.5m 2.25m 5.1ms Performing Time Correction Manually (TCR)/ Phase Switching Because of the particular conditions inside the vehicle, there can be set . For storing, refer to the normal mode. The difference in...
Owners Manual
Page 40
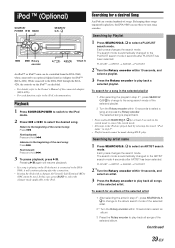
...to the DVA-9860 through the KCA420i, the controls on the iPod when it is connected to the DVA9860, it will resume playback. • If a song is automatically changed to play back all songs ... All songs in the iPod are disabled. • For details, refer to the Owner's Manual of the selected playlist. 2 Turn the Rotary encoder within 10 seconds to select an album. ... keeping these to select a PLAYLIST search mode. The selected song is automatically changed to an optional Alpine Interface Adapter for at least 2 seconds in step 2*1, press SEARCH/ Q.S to change to the album...
...to the DVA-9860 through the KCA420i, the controls on the iPod when it is connected to the DVA9860, it will resume playback. • If a song is automatically changed to play back all songs ... All songs in the iPod are disabled. • For details, refer to the Owner's Manual of the selected playlist. 2 Turn the Rotary encoder within 10 seconds to select an album. ... keeping these to select a PLAYLIST search mode. The selected song is automatically changed to an optional Alpine Interface Adapter for at least 2 seconds in step 2*1, press SEARCH/ Q.S to change to the album...

Owners Manual
Page 54
... artist name/feature, song/program title, or additional information associated with the optional adapter KCA-420i. - ERROR-01 • Communication error - Refer to the Owner's Manual of player) 53-EN Make sure the iPod is not subscribed to the iPod's documentation and charge the battery. Check the display by the iPod...
... artist name/feature, song/program title, or additional information associated with the optional adapter KCA-420i. - ERROR-01 • Communication error - Refer to the Owner's Manual of player) 53-EN Make sure the iPod is not subscribed to the iPod's documentation and charge the battery. Check the display by the iPod...
Owners Manual
Page 55
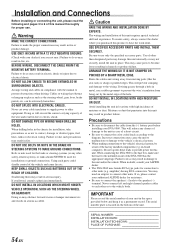
...fire or product damage. DO NOT INSTALL IN LOCATIONS WHICH MIGHT HINDER VEHICLE OPERATION, SUCH AS THE STEERING WHEEL OR GEARSHIFT. Use of this manual thoroughly for assistance. • Be sure to connect the speaker (-) leads to become loose resulting in fire, etc. This may result in...: INSTALLATION DATE: INSTALLATION TECHNICIAN: PLACE OF PURCHASE: 54-EN Be sure to disconnect the cable from the (-) battery post before installing your ALPINE dealer. • The DVA-9860 uses female RCA-type jacks for the intended circuit of the vehicle and cause fire etc. Moisture or dust...
...fire or product damage. DO NOT INSTALL IN LOCATIONS WHICH MIGHT HINDER VEHICLE OPERATION, SUCH AS THE STEERING WHEEL OR GEARSHIFT. Use of this manual thoroughly for assistance. • Be sure to connect the speaker (-) leads to become loose resulting in fire, etc. This may result in...: INSTALLATION DATE: INSTALLATION TECHNICIAN: PLACE OF PURCHASE: 54-EN Be sure to disconnect the cable from the (-) battery post before installing your ALPINE dealer. • The DVA-9860 uses female RCA-type jacks for the intended circuit of the vehicle and cause fire etc. Moisture or dust...
Owners Manual
Page 58
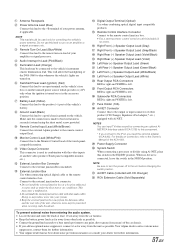
Monitor Control Lead (White/Pink) Connect this to the Owner's Manual of other product (CD Changer, Equalizer, iPod adapter,* etc.) equipped with CD Changer) \ RCA Extension Cable (Sold Separately) To prevent external noise from entering ...connecting a processor or divider using the sheet metal screw provided. 9 Remote Control Input Lead (White/Brown) Connect the external Alpine product to the output or input connector of the KCA-420i. ? Your Alpine dealer carries various noise suppressors, contact them for further information. 57-EN 1 Antenna Receptacle 2 Power Antenna Lead (Blue) ...
Monitor Control Lead (White/Pink) Connect this to the Owner's Manual of other product (CD Changer, Equalizer, iPod adapter,* etc.) equipped with CD Changer) \ RCA Extension Cable (Sold Separately) To prevent external noise from entering ...connecting a processor or divider using the sheet metal screw provided. 9 Remote Control Input Lead (White/Brown) Connect the external Alpine product to the output or input connector of the KCA-420i. ? Your Alpine dealer carries various noise suppressors, contact them for further information. 57-EN 1 Antenna Receptacle 2 Power Antenna Lead (Blue) ...
Owners Manual
Page 60
..., improper operation or failure to follow instructions contained in the Owner's manual. 4 Damage caused by the warranty, and if the product was shipped to an Authorized Alpine Service Center or Alpine for repair and for payment of incidental or consequential damages. THE REMEDIES...Should the product require service, please call the following : 1 Damage occurring during shipment. R LIMITED WARRANTY ALPINE ELECTRONICS OF AMERICA, INC. AND ALPINE OF CANADA INC. ("Alpine"), are dedicated to quality craftsmanship and are pleased to the removal or reinstallation of the product. 5 Service...
..., improper operation or failure to follow instructions contained in the Owner's manual. 4 Damage caused by the warranty, and if the product was shipped to an Authorized Alpine Service Center or Alpine for repair and for payment of incidental or consequential damages. THE REMEDIES...Should the product require service, please call the following : 1 Damage occurring during shipment. R LIMITED WARRANTY ALPINE ELECTRONICS OF AMERICA, INC. AND ALPINE OF CANADA INC. ("Alpine"), are dedicated to quality craftsmanship and are pleased to the removal or reinstallation of the product. 5 Service...


