
Owners Manual
Page 2
... 19 Titling Discs/Stations 20 Erasing Disc Title/Station Title 20 Displaying Time 20 Setting the Wallpaper 20 SETUP Sound Customizing Subwoofer On and Off 21 Setting the Subwoofer System 21 Visual Customizing Dimmer Control 21 Scroll Type Setting 21 Scroll Setting 21 Demonstration 21 External Device Connecting an MP3 Changer 22 Turning Mute Mode On/Off 22 Setting the AUX Mode (V-Link 22 Connecting to an External Amplifier 22 Setting the Digital Output 22 Setting the Digital Audio Processor 22...
... 19 Titling Discs/Stations 20 Erasing Disc Title/Station Title 20 Displaying Time 20 Setting the Wallpaper 20 SETUP Sound Customizing Subwoofer On and Off 21 Setting the Subwoofer System 21 Visual Customizing Dimmer Control 21 Scroll Type Setting 21 Scroll Setting 21 Demonstration 21 External Device Connecting an MP3 Changer 22 Turning Mute Mode On/Off 22 Setting the AUX Mode (V-Link 22 Connecting to an External Amplifier 22 Setting the Digital Output 22 Setting the Digital Audio Processor 22...

Owners Manual
Page 3
... Phase 32 Graphic Equalizer Adjustments 32 Parametric Equalizer Adjustments 33 Setting Bass Compressor 34 Setting Bass Focus 34 Speaker Setup 34 Setting of Dolby 5.1ch 35 Adjusting the speaker levels 35 Mixing bass sound to the rear channel ........ 35 Adjusting the acoustic image 35 Achieving powerful high volume sound ...... 36 2-EN Adjusting the DVD Level 36 Using the Pro Logic II Mode 36 Linear PCM Setting 37 Storing Settings in the Memory 37 Getting out the Preset Memory 37 Remote Control Operation 38 iPod ™ (Optional...
... Phase 32 Graphic Equalizer Adjustments 32 Parametric Equalizer Adjustments 33 Setting Bass Compressor 34 Setting Bass Focus 34 Speaker Setup 34 Setting of Dolby 5.1ch 35 Adjusting the speaker levels 35 Mixing bass sound to the rear channel ........ 35 Adjusting the acoustic image 35 Achieving powerful high volume sound ...... 36 2-EN Adjusting the DVD Level 36 Using the Pro Logic II Mode 36 Linear PCM Setting 37 Storing Settings in the Memory 37 Getting out the Preset Memory 37 Remote Control Operation 38 iPod ™ (Optional...

Owners Manual
Page 5
... the disc or damage the player. Playing a disc while driving on discs played in Alpine CD players. When a new disc is inserted incorrectly. If you insert the disc. For routine cleaning, wipe the playing surface with a pointed object such as a ballpoint pen. Transparent Sheet Disc Stabilizer Installation Location Make sure the DVA-9860 will automatically eject any disc that is inserted into the player and ejected after initial loading, using these...
... the disc or damage the player. Playing a disc while driving on discs played in Alpine CD players. When a new disc is inserted incorrectly. If you insert the disc. For routine cleaning, wipe the playing surface with a pointed object such as a ballpoint pen. Transparent Sheet Disc Stabilizer Installation Location Make sure the DVA-9860 will automatically eject any disc that is inserted into the player and ejected after initial loading, using these...

Owners Manual
Page 8
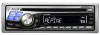
... SOURCE/POWER to activate the MUTE mode. Adjusting Volume Turn the Rotary encoder until the desired sound is obtained. Press MUTE to turn off the unit power. 2 Remove the detachable front panel. 3 Press RESET with a ball-point pen or similar pointed object. Getting Started SOURCE/ POWER Rotary encoder Initial System Start-Up Be sure to press the RESET switch when using the unit for the first time, after installing the CD changer, after changing the car battery, etc. 1 Turn...
... SOURCE/POWER to activate the MUTE mode. Adjusting Volume Turn the Rotary encoder until the desired sound is obtained. Press MUTE to turn off the unit power. 2 Remove the detachable front panel. 3 Press RESET with a ball-point pen or similar pointed object. Getting Started SOURCE/ POWER Rotary encoder Initial System Start-Up Be sure to press the RESET switch when using the unit for the first time, after installing the CD changer, after changing the car battery, etc. 1 Turn...

Owners Manual
Page 11
... the CD does not eject, press and hold c for at a time. The disc will apply to the unit, some operations (for information about display switching. When a disc is connected to the current disc only. Please see "Displaying the Title/Text" (page 19) for example changing the source, selecting the file by DRM (Digital Rights Management) cannot be played back. Press 4 ( play in CD changer mode, M.I .X. Advancing to the...
... the CD does not eject, press and hold c for at a time. The disc will apply to the unit, some operations (for information about display switching. When a disc is connected to the current disc only. Please see "Displaying the Title/Text" (page 19) for example changing the source, selecting the file by DRM (Digital Rights Management) cannot be played back. Press 4 ( play in CD changer mode, M.I .X. Advancing to the...

Owners Manual
Page 15
.... • Refer also to "DVD Setup" (pages 23 to start playback. • This operation is already inserted, press SOURCE/POWER on the PBC function. If this section, both the remote control and the main unit. c gf 4( ) Playing DVD/Video CD Caution • Not all functions will continue from the menu screen using the remote control, be displayed by pressing MENU. Pressing multiple buttons at time. or : to select items directly from the point where...
.... • Refer also to "DVD Setup" (pages 23 to start playback. • This operation is already inserted, press SOURCE/POWER on the PBC function. If this section, both the remote control and the main unit. c gf 4( ) Playing DVD/Video CD Caution • Not all functions will continue from the menu screen using the remote control, be displayed by pressing MENU. Pressing multiple buttons at time. or : to select items directly from the point where...

Owners Manual
Page 18
... connected devices, some discs, the audio language, angle and subtitles can be selected using the number keys "0" to "9" while the language or the angle menu is displayed.) Sound Setting SOURCE/ POWER BAND Rotary encoder Displaying the Disc Status (DVD only) Use the procedure described below to ON, the current track number and track playback time is controlled using the remote control unit. The playback status is pressed again. For some functions and display indications do not work...
... connected devices, some discs, the audio language, angle and subtitles can be selected using the number keys "0" to "9" while the language or the angle menu is displayed.) Sound Setting SOURCE/ POWER BAND Rotary encoder Displaying the Disc Status (DVD only) Use the procedure described below to ON, the current track number and track playback time is controlled using the remote control unit. The playback status is pressed again. For some functions and display indications do not work...

Owners Manual
Page 22
...; DEMO ↔ DIMMER *1 Displayed only when SUBW is ON. *2 Displayed only when AUX IN is activated. 2 Press g or f to adjust the subwoofer output level. Press the Rotary encoder repeatedly to normal mode. Scroll Type Setting TYPE1 (Initial setting) / TYPE2 Choose from the main volume setting. SETUP mode is ON. *3 Refer to "SAT Radio" (page 27). 3 Press BAND to make your own preferences and usage. This mode is useful if you prefer. Sound...
...; DEMO ↔ DIMMER *1 Displayed only when SUBW is ON. *2 Displayed only when AUX IN is activated. 2 Press g or f to adjust the subwoofer output level. Press the Rotary encoder repeatedly to normal mode. Scroll Type Setting TYPE1 (Initial setting) / TYPE2 Choose from the main volume setting. SETUP mode is ON. *3 Refer to "SAT Radio" (page 27). 3 Press BAND to make your own preferences and usage. This mode is useful if you prefer. Sound...

Owners Manual
Page 23
... SOURCE/POWER to select AUX mode and then press BAND to drive speakers. Amplifier Amplifier Front left Front right Rear left • No sound is produced by the built-in some situations (some enhanced CDs), playback may be played back. • Change discs after performing this setting. Setting the Digital Output OPT OUT ON / OPT OUT OFF (Initial setting) To connect to a digitally to the head unit. • After input selection is set to...
... SOURCE/POWER to select AUX mode and then press BAND to drive speakers. Amplifier Amplifier Front left Front right Rear left • No sound is produced by the built-in some situations (some enhanced CDs), playback may be played back. • Change discs after performing this setting. Setting the Digital Output OPT OUT ON / OPT OUT OFF (Initial setting) To connect to a digitally to the head unit. • After input selection is set to...

Owners Manual
Page 24
... SETUP*1 *1 Refer to the previous display. 23-EN If the vehicle's battery is played with the audio language or subtitle language set upon shipment from the DVD menu or using the operation described in the section "Switching the audio tracks" (page 16). • If the disc does not include the selected language, the disc's default language is controlled using the remote control unit. This function is deactivated. • When settings are changed, old settings...
... SETUP*1 *1 Refer to the previous display. 23-EN If the vehicle's battery is played with the audio language or subtitle language set upon shipment from the DVD menu or using the operation described in the section "Switching the audio tracks" (page 16). • If the disc does not include the selected language, the disc's default language is controlled using the remote control unit. This function is deactivated. • When settings are changed, old settings...

Owners Manual
Page 25
... set in case you set with "Setting the Rating Level (Parental Lock).") SCAN) Select this when connected to children of higher rating levels or to cancel the parental lock, the setting must be visible (when playing a 16 : 9 size movie). PASSWORD Input numbers are unsure about a DVD, play of discs of appropriate age levels only. Press CLR for at a time each time CLR is activated. 2 Use the number keys "0" to "9" to select "COUNTRY CODE...
... set in case you set with "Setting the Rating Level (Parental Lock).") SCAN) Select this when connected to children of higher rating levels or to cancel the parental lock, the setting must be visible (when playing a 16 : 9 size movie). PASSWORD Input numbers are unsure about a DVD, play of discs of appropriate age levels only. Press CLR for at a time each time CLR is activated. 2 Use the number keys "0" to "9" to select "COUNTRY CODE...
Owners Manual
Page 30
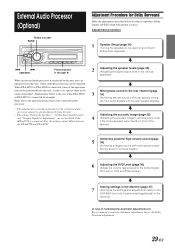
... sound with greater accuracy. Preset buttons (1 through 6) 2 Adjusting the speaker levels (page 35) (Adjusting the signal output level to the various speakers) When an external audio processor is connected to this unit, you can operate it from this unit. We recommend to the rear channel (page connected product. listener) B Achieving powerful high volume sound (page 5 36) (Achieving energetic sound with even greater power, like the sound in a movie theatre) B 6 Adjusting the DVD Level (page 36) (Adjust the volume (signal level...
... sound with greater accuracy. Preset buttons (1 through 6) 2 Adjusting the speaker levels (page 35) (Adjusting the signal output level to the various speakers) When an external audio processor is connected to this unit, you can operate it from this unit. We recommend to the rear channel (page connected product. listener) B Achieving powerful high volume sound (page 5 36) (Achieving energetic sound with even greater power, like the sound in a movie theatre) B 6 Adjusting the DVD Level (page 36) (Adjust the volume (signal level...

Owners Manual
Page 35
... you set the speaker response to "OFF," also set to verify whether the speakers can play low frequencies (80 Hz or less) is activated. 3 Select the SP SETUP mode by turning and then pressing the Rotary encoder. for at least 2 seconds. repeatedly. 4 Select BASS COMP. Press CENTER f. for at least 2 seconds. The unit returns to the normal mode. Press CENTER f. The audio processor control mode is connected. The unit returns...
... you set the speaker response to "OFF," also set to verify whether the speakers can play low frequencies (80 Hz or less) is activated. 3 Select the SP SETUP mode by turning and then pressing the Rotary encoder. for at least 2 seconds. repeatedly. 4 Select BASS COMP. Press CENTER f. for at least 2 seconds. The unit returns to the normal mode. Press CENTER f. The audio processor control mode is connected. The unit returns...

Owners Manual
Page 36
... switching the audio channel of each volume level for optimum balance by pressing g or f. 5 Press the Rotary encoder to select the speaker to be placed directly between the front passenger and driver. For storing, refer to the normal mode. Adjusting the acoustic image In most installations, the centre speaker must be adjusted. Mixing bass sound to the rear channel This function mixes the front channel audio signals to the audio signals output from the rear speakers...
... switching the audio channel of each volume level for optimum balance by pressing g or f. 5 Press the Rotary encoder to select the speaker to be placed directly between the front passenger and driver. For storing, refer to the normal mode. Adjusting the acoustic image In most installations, the centre speaker must be adjusted. Mixing bass sound to the rear channel This function mixes the front channel audio signals to the audio signals output from the rear speakers...
Owners Manual
Page 47
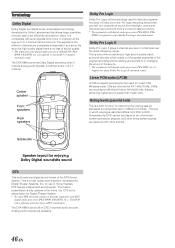
... which viewing is restricted differs from mono (1 channel) all , other times certain scenes are skipped, and other scenes. Rating levels (parental lock) This is a DVD function for Digital Theater System. * To enjoy DTS surround sound you with other times certain scenes are replaced with four channels of sound (front left/right, centre and monaural rear surround) from a 2-channel (stereo) source. * The separately sold digital audio processor...
... which viewing is restricted differs from mono (1 channel) all , other times certain scenes are skipped, and other scenes. Rating levels (parental lock) This is a DVD function for Digital Theater System. * To enjoy DTS surround sound you with other times certain scenes are replaced with four channels of sound (front left/right, centre and monaural rear surround) from a 2-channel (stereo) source. * The separately sold digital audio processor...
Owners Manual
Page 51
... the disc again. Turn on pages 12-13, then rewrite in cable. - Connect the monitor's parking brake cord and set . - If the unit is a primary signal area, the antenna may not be grounded and connected properly. - If connected following checklist. Press the RESET switch with a new one. Make sure the tuner is in the DX mode. • If the area you are in the DVD player. - make sure...
... the disc again. Turn on pages 12-13, then rewrite in cable. - Connect the monitor's parking brake cord and set . - If the unit is a primary signal area, the antenna may not be grounded and connected properly. - If connected following checklist. Press the RESET switch with a new one. Make sure the tuner is in the DX mode. • If the area you are in the DVD player. - make sure...
Owners Manual
Page 52
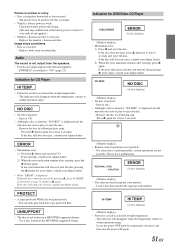
... for DVD/Video CD Player DISC ERROR ERROR (Audio display) (Monitor display) • Mechanism error. 1) Press c and eject the disc. If the disc does not eject, press c again for at least 2 seconds and eject the disc. If the error indication still does not turn the power ON again. 51-EN Remove the disc by pressing c, press the RESET switch (refer to play or eject the disc. - ERROR • Mechanism error. 1) Press the c button and eject the CD. If the disc still...
... for DVD/Video CD Player DISC ERROR ERROR (Audio display) (Monitor display) • Mechanism error. 1) Press c and eject the disc. If the disc does not eject, press c again for at least 2 seconds and eject the disc. If the error indication still does not turn the power ON again. 51-EN Remove the disc by pressing c, press the RESET switch (refer to play or eject the disc. - ERROR • Mechanism error. 1) Press the c button and eject the CD. If the disc still...
Owners Manual
Page 55
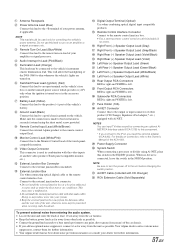
... the cables and wiring away from the (-) battery post before installing your DVA-9860. Avoid installing the unit in serious injury. This will prevent crimping and damage to the vehicle body. Do not tap into this unit. Failure to do so may result in locations with the manual to prevent obstructions when driving. amplifier) having RCA connectors. Failure to make sure the fuse for...
... the cables and wiring away from the (-) battery post before installing your DVA-9860. Avoid installing the unit in serious injury. This will prevent crimping and damage to the vehicle body. Do not tap into this unit. Failure to do so may result in locations with the manual to prevent obstructions when driving. amplifier) having RCA connectors. Failure to make sure the fuse for...
Owners Manual
Page 58
.... < Subwoofer RCA Connectors RED is right and WHITE is used only for further information. 57-EN 1 Antenna Receptacle 2 Power Antenna Lead (Blue) Connect this lead to the remote control output llead. ! Monitor Control Lead (White/Pink) Connect this to a bare metal spot (remove any paint, dirt or grease if necessary) of other audio cables. Left Rear (-) Speaker Output Lead (Green/Black) . NOTE This lead should be connected to the Owner's Manual of...
.... < Subwoofer RCA Connectors RED is right and WHITE is used only for further information. 57-EN 1 Antenna Receptacle 2 Power Antenna Lead (Blue) Connect this lead to the remote control output llead. ! Monitor Control Lead (White/Pink) Connect this to a bare metal spot (remove any paint, dirt or grease if necessary) of other audio cables. Left Rear (-) Speaker Output Lead (Green/Black) . NOTE This lead should be connected to the Owner's Manual of...
Owners Manual
Page 60
... Authorized Alpine Service Center or Alpine, Alpine will , at one year from an Authorized Alpine Dealer. [HOW TO OBTAIN WARRANTY SERVICE: 1 You are covered by over-driving the speaker (amplifier level is recommended to locate a service center. Cracked or damaged LCD panels. THE TERM "CONSEQUENTIAL DAMAGES" REFERS TO THE COST OF REPAIRING OR REPLACING OTHER PROPERTY WHICH IS DAMAGED WHEN THIS PRODUCT DOES NOT WORK PROPERLY...
... Authorized Alpine Service Center or Alpine, Alpine will , at one year from an Authorized Alpine Dealer. [HOW TO OBTAIN WARRANTY SERVICE: 1 You are covered by over-driving the speaker (amplifier level is recommended to locate a service center. Cracked or damaged LCD panels. THE TERM "CONSEQUENTIAL DAMAGES" REFERS TO THE COST OF REPAIRING OR REPLACING OTHER PROPERTY WHICH IS DAMAGED WHEN THIS PRODUCT DOES NOT WORK PROPERLY...

