Owners Manual
Page 1
..., B.P. 50016, 95945 Roissy Charles de Gaulle Cedex, France Phone 01-48638989 ALPINE ITALIA S.p.A. Colombo 8, 20090 Trezzano Sul Naviglio (MI), Italy Phone 02-484781 ALPINE ELECTRONICS DE ESPAÑA, S.A. R MP3 CD Receiver EN CDE-9846 FR FM/AM CD Receiver CDE-9842 ES • OWNER'S MANUAL Please read before using this equipment. • MODE D'EMPLOI Veuillez lire...
..., B.P. 50016, 95945 Roissy Charles de Gaulle Cedex, France Phone 01-48638989 ALPINE ITALIA S.p.A. Colombo 8, 20090 Trezzano Sul Naviglio (MI), Italy Phone 02-484781 ALPINE ELECTRONICS DE ESPAÑA, S.A. R MP3 CD Receiver EN CDE-9846 FR FM/AM CD Receiver CDE-9842 ES • OWNER'S MANUAL Please read before using this equipment. • MODE D'EMPLOI Veuillez lire...
Owners Manual
Page 7
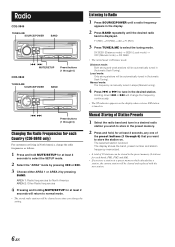
... can be automatically tuned in a desired radio station you want to store the station on the display when a stereo FM station is manually tuned in steps (Manual tuning). 4 Press g or f to tune in the display. 2 Press BAND repeatedly until the desired radio band is displayed. DX... Both strong and weak stations will be stored in the preset memory (6 stations for each band; Radio CDE-9846 TUNE/A.ME SOURCE/POWER BAND g f MUTE/SETUP Preset buttons (1 through 6) CDE-9842 TUNE/A.ME SOURCE/POWER BAND Listening to Radio 1 Press SOURCE/POWER until a radio frequency appears in the...
... can be automatically tuned in a desired radio station you want to store the station on the display when a stereo FM station is manually tuned in steps (Manual tuning). 4 Press g or f to tune in the display. 2 Press BAND repeatedly until the desired radio band is displayed. DX... Both strong and weak stations will be stored in the preset memory (6 stations for each band; Radio CDE-9846 TUNE/A.ME SOURCE/POWER BAND g f MUTE/SETUP Preset buttons (1 through 6) CDE-9842 TUNE/A.ME SOURCE/POWER BAND Listening to Radio 1 Press SOURCE/POWER until a radio frequency appears in the...
Owners Manual
Page 16
...time indication is blinking. 3 When the hour has been adjusted, press the Rotary encoder (CDE-9846 only) or press MODE (CDE-9842 only). 4 Turn the Rotary encoder (CDE-9846 only) or press 4 and 3 (CDE-9842 only) to display the time. The input mode will be canceled if no more titles.... 3 Turn the Rotary encoder (CDE-9846 only) or press 4 and 3 (CDE-9842 only) to select the desired letter/numeral/symbol available for at least 2 seconds while the time is displayed. Minutes will advance one of the previously inputted titles must be manually set 5 seconds after the minute adjustment...
...time indication is blinking. 3 When the hour has been adjusted, press the Rotary encoder (CDE-9846 only) or press MODE (CDE-9842 only). 4 Turn the Rotary encoder (CDE-9846 only) or press 4 and 3 (CDE-9842 only) to display the time. The input mode will be canceled if no more titles.... 3 Turn the Rotary encoder (CDE-9846 only) or press 4 and 3 (CDE-9842 only) to select the desired letter/numeral/symbol available for at least 2 seconds while the time is displayed. Minutes will advance one of the previously inputted titles must be manually set 5 seconds after the minute adjustment...
Owners Manual
Page 17
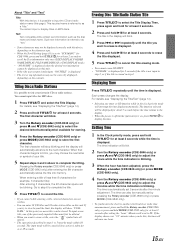
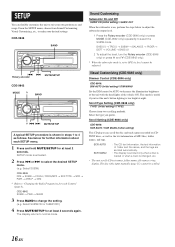
... turn the Rotary encoder (CDE-9846 only) or press 4 and 3 (CDE-9842 only). * When the ...mode is useful if you prefer. CDE-9842 SUBW → PWR → SUBW...SETUP for at night. CDE-9846 BAND g f MUTE/SETUP Rotary encoder CDE-9842 MODE 4 BAND 3 ...g f MUTE/SETUP A typical SETUP procedure is changed, etc. • The unit scrolls CD text names, folder names, file names or tag display. Scroll Type Setting (CDE...Rotary encoder (CDE-9846 only) or press MODE (CDE-9842 only) repeatedly... Customizing (CDE-9846 only) Dimmer Control (CDE-9846 only) CDE-9846: ...
... turn the Rotary encoder (CDE-9846 only) or press 4 and 3 (CDE-9842 only). * When the ...mode is useful if you prefer. CDE-9842 SUBW → PWR → SUBW...SETUP for at night. CDE-9846 BAND g f MUTE/SETUP Rotary encoder CDE-9842 MODE 4 BAND 3 ...g f MUTE/SETUP A typical SETUP procedure is changed, etc. • The unit scrolls CD text names, folder names, file names or tag display. Scroll Type Setting (CDE...Rotary encoder (CDE-9846 only) or press MODE (CDE-9842 only) repeatedly... Customizing (CDE-9846 only) Dimmer Control (CDE-9846 only) CDE-9846: ...

Owners Manual
Page 21
... or may result in metal, use a rubber grommet to prevent the wire's insulation from the (-) battery post before installing your Alpine dealer. • The CDE-9846/CDE-9842 uses female RCA-type jacks for assistance. • Be sure to connect the speaker (-) leads to the speaker (-) terminal. ...to the vehicle body. SERIAL NUMBER: INSTALLATION DATE: INSTALLATION TECHNICIAN: PLACE OF PURCHASE: 20-EN The wiring and installation of this manual thoroughly for proper use only the specified accessory parts. This may result in electric shock or injury due to electrical shorts. Bolts or...
... or may result in metal, use a rubber grommet to prevent the wire's insulation from the (-) battery post before installing your Alpine dealer. • The CDE-9846/CDE-9842 uses female RCA-type jacks for assistance. • Be sure to connect the speaker (-) leads to the speaker (-) terminal. ...to the vehicle body. SERIAL NUMBER: INSTALLATION DATE: INSTALLATION TECHNICIAN: PLACE OF PURCHASE: 20-EN The wiring and installation of this manual thoroughly for proper use only the specified accessory parts. This may result in electric shock or injury due to electrical shorts. Bolts or...
Owners Manual
Page 22
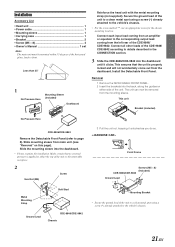
... within 35 degrees of the unit or the removable nosepiece. 2 Hex Nut (M5) Screw Metal Mounting Strap Ground Lead ** Bolt Stud * CDE-9846/CDE-9842 Chassis 3 Pull the unit out, keeping it clicks. Installation Accessory List • Head unit 1 • Power cable 1 • Mounting...case 1 • Bracket 2 • Screw (M5 × 8 4 • Owner's Manual 1 set Note: The main unit must be removed from the dashboard. Front Frame Screws (M5 × 8) (Included) CDE-9846/CDE-9842 Ground Lead * Mounting Bracket • Secure the ground lead of the unit. Slide the mounting ...
... within 35 degrees of the unit or the removable nosepiece. 2 Hex Nut (M5) Screw Metal Mounting Strap Ground Lead ** Bolt Stud * CDE-9846/CDE-9842 Chassis 3 Pull the unit out, keeping it clicks. Installation Accessory List • Head unit 1 • Power cable 1 • Mounting...case 1 • Bracket 2 • Screw (M5 × 8 4 • Owner's Manual 1 set Note: The main unit must be removed from the dashboard. Front Frame Screws (M5 × 8) (Included) CDE-9846/CDE-9842 Ground Lead * Mounting Bracket • Secure the ground lead of the unit. Slide the mounting ...


