
User Manual
Page 1
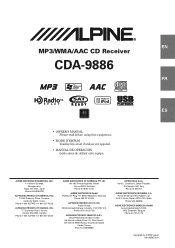
...-165 Princes Highway, Hallam Victoria 3803, Australia Phone 03-8787-1200 ALPINE ELECTRONICS GmbH Frankfurter Ring 117, 80807 München, Germany Phone 089-32 42 640 ALPINE ELECTRONICS OF U.K. Alpine House Fletchamstead Highway, Coventry CV4 9TW, U.K. R EN MP3/WMA/AAC CD Receiver CDA-9886 FR ES • OWNER'S MANUAL Please read before using this equipment...
...-165 Princes Highway, Hallam Victoria 3803, Australia Phone 03-8787-1200 ALPINE ELECTRONICS GmbH Frankfurter Ring 117, 80807 München, Germany Phone 089-32 42 640 ALPINE ELECTRONICS OF U.K. Alpine House Fletchamstead Highway, Coventry CV4 9TW, U.K. R EN MP3/WMA/AAC CD Receiver CDA-9886 FR ES • OWNER'S MANUAL Please read before using this equipment...
User Manual
Page 3
ENGLISH Contents Operating Instructions WARNING WARNING 4 CAUTION 4 PRECAUTIONS 4 Getting Started Accessory List 7 Turning Power On and Off 7 Detaching and Attaching the Front Panel ........ 7 Initial System Start-Up 7 Adjusting Volume 8 Lowering Volume Quickly 8 Setting the Time and Calendar 8 Radio Listening to Radio 8 Presetting Stations Manually 9 Presetting Stations Automatically 9 Tuning to Preset Stations 9 Frequency Search Function 9 Receiving a Multicast Station (HD Radio mode only 9 CD/MP3/WMA/AAC Playback 10 Repeat Play 11 M.I.X. (Random Play 11 Searching for CD ...
ENGLISH Contents Operating Instructions WARNING WARNING 4 CAUTION 4 PRECAUTIONS 4 Getting Started Accessory List 7 Turning Power On and Off 7 Detaching and Attaching the Front Panel ........ 7 Initial System Start-Up 7 Adjusting Volume 8 Lowering Volume Quickly 8 Setting the Time and Calendar 8 Radio Listening to Radio 8 Presetting Stations Manually 9 Presetting Stations Automatically 9 Tuning to Preset Stations 9 Frequency Search Function 9 Receiving a Multicast Station (HD Radio mode only 9 CD/MP3/WMA/AAC Playback 10 Repeat Play 11 M.I.X. (Random Play 11 Searching for CD ...
User Manual
Page 4
Channel 31 Equalizer Presets (Factory's EQ 31 Setting the Response Slope for the High Range Speaker (TW Setup 31 Setting the Filter type 31 Turning Media Xpander ON/OFF 31 Setting the MX Level 31 Setting EQ mode 31 Setting the Time Correction Unit (TCR Parameter 31 Blackout Mode On and Off 31 Sound Field Adjustment 32 Adjusting the Parametric Equalizer Curve 32 Adjusting the Graphic Equalizer Curve ...........32 Adjusting the Time Correction 32 Adjusting the Crossover Settings 32 Storing the Sound Field Adjustment Settings 33 Recalling the Stored Sound Field Adjustment Settings...
Channel 31 Equalizer Presets (Factory's EQ 31 Setting the Response Slope for the High Range Speaker (TW Setup 31 Setting the Filter type 31 Turning Media Xpander ON/OFF 31 Setting the MX Level 31 Setting EQ mode 31 Setting the Time Correction Unit (TCR Parameter 31 Blackout Mode On and Off 31 Sound Field Adjustment 32 Adjusting the Parametric Equalizer Curve 32 Adjusting the Graphic Equalizer Curve ...........32 Adjusting the Time Correction 32 Adjusting the Crossover Settings 32 Storing the Sound Field Adjustment Settings 33 Recalling the Stored Sound Field Adjustment Settings...

User Manual
Page 5
Installation and Connections Warning 44 Caution 44 Precautions 44 Installation 45 Connections 47 LIMITED WARRANTY 3-EN
Installation and Connections Warning 44 Caution 44 Precautions 44 Installation 45 Connections 47 LIMITED WARRANTY 3-EN

User Manual
Page 6
... can be dangerous and may result in fire, etc. Doing so may result in personal injury or damage to your authorized Alpine dealer or the nearest Alpine Service Center for other injury. USE THIS PRODUCT FOR MOBILE 12V APPLICATIONS. Return it to the product. Temperature Be sure the... temperature inside and may cause personal injury or damage to your Alpine dealer or the nearest Alpine Service Station for servicing. 4-EN Return it to the product. DO NOT DISASSEMBLE OR ALTER. USE ONLY IN CARS WITH ...
... can be dangerous and may result in fire, etc. Doing so may result in personal injury or damage to your authorized Alpine dealer or the nearest Alpine Service Center for other injury. USE THIS PRODUCT FOR MOBILE 12V APPLICATIONS. Return it to the product. Temperature Be sure the... temperature inside and may cause personal injury or damage to your Alpine dealer or the nearest Alpine Service Station for servicing. 4-EN Return it to the product. DO NOT DISASSEMBLE OR ALTER. USE ONLY IN CARS WITH ...
User Manual
Page 7
... disc or damage the player. Using such accessories can cause the disc to feel any special shape discs. Do not attempt to be installed in Alpine CD players. If "Error" continues to load more than one disc at a time for this unit and never use round shape discs only for playback...
... disc or damage the player. Using such accessories can cause the disc to feel any special shape discs. Do not attempt to be installed in Alpine CD players. If "Error" continues to load more than one disc at a time for this unit and never use round shape discs only for playback...
User Manual
Page 8
... temperatures or sunlight (e.g., left in the car or this unit), CDs recorded under license from Fraunhofer IIS and Thomson." • "Supply of this product. CAUTION Alpine accepts no bumps around the disc. • Do not use is required. An independent license for lost data, etc., even if data, etc., is lost...
... temperatures or sunlight (e.g., left in the car or this unit), CDs recorded under license from Fraunhofer IIS and Thomson." • "Supply of this product. CAUTION Alpine accepts no bumps around the disc. • Do not use is required. An independent license for lost data, etc., even if data, etc., is lost...
User Manual
Page 9
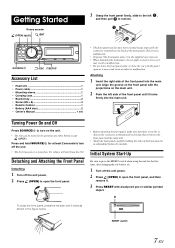
Attaching 1 Insert the right side of the front panel into the main unit. Detaching and Attaching the Front Panel Detaching 1 Turn off the unit power. 2 Press (OPEN) to open the front panel. • Before attaching the front panel, make sure that there is no dirt or dust on the connector terminals and no foreign object between the front panel and the main unit. • Attach the front panel carefully, holding the sides of the front panel to turn off the unit power. 2 Press (OPEN) to turn on the unit. • The unit can be turned on , the volume will start from level 12. To...
Attaching 1 Insert the right side of the front panel into the main unit. Detaching and Attaching the Front Panel Detaching 1 Turn off the unit power. 2 Press (OPEN) to open the front panel. • Before attaching the front panel, make sure that there is no dirt or dust on the connector terminals and no foreign object between the front panel and the main unit. • Attach the front panel carefully, holding the sides of the front panel to turn off the unit power. 2 Press (OPEN) to turn on the unit. • The unit can be turned on , the volume will start from level 12. To...
User Manual
Page 10
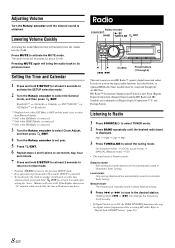
Adjusting Volume Turn the Rotary encoder until the desired radio band is set month, day, hour and minute. 7 Press and hold F/SETUP for at least 2 seconds to return to normal mode. • Pressing /ESC returns to the previous SETUP mode. • If no operation is performed for 60 seconds, SETUP is canceled. • To synchronize the clock to activate the MUTE mode. HD Radio™ Technology Manufactured Under License From iBiquity Digital Corporation. Lowering Volume Quickly Activating the Audio Mute function will be automatically tuned in (Automatic Seek Tuning)....
Adjusting Volume Turn the Rotary encoder until the desired radio band is set month, day, hour and minute. 7 Press and hold F/SETUP for at least 2 seconds to return to normal mode. • Pressing /ESC returns to the previous SETUP mode. • If no operation is performed for 60 seconds, SETUP is canceled. • To synchronize the clock to activate the MUTE mode. HD Radio™ Technology Manufactured Under License From iBiquity Digital Corporation. Lowering Volume Quickly Activating the Audio Mute function will be automatically tuned in (Automatic Seek Tuning)....
User Manual
Page 11
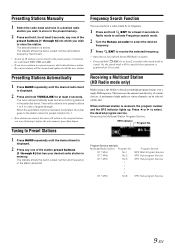
The tuner will return to the original station you wish to store the station. They will be cleared and replaced with the new station. Receiving a Multicast Station (HD Radio mode only) Multicasting is not required during HD Radio reception. • Press and hold /ESC for at least 2 seconds in the search mode to cancel. Program Service example: Multicast Radio Station Program No. 87.7 MHz No.1 87.7 MHz No.2 87.7 MHz No.3 | | | | 87.7 MHz No.8 Program Service MPS: Main Program Service SPS: Sub-program Service SPS: Sub-program Service SPS: Sub-program Service 9-...
The tuner will return to the original station you wish to store the station. They will be cleared and replaced with the new station. Receiving a Multicast Station (HD Radio mode only) Multicasting is not required during HD Radio reception. • Press and hold /ESC for at least 2 seconds in the search mode to cancel. Program Service example: Multicast Radio Station Program No. 87.7 MHz No.1 87.7 MHz No.2 87.7 MHz No.3 | | | | 87.7 MHz No.8 Program Service MPS: Main Program Service SPS: Sub-program Service SPS: Sub-program Service SPS: Sub-program Service 9-...

User Manual
Page 12
When a disc is connected. 3 While playing back MP3/WMA/AAC, press or to the beginning of the current track (file): Press . Advancing to select the desired folder. See "Displaying the Text" (page 17) for MP3/WMA/AAC data playback is the file numbers recorded on this unit. • The track display for information about display switching. 10-EN Pressing and holding or will resume playback. 6 After pressing (OPEN) to select the desired track (file). Fast backward: Press and hold . 5 To pause playback, press / . Fast forward: Press and hold . Close the front panel ...
When a disc is connected. 3 While playing back MP3/WMA/AAC, press or to the beginning of the current track (file): Press . Advancing to select the desired folder. See "Displaying the Text" (page 17) for MP3/WMA/AAC data playback is the file numbers recorded on this unit. • The track display for information about display switching. 10-EN Pressing and holding or will resume playback. 6 After pressing (OPEN) to select the desired track (file). Fast backward: Press and hold . 5 To pause playback, press / . Fast forward: Press and hold . Close the front panel ...
User Manual
Page 13
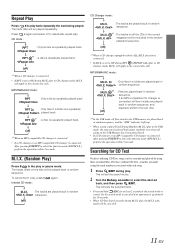
Repeat Play Press 4 to play . play in CD changer mode, M.I .X. This will be played repeatedly. play mode will set to select the desired track, and then press /ENT. CD mode : : Only a track is repeatedly played back. : A disc is repeatedly played back. *1 When a CD changer is connected. • If RPT is set the search mode. 2 Turn the Rotary encoder to ON during M.I .X. will be searched and played by using the track numbers associated with the ALL M.I .X. Press 4 again and select off to the next disc. *4 In the USB mode, all songs on the disc will apply ...
Repeat Play Press 4 to play . play in CD changer mode, M.I .X. This will be played repeatedly. play mode will set to select the desired track, and then press /ENT. CD mode : : Only a track is repeatedly played back. : A disc is repeatedly played back. *1 When a CD changer is connected. • If RPT is set the search mode. 2 Turn the Rotary encoder to ON during M.I .X. will be searched and played by using the track numbers associated with the ALL M.I .X. Press 4 again and select off to the next disc. *4 In the USB mode, all songs on the disc will apply ...
User Manual
Page 14
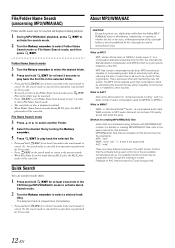
File/Folder Name Search (concerning MP3/WMA/AAC) Folder and file names may be unplayable even though the extension is valid. Or, the search mode is canceled if no operation is performed for 10 seconds. 12-EN Or , the search mode is canceled if no operation is performed for 10 seconds. • Press /ESC in the search mode to cancel. About MP3/WMA/AAC CAUTION Except for private use, duplicating audio data (including MP3/ WMA/AAC data) or distributing, transferring, or copying it, whether for free or for at least 2 seconds in the search mode to return to select a desired track (...
File/Folder Name Search (concerning MP3/WMA/AAC) Folder and file names may be unplayable even though the extension is valid. Or, the search mode is canceled if no operation is performed for 10 seconds. 12-EN Or , the search mode is canceled if no operation is performed for 10 seconds. • Press /ESC in the search mode to cancel. About MP3/WMA/AAC CAUTION Except for private use, duplicating audio data (including MP3/ WMA/AAC data) or distributing, transferring, or copying it, whether for free or for at least 2 seconds in the search mode to return to select a desired track (...
User Manual
Page 15
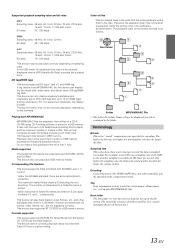
ID3 tags/WMA tags This device supports ID3 tag v1 and v2, and WMA tag. Playback may not be what is contained in the software's documentation. Under the ISO9660 standard, there are not displayed correctly. This device also supports FAT 12/16/32 for encoding. Therefore, the playback order may not be displayed if no file is expected. Root folder The root folder (or root directory) is the "sound" compression rate specified for USB memory device. The root folder contains all caps), numbers 0-9, and '_' (underscore). Do not make a file's playback time more than 1 hour....
ID3 tags/WMA tags This device supports ID3 tag v1 and v2, and WMA tag. Playback may not be what is contained in the software's documentation. Under the ISO9660 standard, there are not displayed correctly. This device also supports FAT 12/16/32 for encoding. Therefore, the playback order may not be displayed if no file is expected. Root folder The root folder (or root directory) is the "sound" compression rate specified for USB memory device. The root folder contains all caps), numbers 0-9, and '_' (underscore). Do not make a file's playback time more than 1 hour....
User Manual
Page 16
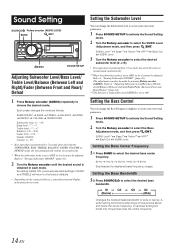
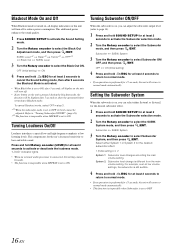
Refer to "Turning Subwoofer ON/OFF" (page 16). 2 Turn the Rotary encoder until the desired sound is set to normal mode. * When the subwoofer mode is obtained in each mode. Refer to wide or narrow. A wider setting will boost only frequencies near the center frequency. 14-EN Each press changes the mode as follows: SUBWOOFER* BASS TREBLE BALANCE FADER DEFEAT VOLUME SUBWOOFER Subwoofer level: 0 ~ +15 Bass level: -7 ~ +7 Treble level: -7 ~ +7 Balance: L15 ~ R15 Fader: R15 ~ F15 Defeat: ON/OFF Volume: 0 ~ 35 • If no operation is performed for 5 seconds after selecting the ...
Refer to "Turning Subwoofer ON/OFF" (page 16). 2 Turn the Rotary encoder until the desired sound is set to normal mode. * When the subwoofer mode is obtained in each mode. Refer to wide or narrow. A wider setting will boost only frequencies near the center frequency. 14-EN Each press changes the mode as follows: SUBWOOFER* BASS TREBLE BALANCE FADER DEFEAT VOLUME SUBWOOFER Subwoofer level: 0 ~ +15 Bass level: -7 ~ +7 Treble level: -7 ~ +7 Balance: L15 ~ R15 Fader: R15 ~ F15 Defeat: ON/OFF Volume: 0 ~ 35 • If no operation is performed for 5 seconds after selecting the ...

User Manual
Page 17
However, Treble Level is still adjustable if an audio processor with the Bass function is connected. *3 When the subwoofer mode is set to select the Treble Adjustment mode, and then press /ENT. You can emphasize or weaken the bass level. 4 Press and hold /ESC for at least 2 seconds to return to normal mode. • If no operation is performed for 15 seconds, the unit will return to OFF, its level cannot be adjusted. Refer to "Turning Subwoofer ON/OFF" (page 16). *4 The function is inoperable when DEFEAT is set to OFF, its level cannot be made by pressing Rotary ...
However, Treble Level is still adjustable if an audio processor with the Bass function is connected. *3 When the subwoofer mode is set to select the Treble Adjustment mode, and then press /ENT. You can emphasize or weaken the bass level. 4 Press and hold /ESC for at least 2 seconds to return to normal mode. • If no operation is performed for 15 seconds, the unit will return to OFF, its level cannot be adjusted. Refer to "Turning Subwoofer ON/OFF" (page 16). *4 The function is inoperable when DEFEAT is set to OFF, its level cannot be made by pressing Rotary ...
User Manual
Page 18
Level*11 Bass*12 Treble*12 HPF*12 Black Out SUBW. Setting the Subwoofer System When the subwoofer is on, you can select either System 1 or System 2 for the ear's decreased sensitivity to ON. Select either System1 or System2 for the desired subwoofer effect. 1 Press and hold /ESC for at least 2 seconds to cancel the Sound Setting mode, then after 5 seconds the Blackout Mode is activated. • When Black Out is set to ON, after 5 seconds, all display indications on this setting cannot be made. • The function is inoperable when DEFEAT is set to normal mode ...
Level*11 Bass*12 Treble*12 HPF*12 Black Out SUBW. Setting the Subwoofer System When the subwoofer is on, you can select either System 1 or System 2 for the ear's decreased sensitivity to ON. Select either System1 or System2 for the desired subwoofer effect. 1 Press and hold /ESC for at least 2 seconds to cancel the Sound Setting mode, then after 5 seconds the Blackout Mode is activated. • When Black Out is set to ON, after 5 seconds, all display indications on this setting cannot be made. • The function is inoperable when DEFEAT is set to normal mode ...
User Manual
Page 19
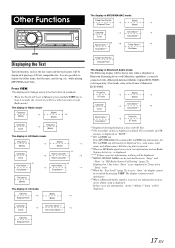
... only when a telephone or Bluetooth Streaming device with Metadata capabilities is correctly connected with CD Text. *2 The root folder of a disc with a Bluetooth Interface Module (Alpine KCE-300BT) (sold separately). If there is no text information, "Artist"/"Album"/"Song" will be scrolled one time (except Radio mode). Elapsed Time The display...
... only when a telephone or Bluetooth Streaming device with Metadata capabilities is correctly connected with CD Text. *2 The root folder of a disc with a Bluetooth Interface Module (Alpine KCE-300BT) (sold separately). If there is no text information, "Artist"/"Album"/"Song" will be scrolled one time (except Radio mode). Elapsed Time The display...
User Manual
Page 20
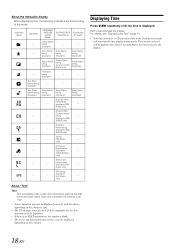
being displayed displayed displayed - being being being - - being - being - - Name being displayed File Name - displayed - (SIRIUS Radio only) Station Call - - The function selected will interrupt the time display momentarily. displayed Artist Name Artist Name Artist Name - Album Name being displayed Album Name being displayed (HD Radio only) Album Name being displayed (XM/ - Radio only) SPS being - - Displaying Time Press VIEW repeatedly until the time is referred to the display. 18-EN About the indication display When ...
being displayed displayed displayed - being being being - - being - being - - Name being displayed File Name - displayed - (SIRIUS Radio only) Station Call - - The function selected will interrupt the time display momentarily. displayed Artist Name Artist Name Artist Name - Album Name being displayed Album Name being displayed (HD Radio only) Album Name being displayed (XM/ - Radio only) SPS being - - Displaying Time Press VIEW repeatedly until the time is referred to the display. 18-EN About the indication display When ...
User Manual
Page 21
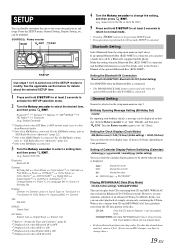
See the applicable section below for details about the selected SETUP item. 1 Press and hold F/SETUP for 60 seconds, SETUP is ON. 4 Turn the Rotary encoder to change discs.) 19-EN Bluetooth*1 HD Radio*4 General Display Bluetooth (e.g. Select AUX IN) Bluetooth: Bluetooth IN General: Birthday Set Clock Mode Clock Adjust*5 Calendar Play Mode Beep INT Mute*6 AUX+ Setup AUX+ Name*7 AUX IN GAIN*7 Digital AUX D.AUX Name*8 AUX IN AUX Name*9 Changer Name Power IC Language Set Demo Birthday Set Display: Dimmer Dimmer Level Font Select BGV Select Scroll Type Text Scroll Opening MSG Dimmer ...
See the applicable section below for details about the selected SETUP item. 1 Press and hold F/SETUP for 60 seconds, SETUP is ON. 4 Turn the Rotary encoder to change discs.) 19-EN Bluetooth*1 HD Radio*4 General Display Bluetooth (e.g. Select AUX IN) Bluetooth: Bluetooth IN General: Birthday Set Clock Mode Clock Adjust*5 Calendar Play Mode Beep INT Mute*6 AUX+ Setup AUX+ Name*7 AUX IN GAIN*7 Digital AUX D.AUX Name*8 AUX IN AUX Name*9 Changer Name Power IC Language Set Demo Birthday Set Display: Dimmer Dimmer Level Font Select BGV Select Scroll Type Text Scroll Opening MSG Dimmer ...
