Owners Manual
Page 2
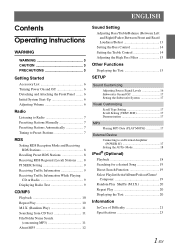
... and Rear)/ Loudness/Defeat 13 Setting the Bass Control 14 Setting the Treble Control 14 Adjusting the High Pass Filter 15 Other Functions Displaying the Text 15 SETUP Sound Customizing Adjusting Source Signal Levels 16 Subwoofer On and Off 17 Setting the Subwoofer System 17 Visual Customizing Scroll Type Setting 17 Scroll Setting (TEXT SCR 17 Demonstration 17 MP3 Playing MP3 Data (PLAY MODE 17 External Device Connecting to an External Amplifier (POWER IC 17 Setting the AUX+ Mode 18 iPod...
... and Rear)/ Loudness/Defeat 13 Setting the Bass Control 14 Setting the Treble Control 14 Adjusting the High Pass Filter 15 Other Functions Displaying the Text 15 SETUP Sound Customizing Adjusting Source Signal Levels 16 Subwoofer On and Off 17 Setting the Subwoofer System 17 Visual Customizing Scroll Type Setting 17 Scroll Setting (TEXT SCR 17 Demonstration 17 MP3 Playing MP3 Data (PLAY MODE 17 External Device Connecting to an External Amplifier (POWER IC 17 Setting the AUX+ Mode 18 iPod...
Owners Manual
Page 4
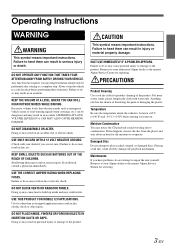
... location before turning your Alpine dealer or the nearest Alpine Service Station for servicing. 3-EN Failure to a complete stop the vehicle in serious injury. Failure to do so may cause heat to repair the unit yourself. Return it to play cracked, warped, or damaged discs.... these functions. Playing a bad disc could severely damage the playback mechanism. KEEP THE VOLUME AT A LEVEL WHERE YOU CAN STILL HEAR OUTSIDE NOISES WHILE DRIVING. USE ONLY IN CARS WITH A 12 VOLT NEGATIVE GROUND. (Check with water only. USE THE CORRECT AMPERE RATING WHEN REPLACING FUSES. Doing...
... location before turning your Alpine dealer or the nearest Alpine Service Station for servicing. 3-EN Failure to a complete stop the vehicle in serious injury. Failure to do so may cause heat to repair the unit yourself. Return it to play cracked, warped, or damaged discs.... these functions. Playing a bad disc could severely damage the playback mechanism. KEEP THE VOLUME AT A LEVEL WHERE YOU CAN STILL HEAR OUTSIDE NOISES WHILE DRIVING. USE ONLY IN CARS WITH A 12 VOLT NEGATIVE GROUND. (Check with water only. USE THE CORRECT AMPERE RATING WHEN REPLACING FUSES. Doing...
Owners Manual
Page 5
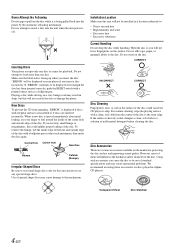
... standard specifications and may create operational problems. We recommend not using these accessories on the market for protecting the disc surface and improving sound quality. If the surface is displayed if discs with a pointed object such as a ballpoint pen. Inserting Discs Your player accepts only one disc. "ERROR" will not scratch the disc or damage the player. Hold the disc so you insert a disc incorrectly. Playing a disc while driving on...
... standard specifications and may create operational problems. We recommend not using these accessories on the market for protecting the disc surface and improving sound quality. If the surface is displayed if discs with a pointed object such as a ballpoint pen. Inserting Discs Your player accepts only one disc. "ERROR" will not scratch the disc or damage the player. Hold the disc so you insert a disc incorrectly. Playing a disc while driving on...
Owners Manual
Page 7
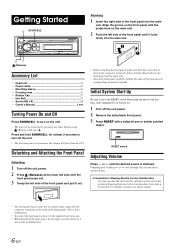
.... 1 RESET switch Adjusting Volume Press or until the desired sound is connected. Initial System Start-Up Be sure to turn off the unit. • The first time power is turned on the connector terminals and no dirt or dust on , the volume will change the volume level continuously. Pressing and holding the sides of the front panel into the main unit. (Release) Accessory List • Head unit 1 • Power cable 1 • Mounting sleeve...
.... 1 RESET switch Adjusting Volume Press or until the desired sound is connected. Initial System Start-Up Be sure to turn off the unit. • The first time power is turned on the connector terminals and no dirt or dust on , the volume will change the volume level continuously. Pressing and holding the sides of the front panel into the main unit. (Release) Accessory List • Head unit 1 • Power cable 1 • Mounting sleeve...

Owners Manual
Page 8
..., preset number and station frequency memorized. • A total of the station preset buttons (1 through 6) FUNC./SETUP Listening to Radio 1 Press SOURCE/ to select the tuning mode. DX SEEK (Distance mode) SEEK (Local mode) OFF (Manual mode) DX SEEK • The initial mode is stored. The selected station is Distance mode. Presetting Stations Automatically 1 Press BAND/TA repeatedly until the desired radio band is displayed. 2 Press any one of 30 stations can perform the operation. Local mode: Only strong stations...
..., preset number and station frequency memorized. • A total of the station preset buttons (1 through 6) FUNC./SETUP Listening to Radio 1 Press SOURCE/ to select the tuning mode. DX SEEK (Distance mode) SEEK (Local mode) OFF (Manual mode) DX SEEK • The initial mode is stored. The selected station is Distance mode. Presetting Stations Automatically 1 Press BAND/TA repeatedly until the desired radio band is displayed. 2 Press any one of 30 stations can perform the operation. Local mode: Only strong stations...

Owners Manual
Page 9
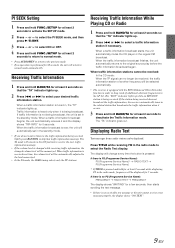
... lights up . 2 Press 1 /AF to activate the RDS mode. 3 Press FUNC./SETUP to the Radio Operation section. If there are still no operation is performed for a station in the area, the unit displays the frequency of the preset station and the preset number disappears. The RDS stations can be received: When the PI SEEK setting is on (refer to select ON or OFF. In the OFF mode, the unit automatically keeps receiving...
... lights up . 2 Press 1 /AF to activate the RDS mode. 3 Press FUNC./SETUP to the Radio Operation section. If there are still no operation is performed for a station in the area, the unit displays the frequency of the preset station and the preset number disappears. The RDS stations can be received: When the PI SEEK setting is on (refer to select ON or OFF. In the OFF mode, the unit automatically keeps receiving...
Owners Manual
Page 10
... to select ON or OFF. 4 Press and hold FUNC./SETUP for at least 2 seconds to return to normal mode. • Press AUDIO/RTN to return to the previous mode. • If no operation is performed for 60 seconds, the unit will change every time the button is pressed. When the traffic information broadcast finishes, the unit automatically returns to select the Radio Text display.
... to select ON or OFF. 4 Press and hold FUNC./SETUP for at least 2 seconds to return to normal mode. • Press AUDIO/RTN to return to the previous mode. • If no operation is performed for 60 seconds, the unit will change every time the button is pressed. When the traffic information broadcast finishes, the unit automatically returns to select the Radio Text display.

Owners Manual
Page 11
... display switching. Pressing / /ENT again will change folders continuously. 3 Press or to the DISC mode. CD/MP3 / /ENT /ESC SOURCE/ AUDIO/RTN 45 1 /AF 2 TITLE 5 To eject the disc, press . • Do not remove a CD during its eject cycle. F101 T103 Playback 1 Insert a disc with the label side facing up when a disc is pressed. Pressing and holding 1 /AF or 2 will be displayed as described below. Folder number File number display display...
... display switching. Pressing / /ENT again will change folders continuously. 3 Press or to the DISC mode. CD/MP3 / /ENT /ESC SOURCE/ AUDIO/RTN 45 1 /AF 2 TITLE 5 To eject the disc, press . • Do not remove a CD during its eject cycle. F101 T103 Playback 1 Insert a disc with the label side facing up when a disc is pressed. Pressing and holding 1 /AF or 2 will be displayed as described below. Folder number File number display display...
Owners Manual
Page 14
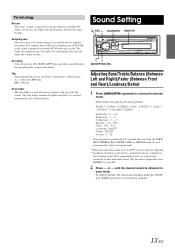
...*1 BASS TREBLE BAL FADER DEFEAT VOLUME SUBW LOUD*2 Subwoofer : 0 ~ +15 Bass level: -7 ~ +7 Treble level: -7 ~ +7 Balance : L15 ~ R15 Fader : R15 ~ F15 Loudness : ON/OFF Defeat : ON/OFF Volume : 0 ~ 35 • If no operation is performed for encoding. Sound Setting /ESC SOURCE/ BAND/TA AUDIO/RTN/A.SEL Adjusting Bass/Treble/Balance (Between Left and Right)/Fader (Between Front and Rear)/Loudness/Defeat 1 Press AUDIO/RTN repeatedly to the factory defaults. 13-EN The function is...
...*1 BASS TREBLE BAL FADER DEFEAT VOLUME SUBW LOUD*2 Subwoofer : 0 ~ +15 Bass level: -7 ~ +7 Treble level: -7 ~ +7 Balance : L15 ~ R15 Fader : R15 ~ F15 Loudness : ON/OFF Defeat : ON/OFF Volume : 0 ~ 35 • If no operation is performed for encoding. Sound Setting /ESC SOURCE/ BAND/TA AUDIO/RTN/A.SEL Adjusting Bass/Treble/Balance (Between Left and Right)/Fader (Between Front and Rear)/Loudness/Defeat 1 Press AUDIO/RTN repeatedly to the factory defaults. 13-EN The function is...

Owners Manual
Page 15
...; The function is inoperable when DEFEAT is set to ON. *2 The adjustment can also be individually memorized for each source (FM, MW (LW), CD, etc.) until the setting is performed for 15 seconds, the unit will return to normal mode automatically. • The bass level settings will be made by pressing AUDIO/RTN. Changes the boosted bass bandwidth to select the desired bass level (-7~+7). BASS TREBLE HPF BASS Setting the Treble Centre Frequency...
...; The function is inoperable when DEFEAT is set to ON. *2 The adjustment can also be individually memorized for each source (FM, MW (LW), CD, etc.) until the setting is performed for 15 seconds, the unit will return to normal mode automatically. • The bass level settings will be made by pressing AUDIO/RTN. Changes the boosted bass bandwidth to select the desired bass level (-7~+7). BASS TREBLE HPF BASS Setting the Treble Centre Frequency...
Owners Manual
Page 16
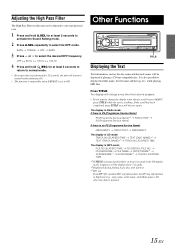
... 2 seconds to return to normal mode. • If no PS (Programme Service Name) FREQUENCY RADIO TEXT FREQUENCY The display in CD mode: TRACK NO./ELAPSED TIME TEXT (DISC NAME)*2 TEXT (TRACK NAME)*2 TRACK NO./ELAPSED TIME The display in the PS display mode, frequency will be displayed for 15 seconds, the unit will be displayed if playing a CD text compatible disc. BASS TREBLE HPF BASS 3 Press or to select the HPF mode. OFF 80 Hz 120 Hz...
... 2 seconds to return to normal mode. • If no PS (Programme Service Name) FREQUENCY RADIO TEXT FREQUENCY The display in CD mode: TRACK NO./ELAPSED TIME TEXT (DISC NAME)*2 TEXT (TRACK NAME)*2 TRACK NO./ELAPSED TIME The display in the PS display mode, frequency will be displayed for 15 seconds, the unit will be displayed if playing a CD text compatible disc. BASS TREBLE HPF BASS 3 Press or to select the HPF mode. OFF 80 Hz 120 Hz...

Owners Manual
Page 17
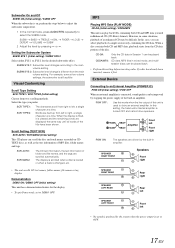
... setting. (e.g. Select SUBWOOFER) FM-LEVEL REGIONAL*1 PI SEEK*2 SUBWOOFER (SUBW SYS)*3 PLAY MODE SCROLLTYPE TEXT SCR POWER IC AUX+ SETUP DEMO FM-LEVEL *1 Refer to "Receiving RDS Regional (Local) Stations" (page 8). *2 Refer to "PI SEEK Setting" (page 9). *3 Displayed only when SUBW is performed for at least 2 seconds to activate the SETUP mode. 2 Press or to normal mode automatically. Indicator/ Mode CD Mode MP3 Mode iPod Mode - From the SETUP menu, Sound Customizing, Visual Customizing, etc., can flexibly customize the unit...
... setting. (e.g. Select SUBWOOFER) FM-LEVEL REGIONAL*1 PI SEEK*2 SUBWOOFER (SUBW SYS)*3 PLAY MODE SCROLLTYPE TEXT SCR POWER IC AUX+ SETUP DEMO FM-LEVEL *1 Refer to "Receiving RDS Regional (Local) Stations" (page 8). *2 Refer to "PI SEEK Setting" (page 9). *3 Displayed only when SUBW is performed for at least 2 seconds to activate the SETUP mode. 2 Press or to normal mode automatically. Indicator/ Mode CD Mode MP3 Mode iPod Mode - From the SETUP menu, Sound Customizing, Visual Customizing, etc., can flexibly customize the unit...
Owners Manual
Page 18
... the power output is filled, it first. The display is scrolled when a disc is loaded or when a track is turned OFF and cannot drive speakers. MP3 Playing MP3 Data (PLAY MODE) CD-DA (Initial setting) / CDDA/MP3 This unit can select playback of this setting, the head unit's internal amplifier is changed, etc. • The unit scrolls CD text names, folder names, file names or tag display. In this setting before inserting a disc. CD data...
... the power output is filled, it first. The display is scrolled when a disc is loaded or when a track is turned OFF and cannot drive speakers. MP3 Playing MP3 Data (PLAY MODE) CD-DA (Initial setting) / CDDA/MP3 This unit can select playback of this setting, the head unit's internal amplifier is changed, etc. • The unit scrolls CD text names, folder names, file names or tag display. In this setting before inserting a disc. CD data...
Owners Manual
Page 19
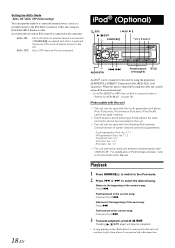
... . Setting the AUX+ Mode AUX+ ON / AUX+ OFF (Initial setting) You can input the audio of a connected external device, (such as a portable player) to the iPod Direct connector of this unit, using the proprietary ALPINE FULL SPEED™ Connection Cable (KCE-422i) (sold separately). An external device and an iPod cannot be connected to select the desired song. Fourth generation iPod: Ver. 3.1.1 Fifth generation iPod: Ver.1.1.2 iPod photo: Ver.1.2.1 iPod mini: Ver. 1.4.1 iPod nano: Ver. 1.2 • The unit cannot...
... . Setting the AUX+ Mode AUX+ ON / AUX+ OFF (Initial setting) You can input the audio of a connected external device, (such as a portable player) to the iPod Direct connector of this unit, using the proprietary ALPINE FULL SPEED™ Connection Cable (KCE-422i) (sold separately). An external device and an iPod cannot be connected to select the desired song. Fourth generation iPod: Ver. 3.1.1 Fifth generation iPod: Ver.1.1.2 iPod photo: Ver.1.2.1 iPod mini: Ver. 1.4.1 iPod nano: Ver. 1.2 • The unit cannot...
Owners Manual
Page 22
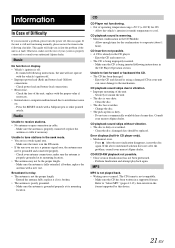
... to receive stations. • No antenna or open connection in your system is at its mounting location. • The antenna may not be replaced. Clean the disc. • The disc has scratches. - Do not use a commercially available lens cleaner disc. Consult your authorized Alpine dealer. After the error indication disappears, insert the disc again. The CD format is poorly grounded. - Check power lead and battery lead connections. • Blown fuse. - Radio...
... to receive stations. • No antenna or open connection in your system is at its mounting location. • The antenna may not be replaced. Clean the disc. • The disc has scratches. - Do not use a commercially available lens cleaner disc. Consult your authorized Alpine dealer. After the error indication disappears, insert the disc again. The CD format is poorly grounded. - Check power lead and battery lead connections. • Blown fuse. - Radio...
Owners Manual
Page 23
... rate not supported by the unit is used. - Audio The sound is not output from the speakers. • Unit has no songs in the iPod. - iPod iPod does not play or eject the disc. - Download podcast data to the iPod and connect to the Owner's Manual of the internal amplifier. - Insert a CD. • Although a disc is inserted, "NO DISC" is correctly connected (refer to play and no podcast data in the iPod. - Reset this unit, using the iPod cable. • Caused...
... rate not supported by the unit is used. - Audio The sound is not output from the speakers. • Unit has no songs in the iPod. - iPod iPod does not play or eject the disc. - Download podcast data to the iPod and connect to the Owner's Manual of the internal amplifier. - Insert a CD. • Although a disc is inserted, "NO DISC" is correctly connected (refer to play and no podcast data in the iPod. - Reset this unit, using the iPod cable. • Caused...
Owners Manual
Page 25
... the fuse box, make the proper connections may result in fire or product damage. Use of a short-circuit. • Be sure to connect the colour coded leads according to electrical shorts. When connecting the CDE-9870R to the vehicle body. Never connect left and right channel speaker cables to prevent the wire's insulation from being cut away cable insulation to supply power to other units. DO...
... the fuse box, make the proper connections may result in fire or product damage. Use of a short-circuit. • Be sure to connect the colour coded leads according to electrical shorts. When connecting the CDE-9870R to the vehicle body. Never connect left and right channel speaker cables to prevent the wire's insulation from being cut away cable insulation to supply power to other units. DO...
Owners Manual
Page 26
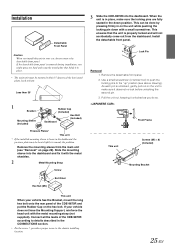
... panel. 2. As each pin is in the CONNECTIONS section. • For the screw *, provide a proper screw to details described in place, make sure it with a small screwdriver. Connect all the leads of the CDE-9870R according to the chassis installing location. 25-EN Install the detachable front panel. When the unit is unlocked, gently pull out on the hex bolt. Remove the mounting...
... panel. 2. As each pin is in the CONNECTIONS section. • For the screw *, provide a proper screw to details described in place, make sure it with a small screwdriver. Connect all the leads of the CDE-9870R according to the chassis installing location. 25-EN Install the detachable front panel. When the unit is unlocked, gently pull out on the hex bolt. Remove the mounting...

Owners Manual
Page 27
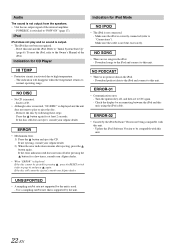
Connections (Pink/Black) AUDIO INTERRUPT IN (Blue/White) REMOTE TURN-ON To iPod Antenna JASO Antenna Plug ISO Antenna Plug To vehicle phone To amplifier or equalizer (Red) IGNITION (Black) GND (Blue) POWER ANT BATTERY (Yellow) (Green) (Green/Black) (White) (White/Black) (Grey/Black) (Grey) (Violet/Black) (Violet) To power antenna Ignition Key Battery Speakers Rear Left Front Left Front Right Rear Right 26-EN Amplifier Speakers Front or Subwoofers
Connections (Pink/Black) AUDIO INTERRUPT IN (Blue/White) REMOTE TURN-ON To iPod Antenna JASO Antenna Plug ISO Antenna Plug To vehicle phone To amplifier or equalizer (Red) IGNITION (Black) GND (Blue) POWER ANT BATTERY (Yellow) (Green) (Green/Black) (White) (White/Black) (Grey/Black) (Grey) (Violet/Black) (Violet) To power antenna Ignition Key Battery Speakers Rear Left Front Left Front Right Rear Right 26-EN Amplifier Speakers Front or Subwoofers

Owners Manual
Page 28
... using iPod Direct/RCA Interface cable (sold separately) An ISO/JASO antenna adapter may be used only for further information. 27-EN Battery Lead (Yellow) Connect this lead to a bare metal spot (remove any paint, dirt or grease if necessary) of your amplifier or signal processor. Power Antenna Lead (Blue) Connect this lead to bare metal and is turned on the vehicle. ISO Power Supply Connector ISO Connector (Speaker Output) Left Rear (+) Speaker Output...
... using iPod Direct/RCA Interface cable (sold separately) An ISO/JASO antenna adapter may be used only for further information. 27-EN Battery Lead (Yellow) Connect this lead to a bare metal spot (remove any paint, dirt or grease if necessary) of your amplifier or signal processor. Power Antenna Lead (Blue) Connect this lead to bare metal and is turned on the vehicle. ISO Power Supply Connector ISO Connector (Speaker Output) Left Rear (+) Speaker Output...


