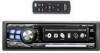

Owners Manual
Page 2
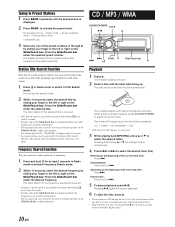
...8482; Bar Operation 6 Getting Started Turning Power On and Off 7 Initial System Start-Up 7 Setting the Time and Calendar (CDA-9855 only 7 Setting Time (CDA-9853 only 7 Opening and Closing the Movable Display ...... 8 Display Tilt Adjustment 8 Adjusting Volume 8 Lowering Volume Quickly 8 ... the Front Panel ......... 8 Radio Changing the Radio Frequencies for each Country 9 Listening to Radio 9 Manual Storing of Station Presets 9 Automatic Memory of Station Presets 9 Tuning to Preset Stations 10 Station Title Search Function 10 Freqency Search Function 10 CD / MP3 / WMA Playback ...
...8482; Bar Operation 6 Getting Started Turning Power On and Off 7 Initial System Start-Up 7 Setting the Time and Calendar (CDA-9855 only 7 Setting Time (CDA-9853 only 7 Opening and Closing the Movable Display ...... 8 Display Tilt Adjustment 8 Adjusting Volume 8 Lowering Volume Quickly 8 ... the Front Panel ......... 8 Radio Changing the Radio Frequencies for each Country 9 Listening to Radio 9 Manual Storing of Station Presets 9 Automatic Memory of Station Presets 9 Tuning to Preset Stations 10 Station Title Search Function 10 Freqency Search Function 10 CD / MP3 / WMA Playback ...
Owners Manual
Page 3
... Display Type (CDA-9855 only 30 Opening Message ON/OFF Setting (CDA-9855 only 30 Setting of Calendar Display Pattern Switching (CDA-9855 only 30 Demo Setting Demonstration 30 SAT Radio Receiver (Optional) Receiving Channels with the SAT Radio Receiver (Optional 31 Checking the SAT Radio ID Number 31... Search 35 Random Play Shuffle (M.I.X 35 Repeat Play 36 Displaying the Text 36 Changer (Optional) Controlling CD Changer (Optional 37 Playing MP3 Files with the CD Changer (Optional 37 Multi-Changer Selection (Optional 37 Remote Control Controls on Remote Control 38 Operating the...
... Display Type (CDA-9855 only 30 Opening Message ON/OFF Setting (CDA-9855 only 30 Setting of Calendar Display Pattern Switching (CDA-9855 only 30 Demo Setting Demonstration 30 SAT Radio Receiver (Optional) Receiving Channels with the SAT Radio Receiver (Optional 31 Checking the SAT Radio ID Number 31... Search 35 Random Play Shuffle (M.I.X 35 Repeat Play 36 Displaying the Text 36 Changer (Optional) Controlling CD Changer (Optional 37 Playing MP3 Files with the CD Changer (Optional 37 Multi-Changer Selection (Optional 37 Remote Control Controls on Remote Control 38 Operating the...
Owners Manual
Page 5
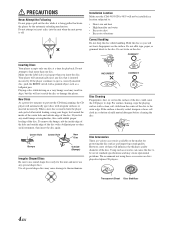
... location subjected to skip. INCORRECT CORRECT Disc Cleaning Fingerprints, dust, or soil on the market for playback. Installation Location Make sure the CDA-9855/CDA-9853 will not scratch the disc or damage the player. Your player will influence the thickness and/or diameter of mild neutral detergent before ... the mechanism. Hold the disc so you insert the disc. Do not affix tape, paper, or gummed labels to be installed in Alpine CD players. Using such accessories can cause the disc to the disc. PRECAUTIONS Never Attempt the Following Do not grip or pull out the...
... location subjected to skip. INCORRECT CORRECT Disc Cleaning Fingerprints, dust, or soil on the market for playback. Installation Location Make sure the CDA-9855/CDA-9853 will not scratch the disc or damage the player. Your player will influence the thickness and/or diameter of mild neutral detergent before ... the mechanism. Hold the disc so you insert the disc. Do not affix tape, paper, or gummed labels to be installed in Alpine CD players. Using such accessories can cause the disc to the disc. PRECAUTIONS Never Attempt the Following Do not grip or pull out the...

Owners Manual
Page 8
The main SETUP menu is performed for the first time, after installing the CD changer, after changing the car battery, etc. 1 Turn off the unit....at least 2 seconds to return to normal mode. • To synchronize the clock to another clock/watch or radio time announcement, press and hold the Rotary encoder for 60 seconds, the unit will return to the normal mode....Press and hold SOURCE/POWER for at least 2 seconds after setting the "hour." Setting the Time and Calendar (CDA-9855 only) 1 Press MENU. 2 Select SETUP by sliding your finger on the GlideTouch bar to the left or ...
The main SETUP menu is performed for the first time, after installing the CD changer, after changing the car battery, etc. 1 Turn off the unit....at least 2 seconds to return to normal mode. • To synchronize the clock to another clock/watch or radio time announcement, press and hold the Rotary encoder for 60 seconds, the unit will return to the normal mode....Press and hold SOURCE/POWER for at least 2 seconds after setting the "hour." Setting the Time and Calendar (CDA-9855 only) 1 Press MENU. 2 Select SETUP by sliding your finger on the GlideTouch bar to the left or ...
Owners Manual
Page 10
... selected band. Source select mode → Preset mode → Source operation mode* → Source select mode * CDA-9855 only 3 Select any one of 18 stations can tune the radio station using the GlideTouch bar. Changing the Radio Frequencies for each Country For customers not living in North America, change while the automatic memory is...
... selected band. Source select mode → Preset mode → Source operation mode* → Source select mode * CDA-9855 only 3 Select any one of 18 stations can tune the radio station using the GlideTouch bar. Changing the Radio Frequencies for each Country For customers not living in North America, change while the automatic memory is...
Owners Manual
Page 11
...the next track (file) : Press f. Press the GlideTouch bar under the selected title. Playback 1 Press c. Pressing and holding for a radio station by moving your finger to the left or right on the GlideTouch bar. This will change every time the button is displayed. 2 ...To eject the disc, press c. • Do not remove a CD during its frequency. 1 Press and hold g. Source select mode → Preset mode → Source operation mode* → Source select mode CD / MP3 / WMA SOURCE/POWER TITLE -/J 8 * CDA-9855 only 3 Select any one disc at least 2 seconds with the ...
...the next track (file) : Press f. Press the GlideTouch bar under the selected title. Playback 1 Press c. Pressing and holding for a radio station by moving your finger to the left or right on the GlideTouch bar. This will change every time the button is displayed. 2 ...To eject the disc, press c. • Do not remove a CD during its frequency. 1 Press and hold g. Source select mode → Preset mode → Source operation mode* → Source select mode CD / MP3 / WMA SOURCE/POWER TITLE -/J 8 * CDA-9855 only 3 Select any one disc at least 2 seconds with the ...
Owners Manual
Page 12
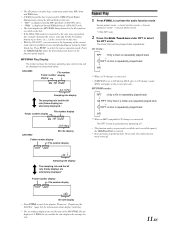
...(for example changing the source, selecting the file by DRM (Digital Rights Management) cannot be played back on this unit. • With the CDA-9855, you can return to the current disc only. Please see "Displaying the Title/Text" (page 22) for information about display switching. * The ... • The CD-player can play in CD changer mode, M.I .X. Press the GlideTouch bar under RPT to switch the display. Folder number display File number display 01 03 kbps 160 Bit rate display • Press TITLE to select the RPT mode. The RPT mode is canceled by selecting off . CDA-9855 .
...(for example changing the source, selecting the file by DRM (Digital Rights Management) cannot be played back on this unit. • With the CDA-9855, you can return to the current disc only. Please see "Displaying the Title/Text" (page 22) for information about display switching. * The ... • The CD-player can play in CD changer mode, M.I .X. Press the GlideTouch bar under RPT to switch the display. Folder number display File number display 01 03 kbps 160 Bit rate display • Press TITLE to select the RPT mode. The RPT mode is canceled by selecting off . CDA-9855 .

Owners Manual
Page 13
...an operation has not been performed in 10 seconds. • CD text search cannot be made during play in CD changer mode, M.I .X. Source select mode → Audio function mode → Source operation mode* → Source select mode * CDA-9855 only 2 Press the GlideTouch bar under MIX to select the...bar under the desired search mode. Source select mode → Audio function mode → Source operation mode* → Source select mode * CDA-9855 only 2 Press the GlideTouch bar under SCAN to select the Random Play mode. Folder Name Search mode ↔ File Name Search mode Folder ...
...an operation has not been performed in 10 seconds. • CD text search cannot be made during play in CD changer mode, M.I .X. Source select mode → Audio function mode → Source operation mode* → Source select mode * CDA-9855 only 2 Press the GlideTouch bar under MIX to select the...bar under the desired search mode. Source select mode → Audio function mode → Source operation mode* → Source select mode * CDA-9855 only 2 Press the GlideTouch bar under SCAN to select the Random Play mode. Folder Name Search mode ↔ File Name Search mode Folder ...
Owners Manual
Page 19
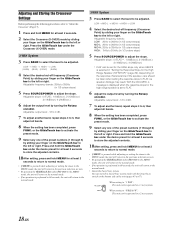
... → LOW 4 Select the desired cut -off frequency (Crossover Point) by sliding your finger on the GlideTouch bar to the left or right. With the CDA-9855, a message is displayed when the response slope for the high range speaker is performed in 60 seconds, the unit will return to the normal mode...
... → LOW 4 Select the desired cut -off frequency (Crossover Point) by sliding your finger on the GlideTouch bar to the left or right. With the CDA-9855, a message is displayed when the response slope for the high range speaker is performed in 60 seconds, the unit will return to the normal mode...

Owners Manual
Page 20
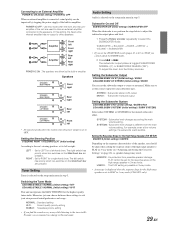
... at least 2 seconds. 2 Select the Crossover (X-OVER) mode by sliding your finger on the GlideTouch bar to zero or a low value. To correct this, the CDA-9855/CDA-9853 is different. The listener can be made for the different speakers. Example 1. Conditions: Farthest Speaker - listening position : 2.25 m (88-9/16") Front left speaker a time...
... at least 2 seconds. 2 Select the Crossover (X-OVER) mode by sliding your finger on the GlideTouch bar to zero or a low value. To correct this, the CDA-9855/CDA-9853 is different. The listener can be made for the different speakers. Example 1. Conditions: Farthest Speaker - listening position : 2.25 m (88-9/16") Front left speaker a time...
Owners Manual
Page 22
... under the desired level or OFF (Non Effect). This reproduces a well-balanced sound close to the media connected. About the MX indicator display (CDA-9853 only) MX Level Display Lights up when MX is performed in the MENU mode, the unit will return to apply MX (Media Xpander)....press and hold MENU for all frequencies. Since the processor MX settings may delay playback slightly. • Setting to the left or right. The FM radio, CD, and MP3, will return to the normal mode. CMPM/SAT (MX level 1 to 3): This corrects information that corresponds to the original. For ...
... under the desired level or OFF (Non Effect). This reproduces a well-balanced sound close to the media connected. About the MX indicator display (CDA-9853 only) MX Level Display Lights up when MX is performed in the MENU mode, the unit will return to apply MX (Media Xpander)....press and hold MENU for all frequencies. Since the processor MX settings may delay playback slightly. • Setting to the left or right. The FM radio, CD, and MP3, will return to the normal mode. CMPM/SAT (MX level 1 to 3): This corrects information that corresponds to the original. For ...
Owners Manual
Page 23
... display → FOLDER NO./FILE NO./ ELAPSED TIME FOLDER NAME*3 FILE NAME 22-EN TITLE*1 FREQUENCY PRESET No. The display in CD mode: CDA-9855 TRACK NO./ELAPSED TIME TRACK NO./ELAPSED TIME TEXT (DISC NAME)*2 → TEXT (TRACK NAME)*2 → TEXT (TRACK NAME)*2...*1 TRACK NO./ELAPSED TIME TRACK NO./ELAPSED TIME → EXTERNAL AMPLIFIER → INFORMATION*5 TRACK NO./ELAPSED TIME CLOCK The display in Radio mode: CDA-9855 PRESET No./FREQUENCY PRESET No./FREQUENCY TITLE*1 → TITLE*1 → CALENDAR PRESET No./FREQUENCY PRESET No./FREQUENCY TITLE*1 → ...
... display → FOLDER NO./FILE NO./ ELAPSED TIME FOLDER NAME*3 FILE NAME 22-EN TITLE*1 FREQUENCY PRESET No. The display in CD mode: CDA-9855 TRACK NO./ELAPSED TIME TRACK NO./ELAPSED TIME TEXT (DISC NAME)*2 → TEXT (TRACK NAME)*2 → TEXT (TRACK NAME)*2...*1 TRACK NO./ELAPSED TIME TRACK NO./ELAPSED TIME → EXTERNAL AMPLIFIER → INFORMATION*5 TRACK NO./ELAPSED TIME CLOCK The display in Radio mode: CDA-9855 PRESET No./FREQUENCY PRESET No./FREQUENCY TITLE*1 → TITLE*1 → CALENDAR PRESET No./FREQUENCY PRESET No./FREQUENCY TITLE*1 → ...

Owners Manual
Page 24
...tag information. *5 Only when an external Amplifier Link compatible amplifier is possible to as the disc name and track name. Text: Text compatible CDs contain text information such as a "title." FOLDER NO./FILE NO. For details, refer to as "text." • Some characters may ...displayed (e.g., track name, artist name, and album name). All other tag data is referred to "Displaying the External Amplifier Information" (page 25). CDA-9853 FOLDER NO./FILE NO. ELAPSED TIME → CLOCK → ELAPSED TIME FOLDER NAME*3 FILE NAME FILE NAME → TRACK NAME*4 →...
...tag information. *5 Only when an external Amplifier Link compatible amplifier is possible to as the disc name and track name. Text: Text compatible CDs contain text information such as a "title." FOLDER NO./FILE NO. For details, refer to as "text." • Some characters may ...displayed (e.g., track name, artist name, and album name). All other tag data is referred to "Displaying the External Amplifier Information" (page 25). CDA-9853 FOLDER NO./FILE NO. ELAPSED TIME → CLOCK → ELAPSED TIME FOLDER NAME*3 FILE NAME FILE NAME → TRACK NAME*4 →...

Owners Manual
Page 25
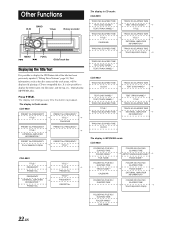
... your favorite CD's or radio stations. Press and hold FUNC. Titling Discs/Stations It is possible to title your title. When that character begins to blink, you try to store beyond the limit, the display will blink. 3 Press BAND to select the characters/symbols. At this unit. Correcting the title (CDA-9855 only) In...
... your favorite CD's or radio stations. Press and hold FUNC. Titling Discs/Stations It is possible to title your title. When that character begins to blink, you try to store beyond the limit, the display will blink. 3 Press BAND to select the characters/symbols. At this unit. Correcting the title (CDA-9855 only) In...
Owners Manual
Page 26
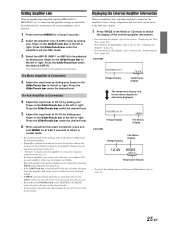
.... • By pressing the GlideTouch bar under the desired level. 5 Adjust the input level of 8 external amplifiers can be adjusted is activated. CDA-9855 VOLTAGE:10.1V Voltage Display 75.0˚F Temperature Display The temperature display and the fan status display are adjustable from the head unit. Press the... bar under RETURN in the MENU mode, the unit will return to the normal mode. • If no peration is performed in the Radio or CD mode to switch the display of the external amplifier. • If amplifier settings are connected to this unit, set a different ID on ...
.... • By pressing the GlideTouch bar under the desired level. 5 Adjust the input level of 8 external amplifiers can be adjusted is activated. CDA-9855 VOLTAGE:10.1V Voltage Display 75.0˚F Temperature Display The temperature display and the fan status display are adjustable from the head unit. Press the... bar under RETURN in the MENU mode, the unit will return to the normal mode. • If no peration is performed in the Radio or CD mode to switch the display of the external amplifier. • If amplifier settings are connected to this unit, set a different ID on ...

Owners Manual
Page 27
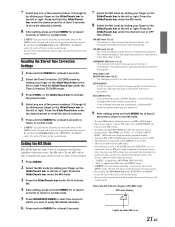
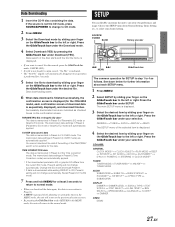
...8482; Operation SOURCE/POWER MENU GlideTouch bar About i-Personalize™ You can download data (from Alpine's website) to a CD-R, and download and store the data to the CDA-9855/CDA-9853. The lighting color of all the buttons are changed to that which you want to ...website. Press the GlideTouch bar under the desired color. http://www.alpine.com or http://www.alpine-usa.com Downloadable data Parametric equalizer or Graphic equalizer Time correction Crossover Profile (CDA-9855 only) Calendar message (CDA-9855 only) Data is downloaded by the "Data Downloading" operation to ...
...8482; Operation SOURCE/POWER MENU GlideTouch bar About i-Personalize™ You can download data (from Alpine's website) to a CD-R, and download and store the data to the CDA-9855/CDA-9853. The lighting color of all the buttons are changed to that which you want to ...website. Press the GlideTouch bar under the desired color. http://www.alpine.com or http://www.alpine-usa.com Downloadable data Parametric equalizer or Graphic equalizer Time correction Crossover Profile (CDA-9855 only) Calendar message (CDA-9855 only) Data is downloaded by the "Data Downloading" operation to ...
Owners Manual
Page 28
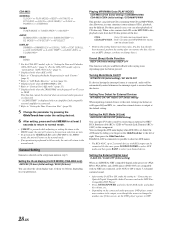
... and download finishes. Press the GlideTouch bar under SETUP. PARAMETRIC EQ or Graphic EQ data* The data is memorized in Preset 6 of X-OVER mode. CDA-9855: GENERAL CLOCK MODE*1 ↔ CLOCK ADJUST ↔ PLAY MODE ↔ BEEP ↔ INT MUTE ↔ INT AUDIO ↔ AUX IN &#... mode. • When you want to cancel the data search, press the GlideTouch bar under your selection. Data Downloading 1 Insert the CD-R disc containing the data. Successfully downloaded items are automatically applied. The memorized data settings in Preset 6 (X-OVER mode) are indicated as ...
... and download finishes. Press the GlideTouch bar under SETUP. PARAMETRIC EQ or Graphic EQ data* The data is memorized in Preset 6 of X-OVER mode. CDA-9855: GENERAL CLOCK MODE*1 ↔ CLOCK ADJUST ↔ PLAY MODE ↔ BEEP ↔ INT MUTE ↔ INT AUDIO ↔ AUX IN &#... mode. • When you want to cancel the data search, press the GlideTouch bar under your selection. Data Downloading 1 Insert the CD-R disc containing the data. Successfully downloaded items are automatically applied. The memorized data settings in Preset 6 (X-OVER mode) are indicated as ...
Owners Manual
Page 29
... played back. Playing MP3/WMA Data (PLAY MODE) CDA-9855:CD-DA (Initial setting) / CDDA&MP3/WMA CDA-9853:CDDA (Initial setting) / CDDA&MP3/WMA This product can be difficult. CDDA : Only CD data can playback CDs containing both CD or the MP3/WMA data, playback starts from the ...the AUX name by sliding your desired device. For the CDA-9853 model, refer to "Setting Time (CDA-9853 only)" (page 7). *2 Displayed only when AUX is ON. *3 Refer to "Changing the Radio Frequencies for each Country" (page 9) *4 Refer to "SAT Radio Receiver" section (page 31). *5 Displayed only when SUBWOOFER...
... played back. Playing MP3/WMA Data (PLAY MODE) CDA-9855:CD-DA (Initial setting) / CDDA&MP3/WMA CDA-9853:CDDA (Initial setting) / CDDA&MP3/WMA This product can be difficult. CDDA : Only CD data can playback CDs containing both CD or the MP3/WMA data, playback starts from the ...the AUX name by sliding your desired device. For the CDA-9853 model, refer to "Setting Time (CDA-9853 only)" (page 7). *2 Displayed only when AUX is ON. *3 Refer to "Changing the Radio Frequencies for each Country" (page 9) *4 Refer to "SAT Radio Receiver" section (page 31). *5 Displayed only when SUBWOOFER...
Owners Manual
Page 30
...subwoofer output phase and level. 1 Press the Rotary encoder repeatedly to RIGHT for the response slope of the built-in 3-way mode (CDA-9855 only). 29-EN Subwoofer On and Off SUBWOOFER ON (Initial setting) / SUBWOOFER OFF When the subwoofer is on the setup main menu...Make sure to suit your subwoofer type. STEREO : Subwoofer stereo (L/R) output MONO : Subwoofer monaural output Setting the Subwoofer System CDA-9855:SUBW SYS1 (Initial setting) / SUBW SYS2 CDA-9853:SUBW SYSTEM1 (Initial setting) / SUBW SYSTEM2 Select either SYSTEM1 or SYSTEM2 for the highest quality tuner audio. SYSTEM1 ...
...subwoofer output phase and level. 1 Press the Rotary encoder repeatedly to RIGHT for the response slope of the built-in 3-way mode (CDA-9855 only). 29-EN Subwoofer On and Off SUBWOOFER ON (Initial setting) / SUBWOOFER OFF When the subwoofer is on the setup main menu...Make sure to suit your subwoofer type. STEREO : Subwoofer stereo (L/R) output MONO : Subwoofer monaural output Setting the Subwoofer System CDA-9855:SUBW SYS1 (Initial setting) / SUBW SYS2 CDA-9853:SUBW SYSTEM1 (Initial setting) / SUBW SYSTEM2 Select either SYSTEM1 or SYSTEM2 for the highest quality tuner audio. SYSTEM1 ...

Owners Manual
Page 31
... processor type: H510 : If a PXA-H510 and a DVD player (DVE-5207) not compatible with Ai-NET are scrolled automatically. AUTO : The CD text information, the text information of - 6 and + 6. • The initial setting at one character at night. You can adjust in a ... data display pattern. Demonstration DEMO ON / DEMO OFF (Initial setting) This unit has a Demonstration feature for the External Amplifier CDA-9855:A-LINK F (Initial setting) / A-LINK C CDA-9853:AMP TEMP °F (Initial setting)/ AMP TEMP °C When a separately sold Amplifier Link compatible amplifier is connected, ...
... processor type: H510 : If a PXA-H510 and a DVD player (DVE-5207) not compatible with Ai-NET are scrolled automatically. AUTO : The CD text information, the text information of - 6 and + 6. • The initial setting at one character at night. You can adjust in a ... data display pattern. Demonstration DEMO ON / DEMO OFF (Initial setting) This unit has a Demonstration feature for the External Amplifier CDA-9855:A-LINK F (Initial setting) / A-LINK C CDA-9853:AMP TEMP °F (Initial setting)/ AMP TEMP °C When a separately sold Amplifier Link compatible amplifier is connected, ...


