Owners Manual
Page 2
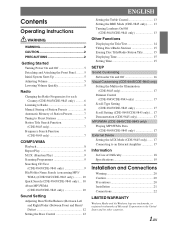
... and Rear)/ Defeat 12 Setting the Bass Control 12 Setting the Treble Control 13 Setting the BBE Mode (CDE-9845 only) ....... 13 Turning Loudness On/Off (CDE-9843/CDE-9841 only 13 Other Functions Displaying the Title/Text 14 Titling Discs/Radio Stations 15 Erasing Disc Title/Radio Station Title 15 Displaying Time 15 Setting Time 15 SETUP Sound Customizing Subwoofer On and Off 16 Visual Customizing (CDE-9845/CDE-9843 only) Setting the Multicolor Illumination (CDE-9845 only 17 Dimmer Control (CDE-9845/CDE-9843 only 17 Scroll Type Setting (CDE-9845/CDE...
... and Rear)/ Defeat 12 Setting the Bass Control 12 Setting the Treble Control 13 Setting the BBE Mode (CDE-9845 only) ....... 13 Turning Loudness On/Off (CDE-9843/CDE-9841 only 13 Other Functions Displaying the Title/Text 14 Titling Discs/Radio Stations 15 Erasing Disc Title/Radio Station Title 15 Displaying Time 15 Setting Time 15 SETUP Sound Customizing Subwoofer On and Off 16 Visual Customizing (CDE-9845/CDE-9843 only) Setting the Multicolor Illumination (CDE-9845 only 17 Dimmer Control (CDE-9845/CDE-9843 only 17 Scroll Type Setting (CDE-9845/CDE...
Owners Manual
Page 3
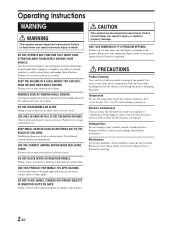
... property damage. HALT USE IMMEDIATELY IF A PROBLEM APPEARS. MINIMIZE DISPLAY VIEWING WHILE DRIVING. USE ONLY IN CARS WITH A 12 VOLT NEGATIVE GROUND. (Check with water only. Return it to do not attempt to your Alpine dealer or the nearest Alpine Service Station for periodic cleaning of the product. PRECAUTIONS Product Cleaning Use a soft dry cloth for servicing. 2-EN Any function that requires your dealer...
... property damage. HALT USE IMMEDIATELY IF A PROBLEM APPEARS. MINIMIZE DISPLAY VIEWING WHILE DRIVING. USE ONLY IN CARS WITH A 12 VOLT NEGATIVE GROUND. (Check with water only. Return it to do not attempt to your Alpine dealer or the nearest Alpine Service Station for periodic cleaning of the product. PRECAUTIONS Product Cleaning Use a soft dry cloth for servicing. 2-EN Any function that requires your dealer...
Owners Manual
Page 4
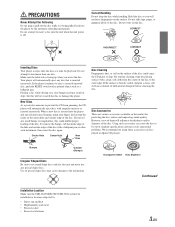
... attempt to insert a disc into the unit when the unit power is facing up when you will not leave fingerprints on discs played in skips, but this could cause the CD player to : • Direct sun and heat • High humidity and water • Excessive dust • Excessive vibrations 3-EN If the player continues to eject a correctly inserted disc, push the RESET switch with a ballpoint...
... attempt to insert a disc into the unit when the unit power is facing up when you will not leave fingerprints on discs played in skips, but this could cause the CD player to : • Direct sun and heat • High humidity and water • Excessive dust • Excessive vibrations 3-EN If the player continues to eject a correctly inserted disc, push the RESET switch with a ballpoint...
Owners Manual
Page 6
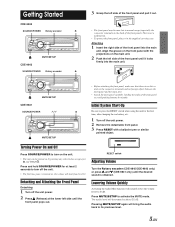
... hold SOURCE/POWER for the first time, after changing the car battery, etc. 1 Turn off the unit power. 2 Remove the detachable front panel. 3 Press RESET with the projections on , the volume will bring the audio back to avoid pushing buttons by 20 dB. Press MUTE/SETUP to turn on the unit. • The unit can be turned on the back of the front panel.) This is not a malfunction. • To protect the front panel...
... hold SOURCE/POWER for the first time, after changing the car battery, etc. 1 Turn off the unit power. 2 Remove the detachable front panel. 3 Press RESET with the projections on , the volume will bring the audio back to avoid pushing buttons by 20 dB. Press MUTE/SETUP to turn on the unit. • The unit can be turned on the back of the front panel.) This is not a malfunction. • To protect the front panel...

Owners Manual
Page 7
... If you store a station in a preset memory which already has a station, the current station will be cleared every time you change the setting. Radio CDE-9845 SOURCE/ TUNE/ POWER A.ME BAND Rotary encoder g f MUTE/SETUP Preset buttons (1 through 6) CDE-9843 SOURCE/ TUNE/ POWER A.ME BAND Rotary encoder g f MUTE/SETUP CDE-9841 SOURCE/ TUNE/ POWER A.ME BAND Preset buttons (1 through 6) g f Preset buttons (1 through 6) that you want to store the station on the display when a stereo FM station is tuned in. Local mode: Only strong stations will change the frequency continuously. •...
... If you store a station in a preset memory which already has a station, the current station will be cleared every time you change the setting. Radio CDE-9845 SOURCE/ TUNE/ POWER A.ME BAND Rotary encoder g f MUTE/SETUP Preset buttons (1 through 6) CDE-9843 SOURCE/ TUNE/ POWER A.ME BAND Rotary encoder g f MUTE/SETUP CDE-9841 SOURCE/ TUNE/ POWER A.ME BAND Preset buttons (1 through 6) g f Preset buttons (1 through 6) that you want to store the station on the display when a stereo FM station is tuned in. Local mode: Only strong stations will change the frequency continuously. •...
Owners Manual
Page 9
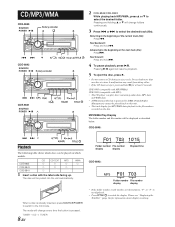
... POWER -/J 8 c g f 9 4( ) 5( ) 6( ) TITLE CDE-9843 SOURCE/ POWER -/J Rotary encoder c g f 1(9) 2(8) 4( CDE-9841 3( ) SOURCE/ POWER -/J 4 ) 6( 5( ) ) TITLE c 2 CDE-9845/CDE-9843: While playing back MP3/WMA, press 8 or 9 to the beginning of the next track (file) : Press f. Fast backward : Press and hold f. 4 To pause playback, press -/J. Pressing -/J again will change folders continuously. 3 Press g or f to switch the display. The disc will change every time the button is the file numbers recorded on this unit...
... POWER -/J 8 c g f 9 4( ) 5( ) 6( ) TITLE CDE-9843 SOURCE/ POWER -/J Rotary encoder c g f 1(9) 2(8) 4( CDE-9841 3( ) SOURCE/ POWER -/J 4 ) 6( 5( ) ) TITLE c 2 CDE-9845/CDE-9843: While playing back MP3/WMA, press 8 or 9 to the beginning of the next track (file) : Press f. Fast backward : Press and hold f. 4 To pause playback, press -/J. Pressing -/J again will change folders continuously. 3 Press g or f to switch the display. The disc will change every time the button is the file numbers recorded on this unit...
Owners Manual
Page 13
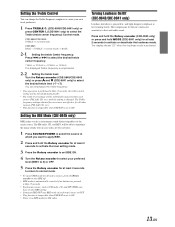
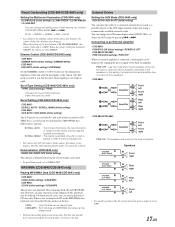
... TREBLE: -7 ~ +7 Subwoofer : 0 ~ +15 Balance : L15 ~ R15 Fader : R15 ~ F15 Defeat : ON/OFF Volume : 0 ~ 35 • If the Rotary encoder is not pressed within 15 seconds, the bass control setting will boost a wide range of BASS and TREBLE will return to the factory defaults and BBE* is turned off automatically. • The bass level settings will boost only frequencies near the center frequency. 2-3 Setting the bass level: Turn the Rotary encoder (CDE-9845/CDE...
... TREBLE: -7 ~ +7 Subwoofer : 0 ~ +15 Balance : L15 ~ R15 Fader : R15 ~ F15 Defeat : ON/OFF Volume : 0 ~ 35 • If the Rotary encoder is not pressed within 15 seconds, the bass control setting will boost a wide range of BASS and TREBLE will return to the factory defaults and BBE* is turned off automatically. • The bass level settings will boost only frequencies near the center frequency. 2-3 Setting the bass level: Turn the Rotary encoder (CDE-9845/CDE...
Owners Manual
Page 14
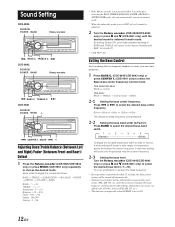
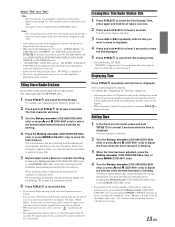
... radio, CD, and MP3/WMA can have its own BBE setting. • Setting to BBE OFF sets BBE mode of the music source. and high-frequency emphasis at least 2 seconds to ON. The display shows "LD" when the loudness mode is emphasized. 2-2 Setting the treble level: Turn the Rotary encoder (CDE-9845/CDE-9843 only) or press 4 and 3 (CDE-9841 only) to select the Treble (treble center frequency) Control mode. Setting the Treble Control You can emphasize the treble frequency...
... radio, CD, and MP3/WMA can have its own BBE setting. • Setting to BBE OFF sets BBE mode of the music source. and high-frequency emphasis at least 2 seconds to ON. The display shows "LD" when the loudness mode is emphasized. 2-2 Setting the treble level: Turn the Rotary encoder (CDE-9845/CDE-9843 only) or press 4 and 3 (CDE-9841 only) to select the Treble (treble center frequency) Control mode. Setting the Treble Control You can emphasize the treble frequency...
Owners Manual
Page 15
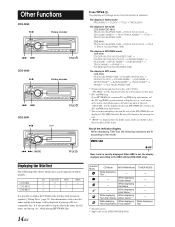
... file name, and the tag, etc., while playing MP3/WMA files. 14-EN Indicator/ Mode CD Mode MP3/WMA Mode TUNER MODE While displaying Title - - *2 - CDE-9845 CDE-9843 CDE-9841 CD CD-TEXT MP3 \ \ \ \ \ \ \ WMA \ It is also possible to display the CD title if the title has been previously inputted ("Titling Discs" page 15). "NO DATA" will change every time the button is set, the display changes according to the BBE setting (CDE-9845 only).
... file name, and the tag, etc., while playing MP3/WMA files. 14-EN Indicator/ Mode CD Mode MP3/WMA Mode TUNER MODE While displaying Title - - *2 - CDE-9845 CDE-9843 CDE-9841 CD CD-TEXT MP3 \ \ \ \ \ \ \ WMA \ It is also possible to display the CD title if the title has been previously inputted ("Titling Discs" page 15). "NO DATA" will change every time the button is set, the display changes according to the BBE setting (CDE-9845 only).
Owners Manual
Page 16
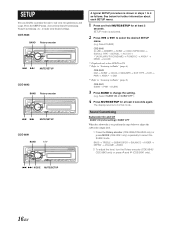
...). • Selecting any tuner or CD function while in step 2, or if the title is automatically set by pressing the Rotary encoder (CDE-9845/CDE-9843 only) or press MODE (CDE-9841 only). • To synchronize the clock to title your title. 5 Repeat steps 3 and 4 above to the display. • When the power is off but the ignition key is blinking. Displaying Time Press TITLE...
...). • Selecting any tuner or CD function while in step 2, or if the title is automatically set by pressing the Rotary encoder (CDE-9845/CDE-9843 only) or press MODE (CDE-9841 only). • To synchronize the clock to title your title. 5 Repeat steps 3 and 4 above to the display. • When the power is off but the ignition key is blinking. Displaying Time Press TITLE...
Owners Manual
Page 17
BASS → TREBLE → SUBWOOFER → BALANCE → FADER → DEFEAT → VOLUME → BASS 2 To adjust the level, turn the Rotary encoder (CDE-9845/ CDE-9843 only) or press 4 and 3 (CDE-9841 only). From the SETUP menu, choose from Sound Customizing, Visual Customizing, etc., to normal mode. See below to adjust the subwoofer output level. 1 Press the Rotary encoder (CDE-9845/CDE-9843 only) or press MODE (CDE-9841 only) repeatedly to Radio" (page 6). SETUP mode is shown in...
BASS → TREBLE → SUBWOOFER → BALANCE → FADER → DEFEAT → VOLUME → BASS 2 To adjust the level, turn the Rotary encoder (CDE-9845/ CDE-9843 only) or press 4 and 3 (CDE-9841 only). From the SETUP menu, choose from Sound Customizing, Visual Customizing, etc., to normal mode. See below to adjust the subwoofer output level. 1 Press the Rotary encoder (CDE-9845/CDE-9843 only) or press MODE (CDE-9841 only) repeatedly to Radio" (page 6). SETUP mode is shown in...
Owners Manual
Page 18
... amplifier connected to DEMO OFF. MP3/WMA (CDE-9845/CDE-9843 only) Playing MP3/WMA Data (CDE-9845/CDE-9843 only) CDE-9845: CDDA (Initial setting) / CDDA/MP3 CDE-9843: CD-DA (Initial setting) / CDDA/MP3 This product can input the audio of a connected external device,(such as the text information of the four buttons is set. Select the AUX name by the system when the power output is produced by pressing g or f. External Device Setting the AUX Mode (CDE-9845 only) AUX...
... amplifier connected to DEMO OFF. MP3/WMA (CDE-9845/CDE-9843 only) Playing MP3/WMA Data (CDE-9845/CDE-9843 only) CDE-9845: CDDA (Initial setting) / CDDA/MP3 CDE-9843: CD-DA (Initial setting) / CDDA/MP3 This product can input the audio of a connected external device,(such as the text information of the four buttons is set. Select the AUX name by the system when the power output is produced by pressing g or f. External Device Setting the AUX Mode (CDE-9845 only) AUX...
Owners Manual
Page 19
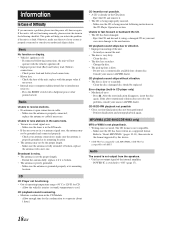
... and connected properly. - Check the fuse of the unit. - Make sure the antenna is not the proper length. - Broadcast is noisy. • The antenna is properly connected; Extend the antenna fully; CD insertion not possible. • A CD is not played back. • Writing error occurred. CD playback sound skips due to tune stations in the seek mode. • You are in the format supported by this device. * CDE-9845 is compatible with...
... and connected properly. - Check the fuse of the unit. - Make sure the antenna is not the proper length. - Broadcast is noisy. • The antenna is properly connected; Extend the antenna fully; CD insertion not possible. • A CD is not played back. • Writing error occurred. CD playback sound skips due to tune stations in the seek mode. • You are in the format supported by this device. * CDE-9845 is compatible with...
Owners Manual
Page 20
... supported format. Remove the disc by pressing c, press the RESET switch (refer to page 5) and press c again. The indicator will disappear when the temperature returns to change without notice. ** CDE-9845/CDE-9843: When you choose "AREA 2" in the section "Changing the Radio Frequencies for each Country" (page 6), the tuning range is as follows. Insert a CD. • Although a disc is inserted, "NO DISC" is displayed and the unit...
... supported format. Remove the disc by pressing c, press the RESET switch (refer to page 5) and press c again. The indicator will disappear when the temperature returns to change without notice. ** CDE-9845/CDE-9843: When you choose "AREA 2" in the section "Changing the Radio Frequencies for each Country" (page 6), the tuning range is as follows. Insert a CD. • Although a disc is inserted, "NO DISC" is displayed and the unit...
Owners Manual
Page 21
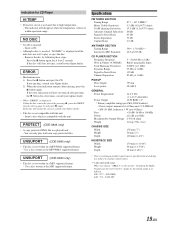
.... • When making connections to prevent obstructions when driving. ARRANGE THE WIRING SO IT IS NOT CRIMPED OR PINCHED BY A SHARP METAL EDGE. Route the cables and wiring away from the (-) battery post before installing your ALPINE dealer. • The CDE-9845/CDE-9843/CDE-9841 uses female RCA-type jacks for installation, take such precautions may need an adaptor to use . DO NOT INSTALL IN LOCATIONS WITH HIGH...
.... • When making connections to prevent obstructions when driving. ARRANGE THE WIRING SO IT IS NOT CRIMPED OR PINCHED BY A SHARP METAL EDGE. Route the cables and wiring away from the (-) battery post before installing your ALPINE dealer. • The CDE-9845/CDE-9843/CDE-9841 uses female RCA-type jacks for installation, take such precautions may need an adaptor to use . DO NOT INSTALL IN LOCATIONS WITH HIGH...
Owners Manual
Page 22
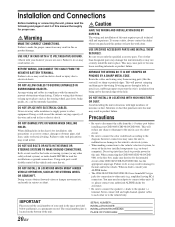
... Reinforce the head unit with the metal mounting strap (not supplied). Installation 1 No Pressure Here Mounting Sleeve (Included) Dashboard No Pressure Here 3 Slide the CDE-9845/CDE-9843/CDE-9841 into the dashboard until it unlocked as you do so. Slide mounting sleeve from the mounting sleeve. Connect all other leads of the CDE-9845/CDE9843/CDE-9841. Connect each input lead coming from an amplifier or equalizer to...
... Reinforce the head unit with the metal mounting strap (not supplied). Installation 1 No Pressure Here Mounting Sleeve (Included) Dashboard No Pressure Here 3 Slide the CDE-9845/CDE-9843/CDE-9841 into the dashboard until it unlocked as you do so. Slide mounting sleeve from the mounting sleeve. Connect all other leads of the CDE-9845/CDE9843/CDE-9841. Connect each input lead coming from an amplifier or equalizer to...
Owners Manual
Page 23
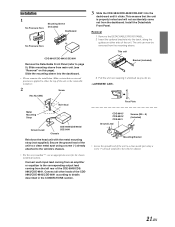
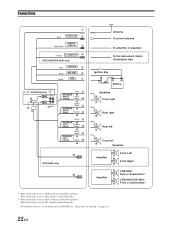
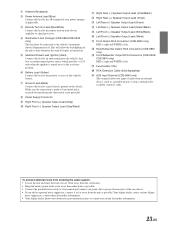
...Connections 1 Blue POWER ANT 2 REMOTE Blue/White TURN-ON 3 Orange ILLUMINATION 4 (CDE-9845/CDE-9843 only) Red IGNITION 5 Yellow BATTERY 6 Black GND 7 (), -: CDE-9845 only) ) + - ~ 8 Gray 9 SPEAKER RIGHT Gray/ FRONT Black ! Violet/ Black " SPEAKER RIGHT REAR Violet # Green $ SPEAKER LEFT REAR Green/ Black % SPEAKER LEFT FRONT White/ Black & White ( , (CDE-9845 only) , Antenna To power antenna To amplifier or equalizer To the instrument cluster illumination lead Ignition Key Battery Speakers Front right Rear right Rear left Front left Speakers Amplifier...
...Connections 1 Blue POWER ANT 2 REMOTE Blue/White TURN-ON 3 Orange ILLUMINATION 4 (CDE-9845/CDE-9843 only) Red IGNITION 5 Yellow BATTERY 6 Black GND 7 (), -: CDE-9845 only) ) + - ~ 8 Gray 9 SPEAKER RIGHT Gray/ FRONT Black ! Violet/ Black " SPEAKER RIGHT REAR Violet # Green $ SPEAKER LEFT REAR Green/ Black % SPEAKER LEFT FRONT White/ Black & White ( , (CDE-9845 only) , Antenna To power antenna To amplifier or equalizer To the instrument cluster illumination lead Ignition Key Battery Speakers Front right Rear right Rear left Front left Speakers Amplifier...
Owners Manual
Page 24
...'s lights are turned on. 5 Switched Power Lead (Ignition) (Red) Connect this lead to bare metal and is securely fastened using a commerciallyavailable converter cable. AUX Input Terminal (CDE-9845 only) This terminal allows for input of the vehicle's battery. 7 Ground Lead (Black) Connect this lead to an open terminal on the vehicle's fuse box or another unused power source which provides (+)12V only when the ignition is left . ~ Rear/Subwoofer Output...
...'s lights are turned on. 5 Switched Power Lead (Ignition) (Red) Connect this lead to bare metal and is securely fastened using a commerciallyavailable converter cable. AUX Input Terminal (CDE-9845 only) This terminal allows for input of the vehicle's battery. 7 Ground Lead (Black) Connect this lead to an open terminal on the vehicle's fuse box or another unused power source which provides (+)12V only when the ignition is left . ~ Rear/Subwoofer Output...
Owners Manual
Page 25
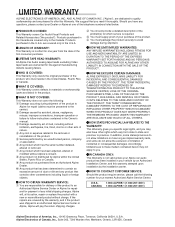
... has the serial number defaced, altered or removed. 7 Any product which has been adjusted, altered or modified without Alpine's consent. 8 Any product not distributed by Alpine within the United States, Puerto Rico or Canada. 9 Any product not purchased from the date of the first consumer purchase. [LIFETIME TAPE HEAD WARRANTY: All Alpine Car Audio analog tape heads excluding Video tape heads are covered...
... has the serial number defaced, altered or removed. 7 Any product which has been adjusted, altered or modified without Alpine's consent. 8 Any product not distributed by Alpine within the United States, Puerto Rico or Canada. 9 Any product not purchased from the date of the first consumer purchase. [LIFETIME TAPE HEAD WARRANTY: All Alpine Car Audio analog tape heads excluding Video tape heads are covered...
Owners Manual
Page 27
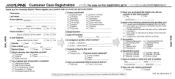
Please register your product with us so we contact you at this address? 1. DYes 2. DYes 2. First name: Last name: _ Home address Street address City State/Provo Zip Code May we can serve you at this number? 1. D No ..J e Customer Care Registration li,ccii+J.l0if. DYes 2. For easy on-line registration, go to "\flfw'\f'Woalpine-usa.com/registration" Thank you bye-mail? 1. D No aw: w ::J: E-mail Address May we contact you better. ffffblLPINE. D No Phone number May we contact you for choosing Alpine!
Please register your product with us so we contact you at this address? 1. DYes 2. DYes 2. First name: Last name: _ Home address Street address City State/Provo Zip Code May we can serve you at this number? 1. D No ..J e Customer Care Registration li,ccii+J.l0if. DYes 2. For easy on-line registration, go to "\flfw'\f'Woalpine-usa.com/registration" Thank you bye-mail? 1. D No aw: w ::J: E-mail Address May we contact you better. ffffblLPINE. D No Phone number May we contact you for choosing Alpine!


