Operating Instructions
Page 2
...below for a Class B digital device, pursuant to part 15 of the FCC Rules. This equipment generates, uses, and can radiate radio frequency energy, and if not installed and used in accordance with the limits for each area: USA UL Canada CSA/cUL FCC Information This equipment has ...harmful interference will not occur in a residential installation. Licensed by turning the equipment off and on a circuit different from BBE Sound, Inc. Please use a power cable is encouraged to try to this device. Connect the equipment into an outlet on , the user is properly grounded. BBE High...
...below for a Class B digital device, pursuant to part 15 of the FCC Rules. This equipment generates, uses, and can radiate radio frequency energy, and if not installed and used in accordance with the limits for each area: USA UL Canada CSA/cUL FCC Information This equipment has ...harmful interference will not occur in a residential installation. Licensed by turning the equipment off and on a circuit different from BBE Sound, Inc. Please use a power cable is encouraged to try to this device. Connect the equipment into an outlet on , the user is properly grounded. BBE High...
Operating Instructions
Page 3
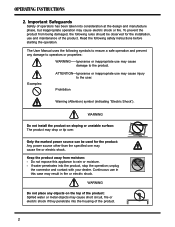
... operation may result in fire or electric shock. Do not expose this case may cause electric shock or fire. Continuous use may cause short circuit, fire or electric shock if they penetrate into the housing of the product. 2 Examples: ATTENTION---Ignorance or inappropriate... use and maintenance of operators has been taken into the product, stop the operation; WARNING Do not install the product on the top of ...
... operation may result in fire or electric shock. Do not expose this case may cause electric shock or fire. Continuous use may cause short circuit, fire or electric shock if they penetrate into the housing of the product. 2 Examples: ATTENTION---Ignorance or inappropriate... use and maintenance of operators has been taken into the product, stop the operation; WARNING Do not install the product on the top of ...
Operating Instructions
Page 4
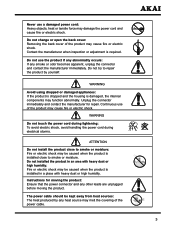
... connector and contact the manufacturer immediately. Do not installed the product in a place with heavy dust or high humidity. Instructions for repair. Never use of the product may cause fire or electric shock. The power cable should be kept away from heat sources: The heat produced by yourself.... Do not use the product if any abnormality occurs: If any heat source may melt the covering of the power cable. 3 Unplug the connector immediately and contact...
... connector and contact the manufacturer immediately. Do not installed the product in a place with heavy dust or high humidity. Instructions for repair. Never use of the product may cause fire or electric shock. The power cable should be kept away from heat sources: The heat produced by yourself.... Do not use the product if any abnormality occurs: If any heat source may melt the covering of the power cable. 3 Unplug the connector immediately and contact...
Operating Instructions
Page 5
...polarities may cause overheating and fire. Unplug the connector Image Sticking: The plasma monitor illuminates phosphor to move them using screen saver function. - Use of video games and computers on the screen. Unplug the connector Hold the power connector when removing the power cable: ...are NOT COVERED by the manufacturer's warranty. Note: Such "Image Sticking" constitute misuse are : - Others: This product is designed for indoor use only and is 5°C ~ 33°C. 4 Do not install the product in accordance with instructions: Insert the batteries with little or no ...
...polarities may cause overheating and fire. Unplug the connector Image Sticking: The plasma monitor illuminates phosphor to move them using screen saver function. - Use of video games and computers on the screen. Unplug the connector Hold the power connector when removing the power cable: ...are NOT COVERED by the manufacturer's warranty. Note: Such "Image Sticking" constitute misuse are : - Others: This product is designed for indoor use only and is 5°C ~ 33°C. 4 Do not install the product in accordance with instructions: Insert the batteries with little or no ...
Operating Instructions
Page 6
... cables or the cords of water may cause fire or electric shock. 9. The Display is supplied with the instructions and using the support recommended by the manufacturer to 1100hPa 5 For more information, contact your dealer. 13. This is dropped or damaged in accordance with a ...and User Manual should be conducted in any way. - When moving so as VCR, DVD or PC. 12. The installation of the product, never use the accessories recommended by the manufacturer. 7. Avoid overloading the power cord. A wet cloth is sufficient for the cleaning of the product should ...
... cables or the cords of water may cause fire or electric shock. 9. The Display is supplied with the instructions and using the support recommended by the manufacturer to 1100hPa 5 For more information, contact your dealer. 13. This is dropped or damaged in accordance with a ...and User Manual should be conducted in any way. - When moving so as VCR, DVD or PC. 12. The installation of the product, never use the accessories recommended by the manufacturer. 7. Avoid overloading the power cord. A wet cloth is sufficient for the cleaning of the product should ...
Operating Instructions
Page 7
... ...30 7. Technical Specification 32 8. Product Features 8 3. Accessories 8 4. Connection to External Equipment 15 6. Support the Signal Mode 33 9. Cleaning and Simple Troubleshooting 34 6 Before use ...7 1.1 Open the Package 7 1.2 Installation ...7 2. Basic Operation 18 6.1 Power ON/OFF 18 6.2 Selection of Parts 9 4.1 Side View ...9 4.2 Front View ...10 4.3 Rear View ...11 4.4 Remote Control 12...
... ...30 7. Technical Specification 32 8. Product Features 8 3. Accessories 8 4. Connection to External Equipment 15 6. Support the Signal Mode 33 9. Cleaning and Simple Troubleshooting 34 6 Before use ...7 1.1 Open the Package 7 1.2 Installation ...7 2. Basic Operation 18 6.1 Power ON/OFF 18 6.2 Selection of Parts 9 4.1 Side View ...9 4.2 Front View ...10 4.3 Rear View ...11 4.4 Remote Control 12...
Operating Instructions
Page 8
... the carton, check that the product is recommended that all directions from the manufacturer of the product: 1.1 Open the Package - Please use caution if wall mounting this product. Please ensure the product be installed horizontally, any other standard accessories. It has passed the Class-B EMC...mount and be broken and scraped easily, move the product gently. The distance between the back of the electronic components. - Before use the jack exclusively designed for this product. If an extended line is protected with your service agent. - The protective glass and the...
... the carton, check that the product is recommended that all directions from the manufacturer of the product: 1.1 Open the Package - Please use caution if wall mounting this product. Please ensure the product be installed horizontally, any other standard accessories. It has passed the Class-B EMC...mount and be broken and scraped easily, move the product gently. The distance between the back of the electronic components. - Before use the jack exclusively designed for this product. If an extended line is protected with your service agent. - The protective glass and the...
Operating Instructions
Page 11
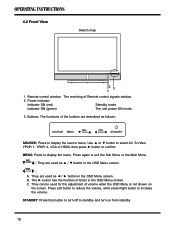
...: The receiving of Enter in the OSD Menu screen. They are described as follows: SOURCE MENU SEL. STANDBY SOURCE: Press to display the source menu, Use ▲ or ▼ button to select AV, S-Video, YPbPr 1, YPbPr 2, VGA or HDMI, then press ► button to exit the Sub Menu ... The ► button has the function of Remote control signals window. 2 Power indicator: Indicator ON (red) Standby mode. They can be used for the adjustment of the buttons are used as ◄ / ► button in the OSD Menu screen. B. MENU: Press to display the menu. Indicator ON (green) The ...
...: The receiving of Enter in the OSD Menu screen. They are described as follows: SOURCE MENU SEL. STANDBY SOURCE: Press to display the source menu, Use ▲ or ▼ button to select AV, S-Video, YPbPr 1, YPbPr 2, VGA or HDMI, then press ► button to exit the Sub Menu ... The ► button has the function of Remote control signals window. 2 Power indicator: Indicator ON (red) Standby mode. They can be used for the adjustment of the buttons are used as ◄ / ► button in the OSD Menu screen. B. MENU: Press to display the menu. Indicator ON (green) The ...
Operating Instructions
Page 12
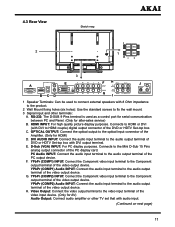
...amplifier or other terminals: A. RS-232: The D-SUB 9 Pins terminal is used to connect external speakers with 8 Ohm impedance to the product. 2 Wall Mount fixing holes (six holes): Use the standard screws to HDMI or DVI (with DVI output terminal. OPTICAL OUTPUT: Connect the...of the Amplifier. (Only for after-sales service) B. G. 4.3 Rear View L BLACK RED BLACK RED R- + 1 Speaker Terminals: Can be used as a control port for serial communication between PC and Panel. (Only for HDMI) D. Video Output: Connect the video output terminal to the optical input ...
...amplifier or other terminals: A. RS-232: The D-SUB 9 Pins terminal is used to connect external speakers with 8 Ohm impedance to the product. 2 Wall Mount fixing holes (six holes): Use the standard screws to HDMI or DVI (with DVI output terminal. OPTICAL OUTPUT: Connect the...of the Amplifier. (Only for after-sales service) B. G. 4.3 Rear View L BLACK RED BLACK RED R- + 1 Speaker Terminals: Can be used as a control port for serial communication between PC and Panel. (Only for HDMI) D. Video Output: Connect the video output terminal to the optical input ...
Operating Instructions
Page 13
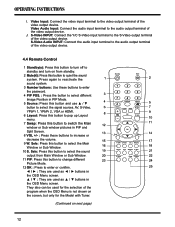
... PIP Mode. 5 Source: Press this button to the video output terminal of the video output device. Press again to reactivate the sound system. 3 Number buttons: Use these buttons to the audio output terminal of the program when the OSD Menu is not shown on next page) 12 Sele: Press this button... to select the sound output from standby. 2 Mute( ): Press this button and use ▲ / ▼ button to the S-Video output terminal of the video output device. I. Sele: Press this button to switch the Main window or Sub ...
... PIP Mode. 5 Source: Press this button to the video output terminal of the video output device. Press again to reactivate the sound system. 3 Number buttons: Use these buttons to the audio output terminal of the program when the OSD Menu is not shown on next page) 12 Sele: Press this button... to select the sound output from standby. 2 Mute( ): Press this button and use ▲ / ▼ button to the S-Video output terminal of the video output device. I. Sele: Press this button to switch the Main window or Sub ...
Operating Instructions
Page 15
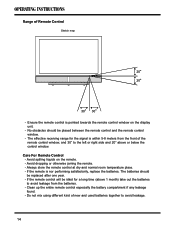
...176; above or below the control window. Always store the remote control at dry and normal room temperature place. - Range of new and used batteries together to avoid leakage. 14 Clean up the entire remote control especially the battery compartment if any leakage found. - The batteries should... be replaced after one year. - Do not mix using different kind of Remote Control Sketch map 20 20 30 30 - Ensure the remote control is nor performing satisfactorily, replace the batteries. No ...
...176; above or below the control window. Always store the remote control at dry and normal room temperature place. - Range of new and used batteries together to avoid leakage. 14 Clean up the entire remote control especially the battery compartment if any leakage found. - The batteries should... be replaced after one year. - Do not mix using different kind of Remote Control Sketch map 20 20 30 30 - Ensure the remote control is nor performing satisfactorily, replace the batteries. No ...
Operating Instructions
Page 16
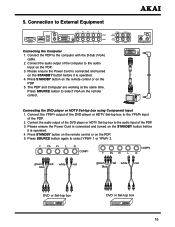
... 2. Press STANDBY button on the remote control or on the PDP. 3. 5. D-Sub(VGA) PC Audio INPUT Connecting the DVD player or HDTV Set-top box using Component input 1. green red white red blue green red white red blue DVD or Set-top box DVD or Set-top box 15
... 2. Press STANDBY button on the remote control or on the PDP. 3. 5. D-Sub(VGA) PC Audio INPUT Connecting the DVD player or HDTV Set-top box using Component input 1. green red white red blue green red white red blue DVD or Set-top box DVD or Set-top box 15

Operating Instructions
Page 17
... connected and turned on the PDP. 5. DVI DVD or Set-top box white red 16 The second step isn't used , if you connect HDMI output to the HDMI input of HDTV Set-top box with DVI output terminal, and a... that with the HDMI cable. 2. Connecting the DVD player or HDTV Set-top box using HDMI input 1. Connect the DVI AUDIO input terminal to the audio output terminal of the PDP. Please ensure the ...Power Cord is used , if you connect DVI output to the HDMI input of the video input device. The PDP and ...
... connected and turned on the PDP. 5. DVI DVD or Set-top box white red 16 The second step isn't used , if you connect HDMI output to the HDMI input of HDTV Set-top box with DVI output terminal, and a... that with the HDMI cable. 2. Connecting the DVD player or HDTV Set-top box using HDMI input 1. Connect the DVI AUDIO input terminal to the audio output terminal of the PDP. Please ensure the ...Power Cord is used , if you connect DVI output to the HDMI input of the video input device. The PDP and ...
Operating Instructions
Page 20
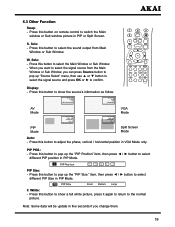
... in PIP Mode. Press this button to pop up the "PIP Position" item, then press ◄ / ► button to pop up "Source Select" menu, then use ▲ or ▼ button to select the signal source and press OK or ► to select the signal source from Main Window or Sub Window...
... in PIP Mode. Press this button to pop up the "PIP Position" item, then press ◄ / ► button to pop up "Source Select" menu, then use ▲ or ▼ button to select the signal source and press OK or ► to select the signal source from Main Window or Sub Window...
Operating Instructions
Page 21
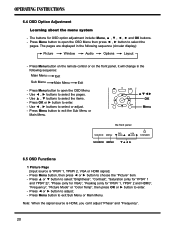
...Temp", then press OK or ► button to adjust; - The pages are displayed in the following sequence (circular display): Picture Window Audio Options Layout - Use ◄ , ► buttons to exit the Sub Menu or Main Menu. OK Menu the front panel SOURCE MENU SEL. Press Menu button on the remote... ◄ or ► button to enter. - Press Menu button to enter. - Press OK or ► button to exit Sub Menu or Main Menu. Use ▲ , ▼ buttons to choose the "Picture" item. - Press Menu button, then press ◄ or ► button to select the items...
...Temp", then press OK or ► button to adjust; - The pages are displayed in the following sequence (circular display): Picture Window Audio Options Layout - Use ◄ , ► buttons to exit the Sub Menu or Main Menu. OK Menu the front panel SOURCE MENU SEL. Press Menu button on the remote... ◄ or ► button to enter. - Press Menu button to enter. - Press OK or ► button to exit Sub Menu or Main Menu. Use ▲ , ▼ buttons to choose the "Picture" item. - Press Menu button, then press ◄ or ► button to select the items...
Operating Instructions
Page 27
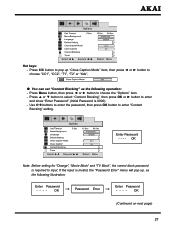
... mode. 2. Hot keys: - The setting is as same as the following operation: - The Wake Up Time and Sleep Time base on the Clock Set you use these functions, the PDP will be turned on next page) 26 After you set the timer three ways: a. Sleep Time function - The operation is valid...
... mode. 2. Hot keys: - The setting is as same as the following operation: - The Wake Up Time and Sleep Time base on the Clock Set you use these functions, the PDP will be turned on next page) 26 After you set the timer three ways: a. Sleep Time function - The operation is valid...
Operating Instructions
Page 28
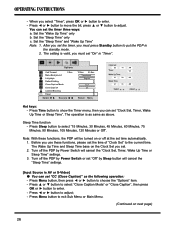
... to choose "CC1", "CC2", "T1", "T2" or "Xds". ● You can set "Content Blocking" as the following operation: - Enter Password - - - - OK Password Error Enter Password - - - - Use 0~9 buttons to enter the password, then press OK button to enter and show "Enter Password" (Initial Password is invalid, the "Password Error" menu will pop...
... to choose "CC1", "CC2", "T1", "T2" or "Xds". ● You can set "Content Blocking" as the following operation: - Enter Password - - - - OK Password Error Enter Password - - - - Use 0~9 buttons to enter the password, then press OK button to enter and show "Enter Password" (Initial Password is invalid, the "Password Error" menu will pop...

Operating Instructions
Page 29
...; or ▼ button to select "Movie Block" in Sub Menu, then press OK or ► button to pop up "Enter New Password". - Use 0~9 buttons to enter your new password. - Use 0~9 buttons to enter your new password again. - Enter New Password - - - - OK Confirm Password - - - - Note: The initial password for the system...
...; or ▼ button to select "Movie Block" in Sub Menu, then press OK or ► button to pop up "Enter New Password". - Use 0~9 buttons to enter your new password. - Use 0~9 buttons to enter your new password again. - Enter New Password - - - - OK Confirm Password - - - - Note: The initial password for the system...

Operating Instructions
Page 35
...still fails to perform as toluene, rosin and alcohol) to prevent water from penetrating into the housing. 9. When the screen is seriously contaminated, use a soft cloth moistened with a dry cloth after cleaning. 3 Cleaning of the cloth before cleaning the product. - Such chemicals may damage the... housing, screen glass and remote control, and cause the paint to clean the screen gently. - Use a soft cotton cloth for assistance. (Continued on next page) 34 Wipe the display with diluted neutral cleaner to avoid cracking. Cleaning and ...
...still fails to perform as toluene, rosin and alcohol) to prevent water from penetrating into the housing. 9. When the screen is seriously contaminated, use a soft cloth moistened with a dry cloth after cleaning. 3 Cleaning of the cloth before cleaning the product. - Such chemicals may damage the... housing, screen glass and remote control, and cause the paint to clean the screen gently. - Use a soft cotton cloth for assistance. (Continued on next page) 34 Wipe the display with diluted neutral cleaner to avoid cracking. Cleaning and ...

Operating Instructions
Page 36
... properly fixed, or display warning message. Check that the input signal line is connected properly. - Check that all the video settings are not drained. (Use new batteries.) - Check that the polarity of PC to Support the Signal Mode in Chapter 8. 35 Check that the Remote Control is no sound. For...
... properly fixed, or display warning message. Check that the input signal line is connected properly. - Check that all the video settings are not drained. (Use new batteries.) - Check that the polarity of PC to Support the Signal Mode in Chapter 8. 35 Check that the Remote Control is no sound. For...