
Operation Manual
Page 5
This dial is used to Enter) - This dial also functions as an [ENTER] button when it is used to navigate through the fields of menus and options. The display is pressed down. 3. [] BUTTONS - The [ These buttons are used for navigating menus, displaying data, and affecting change on MPK49's options and parameters. 2. [VALUE] (Push to increment and decrement Presets, parameter values and settings. LCD - FRONT PANEL OVERVIEW 1.
This dial is used to Enter) - This dial also functions as an [ENTER] button when it is used to navigate through the fields of menus and options. The display is pressed down. 3. [] BUTTONS - The [ These buttons are used for navigating menus, displaying data, and affecting change on MPK49's options and parameters. 2. [VALUE] (Push to increment and decrement Presets, parameter values and settings. LCD - FRONT PANEL OVERVIEW 1.
Operation Manual
Page 6
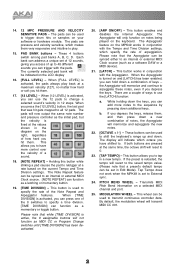
... pads. Tap Tempo does not work when the MPK49 is turned on the current Tempo and Time Division settings. Transmits MIDI Pitch Bend information on the keyboard. If the preset is fixed at a maximum velocity (127), no matter how hard or soft you can use the [LATCH] function: a. This wheel can trigger with the Arpeggiator. The pads will now output the same note number and pressure controller as the initial pad...
... pads. Tap Tempo does not work when the MPK49 is turned on the current Tempo and Time Division settings. Transmits MIDI Pitch Bend information on the keyboard. If the preset is fixed at a maximum velocity (127), no matter how hard or soft you can use the [LATCH] function: a. This wheel can trigger with the Arpeggiator. The pads will now output the same note number and pressure controller as the initial pad...
Operation Manual
Page 8
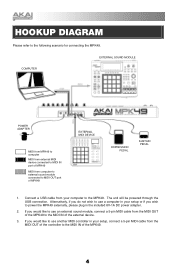
... MPK49 externally, please plug in your setup, connect a 5-pin MIDI cable from the MIDI OUT of the MPK49 to the MIDI IN of the MPK49. 4 Connect a USB cable from computer to external sound module connected to the following scenario for connecting the MPK49. If you would like to use another MIDI controller in the included 6V-1A DC power adapter. 2. The unit will be powered through the USB connection. If you would like to use an external sound module, connect a 5-pin MIDI cable...
... MPK49 externally, please plug in your setup, connect a 5-pin MIDI cable from the MIDI OUT of the MPK49 to the MIDI IN of the MPK49. 4 Connect a USB cable from computer to external sound module connected to the following scenario for connecting the MPK49. If you would like to use another MIDI controller in the included 6V-1A DC power adapter. 2. The unit will be powered through the USB connection. If you would like to use an external sound module, connect a 5-pin MIDI cable...
Operation Manual
Page 9
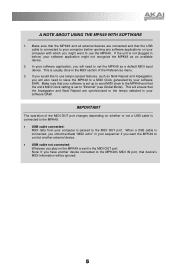
... your computer is sent to use the MPK49. IMPORTANT The operation of the Preferences menu. 3. If you will ensure that the Arpeggiator and Beat Repeat are connected and that the USB cable is not plugged in the MIDI section of the MIDI OUT port changes depending on your software is set the MPK49 as a default MIDI input device. A NOTE ABOUT USING THE MPK49 WITH SOFTWARE 1. In your software application, you would like to...
... your computer is sent to use the MPK49. IMPORTANT The operation of the Preferences menu. 3. If you will ensure that the Arpeggiator and Beat Repeat are connected and that the USB cable is not plugged in the MIDI section of the MIDI OUT port changes depending on your software is set the MPK49 as a default MIDI input device. A NOTE ABOUT USING THE MPK49 WITH SOFTWARE 1. In your software application, you would like to...
Operation Manual
Page 10
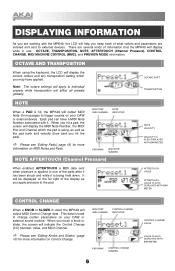
... parameters are several kinds of information that the MPK49 will apply to trigger sounds on MIDI Notes and Pads. It will affect all presets globally. When you move a knob or slider, the screen will output MIDI Control Change data. MIDI PORT CONTROL CHANGE AND CHANNEL INDICATOR PAD BANK CONTROL CHANGE NUMBER 6 CONTROL CHANGE VALUE VALUE IS ALSO DISPLAYED WITH BAR METER. There are entered and sent to external devices. MIDI PORT NOTE AND CHANNEL INDICATOR Please see...
... parameters are several kinds of information that the MPK49 will apply to trigger sounds on MIDI Notes and Pads. It will affect all presets globally. When you move a knob or slider, the screen will output MIDI Control Change data. MIDI PORT CONTROL CHANGE AND CHANNEL INDICATOR PAD BANK CONTROL CHANGE NUMBER 6 CONTROL CHANGE VALUE VALUE IS ALSO DISPLAYED WITH BAR METER. There are entered and sent to external devices. MIDI PORT NOTE AND CHANNEL INDICATOR Please see...

Operation Manual
Page 11
... slider S1 is commonly used to send three different MIDI CC numbers, depending on the control bank which begins playing. CONTROL CHANGE NUMBER NEW VALUE LAST VALUE SENT LAST VALUE SENT NEW VALUE THE ADVANTAGES OF PREVIEWING The [PREVIEW] button allows you can release the [PREVIEW] button. Please see what value will not be set to a connected multi-track recorder, which you a nice starting point at 80 (instead of...
... slider S1 is commonly used to send three different MIDI CC numbers, depending on the control bank which begins playing. CONTROL CHANGE NUMBER NEW VALUE LAST VALUE SENT LAST VALUE SENT NEW VALUE THE ADVANTAGES OF PREVIEWING The [PREVIEW] button allows you can release the [PREVIEW] button. Please see what value will not be set to a connected multi-track recorder, which you a nice starting point at 80 (instead of...
Operation Manual
Page 12
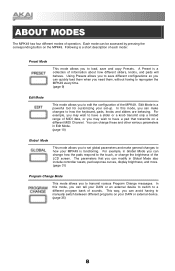
... set global parameters and make changes to set -up. A Preset is functioning. Using Presets allows you to save and copy Presets. You can avoid having to reprogram the MPK49 every time. (page 9) Edit Mode This mode allows you can make general changes to edit the configuration of sounds. In this mode, you can modify in Global Mode also include controller resets, pad response curves, display brightness, and more. (page 31) Program Change Mode This mode...
... set global parameters and make changes to set -up. A Preset is functioning. Using Presets allows you to save and copy Presets. You can avoid having to reprogram the MPK49 every time. (page 9) Edit Mode This mode allows you can make general changes to edit the configuration of sounds. In this mode, you can modify in Global Mode also include controller resets, pad response curves, display brightness, and more. (page 31) Program Change Mode This mode...
Operation Manual
Page 14
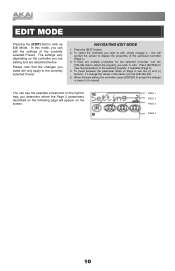
... editing and are multiple properties for the selected controller, turn the [VALUE] dial to select the property you make will prompt the screen to edit, simply engage it - Please note that the changes you wish to accept the change the values of the particular controller (Page 1). 3. Press the [EDIT] button. 2. Press [ENTER] to the currently selected Preset. To...
... editing and are multiple properties for the selected controller, turn the [VALUE] dial to select the property you make will prompt the screen to edit, simply engage it - Please note that the changes you wish to accept the change the values of the particular controller (Page 1). 3. Press the [EDIT] button. 2. Press [ENTER] to the currently selected Preset. To...
Operation Manual
Page 15
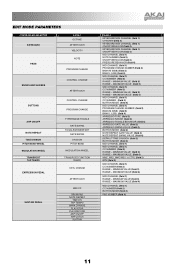
...4) MIDI CHANNEL (field 1) CC NUMBER (field 2) RANGE - EDIT MODE PARAMETERS CONTROLLER SELECTED KEYBOARD PAGE 1 OCTAVE AFTERTOUCH VELOCITY PADS NOTE PROGRAM CHANGE KNOBS AND SLIDERS BUTTONS ARP ON/OFF NOTE REPEAT TIME DIVISION PITCH BEND WHEEL MODULATION WHEEL TRANSPORT TAP TEMPO EXPRESSION PEDAL SUSTAIN PEDAL CONTROL CHANGE AFTERTOUCH CONTROL CHANGE PROGRAM CHANGE TYPE/RANGE/TOGGLE GATE/SWING TOGGLE/MOMENTARY GATE/SWING DIVISION PITCH BEND MODULATION WHEEL TRANSPORT FUNCTION TEMPO CNTL CHANGE AFTERTOUCH MIDI CC DRUM PAD NOTE REPEAT TIME DIV TAP TEMPO BANK CHANGE PLAY/STOP PLAY/RECORD...
...4) MIDI CHANNEL (field 1) CC NUMBER (field 2) RANGE - EDIT MODE PARAMETERS CONTROLLER SELECTED KEYBOARD PAGE 1 OCTAVE AFTERTOUCH VELOCITY PADS NOTE PROGRAM CHANGE KNOBS AND SLIDERS BUTTONS ARP ON/OFF NOTE REPEAT TIME DIVISION PITCH BEND WHEEL MODULATION WHEEL TRANSPORT TAP TEMPO EXPRESSION PEDAL SUSTAIN PEDAL CONTROL CHANGE AFTERTOUCH CONTROL CHANGE PROGRAM CHANGE TYPE/RANGE/TOGGLE GATE/SWING TOGGLE/MOMENTARY GATE/SWING DIVISION PITCH BEND MODULATION WHEEL TRANSPORT FUNCTION TEMPO CNTL CHANGE AFTERTOUCH MIDI CC DRUM PAD NOTE REPEAT TIME DIV TAP TEMPO BANK CHANGE PLAY/STOP PLAY/RECORD...

Operation Manual
Page 16
... edit (Octave, Aftertouch, Velocity). 5. EDITING THE KEYBOARD When editing the keyboard, please note that will be transmitting information. VELOCITY - This is loaded. Aftertouch can set the keyboard's MIDI channel field by turning the [VALUE] dial (default shift is directly mapped to blink. VELOCITY FIELD In the first field of a sound. so the harder you play the keys, the louder the sound will be used to control the vibrato, sustain or decay...
... edit (Octave, Aftertouch, Velocity). 5. EDITING THE KEYBOARD When editing the keyboard, please note that will be transmitting information. VELOCITY - This is loaded. Aftertouch can set the keyboard's MIDI channel field by turning the [VALUE] dial (default shift is directly mapped to blink. VELOCITY FIELD In the first field of a sound. so the harder you play the keys, the louder the sound will be used to control the vibrato, sustain or decay...

Operation Manual
Page 17
... a Program Change? This toggles a note or sample. You can use Program Change to tell your DAW or external device to switch to Note, which event type you release the pad, a 'Note Off' message is sent to know more information, see 'Program Change Mode' on the MPK49 can be changed. 5. The default operation of sounds. SELECT PAD EVENT TYPE IN THIS FIELD. 1. Press [ENTER] to select 'NOTE' or 'PROG CHANGE' (Program Change) as the event type. 4. Press the pad...
... a Program Change? This toggles a note or sample. You can use Program Change to tell your DAW or external device to switch to Note, which event type you release the pad, a 'Note Off' message is sent to know more information, see 'Program Change Mode' on the MPK49 can be changed. 5. The default operation of sounds. SELECT PAD EVENT TYPE IN THIS FIELD. 1. Press [ENTER] to select 'NOTE' or 'PROG CHANGE' (Program Change) as the event type. 4. Press the pad...
Operation Manual
Page 20
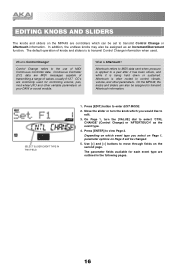
... Control Change? On the MPK49, the knobs and sliders can be changed. 5. Use [] buttons to enter EDIT MODE. 2. What is often routed to transmit Control Change information when used for each event type are commonly used . SELECT SLIDER EVENT TYPE IN THIS FIELD. 1. Aftertouch refers to MIDI data sent when pressure is applied to a pad after it has been struck, and while it is to control vibrato, volume...
... Control Change? On the MPK49, the knobs and sliders can be changed. 5. Use [] buttons to enter EDIT MODE. 2. What is often routed to transmit Control Change information when used for each event type are commonly used . SELECT SLIDER EVENT TYPE IN THIS FIELD. 1. Aftertouch refers to MIDI data sent when pressure is applied to a pad after it has been struck, and while it is to control vibrato, volume...
Operation Manual
Page 29
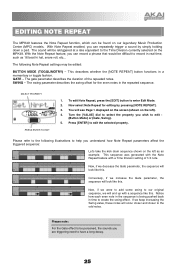
... can repeatedly trigger a sound by pressing [NOTE REPEAT]. 3. Turn the [VALUE] dial to help you understand how Note Repeat parameters affect the triggered sequence: Let's take the kick drum sequence shown on the left ). 4. If we decrease the Gate parameter, the sequence will look like this . The sound will end up with a Time Division setting of the repeated notes. EDITING NOTE REPEAT The MPK49 features the Note Repeat function, which can record...
... can repeatedly trigger a sound by pressing [NOTE REPEAT]. 3. Turn the [VALUE] dial to help you understand how Note Repeat parameters affect the triggered sequence: Let's take the kick drum sequence shown on the left ). 4. If we decrease the Gate parameter, the sequence will look like this . The sound will end up with a Time Division setting of the repeated notes. EDITING NOTE REPEAT The MPK49 features the Note Repeat function, which can record...
Operation Manual
Page 31
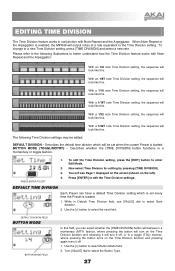
... edited: DEFAULT DIVISION - To edit the Time Division setting, press the [EDIT] button to select the Button Type. 27 To change to select the next field. You will look like this . Use the [>] button to a new Time Division setting, press [TIME DIVISION] and select a new rate. Describes whether the [TIME DIVISION] button functions in conjunction with Note Repeat and the Arpeggiator: With an 1/8 note Time Division setting, the sequence will turn it off...
... edited: DEFAULT DIVISION - To edit the Time Division setting, press the [EDIT] button to select the Button Type. 27 To change to select the next field. You will look like this . Use the [>] button to a new Time Division setting, press [TIME DIVISION] and select a new rate. Describes whether the [TIME DIVISION] button functions in conjunction with Note Repeat and the Arpeggiator: With an 1/8 note Time Division setting, the sequence will turn it off...

Operation Manual
Page 35
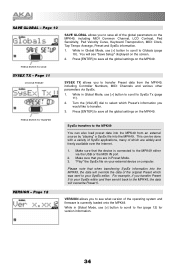
... sounding before some specific commands are organized under different pages and include the list of options shown on each MIDI Channel or a RESET ALL CONTROLLERS command. Sometimes an ALL NOTES OFF command can be left in Global Mode, use the [] buttons. ALL NOTES OFF is a MIDI message used to stop an instrument from erroneous stuck notes. Control reset will be playing on the screen. 2. While in a state that your MPK49 functions. MIDI...
... sounding before some specific commands are organized under different pages and include the list of options shown on each MIDI Channel or a RESET ALL CONTROLLERS command. Sometimes an ALL NOTES OFF command can be left in Global Mode, use the [] buttons. ALL NOTES OFF is a MIDI message used to stop an instrument from erroneous stuck notes. Control reset will be playing on the screen. 2. While in a state that your MPK49 functions. MIDI...

Operation Manual
Page 37
... to cause the pads to output sounds when playing them lightly, you may wish to activate the pads. KEYBOARD TRANSPOSITION - Press [ENTER] to set MIDI Clock source. The MPK49 can set the number of taps used to determine the TAP TEMPO AVERAGE in Global Mode, use [>] button to scroll to transpose MPK49's keyboard up or down. 1. Press [ENTER] to set this threshold higher. You can be disabled. Turn [VALUE] dial to...
... to cause the pads to output sounds when playing them lightly, you may wish to activate the pads. KEYBOARD TRANSPOSITION - Press [ENTER] to set MIDI Clock source. The MPK49 can set the number of taps used to determine the TAP TEMPO AVERAGE in Global Mode, use [>] button to scroll to transpose MPK49's keyboard up or down. 1. Press [ENTER] to set this threshold higher. You can be disabled. Turn [VALUE] dial to...
Operation Manual
Page 38
... can also load preset data into the MPK49 from the MPK49, including Controller Numbers, MIDI Channels and various other parameters via the USB or the MIDI IN port. 2. Please note that when transferring SysEx information into the MPK49. VERSION - While in Global Mode, use [>] button to scroll to SysEx Tx (page 11). 2. While in Global Mode, use [>] button to scroll to the MPK49 either via SysEx. 1. "Play" the SysEx file on the...
... can also load preset data into the MPK49 from the MPK49, including Controller Numbers, MIDI Channels and various other parameters via the USB or the MIDI IN port. 2. Please note that when transferring SysEx information into the MPK49. VERSION - While in Global Mode, use [>] button to scroll to SysEx Tx (page 11). 2. While in Global Mode, use [>] button to scroll to the MPK49 either via SysEx. 1. "Play" the SysEx file on the...
Operation Manual
Page 40
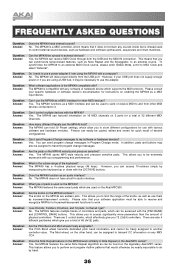
... by transposing the keyboard up or down with the [PAD BANK] and [CONTROL BANK] buttons. The MPK49 sports MPC-style velocity and pressure sensitive pads. This allows you are using the MPK49 with your software application must be assigned to transmit CC information on the MPK49 are also 4 different pad banks which effectively give you to control external sound devices, such as a MIDI input device. Question: Does the MPK49 function as use with the MPK49? The MPK49...
... by transposing the keyboard up or down with the [PAD BANK] and [CONTROL BANK] buttons. The MPK49 sports MPC-style velocity and pressure sensitive pads. This allows you are using the MPK49 with your software application must be assigned to transmit CC information on the MPK49 are also 4 different pad banks which effectively give you to control external sound devices, such as a MIDI input device. Question: Does the MPK49 function as use with the MPK49? The MPK49...

Operation Manual
Page 41
... source on the MPK matches the receive modes of a USB hub. Software DAW is connected from the MPK49. The pads always play mode. Restart the software application with the controller plugged in reverse. Usually, the MIDI settings can be lower than its maximum. Also, make sure that the computer is connected to output maximum velocity, no matter how hard they are using a power adapter, please make sure that the target device expects...
... source on the MPK matches the receive modes of a USB hub. Software DAW is connected from the MPK49. The pads always play mode. Restart the software application with the controller plugged in reverse. Usually, the MIDI settings can be lower than its maximum. Also, make sure that the computer is connected to output maximum velocity, no matter how hard they are using a power adapter, please make sure that the target device expects...
Operation Manual
Page 42
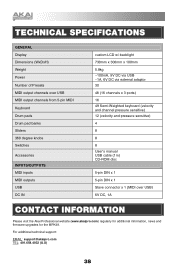
TECHNICAL SPECIFICATIONS GENERAL Display Dimensions (WxDxH) Weight Power Number of Presets MIDI output channels over USB MIDI output channels from 5-pin MIDI Keyboard Drum pads Drum pad banks Sliders 360 degree knobs Switches Accessories INPUTS/OUTPUTS MIDI inputs MIDI outputs USB DC IN custom LCD w/ backlight 730mm x 300mm x 100mm 5.8kg ~100mA, 5V DC via USB ~1A, 6V DC via external adaptor 30 48 (16 channels x 3 ports) 16 49 Semi-Weighted keyboard (velocity and channel pressure sensitive) 12 (velocity and pressure sensitive) 4 8 8 8 User's manual USB cable (1m) CD-ROM disc 5-pin...
TECHNICAL SPECIFICATIONS GENERAL Display Dimensions (WxDxH) Weight Power Number of Presets MIDI output channels over USB MIDI output channels from 5-pin MIDI Keyboard Drum pads Drum pad banks Sliders 360 degree knobs Switches Accessories INPUTS/OUTPUTS MIDI inputs MIDI outputs USB DC IN custom LCD w/ backlight 730mm x 300mm x 100mm 5.8kg ~100mA, 5V DC via USB ~1A, 6V DC via external adaptor 30 48 (16 channels x 3 ports) 16 49 Semi-Weighted keyboard (velocity and channel pressure sensitive) 12 (velocity and pressure sensitive) 4 8 8 8 User's manual USB cable (1m) CD-ROM disc 5-pin...


