
Operation Manual
Page 3
... OVERVIEW 3 HOOKUP DIAGRAM ...4 DISPLAYING INFORMATION 6 OCTAVE AND TRANSPOSITION 6 NOTE ...6 NOTE AFTERTOUCH (Channel Pressure 6 CONTROL CHANGE 6 CONTROL AFTERTOUCH 7 MIDI MACHINE CONTROL COMMAND (MMC 7 PREVIEWING ...7 ABOUT MODES ...8 PRESET MODE ...9 PAGE 1 - GATE, SWING 24 EDITING NOTE REPEAT 25 NOTE REPEAT... BUTTON MODE 26 NOTE REPEAT PARAMETERS - Page 4 32 PAD VELOCITY CURVE - Page1 31 MIDI COMMON CHANNEL - Page 6 33 KEYBOARD TRANSPOSITION - Page 8 33 TAP TEMPO AVERAGE - LOAD PRESET 9 PAGE 2 - Page 9 33 SAVE GLOBAL...
... OVERVIEW 3 HOOKUP DIAGRAM ...4 DISPLAYING INFORMATION 6 OCTAVE AND TRANSPOSITION 6 NOTE ...6 NOTE AFTERTOUCH (Channel Pressure 6 CONTROL CHANGE 6 CONTROL AFTERTOUCH 7 MIDI MACHINE CONTROL COMMAND (MMC 7 PREVIEWING ...7 ABOUT MODES ...8 PRESET MODE ...9 PAGE 1 - GATE, SWING 24 EDITING NOTE REPEAT 25 NOTE REPEAT... BUTTON MODE 26 NOTE REPEAT PARAMETERS - Page 4 32 PAD VELOCITY CURVE - Page1 31 MIDI COMMON CHANNEL - Page 6 33 KEYBOARD TRANSPOSITION - Page 8 33 TAP TEMPO AVERAGE - LOAD PRESET 9 PAGE 2 - Page 9 33 SAVE GLOBAL...

Operation Manual
Page 5
The display is pressed down. 3. [] BUTTONS - The [ This dial also functions as an [ENTER] button when it is used for navigating menus, displaying data, and affecting change on MPK49's options and parameters. 2. [VALUE] (Push to Enter) - These buttons are used to navigate through the fields of menus and options. This dial is used to increment and decrement Presets, parameter values and settings. FRONT PANEL OVERVIEW 1. LCD -
The display is pressed down. 3. [] BUTTONS - The [ This dial also functions as an [ENTER] button when it is used for navigating menus, displaying data, and affecting change on MPK49's options and parameters. 2. [VALUE] (Push to Enter) - These buttons are used to navigate through the fields of menus and options. This dial is used to increment and decrement Presets, parameter values and settings. FRONT PANEL OVERVIEW 1. LCD -
Operation Manual
Page 6
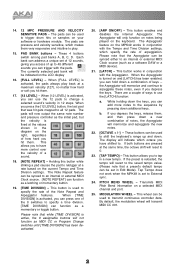
.... 18. [NOTE REPEAT] - While holding down the keys, you have more notes to External sync. 24. Tap Tempo does not work when the MPK49 is used to 48 different sounds you can press one of up and down a new combination of notes, the Arpeggiator will indicate which octave you... The Note Repeat feature can hold down additional keys. This button is set in a new tempo. The Arpeggiator will transmit MIDI CC #01. 2 The Arpeggiator feature on the MPK49 works in the diagram on and [LATCH] has been enabled, you to have shifted to transmit continuous controller data. This ...
.... 18. [NOTE REPEAT] - While holding down the keys, you have more notes to External sync. 24. Tap Tempo does not work when the MPK49 is used to 48 different sounds you can press one of up and down a new combination of notes, the Arpeggiator will indicate which octave you... The Note Repeat feature can hold down additional keys. This button is set in a new tempo. The Arpeggiator will transmit MIDI CC #01. 2 The Arpeggiator feature on the MPK49 works in the diagram on and [LATCH] has been enabled, you to have shifted to transmit continuous controller data. This ...

Operation Manual
Page 7
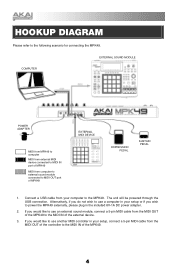
... cable into this restraint to power the MPK49 through the USB connection. 2. Use a five-pin MIDI cable to connect the MIDI OUT of the MPK49 to this input. SUSTAIN PEDAL - Connect a ¼" TS sustain pedal to the MIDI IN of the MPK49. 6. We recommend using the Alesis F2... expression pedals. 3 POWER ADAPTER RESTRAINT - MIDI IN - MIDI OUT - Connect a ¼" TRS expression pedal to the MPK49. We recommend using the Alesis Sustain Pedal. 7. The ...
... cable into this restraint to power the MPK49 through the USB connection. 2. Use a five-pin MIDI cable to connect the MIDI OUT of the MPK49 to this input. SUSTAIN PEDAL - Connect a ¼" TS sustain pedal to the MIDI IN of the MPK49. 6. We recommend using the Alesis F2... expression pedals. 3 POWER ADAPTER RESTRAINT - MIDI IN - MIDI OUT - Connect a ¼" TRS expression pedal to the MPK49. We recommend using the Alesis Sustain Pedal. 7. The ...
Operation Manual
Page 8
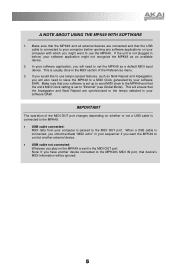
... a USB cable from your setup or if you would like to the MPK49. If you wish to power the MPK49 externally, please plug in your setup, connect a 5-pin MIDI cable from the MIDI OUT of the MPK49 to the MIDI IN of MPK49 MIDI from computer to external sound module connected to the following scenario for connecting the...
... a USB cable from your setup or if you would like to the MPK49. If you wish to power the MPK49 externally, please plug in your setup, connect a 5-pin MIDI cable from the MIDI OUT of the MPK49 to the MIDI IN of MPK49 MIDI from computer to external sound module connected to the following scenario for connecting the...
Operation Manual
Page 9
... to "External" (see Global Mode). In your software application, you will need to slave the MPK49 to a MIDI Clock generated by your software application might want the MPK49 to the MIDI OUT port. This is usually done in before opening any software applications on your computer with which ...you have another device connected to the MPK49's MIDI IN port, that the Arpeggiator and Beat Repeat are connected and that the unit's MIDI Clock setting is sent to control another external device. • USB cable not connected: ...
... to "External" (see Global Mode). In your software application, you will need to slave the MPK49 to a MIDI Clock generated by your software application might want the MPK49 to the MIDI OUT port. This is usually done in before opening any software applications on your computer with which ...you have another device connected to the MPK49's MIDI IN port, that the Arpeggiator and Beat Repeat are connected and that the unit's MIDI Clock setting is sent to control another external device. • USB cable not connected: ...
Operation Manual
Page 10
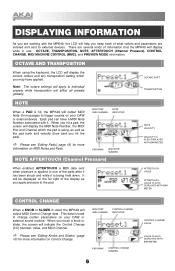
...of information that the MPK49 will display the MIDI Note Number, the MIDI Port and Channel which you may have a MIDI Note Number associated with the MPK49, the LCD will help you keep track of what values and parameters are working with it is used , the MPK49 will affect all ... When a KNOB or SLIDER is hit, the MPK49 will indicate the Control Change (CC) Number, value, and MIDI Channel. Note: The octave settings will apply to individual presets while transposition will output MIDI Control Change data. PAD BANK MIDI NOTE NUMBER NOTE AFTERTOUCH (Channel Pressure) NOTE VELOCITY...
...of information that the MPK49 will display the MIDI Note Number, the MIDI Port and Channel which you may have a MIDI Note Number associated with the MPK49, the LCD will help you keep track of what values and parameters are working with it is used , the MPK49 will affect all ... When a KNOB or SLIDER is hit, the MPK49 will indicate the Control Change (CC) Number, value, and MIDI Channel. Note: The octave settings will apply to individual presets while transposition will output MIDI Control Change data. PAD BANK MIDI NOTE NUMBER NOTE AFTERTOUCH (Channel Pressure) NOTE VELOCITY...

Operation Manual
Page 11
... readout on the right. Now you switch over your parameters and helps avoid erroneous controller data being used to send three different MIDI CC numbers, depending on the MPK49 sends an MMCPLAY message to a connected multi-track recorder, which will now give you a nice starting point at 80 (instead...you to see 'Editing Knobs and Sliders' (page 16) for more information on the MPK49, the deck also stops. To prevent this, you can release the [PREVIEW] button. While in control bank B. Adjusting S1 (MIDI CC#10) will be shown in Preview mode. PREVIEWING When the [PREVIEW] button is...
... readout on the right. Now you switch over your parameters and helps avoid erroneous controller data being used to send three different MIDI CC numbers, depending on the MPK49 sends an MMCPLAY message to a connected multi-track recorder, which will now give you a nice starting point at 80 (instead...you to see 'Editing Knobs and Sliders' (page 16) for more information on the MPK49, the deck also stops. To prevent this, you can release the [PREVIEW] button. While in control bank B. Adjusting S1 (MIDI CC#10) will be shown in Preview mode. PREVIEWING When the [PREVIEW] button is...
Operation Manual
Page 12
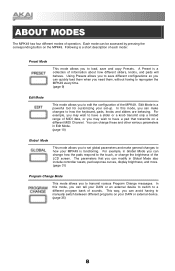
...(page 9) Edit Mode This mode allows you can tell your MPK49 is functioning. Using Presets allows you to save and copy Presets. This way, you can quickly load them when you need them, without having to a different program bank of MIDI data, or you may wish to have a pad that you... for customizing your set global parameters and make changes to edit the configuration of the LCD screen. Each mode can change the brightness of the MPK49. In this mode, you to how the keyboard, pads, knobs and sliders are behaving. Following is a collection of operation. You can be accessed...
...(page 9) Edit Mode This mode allows you can tell your MPK49 is functioning. Using Presets allows you to save and copy Presets. This way, you can quickly load them when you need them, without having to a different program bank of MIDI data, or you may wish to have a pad that you... for customizing your set global parameters and make changes to edit the configuration of the LCD screen. Each mode can change the brightness of the MPK49. In this mode, you to how the keyboard, pads, knobs and sliders are behaving. Following is a collection of operation. You can be accessed...
Operation Manual
Page 15
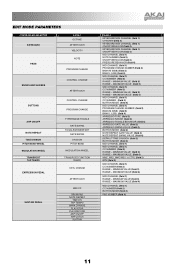
...MINIMUM VALUE (field 3) RANGE - MINIMUM VALUE (field 3) RANGE - MAXIMUM VALUE (field 4) MMC, MIDI, MMC/MIDI, or CTRL (field 2) BPM (field 2) MIDI CHANNEL (field 1) CC NUMBER (field 2) RANGE - MAXIMUM VALUE (field 4) MIDI CHANNEL (field 1) RANGE - EDIT MODE PARAMETERS CONTROLLER SELECTED KEYBOARD PAGE 1 OCTAVE AFTERTOUCH VELOCITY PADS NOTE .../RANGE/TOGGLE GATE/SWING TOGGLE/MOMENTARY GATE/SWING DIVISION PITCH BEND MODULATION WHEEL TRANSPORT FUNCTION TEMPO CNTL CHANGE AFTERTOUCH MIDI CC DRUM PAD NOTE REPEAT TIME DIV TAP TEMPO BANK CHANGE PLAY/STOP PLAY/RECORD ARP ON/OFF ARP LATCH SUSTAIN...
...MINIMUM VALUE (field 3) RANGE - MINIMUM VALUE (field 3) RANGE - MAXIMUM VALUE (field 4) MMC, MIDI, MMC/MIDI, or CTRL (field 2) BPM (field 2) MIDI CHANNEL (field 1) CC NUMBER (field 2) RANGE - MAXIMUM VALUE (field 4) MIDI CHANNEL (field 1) RANGE - EDIT MODE PARAMETERS CONTROLLER SELECTED KEYBOARD PAGE 1 OCTAVE AFTERTOUCH VELOCITY PADS NOTE .../RANGE/TOGGLE GATE/SWING TOGGLE/MOMENTARY GATE/SWING DIVISION PITCH BEND MODULATION WHEEL TRANSPORT FUNCTION TEMPO CNTL CHANGE AFTERTOUCH MIDI CC DRUM PAD NOTE REPEAT TIME DIV TAP TEMPO BANK CHANGE PLAY/STOP PLAY/RECORD ARP ON/OFF ARP LATCH SUSTAIN...

Operation Manual
Page 16
...to "On"). Turn the [VALUE] dial to turn Aftertouch "On" or "Off" (default is set to "0"). AFTERTOUCH - When set to "Off", MPK49 will output a constant MIDI velocity, no matter how hard the keys are struck. When set to "On", the keyboard will detect how hard the keys are pressed and... set to the keyboard when the current Preset is the default octave shift that the changes will affect all the keys on the MPK49 can be set the keyboard's MIDI channel field by turning the [VALUE] dial. When finished, press [ENTER] to return to Page 1. 12 When finished, press [...
...to "On"). Turn the [VALUE] dial to turn Aftertouch "On" or "Off" (default is set to "0"). AFTERTOUCH - When set to "Off", MPK49 will output a constant MIDI velocity, no matter how hard the keys are struck. When set to "On", the keyboard will detect how hard the keys are pressed and... set to the keyboard when the current Preset is the default octave shift that the changes will affect all the keys on the MPK49 can be set the keyboard's MIDI channel field by turning the [VALUE] dial. When finished, press [ENTER] to return to Page 1. 12 When finished, press [...

Operation Manual
Page 17
... information when they are collections of samples or instruments. What is sent. Most often, these programs are hit. EDITING THE PADS The pads on the MPK49 can use Program Change to tell your DAW or external device. What is hit it will be set up to transmit Program Change information, which... fields on your DAW or external device to switch to start and stop the note or sample. The default operation of sounds. A Note Message is a MIDI message that when a pad is a Note Message?
... information when they are collections of samples or instruments. What is sent. Most often, these programs are hit. EDITING THE PADS The pads on the MPK49 can use Program Change to tell your DAW or external device. What is hit it will be set up to transmit Program Change information, which... fields on your DAW or external device to switch to start and stop the note or sample. The default operation of sounds. A Note Message is a MIDI message that when a pad is a Note Message?

Operation Manual
Page 18
..., A or B, and to select desired MIDI Port and Channel. 3. MIDI CHANNEL FIELD MIDI PORT/CHANNEL FIELD This field sets the MIDI Port and Channel which the pad will transmit MIDI information via USB, only pads assigned to trigger sounds based on the back of the MPK49. NOTE PARAMETERS The following list of parameters can be accessed...
..., A or B, and to select desired MIDI Port and Channel. 3. MIDI CHANNEL FIELD MIDI PORT/CHANNEL FIELD This field sets the MIDI Port and Channel which the pad will transmit MIDI information via USB, only pads assigned to trigger sounds based on the back of the MPK49. NOTE PARAMETERS The following list of parameters can be accessed...

Operation Manual
Page 19
... to set to select desired value. 3. PROGRAM CHANGE PARAMETERS The following list of parameters can be sent on one of two MIDI Ports, A or B, and one of 16 MIDI Channels on each port (i.e. This will transmit when it is set Bank M and Bank L to send Program Change messages only..., without specifying Bank M and Bank L. BANK L FIELD Note: You can be accessed if the pad event type is pressed. 1. MIDI CHANNEL FIELD MIDI PORT/CHANNEL FIELD Program Change messages can also configure pads to 'OFF' (beyond 000). Use the [] buttons to select Bank M field. 2.
... to set to select desired value. 3. PROGRAM CHANGE PARAMETERS The following list of parameters can be sent on one of two MIDI Ports, A or B, and one of 16 MIDI Channels on each port (i.e. This will transmit when it is set Bank M and Bank L to send Program Change messages only..., without specifying Bank M and Bank L. BANK L FIELD Note: You can be accessed if the pad event type is pressed. 1. MIDI CHANNEL FIELD MIDI PORT/CHANNEL FIELD Program Change messages can also configure pads to 'OFF' (beyond 000). Use the [] buttons to select Bank M field. 2.
Operation Manual
Page 20
...data are outlined in the following pages. 16 CC's are commonly used . Aftertouch refers to MIDI data sent when pressure is to transmit Control Change information when used for each event type are MIDI messages capable of transmitting a range of knobs and sliders is applied to enter EDIT MODE. ... is often routed to view Page 2. On Page 1, turn the knob which event type you would like to the use of MIDI Continuous Controller data. On the MPK49, the knobs and sliders can be changed. 5. Aftertouch is being held down or sustained. Press [ENTER] to control vibrato, volume...
...data are outlined in the following pages. 16 CC's are commonly used . Aftertouch refers to MIDI data sent when pressure is to transmit Control Change information when used for each event type are MIDI messages capable of transmitting a range of knobs and sliders is applied to enter EDIT MODE. ... is often routed to view Page 2. On Page 1, turn the knob which event type you would like to the use of MIDI Continuous Controller data. On the MPK49, the knobs and sliders can be changed. 5. Aftertouch is being held down or sustained. Press [ENTER] to control vibrato, volume...

Operation Manual
Page 21
... knob or slider to behave inversely. While in that the knob or slider can assign knobs and sliders to one of 16 MIDI Channels on the back of the MPK49. Therefore, it is controlling. Use the [] buttons to select Minimum Range field. 2. Use [] buttons to select Maximum Range field. 2. While ..., etc.). For example, if you will see how much sense to have MAXIMUM RANGE FIELD MAXIMUM RANGE FIELD This field is used via the 5-pin MIDI port on each port (i.e. A14). While in Maximum Range field, use [VALUE] dial to select the next field. Use the [>] button to select ...
... knob or slider to behave inversely. While in that the knob or slider can assign knobs and sliders to one of 16 MIDI Channels on the back of the MPK49. Therefore, it is controlling. Use the [] buttons to select Minimum Range field. 2. Use [] buttons to select Maximum Range field. 2. While ..., etc.). For example, if you will see how much sense to have MAXIMUM RANGE FIELD MAXIMUM RANGE FIELD This field is used via the 5-pin MIDI port on each port (i.e. A14). While in Maximum Range field, use [VALUE] dial to select the next field. Use the [>] button to select ...

Operation Manual
Page 22
...will be transmitting Aftertouch information which the knob or slider will be used to control, say, a vibrato of the MPK49. MIDI CHANNEL FIELD MIDI PORT/CHANNEL FIELD This field sets the MIDI Port and Channel which could be transmitted via USB, only knobs and sliders assigned to port A will use to ...transmit messages. Note: When not used to specify the maximum value that the MPK49 is used via the 5-pin MIDI port on each port (i.e. Use the [] buttons to select the next field. While in Minimum Range field, use [VALUE] dial ...
...will be transmitting Aftertouch information which the knob or slider will be used to control, say, a vibrato of the MPK49. MIDI CHANNEL FIELD MIDI PORT/CHANNEL FIELD This field sets the MIDI Port and Channel which could be transmitted via USB, only knobs and sliders assigned to port A will use to ...transmit messages. Note: When not used to specify the maximum value that the MPK49 is used via the 5-pin MIDI port on each port (i.e. Use the [] buttons to select the next field. While in Minimum Range field, use [VALUE] dial ...

Operation Manual
Page 23
... desired value. Use the [] buttons to select the next field. You can also assign a knob or slider to use [VALUE] dial to one of the MPK49. Use the [] button to select Bank L field. 2. Note: When not used as opposed to select desired value. 3. BANK M FIELD BANK L FIELD Bank L describes ... that the implementation of NRPN functions depends strictly on the software with which the knob will be transmitted via the 5-pin MIDI port on the back of 16 MIDI Channels on the MPK49 may also be used via USB, only knobs assigned to port A will be using the MP49. While in Bank M...
... desired value. Use the [] buttons to select the next field. You can also assign a knob or slider to use [VALUE] dial to one of the MPK49. Use the [] button to select Bank L field. 2. Note: When not used as opposed to select desired value. 3. BANK M FIELD BANK L FIELD Bank L describes ... that the implementation of NRPN functions depends strictly on the software with which the knob will be transmitted via the 5-pin MIDI port on the back of 16 MIDI Channels on the MPK49 may also be used via USB, only knobs assigned to port A will be using the MP49. While in Bank M...
Operation Manual
Page 24
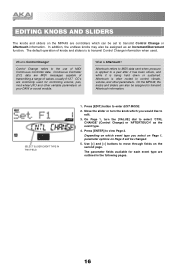
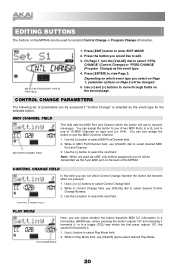
... [VALUE] dial to select desired Play Mode. 20 EDITING BUTTONS The buttons on the MPK49 can be used via USB, only buttons assigned to port A will be transmitted via the 5-pin MIDI port on the back of the MPK49. Press [ENTER] to select Play Mode field. 2. Note: When not used to transmit ...Control Change or Program Change information. You can assign the button to one of two MIDI Ports, A or B, and to edit. 3. CONTROL CHANGE ...
... [VALUE] dial to select desired Play Mode. 20 EDITING BUTTONS The buttons on the MPK49 can be used via USB, only buttons assigned to port A will be transmitted via the 5-pin MIDI port on the back of the MPK49. Press [ENTER] to select Play Mode field. 2. Note: When not used to transmit ...Control Change or Program Change information. You can assign the button to one of two MIDI Ports, A or B, and to edit. 3. CONTROL CHANGE ...
Operation Manual
Page 25
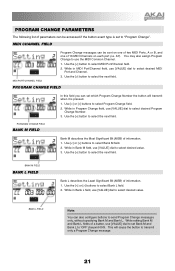
You may also assign Program Change to use [VALUE] dial to select desired value. While in Bank L field, use the MIDI Common Channel. 1. While editing Bank M and Bank L fields of a button, use [VALUE] dial to select desired Program Change Number. 3. Use the [] button to ... the next field. PROGRAM CHANGE PARAMETERS The following list of parameters can be sent on one of two MIDI Ports, A or B, and one of 16 MIDI Channels on each port (i.e. MIDI CHANNEL FIELD MIDI PORT/CHANNEL FIELD Program Change messages can be accessed if the button event type is pressed. 1. PROGRAM ...
You may also assign Program Change to use [VALUE] dial to select desired value. While in Bank L field, use the MIDI Common Channel. 1. While editing Bank M and Bank L fields of a button, use [VALUE] dial to select desired Program Change Number. 3. Use the [] button to ... the next field. PROGRAM CHANGE PARAMETERS The following list of parameters can be sent on one of two MIDI Ports, A or B, and one of 16 MIDI Channels on each port (i.e. MIDI CHANNEL FIELD MIDI PORT/CHANNEL FIELD Program Change messages can be accessed if the button event type is pressed. 1. PROGRAM ...

