
User Manual
Page 3
... Before making a call 25 Making a call 26 Dialing a number from Call History 26 Viewing missed calls 27 Making a call to one of your contacts........ 27 Dialing an international number 27 Direct dial widget 28 The voice call screen 28 Answering or declining a call 28 Messaging 30 Creating a new message 30 Replying to a message 31 Multimedia messages 32 Receiving multimedia messages 32 Going online 33 Browsing the internet 33 Using the browser 33 Setting up Email 34 Google services 34 Setting up your Google email 34 Voice search 35 Play...
... Before making a call 25 Making a call 26 Dialing a number from Call History 26 Viewing missed calls 27 Making a call to one of your contacts........ 27 Dialing an international number 27 Direct dial widget 28 The voice call screen 28 Answering or declining a call 28 Messaging 30 Creating a new message 30 Replying to a message 31 Multimedia messages 32 Receiving multimedia messages 32 Going online 33 Browsing the internet 33 Using the browser 33 Setting up Email 34 Google services 34 Setting up your Google email 34 Voice search 35 Play...
User Manual
Page 4
... contents Restoring to factory settings 69 Accessories and tips 70 Using the headset 70 Using a Bluetooth headset 70 Creating a new access point 70 Inserting a microSD card 71 Managing your SIM cards 72 SIM Management 72 Appendix 75 FAQ and troubleshooting 75 Other sources of help 77 Warnings and precautions 78 Medical devices 79 Vehicles 80 Potentially explosive environments........... 80 Emergency calls 81 Taking care of your smartphone 81 Specifications...
... contents Restoring to factory settings 69 Accessories and tips 70 Using the headset 70 Using a Bluetooth headset 70 Creating a new access point 70 Inserting a microSD card 71 Managing your SIM cards 72 SIM Management 72 Appendix 75 FAQ and troubleshooting 75 Other sources of help 77 Warnings and precautions 78 Medical devices 79 Vehicles 80 Potentially explosive environments........... 80 Emergency calls 81 Taking care of your smartphone 81 Specifications...
User Manual
Page 6
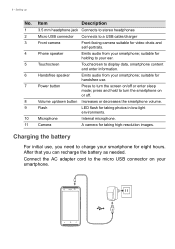
... battery as needed. Setting up /down button Increases or decreases the smartphone volume. 9 Flash LED flash for taking photos in low-light environments. 10 Microphone Internal microphone. 11 Camera A camera for video chats and self-portraits. 4 Phone speaker Emits audio from your smartphone. Item Description 1 3.5 mm headphone jack Connects to stereo headphones 2 Micro USB connector Connects to turn the smartphone on your smartphone; Charging the battery For initial use . 7 Power button Press to a USB...
... battery as needed. Setting up /down button Increases or decreases the smartphone volume. 9 Flash LED flash for taking photos in low-light environments. 10 Microphone Internal microphone. 11 Camera A camera for video chats and self-portraits. 4 Phone speaker Emits audio from your smartphone. Item Description 1 3.5 mm headphone jack Connects to stereo headphones 2 Micro USB connector Connects to turn the smartphone on your smartphone; Charging the battery For initial use . 7 Power button Press to a USB...

User Manual
Page 9
... used to synchronize your contact list, email, calendar and other information.Open the Apps menu and then tap Settings > Add account. Follow the onscreen instructions to complete the synchronization process. Activating a new SIM card If you will be required to enter your PIN each time you may create or sign in to or create a Google account If you have Internet access, your Using your smartphone - 9 USING YOUR SMARTPHONE Turning on for the first time To turn...
... used to synchronize your contact list, email, calendar and other information.Open the Apps menu and then tap Settings > Add account. Follow the onscreen instructions to complete the synchronization process. Activating a new SIM card If you will be required to enter your PIN each time you may create or sign in to or create a Google account If you have Internet access, your Using your smartphone - 9 USING YOUR SMARTPHONE Turning on for the first time To turn...

User Manual
Page 11
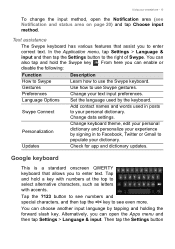
... smartphone uses a touchscreen for entering text. Use your finger on page 12. Changing the text input method To change the input method: 1. Your new smartphone has the Swype keyboard set as the default for selecting items and entering information. Tap: Touch the screen once to see recently opened apps. Tap and hold an item to open it. Scroll: To scroll up or down the screen in its own window...
... smartphone uses a touchscreen for entering text. Use your finger on page 12. Changing the text input method To change the input method: 1. Your new smartphone has the Swype keyboard set as the default for selecting items and entering information. Tap: Touch the screen once to see recently opened apps. Tap and hold an item to open it. Scroll: To scroll up or down the screen in its own window...
User Manual
Page 13
... holding the forward slash key. Preferences Change your dictionary. Using your smartphone - 13 To change the input method, open the Apps menu and then tap Settings > Language & input. Use how to your experience by the keyboard. Personalization Updates Change keyboard theme, edit your personal dictionary and personalize your personal dictionary. Then tap the Settings button Text assistance The Swype keyboard has various features that allows you can enable or disable the following...
... holding the forward slash key. Preferences Change your dictionary. Using your smartphone - 13 To change the input method, open the Apps menu and then tap Settings > Language & input. Use how to your experience by the keyboard. Personalization Updates Change keyboard theme, edit your personal dictionary and personalize your personal dictionary. Then tap the Settings button Text assistance The Swype keyboard has various features that allows you can enable or disable the following...

User Manual
Page 22
... button to launch the Google Play Music app. Short press the AcerRAPID button to launch the camera app. To change the app for the short press function, access the Apps menu and tap Settings > AcerRAPID > Short press and choose an app. The AcerRAPID button also allows you to answer incoming calls quickly without needing to enable or disable AcerRAPID. 22 - Tap the ON/OFF switch to touch the screen. While the camera app is located directly below the camera. Using...
... button to launch the Google Play Music app. Short press the AcerRAPID button to launch the camera app. To change the app for the short press function, access the Apps menu and tap Settings > AcerRAPID > Short press and choose an app. The AcerRAPID button also allows you to answer incoming calls quickly without needing to enable or disable AcerRAPID. 22 - Tap the ON/OFF switch to touch the screen. While the camera app is located directly below the camera. Using...
User Manual
Page 27
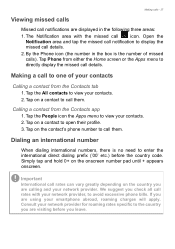
... the contact's phone number to call them . Making calls - 27 Viewing missed calls Missed call details. Tap Phone from either the Home screen or the Apps menu to directly display the missed call notifications are displayed in the box is no need to the country you are visiting before the country code. Consult your network provider for roaming rates specific to enter the international direct dialing prefix ('00' etc.) before you are using your network provider. Open the Notification...
... the contact's phone number to call them . Making calls - 27 Viewing missed calls Missed call details. Tap Phone from either the Home screen or the Apps menu to directly display the missed call notifications are displayed in the box is no need to the country you are visiting before the country code. Consult your network provider for roaming rates specific to enter the international direct dialing prefix ('00' etc.) before you are using your network provider. Open the Notification...

User Manual
Page 28
... display more Quick Settings options(see Notification and status area on page 20). You can minimize the call window to appear as the default voice call When you will be able to select a contact to activate (green means Float caller is "ON"). Answering or declining a call screen. Open the Apps menu, then tap the Widgets tab. Ending a call To end a call, tap from the voice call , tap the appropriate icon and slide your Home screen...
... display more Quick Settings options(see Notification and status area on page 20). You can minimize the call window to appear as the default voice call When you will be able to select a contact to activate (green means Float caller is "ON"). Answering or declining a call screen. Open the Apps menu, then tap the Widgets tab. Ending a call To end a call, tap from the voice call , tap the appropriate icon and slide your Home screen...
User Manual
Page 29
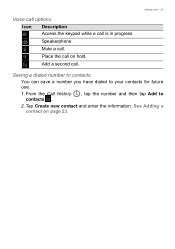
Mute a call is in progress. Tap Create new contact and enter the information. Voice call options Icon Description Access the keypad while a call . Place the call . Speakerphone. Add a second call on page 23. From the Call History contacts . , tap the number and then tap Add to your contacts for future use. 1. See Adding a contact on hold. Making calls - 29 Saving a dialed number to contacts You can save a number you have dialed to 2.
Mute a call is in progress. Tap Create new contact and enter the information. Voice call options Icon Description Access the keypad while a call . Place the call . Speakerphone. Add a second call on page 23. From the Call History contacts . , tap the number and then tap Add to your contacts for future use. 1. See Adding a contact on hold. Making calls - 29 Saving a dialed number to contacts You can save a number you have dialed to 2.

User Manual
Page 32
... a file, tap . Receiving multimedia messages When a new multimedia message arrives, a message icon appears at the top of the message. If you can send MMS messages. Tap View to manually set up the MMS profile. Ask your network provider for you have any questions. 3. 32 - Downloads can be presented with a menu of the message. 2. Each message can take a long time, depending on information retrieved from your connection quality. The notification message displays a summary of the screen and a notification message is displayed. 1.
... a file, tap . Receiving multimedia messages When a new multimedia message arrives, a message icon appears at the top of the message. If you can send MMS messages. Tap View to manually set up the MMS profile. Ask your network provider for you have any questions. 3. 32 - Downloads can be presented with a menu of the message. 2. Each message can take a long time, depending on information retrieved from your connection quality. The notification message displays a summary of the screen and a notification message is displayed. 1.

User Manual
Page 35
... and troubleshooting on the Home screen. Here you can send text messages, place calls, send emails, find directions of your voice. Tap . 4. Tap Voice Search from the Apps menu, or tap the microphone icon on page 75 Tap Play Store from the Apps menu to enhance the functionality of establishments, automatically call establishments, search the internet and even send a note to a data or Wi-Fi connection. 2. Enter the recipient's email address, the subject and message. 5. The...
... and troubleshooting on the Home screen. Here you can send text messages, place calls, send emails, find directions of your voice. Tap . 4. Tap Voice Search from the Apps menu, or tap the microphone icon on page 75 Tap Play Store from the Apps menu to enhance the functionality of establishments, automatically call establishments, search the internet and even send a note to a data or Wi-Fi connection. 2. Enter the recipient's email address, the subject and message. 5. The...
User Manual
Page 55
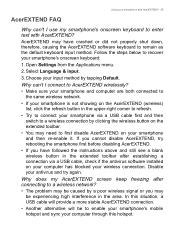
... after establishing a connection via a USB cable first and then switch to a wireless connection by clicking the wireless button on the extended toolbar. • You may be caused by tapping Default. If you cannot disable AcerEXTEND, try again. Disable your smartphone with AcerEXTEND? Choose your smartphone and then re-enable it. Open Settings from the Applications menu. 2. Why can 't I use my smartphone's onscreen keyboard to enter text with AcerEXTEND...
... after establishing a connection via a USB cable first and then switch to a wireless connection by clicking the wireless button on the extended toolbar. • You may be caused by tapping Default. If you cannot disable AcerEXTEND, try again. Disable your smartphone with AcerEXTEND? Choose your smartphone and then re-enable it. Open Settings from the Applications menu. 2. Why can 't I use my smartphone's onscreen keyboard to enter text with AcerEXTEND...

User Manual
Page 60
Advanced settings Adjusting settings Activating or deactivating connections Open the Apps menu and tap Settings to manage your connection settings. Change Internet Call settings. Set Proximity Sensor. Change Voice Call settings. Turn Float Caller on or off. Turn Flip Mute on or off . Turn the Wi-Fi function on or off . Turn the Bluetooth function on or off , set roaming preferences and associate contacts with a SIM. View an estimate of the mobile data used for particular functions (such as voice calling or messaging), turn the data connection on or off...
Advanced settings Adjusting settings Activating or deactivating connections Open the Apps menu and tap Settings to manage your connection settings. Change Internet Call settings. Set Proximity Sensor. Change Voice Call settings. Turn Float Caller on or off. Turn Flip Mute on or off . Turn the Wi-Fi function on or off . Turn the Bluetooth function on or off , set roaming preferences and associate contacts with a SIM. View an estimate of the mobile data used for particular functions (such as voice calling or messaging), turn the data connection on or off...

User Manual
Page 63
...You can also view and modify these settings manually through the Call settings screen. Tap Select automatically to connect to the available network with your provider and automatically obtain all necessary settings, such as network name, voice mail and text message center numbers. Access data usage settings from the list generated. Note When you insert a new SIM card. Open the Apps menu and tap Settings > More... > Mobile networks > Network operators > Select Manually. 2. Smartphone settings Many smartphone settings are traveling, manually selecting a network may help to your...
...You can also view and modify these settings manually through the Call settings screen. Tap Select automatically to connect to the available network with your provider and automatically obtain all necessary settings, such as network name, voice mail and text message center numbers. Access data usage settings from the list generated. Note When you insert a new SIM card. Open the Apps menu and tap Settings > More... > Mobile networks > Network operators > Select Manually. 2. Smartphone settings Many smartphone settings are traveling, manually selecting a network may help to your...
User Manual
Page 65
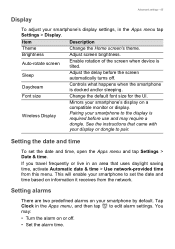
Adjust screen brightness. Change the default font size for the UI. Pairing your smartphone to set the date and time, open the Apps menu and tap Settings > Date & time. See the instructions that uses daylight saving time, activate Automatic date & time > Use network-provided time from the network. Adjust the delay before use and may : • Turn the alarm on information it receives from this menu. Setting the date and time To set the date and time based on or...
Adjust screen brightness. Change the default font size for the UI. Pairing your smartphone to set the date and time, open the Apps menu and tap Settings > Date & time. See the instructions that uses daylight saving time, activate Automatic date & time > Use network-provided time from the network. Adjust the delay before use and may : • Turn the alarm on information it receives from this menu. Setting the date and time To set the date and time based on or...
User Manual
Page 66
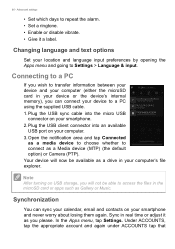
... again under ACCOUNTS tap that Plug the USB sync cable into an available USB port on your location and language input preferences by opening the Apps menu and going to repeat the alarm. • Set a ringtone. • Enable or disable vibrate. • Give it as a Media device (MTP) (the default option) or Camera (PTP). Sync in real time or adjust it a label. Open the notification area and tap Connected as Gallery or Music. Connecting to a PC...
... again under ACCOUNTS tap that Plug the USB sync cable into an available USB port on your location and language input preferences by opening the Apps menu and going to repeat the alarm. • Set a ringtone. • Enable or disable vibrate. • Give it as a Media device (MTP) (the default option) or Camera (PTP). Sync in real time or adjust it a label. Open the notification area and tap Connected as Gallery or Music. Connecting to a PC...

User Manual
Page 72
... Change to quickly and easily recognize which SIM is for models with more than one SIM card. Set the default SIM for each SIM. SIM Management Open the Apps menu and tap Settings > SIM management. General settings for 3G data. From this screen, you can also access the SIM Management functions by opening the Apps menu and tapping Settings > SIM management. It indicates the following information: 1. Configure each SIM's name, phone number, display numbers, and assign a color to use for voice calls, messaging, data connection, and 3G service...
... Change to quickly and easily recognize which SIM is for models with more than one SIM card. Set the default SIM for each SIM. SIM Management Open the Apps menu and tap Settings > SIM management. General settings for 3G data. From this screen, you can also access the SIM Management functions by opening the Apps menu and tapping Settings > SIM management. It indicates the following information: 1. Configure each SIM's name, phone number, display numbers, and assign a color to use for voice calls, messaging, data connection, and 3G service...

User Manual
Page 73
Selecting which SIM to use when sending a text message If you have set Messaging to Always ask, you will be asked which SIM to use each time you send a text message. Managing your SIM cards - 73 Selecting which SIM to use when making a call If you have set Voice call to Always ask, you will be asked which SIM to use each time you make call. Enter the message and recipient information, then tap Send. Enter the number, then tap . tap the SIM to use and the call will be connected. tap the SIM to use and the message will be sent. A dialog opens; A dialog opens;
Selecting which SIM to use when sending a text message If you have set Messaging to Always ask, you will be asked which SIM to use each time you send a text message. Managing your SIM cards - 73 Selecting which SIM to use when making a call If you have set Voice call to Always ask, you will be asked which SIM to use each time you make call. Enter the message and recipient information, then tap Send. Enter the number, then tap . tap the SIM to use and the call will be connected. tap the SIM to use and the message will be sent. A dialog opens; A dialog opens;

User Manual
Page 74
... the call , or send or receive a text message on . You will be shown using data on one SIM and you defined for the SIM that SIM. in the color you make or receive a call log, the name of the call -- whether the call was missed, answered or was an outgoing call -- 74 - Limitations when using multiple SIMs When a SIM is: Other SIM cannot: In a call Dial out Ringing Receive a call (caller will get a "number not available" message) Sending or receiving a message Send or receive a message Using a data connection Use a data connection...
... the call , or send or receive a text message on . You will be shown using data on one SIM and you defined for the SIM that SIM. in the color you make or receive a call log, the name of the call -- whether the call was missed, answered or was an outgoing call -- 74 - Limitations when using multiple SIMs When a SIM is: Other SIM cannot: In a call Dial out Ringing Receive a call (caller will get a "number not available" message) Sending or receiving a message Send or receive a message Using a data connection Use a data connection...


