
User Manual
Page 7
...computer use Computer users may lead to carpal tunnel syndrome, tendonitis, tenosynovitis or other recurring or persistent discomfort and/or pain related to remove the strain on the recorded image and does not constitute a malfunction. The following symptoms may occasionally misfire or appear as black or red... Find your leg muscles Nevertheless, some pixels may appear in one fixed posture • avoid slouching forward and/or leaning backward • stand up and walk around regularly to computer use . This has no effect on your comfort zone by pushing the power button. Tips and...
...computer use Computer users may lead to carpal tunnel syndrome, tendonitis, tenosynovitis or other recurring or persistent discomfort and/or pain related to remove the strain on the recorded image and does not constitute a malfunction. The following symptoms may occasionally misfire or appear as black or red... Find your leg muscles Nevertheless, some pixels may appear in one fixed posture • avoid slouching forward and/or leaning backward • stand up and walk around regularly to computer use . This has no effect on your comfort zone by pushing the power button. Tips and...
User Manual
Page 9
TABLE OF CONTENTS UNPACKING 1 REMOVING THE STAND ARM FOR WALL MOUNT 2 ATTACHING THE BASE 3 SCREEN POSITION ADJUSTMENT 4 CONNECTING THE POWER CORD 6 SAFETY PRECAUTION 6 CLEANING YOUR MONITOR 6 POWER SAVING 7 DDC...7 CONNECTOR PIN ASSIGNMENT 8 Standard Timing Table 9 INSTALLATION 11 USER CONTROLS 13 TROUBLESHOOTING 24
TABLE OF CONTENTS UNPACKING 1 REMOVING THE STAND ARM FOR WALL MOUNT 2 ATTACHING THE BASE 3 SCREEN POSITION ADJUSTMENT 4 CONNECTING THE POWER CORD 6 SAFETY PRECAUTION 6 CLEANING YOUR MONITOR 6 POWER SAVING 7 DDC...7 CONNECTOR PIN ASSIGNMENT 8 Standard Timing Table 9 INSTALLATION 11 USER CONTROLS 13 TROUBLESHOOTING 24
User Manual
Page 11
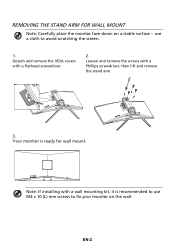
EN-2 Loosen and remove the screws with a wall mounting kit, it is ready for wall mount. Your monitor is recommended to use a cloth to fix your monitor on a stable surface -- use M4 x 10 (L) mm screws to avoid scratching the screen. 1. Note: If installing with a Phillips screwdriver, then lift and remove the stand arm. 3. REMOVING THE STAND ARM FOR WALL MOUNT Note: Carefully place the monitor face-down on the wall. Detach and remove the VESA covers with a flathead screwdriver. 2.
EN-2 Loosen and remove the screws with a wall mounting kit, it is ready for wall mount. Your monitor is recommended to use a cloth to fix your monitor on a stable surface -- use M4 x 10 (L) mm screws to avoid scratching the screen. 1. Note: If installing with a Phillips screwdriver, then lift and remove the stand arm. 3. REMOVING THE STAND ARM FOR WALL MOUNT Note: Carefully place the monitor face-down on the wall. Detach and remove the VESA covers with a flathead screwdriver. 2.


