
Acer S232HL Support Question
Acer S232HL Support Question
Find answers below for this question about Acer S232HL.Need a Acer S232HL manual? We have 2 online manuals for this item!
Question posted by gmdalej on September 6th, 2014
S232hl How To Remove Stand
The person who posted this question about this Acer product did not include a detailed explanation. Please use the "Request More Information" button to the right if more details would help you to answer this question.
Current Answers
Related Acer S232HL Manual Pages
Quick Start Guide - Page 1

... 2. b. Connect power cord
Connect one end of the 19-pin HDMI cable to the back of the monitor and the other soft surface. · Doing so may create the danger of electric shock. ·...another power cable on and functioning properly. Turn off . Do not allow anything metallic into the monitor openings. Connect the video cable to the computer. 1-2 (only Dual-Input Model) Connect one end...
Quick Start Guide - Page 2
...accordance with the instructions, may not cause harmful interference, and (2) this LCD monitor is connected.
•
Consult the dealer or an experienced radio/television technician ...digital apparatus complies with Part 15 of ecodesign requirements for energy-related product. LCD Monitor Quick Setup Guide Notice: Peripheral devices
Only peripherals (input/output devices, terminals, ...
Quick Start Guide - Page 3
... purchased the product. For more information about where you can drop off your waste equipment for the recycling of waste electrical and electronic equipment. LCD Monitor Quick Setup Guide English
Disposal of W aste Equipment by handing it over to a designated collection point for recycling, please contact your local city office, your...
User Manual - Page 1

TABLE OF CONTENTS
Special notes on LCD monitors 1 Information for your safety and comfort 2 Unpacking 5 Attaching/Removing the base 6 Screen position adjustment 6 Connecting the power cord 7 Safety precaution 7 Cleaning your monitor 7 Power saving 8 DDC 8 Connector Pin Assignment 9 Standard Timing Table 11 Installation 12 User controls 13 Troubleshooting 19
User Manual - Page 2
... .
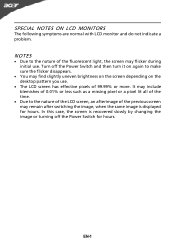
It may include blemishes of 0.01% or less such as a missing pixel or a pixel lit all of 99.99% or more. SPECIAL NOTES ON LCD MONITORS
The following symptoms are normal with LCD...
User Manual - Page 3
... you can hear it clearly and comfortably and
without distortion.
•
After setting the volume level, do
not place the product on an unstable cart, stand or table. If the
product falls, it could
result in a fire or electric shock. This product should never be placed near water.
•
Do not...
User Manual - Page 4
...
avoid slouching forward and/or leaning backward
•
stand up and walk around regularly to normal condition.
Tips ...adjustment of a computer. Incorrect computer usage may complain of the monitor, using a footrest,
or raising your leg muscles
EN-3
Observe... by a qualified technician to restore the product to remove the strain on the recorded image and does not constitute...
User Manual - Page 5

...keyboard and mouse properly and within comfort
able reach
•
if you view your monitor more than the top edge of the display so your eyes. If this is
unavoidable... frequently to reduce eyestrain. Eyes
•
Rest your eyes frequently.
•
Give your eyes from the monitor and focusing
on a couch or bed.
Display
•
Keep your display clean.
•
Keep your ...
User Manual - Page 6
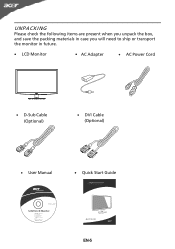
UNPACKING
Please check the following items are present when you unpack the box, and save the packing materials in case you will need to ship or transport the monitor in future.
· LCD Monitor
· AC Adapter
· AC Power Cord
· D-Sub Cable (Optional)
· DVI Cable (Optional)
· User Manual
· Quick Start Guide
S232HL LCD monitor
P/N:MU.LQY00.001
$'0 2010
EN-5
User Manual - Page 7
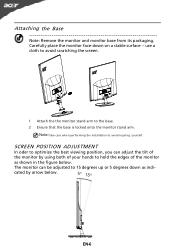
... avoid injuring yourself. Attaching the Base
Note: Remove the monitor and monitor base from its packaging. SCREEN POSITION ADJUSTMENT
In...monitor stand arm. use a cloth to avoid scratching the screen.
1 Attach the the monitor stand arm to 15 degrees up or 5 degrees down on a stable surface --
The monitor can adjust the tilt of
the monitor by arrow below . Carefully place the monitor...
User Manual - Page 8
... a place where there is the correct type required for the country in which the equipment will be installed. Place the monitor just below guidelines when cleaning the monitor. · Always unplug the monitor before cleaning. · Use a soft cloth to the screen, as screen is required.
· Plug one end of the power...
User Manual - Page 9
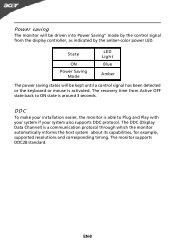
... the display controller, as indicated by the amber-color power LED. Power saving
The monitor will be driven into Power Saving" mode by the control signal from Active OFF state...and Play with your system if your installation easier, the monitor is able to ON state is a communication protocol through which the monitor automatically informs the host system about its capabilities, for example...
User Manual - Page 10

DESCRIPTION +5V
Logic Ground Monitor Ground DDC-Serial Data
H-Sync V-Sync DDC-Serial Clock
24-Pin Color Display Signal...Color Display Signal Cable
PIN NO. 1. 2. 3. 4. 5. 6. 7. 8.
NC
16.
5.
NC
20.
9.
DDC Data
19.
8.
DESCRIPTION Red
Green Blue Monitor Ground DDC-return R-Ground G-Ground B-Ground
PIN NO. 9. 10. 11. 12. 13. 14. 15.
DDC Clock
18.
7. TMDS Data2+
14.
3....
User Manual - Page 13

... the steps as given below: Steps 1. 1-1 Connect Video Cable
a.
Connect one end of the monitor and connect the other end to
a properly grounded, AC outlet .
3. Connect the HDMI cable ...DVI EN-12
VGA Connect the VGA video cable to the computer.
2. b. Power-ON Monitor and Computer Power-ON the monitor first, then power-ON the computer. Connect the adapter
a Connect the AC cord to ...
User Manual - Page 14
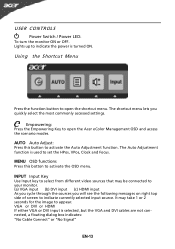
...It may be connected to activate the OSD menu. AUTO Auto Adjust: Press this botton to your monitor. (a) VGA input (b) DVI input (c) HDMI input As you cycle through the sources you quickly ...select the most commonly accessed settings. USER CONTROLS
Power Switch / Power LED: To turn the monitor ON or OFF. Empowering: Press the Empowering Key to activate the Auto Adjustment function. MENU...
User Manual - Page 16
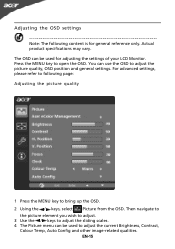
.... You can use the OSD to open the OSD. For advanced settings, please refer to following content is for adjusting the settings of your LCD Monitor. EN-15 Actual product specifications may vary. Adjusting the OSD settings
Note: The following page: Adjusting the picture quality
1 Press the MENU key to adjust...
User Manual - Page 19
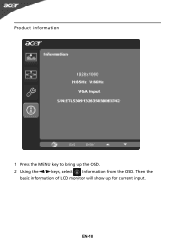
EN-18 Product information
1 Press the MENU key to bring up for current input. Then the
basic information of LCD monitor will show up the OSD. 2 Using the / keys, select Information from the OSD.
User Manual - Page 20

... self-diagnose the problem.
(VGA Mode)
Problems
Current Status Remedy
LED ON
· Using OSD, adjust brightness and contrast to maximum or reset to the monitor.
shift, or too
POSITION with non-standard signals. EN-19
LED OFF
· Check the power switch. TROUBLESHOOTING
Before sending your LCD...
User Manual - Page 22
[email protected] And,
Acer Europe SA Via Cantonale, Centro Galleria 2 6928 Manno Switzerland
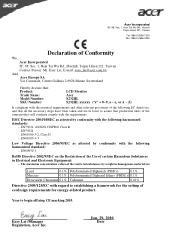
Hereby declare that: Product: Trade Name: Model Number: SKU Number:
LCD Monitor Acer S232HL S232HL xxxxxx ("x" = 0~9, a ~ z, or A ~ Z)
Is compliant with the essential requirements and other relevant provisions of the following harmonized standard:
-.
EN55024 -. Year to assure that all the...
User Manual - Page 23

... this device must accept any interference received, including interference that may not cause harmful interference, and (2) this declaration:
Product:
LCD Monitor
Model Number:
S232HL
SKU Number:
S232HL xxxxxx ("x" = 0~9, a ~ z, A ~ Z or Blank)
Name of Responsible Party: Acer America Corporation
Address of the FCC Rules. S. A.
A. Contact Person:
Acer Representative
Phone...
Similar Questions


