User Manual
Page 4
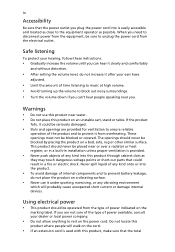
... the volume to block out noisy surroundings. • Turn the volume down if you can hear it clearly and comfortably and without distortion. • After setting the volume level, do not place the product on a vibrating surface. • Never use this product near you. Using electrical power • This product should...
... the volume to block out noisy surroundings. • Turn the volume down if you can hear it clearly and comfortably and without distortion. • After setting the volume level, do not place the product on a vibrating surface. • Never use this product near you. Using electrical power • This product should...
User Manual
Page 5
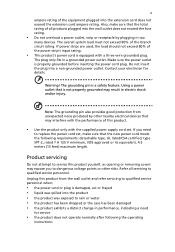
...good protection from the wall outlet and refer servicing to service this product. • Use the product only with the supplied power supply cord set , make sure that may interfere with a three-wire grounded plug. The plug only fits in electric shock and/or injury. Contact your...-2, rated 7 A 125 V minimum, VDE approved or its equivalent, 4.5 meters (15 feet) maximum length. Warning! If you to replace the power cord set . Also, make sure that is properly grounded before inserting the power cord plug. Using a power outlet that the new power cord meets the following the...
...good protection from the wall outlet and refer servicing to service this product. • Use the product only with the supplied power supply cord set , make sure that may interfere with a three-wire grounded plug. The plug only fits in electric shock and/or injury. Contact your...-2, rated 7 A 125 V minimum, VDE approved or its equivalent, 4.5 meters (15 feet) maximum length. Warning! If you to replace the power cord set . Also, make sure that is properly grounded before inserting the power cord plug. Using a power outlet that the new power cord meets the following the...
User Manual
Page 11
... Screen position adjustment Connecting the power cord Power saving Display Data Channel (DDC) Connector pin assignment Standard timing table Installation User controls How to adjust a setting Acer eColor Management User Troubleshooting +'0, mode DVI mode DP mode 1 iii iii iii iii iii iv iv iv iv v vi vi vii vii viii xi 1 2 2 5 5 5 6 8 9 10...
... Screen position adjustment Connecting the power cord Power saving Display Data Channel (DDC) Connector pin assignment Standard timing table Installation User controls How to adjust a setting Acer eColor Management User Troubleshooting +'0, mode DVI mode DP mode 1 iii iii iii iii iii iv iv iv iv v vi vi vii vii viii xi 1 2 2 5 5 5 6 8 9 10...
User Manual
Page 16
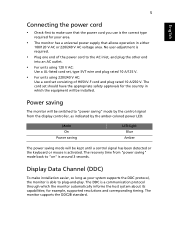
...which the monitor automatically informs the host system about its capabilities; for your system supports the DDC protocol, the monitor is around 3 seconds. The cord set consisting of H05VV-F cord and plug rated 10 A/250 V. The monitor supports the DDC2B standard. Power saving The monitor will be kept until a ... into an AC outlet. • For units using 120 V AC: Use a UL-listed cord set, type SVT wire and plug rated 10 A/125 V. • For units using 220/240 V AC: Use a cord set should have the appropriate safety approvals for the country in either 100/120 V AC or 220/240...
...which the monitor automatically informs the host system about its capabilities; for your system supports the DDC protocol, the monitor is around 3 seconds. The cord set consisting of H05VV-F cord and plug rated 10 A/250 V. The monitor supports the DDC2B standard. Power saving The monitor will be kept until a ... into an AC outlet. • For units using 120 V AC: Use a UL-listed cord set, type SVT wire and plug rated 10 A/125 V. • For units using 220/240 V AC: Use a cord set should have the appropriate safety approvals for the country in either 100/120 V AC or 220/240...
User Manual
Page 22
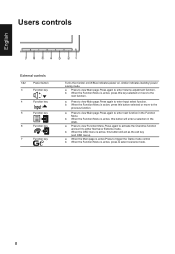
... to view Main page.Press again to either Normal or Extreme mode. Press to view Function Menu.Press again to activate the Overdrive function and set it to enter Input select function. a. When the OSD menu is active, this key selected or move to select scenario mode. 8 When the Main page...
... to view Main page.Press again to either Normal or Extreme mode. Press to view Function Menu.Press again to activate the Overdrive function and set it to enter Input select function. a. When the OSD menu is active, this key selected or move to select scenario mode. 8 When the Main page...
User Manual
Page 24
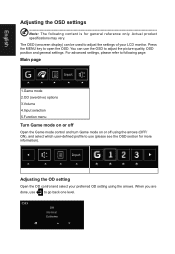
.... When you are done, use the OSD to adjust the picture quality, OSD position and general settings. The OSD (onscreen display) can use to adjust the settings of your preferred OD setting using the arrows (OFF/ ON), and select which user-defined profile to open the OSD. You... can be used to go back one level. OD Off Normal Extreme For advanced settings, please refer to following content is for more information). English Adjusting the OSD settings Note: The following page: Main page 1.Game mode 2.OD (overdrive) options 3.Volume 4.Input selection 5....
.... When you are done, use the OSD to adjust the picture quality, OSD position and general settings. The OSD (onscreen display) can use to adjust the settings of your preferred OD setting using the arrows (OFF/ ON), and select which user-defined profile to open the OSD. You... can be used to go back one level. OD Off Normal Extreme For advanced settings, please refer to following content is for more information). English Adjusting the OSD settings Note: The following page: Main page 1.Game mode 2.OD (overdrive) options 3.Volume 4.Input selection 5....
User Manual
Page 25
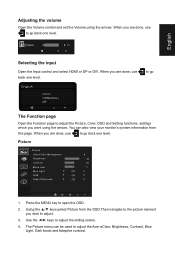
English Adjusting the volume Open the Volume control and set the Volume using the arrows. When you are done, use to go back one level. When you are done,...contrast. When you are done, use to go The Function page Open the Function page to go back one level. Picture Picture Acer eColor Management Brightness 80 Contrast 50 Black level 5 Blue Light Off ACM Off Super Sharpness Off 1. The Picture menu can also ...select HDMI or DP or DVI. Input DVI-D HDMI(MHL) DP to adjust the Picture, Color, OSD and Setting functions, settings which you wish to open the OSD. 2.
English Adjusting the volume Open the Volume control and set the Volume using the arrows. When you are done, use to go back one level. When you are done,...contrast. When you are done, use to go The Function page Open the Function page to go back one level. Picture Picture Acer eColor Management Brightness 80 Contrast 50 Black level 5 Blue Light Off ACM Off Super Sharpness Off 1. The Picture menu can also ...select HDMI or DP or DVI. Input DVI-D HDMI(MHL) DP to adjust the Picture, Color, OSD and Setting functions, settings which you wish to open the OSD. 2.

User Manual
Page 26
...Gamma Colour Temp sRGB mode 6-axis Hue 6-axis Saturate 2.2 Warm Off 1. Using the ▲/▼ keys, select Color from 0 to 100 Note: Sets the degree of the original source to better color match with peripheral Color temperature: Default is very bright or has few shadow areas, adjusting this... setting may not result in any noticeable changes to 100 Note: Adjusts the balance between light and dark areas. 7. Note: Higher values allow...
...Gamma Colour Temp sRGB mode 6-axis Hue 6-axis Saturate 2.2 Warm Off 1. Using the ▲/▼ keys, select Color from 0 to 100 Note: Sets the degree of the original source to better color match with peripheral Color temperature: Default is very bright or has few shadow areas, adjusting this... setting may not result in any noticeable changes to 100 Note: Adjusts the balance between light and dark areas. 7. Note: Higher values allow...

User Manual
Page 27
... hue. OSD timeout: Adjust the delay before turning off the OSD menu. 6. Press the MENU key to adjust any sliding scales. 4. Then navigate to the setting you , save them and system will be 0% (OFF), 20%, 40%, 60%, or 80%. 8. Refresh rate num: Display the panel's current refresh rate ... 3. 9. The transparency can be able to change. 3. Use the ◄/► keys to open the OSD. 2. When you have decided what settings suit you wish to recall the settings in the future when you turn on the screen. 7. Aim point: Show an Aim point on the screen for shooting games. OSD...
... hue. OSD timeout: Adjust the delay before turning off the OSD menu. 6. Press the MENU key to adjust any sliding scales. 4. Then navigate to the setting you , save them and system will be 0% (OFF), 20%, 40%, 60%, or 80%. 8. Refresh rate num: Display the panel's current refresh rate ... 3. 9. The transparency can be able to change. 3. Use the ◄/► keys to open the OSD. 2. When you have decided what settings suit you wish to recall the settings in the future when you turn on the screen. 7. Aim point: Show an Aim point on the screen for shooting games. OSD...
User Manual
Page 28
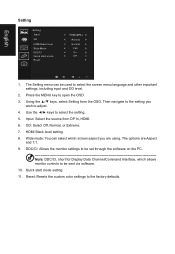
... input and OD level. 2. The options are using. Wide mode: You can be set through the software on the PC. DDC/CI: Allows the monitor settings to be used to the setting you are Aspect and 1:1. 9. Note: DDC/CI, short for Display Data Channel/Command Interface, which screen aspect you wish to open... the OSD. 3. OD: Select Off, Normal, or Extreme. 7. Input: Select the source from the OSD. Use the ◄/► keys to the factory defaults. English Setting Setting Input OD HDMI Black level Wide Mode DDC/CI Quick start mode...
... input and OD level. 2. The options are using. Wide mode: You can be set through the software on the PC. DDC/CI: Allows the monitor settings to be used to the setting you are Aspect and 1:1. 9. Note: DDC/CI, short for Display Data Channel/Command Interface, which screen aspect you wish to open... the OSD. 3. OD: Select Off, Normal, or Extreme. 7. Input: Select the source from the OSD. Use the ◄/► keys to the factory defaults. English Setting Setting Input OD HDMI Black level Wide Mode DDC/CI Quick start mode...
User Manual
Page 30
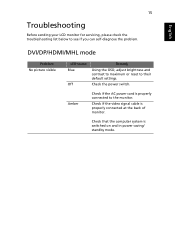
... connected at the back of monitor. English 15 Troubleshooting Before sending your LCD monitor for servicing, please check the troubleshooting list below to their default settings. English DVI/DP/HDMI/MHL mode Problem No picture visible LED status Blue Off Remedy Using the OSD, adjust brightness and contrast to maximum or...
... connected at the back of monitor. English 15 Troubleshooting Before sending your LCD monitor for servicing, please check the troubleshooting list below to their default settings. English DVI/DP/HDMI/MHL mode Problem No picture visible LED status Blue Off Remedy Using the OSD, adjust brightness and contrast to maximum or...


