
User Manual XF252Q X
Page 3
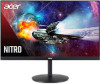
Acer monitor is recovered slowly by changing the image or turning off the power switch and then turn it on again to make sure the flicker disappears. • You may find slightly uneven brightness on the screen depending on the product. In this document for future reference. Special notes on LCD monitors The following are normal with the LCD monitor and do not indicate a problem. • Due to...
Acer monitor is recovered slowly by changing the image or turning off the power switch and then turn it on again to make sure the flicker disappears. • You may find slightly uneven brightness on the screen depending on the product. In this document for future reference. Special notes on LCD monitors The following are normal with the LCD monitor and do not indicate a problem. • Due to...

User Manual XF252Q X
Page 4
...; Turn the volume down if you can't hear people speaking near you. If you plug the power cord into the product. • To avoid dmage of internal components and to ensure reliable operation of power indicated on an unstable cart, stand or table. Safe listening To protect your hearing, follow these instructions. • Gradually increase the volume until you need...
...; Turn the volume down if you can't hear people speaking near you. If you plug the power cord into the product. • To avoid dmage of internal components and to ensure reliable operation of power indicated on an unstable cart, stand or table. Safe listening To protect your hearing, follow these instructions. • Gradually increase the volume until you need...
User Manual XF252Q X
Page 5
... the power strip's input rating. • This product's power cord is equipped with this product, make sure that is not properly grounded may interfere with the performance of this product. • Use the product only with the supplied power supply cord set , make sure that may result in performance, indicating a need to qualified service personnel. Note: The grounding pin also provides good protection from the wall...
... the power strip's input rating. • This product's power cord is equipped with this product, make sure that is not properly grounded may interfere with the performance of this product. • Use the product only with the supplied power supply cord set , make sure that may result in performance, indicating a need to qualified service personnel. Note: The grounding pin also provides good protection from the wall...

User Manual XF252Q X
Page 6
... best working procedures to reduce the environmental impact of used equipment, as grain, dust or metal powders. Potentially explosive environments Switch off the device near depots, storage and distribution areas; chemical plants; Disposal instructions Do not throw this website: http://www.acer-...help when recycling, please go to this electronic device into the trash when discarding. Potentially explosive atmospheres include areas where you would normally be advised to turn off your device in bodily injury or even death. English Note: Adjust only those controls that are covered...
... best working procedures to reduce the environmental impact of used equipment, as grain, dust or metal powders. Potentially explosive environments Switch off the device near depots, storage and distribution areas; chemical plants; Disposal instructions Do not throw this website: http://www.acer-...help when recycling, please go to this electronic device into the trash when discarding. Potentially explosive atmospheres include areas where you would normally be advised to turn off your device in bodily injury or even death. English Note: Adjust only those controls that are covered...
User Manual XF252Q X
Page 7
... effect on your sitting height to remove the strain on the recorded image and does not constitute a malfunction. Users are also at risk of physical injury. Long work periods, bad posture, poor work habits, stress, inadequate working in front of the monitor, using a footrest, or raising your leg muscles English LCD pixel statement The LCD unit is in Active Off mode,move the mouse...
... effect on your sitting height to remove the strain on the recorded image and does not constitute a malfunction. Users are also at risk of physical injury. Long work periods, bad posture, poor work habits, stress, inadequate working in front of the monitor, using a footrest, or raising your leg muscles English LCD pixel statement The LCD unit is in Active Off mode,move the mouse...
User Manual XF252Q X
Page 11
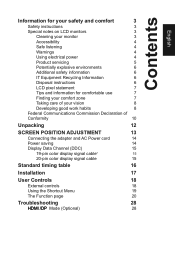
... of your vision 8 Developing good work habits 8 Federal Communications Commission Declaration of Conformity 10 Unpacking 12 SCREEN POSITION ADJUSTMENT 13 Connecting the adapter and AC Power cord 14 Power saving 14 Display Data Channel (DDC) 15 19-pin color display signal cable* 15 20-pin color display signal cable 15 Standard timing table 16 Installation 17 User Controls 18 External controls 18 Using the Shortcut Menu 19 The Function page 20 Troubleshooting 28 HDMI /DP Mode (Optional) 28
... of your vision 8 Developing good work habits 8 Federal Communications Commission Declaration of Conformity 10 Unpacking 12 SCREEN POSITION ADJUSTMENT 13 Connecting the adapter and AC Power cord 14 Power saving 14 Display Data Channel (DDC) 15 19-pin color display signal cable* 15 20-pin color display signal cable 15 Standard timing table 16 Installation 17 User Controls 18 External controls 18 Using the Shortcut Menu 19 The Function page 20 Troubleshooting 28 HDMI /DP Mode (Optional) 28

User Manual XF252Q X
Page 12
LCD monitor Quick start guide AC Power cord HDMI Cable (Optional) LCD Monitor NITRO XF2 series-XF252Q DP Cable (Optional) USB cable (Optional) English Unpacking Please check that the following items are present when you unpack the box, and save the packing materials in case you need to ship or transport the monitor in the future.
LCD monitor Quick start guide AC Power cord HDMI Cable (Optional) LCD Monitor NITRO XF2 series-XF252Q DP Cable (Optional) USB cable (Optional) English Unpacking Please check that the following items are present when you unpack the box, and save the packing materials in case you need to ship or transport the monitor in the future.

User Manual XF252Q X
Page 13
... example of the tilt range. use a cloth to optimize the best viewing position, you can adjust the height of the monitor. 1 2 120mm • Tilt Please see the illustration below for the angle of elevation. English SCREEN POSITION ADJUSTMENT In oder to avoid scratching the screen. 1 3 2 • Height Adjustment After pressing the top of the monitor then you can adjust the tilt of the monitor. • Attaching the Base Note: Remove the monitor and monitor base from its...
... example of the tilt range. use a cloth to optimize the best viewing position, you can adjust the height of the monitor. 1 2 120mm • Tilt Please see the illustration below for the angle of elevation. English SCREEN POSITION ADJUSTMENT In oder to avoid scratching the screen. 1 3 2 • Height Adjustment After pressing the top of the monitor then you can adjust the tilt of the monitor. • Attaching the Base Note: Remove the monitor and monitor base from its...
User Manual XF252Q X
Page 15
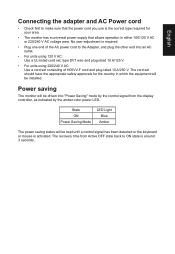
... keyboard or mouse is activated. No user-adjustment is required. • Plug one end of H05VV-F cord and plug rated 10 A/250 V. Power saving The monitor will be installed. The cord set consisting of the AC power cord to the Adapter, and plug the other end into "Power Saving" mode by the control signal from Active OFF state back to make sure that the power cord you use is the correct type required for the...
... keyboard or mouse is activated. No user-adjustment is required. • Plug one end of H05VV-F cord and plug rated 10 A/250 V. Power saving The monitor will be installed. The cord set consisting of the AC power cord to the Adapter, and plug the other end into "Power Saving" mode by the control signal from Active OFF state back to make sure that the power cord you use is the correct type required for the...

User Manual XF252Q X
Page 16
...monitor supports the DDC2B standard. 19-pin color display signal cable* PIN No. on device) 16 SDA 18 +5V Power Description 1 TMDS Data2+ 3 TMDS Data25 TMDS Data1 Shield 7 TMDS Data0+ 9 TMDS Data011 TMDS Clock Shield 13 CEC 15 SCL 17 DDC/CEC Ground 19 Hot Plug Detect PIN No. The DDC is able to plug...Reserved (N.C. for example, supported resolutions and corresponding timing. English Display Data Channel (DDC) To make installation easier, so long as your system supports the DDC protocol, the monitor is a communication protocol through which the monitor automatically informs the host ...
...monitor supports the DDC2B standard. 19-pin color display signal cable* PIN No. on device) 16 SDA 18 +5V Power Description 1 TMDS Data2+ 3 TMDS Data25 TMDS Data1 Shield 7 TMDS Data0+ 9 TMDS Data011 TMDS Clock Shield 13 CEC 15 SCL 17 DDC/CEC Ground 19 Hot Plug Detect PIN No. The DDC is able to plug...Reserved (N.C. for example, supported resolutions and corresponding timing. English Display Data Channel (DDC) To make installation easier, so long as your system supports the DDC protocol, the monitor is a communication protocol through which the monitor automatically informs the host ...
User Manual XF252Q X
Page 18
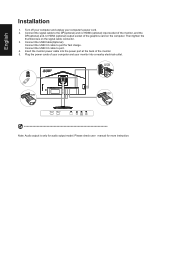
Connect the USB Cable(Optional) Connect the USB 3.0 cable to port. 4. Turn off your computer and unplug your monitor into the power port at the back of the graphics card on the signal cable connector. 3. Connect the USB 3.0 cable to port for fast charge. Plug the power cords of your computer and your computer's power cord. 2. Please check user manual for audio output model. Connect the signal cable to the DP(optional) and /or HDMI (optional) input socket of the monitor, and the DP(optional) and...
Connect the USB Cable(Optional) Connect the USB 3.0 cable to port. 4. Turn off your computer and unplug your monitor into the power port at the back of the graphics card on the signal cable connector. 3. Connect the USB 3.0 cable to port for fast charge. Plug the power cords of your computer and your computer's power cord. 2. Please check user manual for audio output model. Connect the signal cable to the DP(optional) and /or HDMI (optional) input socket of the monitor, and the DP(optional) and...
User Manual XF252Q X
Page 19
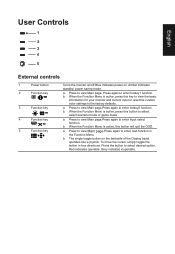
..., simply toggle the button in the Function Menu. Amber indicates standby/ power saving mode. b. When the Function Menu is active, press this key to view the basic information for your monitor and current input or reset the custom color settings to select select scenario mode or game mode . The single toggle button on . When the Function Menu is active, press this button to the factory defaults. Grey indicates inoperable...
..., simply toggle the button in the Function Menu. Amber indicates standby/ power saving mode. b. When the Function Menu is active, press this key to view the basic information for your monitor and current input or reset the custom color settings to select select scenario mode or game mode . The single toggle button on . When the Function Menu is active, press this button to the factory defaults. Grey indicates inoperable...
User Manual XF252Q X
Page 20
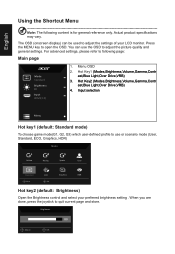
... store. Hot Key1 (Modes,Brightness,Volume,Gamma,Contr ast,Blue Light,Over Drive,VRB) 3. Hot Key2 (Modes,Brightness,Volume,Gamma,Contr ast,Blue Light,Over Drive,VRB) 4. Brightness 80 Adjust OK The OSD (onscreen display) can use or scenario mode (User, Standard, ECO, Graphics, HDR) Modes Action Racing Sports User Standard ECO Graphics HDR Move OK Hot key2 (default: Brightness) Open the Brightness control and select your LCD monitor. Input selection Menu Hot key1 (default: Standard mode) To choose game...
... store. Hot Key1 (Modes,Brightness,Volume,Gamma,Contr ast,Blue Light,Over Drive,VRB) 3. Hot Key2 (Modes,Brightness,Volume,Gamma,Contr ast,Blue Light,Over Drive,VRB) 4. Brightness 80 Adjust OK The OSD (onscreen display) can use or scenario mode (User, Standard, ECO, Graphics, HDR) Modes Action Racing Sports User Standard ECO Graphics HDR Move OK Hot key2 (default: Brightness) Open the Brightness control and select your LCD monitor. Input selection Menu Hot key1 (default: Standard mode) To choose game...
User Manual XF252Q X
Page 21
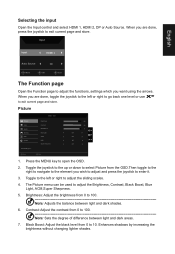
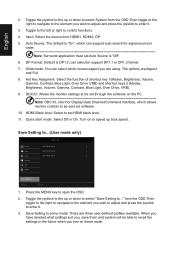
... between light and dark areas. 7. Picture Picture Color Audio Gaming OSD System Save Settings to adjust the Brightness, Contrast, Black Boost, Blue Light, ACM,Super Sharpness. 5. User Brightness Contrast Black Boost Blue Light ACM HDR Super Sharpness Enter 80 50 9 Off Off Off X Off 1. Contrast: Adjust the contrast from 0 to 100 Note: Sets the degree of difference between light and dark shades. 6. When you want using the arrows. Input English Input HDMI 1 Auto Source On Move OK Exit The Function page Open the...
... between light and dark areas. 7. Picture Picture Color Audio Gaming OSD System Save Settings to adjust the Brightness, Contrast, Black Boost, Blue Light, ACM,Super Sharpness. 5. User Brightness Contrast Black Boost Blue Light ACM HDR Super Sharpness Enter 80 50 9 Off Off Off X Off 1. Contrast: Adjust the contrast from 0 to 100 Note: Sets the degree of difference between light and dark shades. 6. When you want using the arrows. Input English Input HDMI 1 Auto Source On Move OK Exit The Function page Open the...
User Manual XF252Q X
Page 22
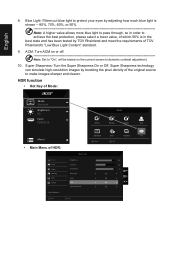
... order to make images sharper and clearer. Blue Light: Filters out blue light to protect your eyes by adjusting how much blue light is shown -- 80%, 70%, 60%, or 50 Note: A higher value allows more blue light to pass through, so in the best state and has been tested by boosting the pixel density of HDR: Mode - User Picture Color Audio Gaming OSD System Save Settings to dynamic contrast adjustment. 10. English 8. ACM: Turn ACM...
... order to make images sharper and clearer. Blue Light: Filters out blue light to protect your eyes by adjusting how much blue light is shown -- 80%, 70%, 60%, or 50 Note: A higher value allows more blue light to pass through, so in the best state and has been tested by boosting the pixel density of HDR: Mode - User Picture Color Audio Gaming OSD System Save Settings to dynamic contrast adjustment. 10. English 8. ACM: Turn ACM...
User Manual XF252Q X
Page 23
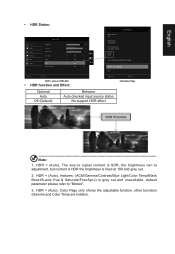
... Auto checked input source status No support HDR effect Exit Information Page Note: 1. HDR = (Auto), The source signal content is SDR, the brightness can to adjustment, but content is HDR the brightness is gray out and unavailable, default parameter please refer to "Modes". 3. HDR = (Auto), features: (ACM/Gamma/Contrast/Blue Light/Color Temp/Black Boost/6-axis Hue & Saturate/FreeSync) is fixed at 100 and gray out. 2. English • HDR Status: Picture Color Audio Gaming OSD...
... Auto checked input source status No support HDR effect Exit Information Page Note: 1. HDR = (Auto), The source signal content is SDR, the brightness can to adjustment, but content is HDR the brightness is gray out and unavailable, default parameter please refer to "Modes". 3. HDR = (Auto), features: (ACM/Gamma/Contrast/Blue Light/Color Temp/Black Boost/6-axis Hue & Saturate/FreeSync) is fixed at 100 and gray out. 2. English • HDR Status: Picture Color Audio Gaming OSD...
User Manual XF252Q X
Page 26
HDR setting: "Auto" is Off Note: 1. VRB set "On", when to adjustment (Brightness, Blue Light, ACM), will auto set VRB is "Off". 3. English 6. VRB set "On", when to support dynamic picture more clean control, default is not support VRB. 2. VRB function does not affect the (Logo, Aim Point, Message and Input Icon) brightness. 5. VRB setting "On", when detection of Input Timing VRB: To choose whether to turn on FreeSync, will auto set VRB is "Off". 4.
HDR setting: "Auto" is Off Note: 1. VRB set "On", when to adjustment (Brightness, Blue Light, ACM), will auto set VRB is "Off". 3. English 6. VRB set "On", when to support dynamic picture more clean control, default is not support VRB. 2. VRB function does not affect the (Logo, Aim Point, Message and Input Icon) brightness. 5. VRB setting "On", when detection of Input Timing VRB: To choose whether to turn on FreeSync, will auto set VRB is "Off". 4.
User Manual XF252Q X
Page 27
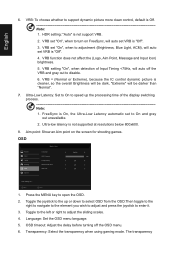
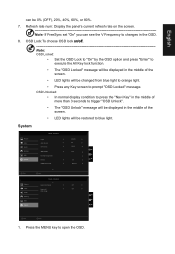
... OSD. 8. English can see the V Frequency to changes in the middle of the screen. • LED lights will be changed from blue light to orange light. • Press any Key screen to prompt "OSD Locked" message. Standard Picture Color Audio Gaming OSD System Quick Start Mode Power-off USB charge Off Off X Move Enter Quick Start Mode 1. Refresh rate num: Display the panel's current refresh rate on /off Note: OSD Locked: • Set the OSD Lock to "On" by the OSD option and press "Enter" to blue light. OSD Lock:To choose OSD lock...
... OSD. 8. English can see the V Frequency to changes in the middle of the screen. • LED lights will be changed from blue light to orange light. • Press any Key screen to prompt "OSD Locked" message. Standard Picture Color Audio Gaming OSD System Quick Start Mode Power-off USB charge Off Off X Move Enter Quick Start Mode 1. Refresh rate num: Display the panel's current refresh rate on /off Note: OSD Locked: • Set the OSD Lock to "On" by the OSD option and press "Enter" to blue light. OSD Lock:To choose OSD lock...
User Manual XF252Q X
Page 28
... ... HDMI Black level: Select to set Auto Source is DP1.2, can support auto search for Display Data Channel/Command Interface, which allows monitor controls to be able to some mode: There are Aspect and Full. 8. The options are three user-defined profiles available. from the OSD.Then toggle to the right to navigate to enter it . 3. User Picture Color Audio Gaming OSD System Game Mode Action Game Mode Racing Game Mode...
... ... HDMI Black level: Select to set Auto Source is DP1.2, can support auto search for Display Data Channel/Command Interface, which allows monitor controls to be able to some mode: There are Aspect and Full. 8. The options are three user-defined profiles available. from the OSD.Then toggle to the right to navigate to enter it . 3. User Picture Color Audio Gaming OSD System Game Mode Action Game Mode Racing Game Mode...
User Manual XF252Q X
Page 29
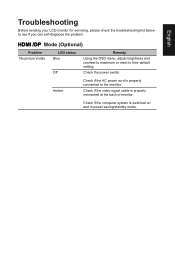
Amber Check if the AC power cord is properly connected to their default setting. Check the power switch. English HDMI /DP Mode (Optional) Problem No picture visible LED status Blue Off Remedy Using the OSD menu, adjust brightness and contrast to maximum or reset to the monitor. Check if the computer system is properly connected at the back of monitor. Check if the video signal cable is switched on and in power saving/standby mode. Troubleshooting Before sending your LCD monitor for servicing, please check the troubleshooting list below to see if...
Amber Check if the AC power cord is properly connected to their default setting. Check the power switch. English HDMI /DP Mode (Optional) Problem No picture visible LED status Blue Off Remedy Using the OSD menu, adjust brightness and contrast to maximum or reset to the monitor. Check if the computer system is properly connected at the back of monitor. Check if the video signal cable is switched on and in power saving/standby mode. Troubleshooting Before sending your LCD monitor for servicing, please check the troubleshooting list below to see if...


