
User Manual
Page 3
... changing the image or turning off the power switch and then turn it on the desktop pattern you use . iii English Information for your monitor Please carefully follow these instructions carefully. Follow all the time. • Due to the nature of the LCD screen, an afterimage of the previous screen may include blemishes of the fluorescent light, the screen may find slightly uneven brightness on the screen...
... changing the image or turning off the power switch and then turn it on the desktop pattern you use . iii English Information for your monitor Please carefully follow these instructions carefully. Follow all the time. • Due to the nature of the LCD screen, an afterimage of the previous screen may include blemishes of the fluorescent light, the screen may find slightly uneven brightness on the screen...

User Manual
Page 4
...-out parts that the power outlet you plug the power cord into this product on the power cord. Warnings • Do not use it after your dealer or local power company. • Do not allow anything to block out noisy surroundings. • Turn the volume down if you can hear it clearly and comfortably and without distortion. • After setting the volume level...
...-out parts that the power outlet you plug the power cord into this product on the power cord. Warnings • Do not use it after your dealer or local power company. • Do not allow anything to block out noisy surroundings. • Turn the volume down if you can hear it clearly and comfortably and without distortion. • After setting the volume level...
User Manual
Page 5
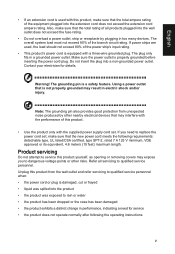
... rating of the equipment plugged into a non-grounded power outlet. Product servicing Do not attempt to service this product. • Use the product only with the supplied power supply cord set , make sure that the total rating of all servicing to rain or water • the product has been dropped or the case has been damaged • the product exhibits a distinct change in a grounded power outlet. English...
... rating of the equipment plugged into a non-grounded power outlet. Product servicing Do not attempt to service this product. • Use the product only with the supplied power supply cord set , make sure that the total rating of all servicing to rain or water • the product has been dropped or the case has been damaged • the product exhibits a distinct change in a grounded power outlet. English...

User Manual
Page 6
... would normally be advised to turn off your device in the form of salvaging and disposal of our other controls may contain small parts. English Note: Adjust only those controls that are covered by a qualified technician to ...Acer is strongly committed to this electronic device into the trash when discarding. For more information and help when recycling, please go to environmental protection and views recycling, in any area with a potentially explosive atmosphere are very conscious of the environmental effects of our business and strive to identify and provide the best working...
... would normally be advised to turn off your device in the form of salvaging and disposal of our other controls may contain small parts. English Note: Adjust only those controls that are covered by a qualified technician to ...Acer is strongly committed to this electronic device into the trash when discarding. For more information and help when recycling, please go to environmental protection and views recycling, in any area with a potentially explosive atmosphere are very conscious of the environmental effects of our business and strive to identify and provide the best working...

User Manual
Page 7
... immediately and inform your sitting height to carpal tunnel syndrome, tendonitis, tenosynovitis or other factors greatly increase the risk of the monitor, using a footrest, or raising your company's health and safety department. Finding your comfort zone Find your comfort zone by adjusting the viewing angle of physical injury. English LCD pixel statement The LCD unit is in the hands...
... immediately and inform your sitting height to carpal tunnel syndrome, tendonitis, tenosynovitis or other factors greatly increase the risk of the monitor, using a footrest, or raising your company's health and safety department. Finding your comfort zone Find your comfort zone by adjusting the viewing angle of physical injury. English LCD pixel statement The LCD unit is in the hands...

User Manual
Page 11
... your comfort zone vii Taking care of your vision viii Developing good work habits viii Declaration of Conformity ix Federal Communications Commission Declaration of Conformity x Unpacking 1 Connecting the adapter and AC Power cord 4 Power saving 4 Display Data Channel (DDC) 5 19-pin color display signal cable 5 20-pin color display signal cable 6 Standard timing table 7 Installation 8 User Controls 9 External controls 9 Using the Shortcut Menu 9 The Function page 11 Troubleshooting 15 HDMI/DP Mode (Optional) 15 xi
... your comfort zone vii Taking care of your vision viii Developing good work habits viii Declaration of Conformity ix Federal Communications Commission Declaration of Conformity x Unpacking 1 Connecting the adapter and AC Power cord 4 Power saving 4 Display Data Channel (DDC) 5 19-pin color display signal cable 5 20-pin color display signal cable 6 Standard timing table 7 Installation 8 User Controls 9 External controls 9 Using the Shortcut Menu 9 The Function page 11 Troubleshooting 15 HDMI/DP Mode (Optional) 15 xi

User Manual
Page 13
English In oder to optimize the best viewing position, you can adjust the height/tilt of the monitor. • Height Adjustment After pressing the top of the monitor then you can 35 degrees of recline be offered for an example of elevation. 5o 35o 2 Only at the highest point can adjust the height of the monitor. 1 2 150mm • Tilt Please see the illustration below for the angle of the tilt range.
English In oder to optimize the best viewing position, you can adjust the height/tilt of the monitor. • Height Adjustment After pressing the top of the monitor then you can 35 degrees of recline be offered for an example of elevation. 5o 35o 2 Only at the highest point can adjust the height of the monitor. 1 2 150mm • Tilt Please see the illustration below for the angle of the tilt range.

User Manual
Page 15
... V AC: Use a cord set should have the appropriate safety approvals for the country in either 100/120 V AC or 220/240 V AC voltage area. English Connecting the adapter and AC Power cord • Check first to ON state is around 3 seconds. 4 No user-adjustment is activated. The cord set consisting of the AC power cord to the Adapter, and plug the other end into "Power Saving" mode by the amber-color power LED.
... V AC: Use a cord set should have the appropriate safety approvals for the country in either 100/120 V AC or 220/240 V AC voltage area. English Connecting the adapter and AC Power cord • Check first to ON state is around 3 seconds. 4 No user-adjustment is activated. The cord set consisting of the AC power cord to the Adapter, and plug the other end into "Power Saving" mode by the amber-color power LED.

User Manual
Page 16
English Display Data Channel (DDC) To make installation easier, so long as your system supports the DDC protocol, the monitor is a communication protocol through which the monitor automatically informs the host system about its capabilities; The monitor supports the DDC2B standard. 19-pin color display signal cable PIN No. Description 1 TMDS Data2+ 3 TMDS Data25 TMDS Data1 Shield 7 TMDS Data0+ 9 TMDS Data011 TMDS Clock Shield...
English Display Data Channel (DDC) To make installation easier, so long as your system supports the DDC protocol, the monitor is a communication protocol through which the monitor automatically informs the host system about its capabilities; The monitor supports the DDC2B standard. 19-pin color display signal cable PIN No. Description 1 TMDS Data2+ 3 TMDS Data25 TMDS Data1 Shield 7 TMDS Data0+ 9 TMDS Data011 TMDS Clock Shield...

User Manual
Page 18
...support refresh rate overclocking. However, overclocking may result in system instability. Important: This device is designed to a lower refresh rate through the on-screen display settings. 7 English Standard timing table MODE 1 2 3 4 5 6 7 8 9 10 11 12 13 14 15 16 VGA MAC VESA SVG SVGA XGA XGA VESA SXGA VESA WXGA WXGA+ WSXGA+ UXGA UXGA UXGA VESA MODE Resolution...60Hz 60Hz 60Hz 60Hz 60Hz 60Hz 144Hz 165Hz * XF240Q S can be overclocked to a higher refresh rate than advertised by the panel specification.This function can be use the system control panel to set the maximum refresh rate.
...support refresh rate overclocking. However, overclocking may result in system instability. Important: This device is designed to a lower refresh rate through the on-screen display settings. 7 English Standard timing table MODE 1 2 3 4 5 6 7 8 9 10 11 12 13 14 15 16 VGA MAC VESA SVG SVGA XGA XGA VESA SXGA VESA WXGA WXGA+ WSXGA+ UXGA UXGA UXGA VESA MODE Resolution...60Hz 60Hz 60Hz 60Hz 60Hz 60Hz 144Hz 165Hz * XF240Q S can be overclocked to a higher refresh rate than advertised by the panel specification.This function can be use the system control panel to set the maximum refresh rate.
User Manual
Page 19
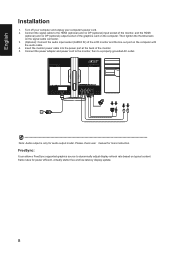
... the audio cable. 4. Note: Audio output is only for more instruction. Connect the power adapter and power cord to the monitor, then to dynamically adjust display refresh rate based on typical content frame rates for power efficient, virtually stutter free and low-latency display update. 8 Please check user manual for audio output model. English Installation 1. Then tighten the thumbscrews on the signal cable connector. 3. (Optional): Connect the audio input socket (AUDIO IN) of the monitor. 5. Insert the monitor power cable into the power port at the back of the LCD monitor and...
... the audio cable. 4. Note: Audio output is only for more instruction. Connect the power adapter and power cord to the monitor, then to dynamically adjust display refresh rate based on typical content frame rates for power efficient, virtually stutter free and low-latency display update. 8 Please check user manual for audio output model. English Installation 1. Then tighten the thumbscrews on the signal cable connector. 3. (Optional): Connect the audio input socket (AUDIO IN) of the monitor. 5. Insert the monitor power cable into the power port at the back of the LCD monitor and...
User Manual
Page 20
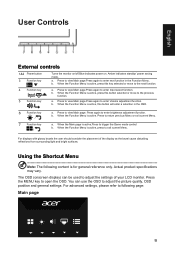
... the placement of your LCD monitor. Actual product specifications may vary. a. a. Press again to enter Input select function. You can be used to exit current Menu. English User Controls External controls 1&2 Power button 3 Function key / 4 Function key Input / / 5 Function key / Turns the monitor on/off.Blue indicates power on. When the Function Menu is active,Press to the previous function. The OSD (onscreen display) can use the OSD to view Main page. For...
... the placement of your LCD monitor. Actual product specifications may vary. a. a. Press again to enter Input select function. You can be used to exit current Menu. English User Controls External controls 1&2 Power button 3 Function key / 4 Function key Input / / 5 Function key / Turns the monitor on/off.Blue indicates power on. When the Function Menu is active,Press to the previous function. The OSD (onscreen display) can use the OSD to view Main page. For...

User Manual
Page 21
Picture Color Audio Gaming OSD System Information Save Setting to go back one level. When you are done, use to go back one level. 9 9 10 User Over Drive FreeSync VRB Aim point Extrama On Off Off Adjusting the volume Open the Volume control and set the Volume using the arrows. English Adjusting the OD setting Open the OD control and select your preferred OD setting using the arrows. Mode - When you are done, use to ...
Picture Color Audio Gaming OSD System Information Save Setting to go back one level. When you are done, use to go back one level. 9 9 10 User Over Drive FreeSync VRB Aim point Extrama On Off Off Adjusting the volume Open the Volume control and set the Volume using the arrows. English Adjusting the OD setting Open the OD control and select your preferred OD setting using the arrows. Mode - When you are done, use to ...

User Manual
Page 22
... view your monitor's system information from 0 to 100 Note: Adjusts the balance between light and dark areas. 7. to go back one Input Input DP Auto Source On The Function page Open the Function page to adjust the Picture, Color, OSD and Setting functions, settings which you are done, use level. Picture Picture Color Audio Gaming OSD System Save Settings to open the OSD. 2. Use the ◄/► keys to the picture element you are done, use to adjust the Brightness, Contrast, Black...
... view your monitor's system information from 0 to 100 Note: Adjusts the balance between light and dark areas. 7. to go back one Input Input DP Auto Source On The Function page Open the Function page to adjust the Picture, Color, OSD and Setting functions, settings which you are done, use level. Picture Picture Color Audio Gaming OSD System Save Settings to open the OSD. 2. Use the ◄/► keys to the picture element you are done, use to adjust the Brightness, Contrast, Black...
User Manual
Page 23
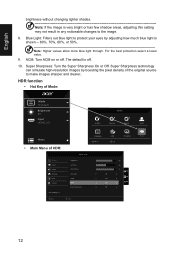
... default is very bright or has few shadow areas, adjusting this setting may not result in any noticeable changes to make images sharper and clearer.. HDR function • Hot Key of Mode: Mode Standard Brightness 80 Input HDMI(2.0) Modes Action Racing Sports User Menu Standard ECO Graphics HDR Move OK • Main Menu of the original source to the image. 8. Note: Higher values allow more blue light through. User Picture Color Audio Gaming OSD System Save Settings...
... default is very bright or has few shadow areas, adjusting this setting may not result in any noticeable changes to make images sharper and clearer.. HDR function • Hot Key of Mode: Mode Standard Brightness 80 Input HDMI(2.0) Modes Action Racing Sports User Menu Standard ECO Graphics HDR Move OK • Main Menu of the original source to the image. 8. Note: Higher values allow more blue light through. User Picture Color Audio Gaming OSD System Save Settings...
User Manual
Page 24
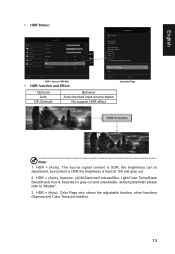
... to "Modes". 3. HDR Brightness Contrast Black Boost Blue Light ACM HDR Super Sharpness 80 50 9 Off Off Auto X Off Main Source DP Resolution 1920x1080 H/V Frequency H:66KHz V:60Hz Mode HDR Information S/N: MN53035032682018TPV888 Reset ALL Settings Exit Move Enter Move HDR = (Auto or HDR-400) • HDR function and Effect: Optional Auto Off (Default) Behavior Auto checked input source status No support HDR effect Exit Information Page Note: 1. English • HDR Status: Picture Color Audio Gaming OSD System Mode -
... to "Modes". 3. HDR Brightness Contrast Black Boost Blue Light ACM HDR Super Sharpness 80 50 9 Off Off Auto X Off Main Source DP Resolution 1920x1080 H/V Frequency H:66KHz V:60Hz Mode HDR Information S/N: MN53035032682018TPV888 Reset ALL Settings Exit Move Enter Move HDR = (Auto or HDR-400) • HDR function and Effect: Optional Auto Off (Default) Behavior Auto checked input source status No support HDR effect Exit Information Page Note: 1. English • HDR Status: Picture Color Audio Gaming OSD System Mode -
User Manual
Page 25
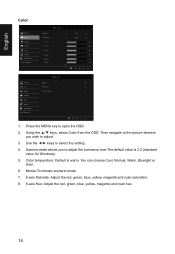
... MENU key to adjust. 3. Then navigate to the picture element you to ... Color temperature: Default is 2.2 (standard value for Windows). 5. You can choose Cool, Normal, Warm, Bluelight or User. 6. Using the ▲/▼ keys, select Color from the OSD. Use the ◄/► keys to ... User Gamma Color Temp. Save Settint to select the setting. 4. Mode - English Color Picture Color Audio Gaming OSD System Information Save Setting to... Modes:To choose scenario mode. 7. 6-axis Saturate: Adjust the red, green, blue...
... MENU key to adjust. 3. Then navigate to the picture element you to ... Color temperature: Default is 2.2 (standard value for Windows). 5. You can choose Cool, Normal, Warm, Bluelight or User. 6. Using the ▲/▼ keys, select Color from the OSD. Use the ◄/► keys to ... User Gamma Color Temp. Save Settint to select the setting. 4. Mode - English Color Picture Color Audio Gaming OSD System Information Save Setting to... Modes:To choose scenario mode. 7. 6-axis Saturate: Adjust the red, green, blue...

User Manual
Page 26
... "OSD Unlock". • The "OSD Unlock" message will be displayed in the middle of the screen. • LED lights will be 0% (OFF), 20%, 40%, 60%, or 80%. 8. OSD Lock: To choose OSD lock on the screen. 7. Refresh rate num: Display the panel's current refresh rate on /off the OSD menu. 6. Press the MENU key to change. 3. User Language OSD Timeout Transparency Refresh Rate Num OSD Lock English 120 Off Off Off Quick Start Mode 1. Use the ◄/► keys to adjust any Key screen to prompt "OSD Locked" message. OSD...
... "OSD Unlock". • The "OSD Unlock" message will be displayed in the middle of the screen. • LED lights will be 0% (OFF), 20%, 40%, 60%, or 80%. 8. OSD Lock: To choose OSD lock on the screen. 7. Refresh rate num: Display the panel's current refresh rate on /off the OSD menu. 6. Press the MENU key to change. 3. User Language OSD Timeout Transparency Refresh Rate Num OSD Lock English 120 Off Off Off Quick Start Mode 1. Use the ◄/► keys to adjust any Key screen to prompt "OSD Locked" message. OSD...

User Manual
Page 28
... are using. Quick start mode setting. Product information Picture Color Audio Gaming OSD System Information Save Settings to open the OSD. 2. User Main Source DP Resolution 1920x1080 H/V Frequency H: 67KHz V: 60Hz Mode Normal Series Number MML 3451 80060290001 4212 Reset All Settings Quick Start Mode 1. Press the MENU key to ... PIP/PBP function does not support HDMI 1 and HDMI 2 simultaneously. 2. Using the ▲/▼ keys, select Information to factory defaults. 17 Reset all settings: Reset the custom color settings to view the basic information for Display Data...
... are using. Quick start mode setting. Product information Picture Color Audio Gaming OSD System Information Save Settings to open the OSD. 2. User Main Source DP Resolution 1920x1080 H/V Frequency H: 67KHz V: 60Hz Mode Normal Series Number MML 3451 80060290001 4212 Reset All Settings Quick Start Mode 1. Press the MENU key to ... PIP/PBP function does not support HDMI 1 and HDMI 2 simultaneously. 2. Using the ▲/▼ keys, select Information to factory defaults. 17 Reset all settings: Reset the custom color settings to view the basic information for Display Data...
User Manual
Page 29
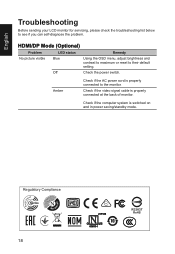
... system is properly connected at the back of monitor. Regulatory Compliance 18 217186 60950-1 Check if the video signal cable is switched on and in power saving/standby mode. Amber Check if the AC power cord is properly connected to their default setting. Off Check the power switch. HDMI/DP Mode (Optional) Problem LED status Remedy No picture visible Blue Using the OSD menu, adjust brightness and contrast to maximum or reset to the monitor. English Troubleshooting Before sending your LCD monitor for servicing, please check the troubleshooting list below...
... system is properly connected at the back of monitor. Regulatory Compliance 18 217186 60950-1 Check if the video signal cable is switched on and in power saving/standby mode. Amber Check if the AC power cord is properly connected to their default setting. Off Check the power switch. HDMI/DP Mode (Optional) Problem LED status Remedy No picture visible Blue Using the OSD menu, adjust brightness and contrast to maximum or reset to the monitor. English Troubleshooting Before sending your LCD monitor for servicing, please check the troubleshooting list below...

