User Manual
Page 2
.... The serial number and model number are recorded on the label affixed to the information in the space provided below. Acer LCD Monitor User Guide Original Issue: 06/2019 Changes may be reproduced, stored in a retrieval system, or transmitted, in new editions of Acer Incorporated. English Copyright © 2019. Record the model number, serial number, purchase date and place of purchase information in this manual or supplementary...
.... The serial number and model number are recorded on the label affixed to the information in the space provided below. Acer LCD Monitor User Guide Original Issue: 06/2019 Changes may be reproduced, stored in a retrieval system, or transmitted, in new editions of Acer Incorporated. English Copyright © 2019. Record the model number, serial number, purchase date and place of purchase information in this manual or supplementary...
User Manual
Page 3
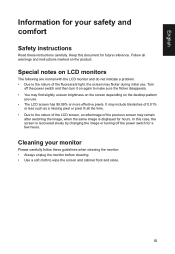
.... Turn off the power switch for your monitor Please carefully follow these instructions carefully. iii Cleaning your safety and comfort Safety instructions Read these guidelines when cleaning the monitor: • Always unplug the monitor before cleaning. • Use a soft cloth to make sure the flicker disappears. • You may flicker during initial use . • The LCD screen has 99.99% or more effective pixels. Keep this case, the screen is displayed for...
.... Turn off the power switch for your monitor Please carefully follow these instructions carefully. iii Cleaning your safety and comfort Safety instructions Read these guidelines when cleaning the monitor: • Always unplug the monitor before cleaning. • Use a soft cloth to make sure the flicker disappears. • You may flicker during initial use . • The LCD screen has 99.99% or more effective pixels. Keep this case, the screen is displayed for...

User Manual
Page 4
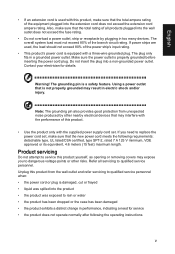
... they may touch dangerous voltage points or short-out parts that the power outlet you plug the power cord into the product. • To avoid dmage of time listening to music at high volume. • Avoid turning up the volume to block out noisy surroundings. • Turn the volume down if you need to disconnect power from the equipment, be blocked or covered. When...
... they may touch dangerous voltage points or short-out parts that the power outlet you plug the power cord into the product. • To avoid dmage of time listening to music at high volume. • Avoid turning up the volume to block out noisy surroundings. • Turn the volume down if you need to disconnect power from the equipment, be blocked or covered. When...
User Manual
Page 5
...; the product exhibits a distinct change in too many devices. If power strips are used with this product, make sure that the total rating of all servicing to qualified service personnel. If you to replace the power cord set . English • If an extension cord is used , the load should not exceed 80% of the power strip's input rating. • This product's power cord is equipped with a three-wire grounded plug.
...; the product exhibits a distinct change in too many devices. If power strips are used with this product, make sure that the total rating of all servicing to qualified service personnel. If you to replace the power cord set . English • If an extension cord is used , the load should not exceed 80% of the power strip's input rating. • This product's power cord is equipped with a three-wire grounded plug.

User Manual
Page 6
...you would normally be advised to turn off your device in any area with a potentially explosive atmosphere are in minimizing the burden placed on boats, chemical transfer or storage facilities, vehicles using liquefied petroleum gas (such as ...Switch off your vehicle engine. For more information on the features and benefits of our other controls may contain small parts. We at Acer are covered by the operating instructions, since improper adjustment of other products. Sparks in such areas could cause an explosion or fire resulting in damage and will often require extensive work...
...you would normally be advised to turn off your device in any area with a potentially explosive atmosphere are in minimizing the burden placed on boats, chemical transfer or storage facilities, vehicles using liquefied petroleum gas (such as ...Switch off your vehicle engine. For more information on the features and benefits of our other controls may contain small parts. We at Acer are covered by the operating instructions, since improper adjustment of other products. Sparks in such areas could cause an explosion or fire resulting in damage and will often require extensive work...

User Manual
Page 7
... zone Find your sitting height to remove the strain on the recorded image and does not constitute a malfunction. Tips and information for comfortable use . Incorrect computer usage may complain of the monitor, using a footrest, or raising your comfort zone by adjusting the viewing angle of eyestrain and headaches after long hours of a computer. English LCD pixel statement The LCD unit is in...
... zone Find your sitting height to remove the strain on the recorded image and does not constitute a malfunction. Tips and information for comfortable use . Incorrect computer usage may complain of the monitor, using a footrest, or raising your comfort zone by adjusting the viewing angle of eyestrain and headaches after long hours of a computer. English LCD pixel statement The LCD unit is in...

User Manual
Page 8
... display. • Adjust the display brightness and/or contrast to make your eyes. Developing good work habits to a comfortable level for enhanced text readability and graphics clarity. • Eliminate glare and reflections by: • placing your display in such a way that the side faces the window or any light source • minimizing room light by looking at bright light sources, such as open windows, for video and visual display...
... display. • Adjust the display brightness and/or contrast to make your eyes. Developing good work habits to a comfortable level for enhanced text readability and graphics clarity. • Eliminate glare and reflections by: • placing your display in such a way that the side faces the window or any light source • minimizing room light by looking at bright light sources, such as open windows, for video and visual display...

User Manual
Page 11
... for comfortable use vii Finding your comfort zone vii Taking care of your vision viii Developing good work habits viii Declaration of Conformity ix Federal Communications Commission x Supplier's Declaration of Conformity x Unpacking 1 SCREEN POSITION ADJUSTMENT 2 Connecting the adapter and AC Power cord 4 Power saving 4 Display Data Channel (DDC) 5 20-pin color display signal cable 5 19-pin color display signal cable 6 Standard timing table 7 Installation 8 User Controls 9 Using the Shortcut Menu 10 Troubleshooting 15 HDMI/DP Mode (Optional) 15...
... for comfortable use vii Finding your comfort zone vii Taking care of your vision viii Developing good work habits viii Declaration of Conformity ix Federal Communications Commission x Supplier's Declaration of Conformity x Unpacking 1 SCREEN POSITION ADJUSTMENT 2 Connecting the adapter and AC Power cord 4 Power saving 4 Display Data Channel (DDC) 5 20-pin color display signal cable 5 19-pin color display signal cable 6 Standard timing table 7 Installation 8 User Controls 9 Using the Shortcut Menu 10 Troubleshooting 15 HDMI/DP Mode (Optional) 15...

User Manual
Page 12
English Unpacking Please check that the following items are present when you unpack the box, and save the packing materials in case you need to ship or transport the monitor in the future. LCD monitor Quick start guide USB cable (Optional) DP Cable (Optional) *NC.20111.0M8* NC.20111.0M8 Predator XB273 Quick Guide HDMI cable (Optional) AC Power cord 1
English Unpacking Please check that the following items are present when you unpack the box, and save the packing materials in case you need to ship or transport the monitor in the future. LCD monitor Quick start guide USB cable (Optional) DP Cable (Optional) *NC.20111.0M8* NC.20111.0M8 Predator XB273 Quick Guide HDMI cable (Optional) AC Power cord 1

User Manual
Page 13
Only at the highest point can adjust the height of the monitor. 1 2 115mm • Tilt Please see the illustration below for the angle of the tilt range. English SCREEN POSITION ADJUSTMENT In oder to optimize the best viewing position, you can adjust the height/tilt of the monitor. • Height Adjustment After pressing the top of the monitor then you can 20 degrees of recline be offered for an example of elevation. -5° 20° 2
Only at the highest point can adjust the height of the monitor. 1 2 115mm • Tilt Please see the illustration below for the angle of the tilt range. English SCREEN POSITION ADJUSTMENT In oder to optimize the best viewing position, you can adjust the height/tilt of the monitor. • Height Adjustment After pressing the top of the monitor then you can 20 degrees of recline be offered for an example of elevation. -5° 20° 2

User Manual
Page 15
No user-adjustment is required. • Plug one end of H05VV-F cord and plug rated 10 A/250 V. Power saving The monitor will be installed. English Connecting the adapter and AC Power cord • Check first to make sure that allows operation in which the equipment will be kept until a control signal has been detected or the keyboard or mouse is activated. State ON Power Saving Mode LED Light Blue Amber The power saving states will be driven into...
No user-adjustment is required. • Plug one end of H05VV-F cord and plug rated 10 A/250 V. Power saving The monitor will be installed. English Connecting the adapter and AC Power cord • Check first to make sure that allows operation in which the equipment will be kept until a control signal has been detected or the keyboard or mouse is activated. State ON Power Saving Mode LED Light Blue Amber The power saving states will be driven into...
User Manual
Page 16
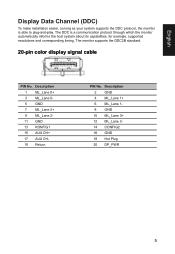
for example, supported resolutions and corresponding timing. Description 2 GND 4 ML_Lane 1+ 6 ML_Lane 18 GND 10 ML_Lane 3+ 12 ML_Lane 314 CONFIG2 16 GND 18 Hot Plug 20 DP_PWR 5 English Display Data Channel (DDC) To make installation easier, so long as your system supports the DDC protocol, the monitor is a communication protocol through which the monitor automatically informs the host system about its capabilities...
for example, supported resolutions and corresponding timing. Description 2 GND 4 ML_Lane 1+ 6 ML_Lane 18 GND 10 ML_Lane 3+ 12 ML_Lane 314 CONFIG2 16 GND 18 Hot Plug 20 DP_PWR 5 English Display Data Channel (DDC) To make installation easier, so long as your system supports the DDC protocol, the monitor is a communication protocol through which the monitor automatically informs the host system about its capabilities...

User Manual
Page 19
... the monitor. 5. Connect the USB 3.0 cable to port for more instruction. 8 English Installation 1. Please check user manual for fast charge. Connect the USB Cable(Optional) Connect the USB 3.0 cable to port. 4. USB3.0 port -supporting fast charge USB3.0 port HDMI USB HDMI USB Note: Audio output is only for audio output model. Insert the monitor power cable into a nearby electrical outlet. Plug the power cords of your computer and your computer's power cord. 2. Turn off your computer and unplug your monitor into the power port at the back of the graphics card...
... the monitor. 5. Connect the USB 3.0 cable to port for more instruction. 8 English Installation 1. Please check user manual for fast charge. Connect the USB Cable(Optional) Connect the USB 3.0 cable to port. 4. USB3.0 port -supporting fast charge USB3.0 port HDMI USB HDMI USB Note: Audio output is only for audio output model. Insert the monitor power cable into a nearby electrical outlet. Plug the power cords of your computer and your computer's power cord. 2. Turn off your computer and unplug your monitor into the power port at the back of the graphics card...
User Manual
Page 20
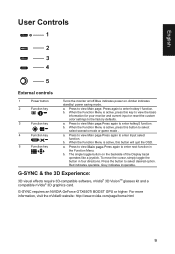
...: http://www.nvidia.com/page/home.html 9 Press to view Main page.Press again to enter hotkey1 function. English User Controls 1 2 3 4 5 External controls 1 Power button 2 Function key / 3 Function key / 4 Function key /X 5 Function key / Turns the monitor on/off.Blue indicates power on the backside of the Display bezel operates like a joystick. Amber indicates standby/ power saving mode. Press to enter next function in four directions.
...: http://www.nvidia.com/page/home.html 9 Press to view Main page.Press again to enter hotkey1 function. English User Controls 1 2 3 4 5 External controls 1 Power button 2 Function key / 3 Function key / 4 Function key /X 5 Function key / Turns the monitor on/off.Blue indicates power on the backside of the Display bezel operates like a joystick. Amber indicates standby/ power saving mode. Press to enter next function in four directions.

User Manual
Page 21
Hot Key2 Modes, Brightness, Contrast, Volume, Gamma, Blue Light, Over Drive 3. Hot Key1 Modes, Brightness, Volume, Gamma, Contrast, Blue Light, Over Drive 2. When you are done, press the joystick to open the OSD. The OSD (onscreen display) can use or scenario mode (User, Standard, ECO, Graphics, Movie) Modes Action Racing Sports User Standard Move ECO OK Graphics Movie Hot key2 (default: Brightness) Open the Brightness control and select your LCD monitor. Main Menu Hot key1 (default: Modes) To choose scenario mode (G1 , G2...
Hot Key2 Modes, Brightness, Contrast, Volume, Gamma, Blue Light, Over Drive 3. Hot Key1 Modes, Brightness, Volume, Gamma, Contrast, Blue Light, Over Drive 2. When you are done, press the joystick to open the OSD. The OSD (onscreen display) can use or scenario mode (User, Standard, ECO, Graphics, Movie) Modes Action Racing Sports User Standard Move ECO OK Graphics Movie Hot key2 (default: Brightness) Open the Brightness control and select your LCD monitor. Main Menu Hot key1 (default: Modes) To choose scenario mode (G1 , G2...

User Manual
Page 22
... the joystick to open the OSD. 2. Modes Hot Key : To change Modes Hot Key menu. 6. English Ref. Picture Picture Color Audio Gaming OSD System Mode - Toggle the joystick to the up or down to select Picture from the OSD.Then toggle to the right to navigate to the element you wish to adjust and press the joystick to enter it . 11 Standard Brightness Contrast Blue Light Dark Boost Adaptive Contrast 65 50...
... the joystick to open the OSD. 2. Modes Hot Key : To change Modes Hot Key menu. 6. English Ref. Picture Picture Color Audio Gaming OSD System Mode - Toggle the joystick to the up or down to select Picture from the OSD.Then toggle to the right to navigate to the element you wish to adjust and press the joystick to enter it . 11 Standard Brightness Contrast Blue Light Dark Boost Adaptive Contrast 65 50...
User Manual
Page 23
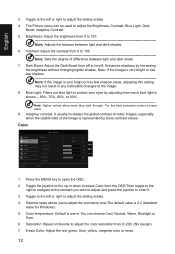
.... 3. Color Picture Color Audio Gaming OSD System Move Mode - Enhances shadows by close contrast values. Brightness: Adjust the brightness from the OSD.Then toggle to the right to navigate to the element you to adjust the color saturation from off to adjust the Brightness, Contrast, Blue Light, Dark Boost, Adaptive Contrast. 5. For the best protection select a lower value. 9. Red Color Green Color Blur Color Saturation 6-axis Color Enter 22 Warm 50 50 50 X 100 1. Press the MENU key...
.... 3. Color Picture Color Audio Gaming OSD System Move Mode - Enhances shadows by close contrast values. Brightness: Adjust the brightness from the OSD.Then toggle to the right to navigate to the element you to adjust the color saturation from off to adjust the Brightness, Contrast, Blue Light, Dark Boost, Adaptive Contrast. 5. For the best protection select a lower value. 9. Red Color Green Color Blur Color Saturation 6-axis Color Enter 22 Warm 50 50 50 X 100 1. Press the MENU key...

User Manual
Page 24
Stardard Volume 70 X Save Settings to open the OSD. 2. Toggle to the left or right to adjust the sliding scales. 4. Press the MENU key to ... Over Drive: Select Off, Normal or Extreme. 5. Move Enter 1. Volume: Adjust the volume Gaming Picture Color Audio Gaming OSD System Mode - Toggle to the left or right to enter it . 3. Toggle the joystick to the up or down to select Audio from...
Stardard Volume 70 X Save Settings to open the OSD. 2. Toggle to the left or right to adjust the sliding scales. 4. Press the MENU key to ... Over Drive: Select Off, Normal or Extreme. 5. Move Enter 1. Volume: Adjust the volume Gaming Picture Color Audio Gaming OSD System Mode - Toggle to the left or right to enter it . 3. Toggle the joystick to the up or down to select Audio from...

User Manual
Page 25
... source from the OSD.Then toggle to the right to navigate to the element you wish to adjust and press the joystick to enter it . 3. Language: Set the OSD menu language. 5. English OSD Picture Color Audio Gaming OSD System Mode - Standard Language OSD Timeout Transparency Refresh rate num English Off Off 10 X Move Enter 1. OSD timeout: Adjust the delay before turning off the OSD menu. 6. Transparency: Select the transparency when using . Standard Input Hot Key Assignment Wide Mode Deep Sleep Quick Start Mode Power...
... source from the OSD.Then toggle to the right to navigate to the element you wish to adjust and press the joystick to enter it . 3. Language: Set the OSD menu language. 5. English OSD Picture Color Audio Gaming OSD System Mode - Standard Language OSD Timeout Transparency Refresh rate num English Off Off 10 X Move Enter 1. OSD timeout: Adjust the delay before turning off the OSD menu. 6. Transparency: Select the transparency when using . Standard Input Hot Key Assignment Wide Mode Deep Sleep Quick Start Mode Power...
User Manual
Page 26
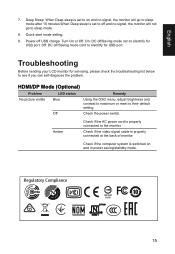
... signal, the monitor will not go to electrify for USB port. Check if the computer system is properly connected at the back of monitor. Power-off /Saving mode can self-diagnose the problem. HDMI/DP Mode (Optional) Problem LED status Remedy No picture visible Blue Using the OSD menu, adjust brightness and contrast to maximum or reset to the monitor. Off Check the power switch. Amber Check if the AC power cord is set to off /Saving mode can to electrify for servicing, please check the troubleshooting...
... signal, the monitor will not go to electrify for USB port. Check if the computer system is properly connected at the back of monitor. Power-off /Saving mode can self-diagnose the problem. HDMI/DP Mode (Optional) Problem LED status Remedy No picture visible Blue Using the OSD menu, adjust brightness and contrast to maximum or reset to the monitor. Off Check the power switch. Amber Check if the AC power cord is set to off /Saving mode can to electrify for servicing, please check the troubleshooting...


