
User Manual RGB Light Sense
Page 2
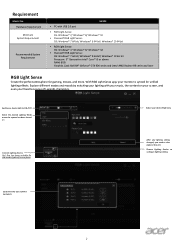
... Adjust your device light to configure lighting setting Customize the LED numbers (optional) 2 Choose Lighting Device to ON /OFF Select the desired Lighting Mode when the system has been turned on your screen, and even your monitor is synced for gaming, movies, and more. Swith your device Brightness Connect Lighting Device. Explore different modes and moods by matching your lighting with USB 2.0 port GB300 GB100W • RGB Light Sense: OS: Windows® 7/ Windows® 8/ Windows...
... Adjust your device light to configure lighting setting Customize the LED numbers (optional) 2 Choose Lighting Device to ON /OFF Select the desired Lighting Mode when the system has been turned on your screen, and even your monitor is synced for gaming, movies, and more. Swith your device Brightness Connect Lighting Device. Explore different modes and moods by matching your lighting with USB 2.0 port GB300 GB100W • RGB Light Sense: OS: Windows® 7/ Windows® 8/ Windows...
User Manual RGB Light Sense
Page 3
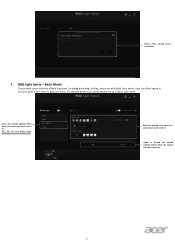
... the desired Color when the system has been turned on . Vary the effect speed to suit your preference, then sit back and enjoy. RGB Light Sense - Acer X35 only support Static, Breathing and Spectrum on . 3 Apply or Discard the desired Lighting setting when the system has been turned on Basic mode. All enabled devices are automatically set up in Basic Sync mode. Plesae check lighting device...
... the desired Color when the system has been turned on . Vary the effect speed to suit your preference, then sit back and enjoy. RGB Light Sense - Acer X35 only support Static, Breathing and Spectrum on . 3 Apply or Discard the desired Lighting setting when the system has been turned on Basic mode. All enabled devices are automatically set up in Basic Sync mode. Plesae check lighting device...
User Manual RGB Light Sense
Page 4
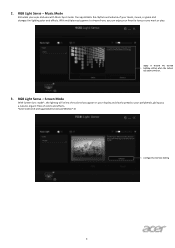
The app detects the rhythm and volume of colors and effects. *Screen mode works with Music Sync mode. With multiple music genres to your peripherals, giving you work or play. Screen Mode With Screen Sync mode*, the lighting will mimic the colors that appear on . 3. RGB Light Sense - 2. Configure Screen Sync Setting 4 Apply or Discard the desired Lighting setting when the system has been turned on your display and slowly spread to choose from, you...
The app detects the rhythm and volume of colors and effects. *Screen mode works with Music Sync mode. With multiple music genres to your peripherals, giving you work or play. Screen Mode With Screen Sync mode*, the lighting will mimic the colors that appear on . 3. RGB Light Sense - 2. Configure Screen Sync Setting 4 Apply or Discard the desired Lighting setting when the system has been turned on your display and slowly spread to choose from, you...
User Manual RGB Light Sense
Page 5
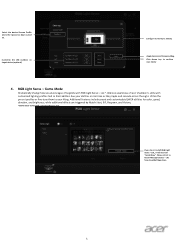
... the system has been turned on target device (optional) Configure Screen Sync Setting Apply the desired Screen setting Click Demo key to Install RGB Light Sense - LoL*. See your liking. Additional features include preset and customizable QWER abilities for color, speed, duration, and brightness, while additional effects are triggered by Match Start, Kill, Respawn, and Victory. *Game mode works with customized lighting profiles tied to...
... the system has been turned on target device (optional) Configure Screen Sync Setting Apply the desired Screen setting Click Demo key to Install RGB Light Sense - LoL*. See your liking. Additional features include preset and customizable QWER abilities for color, speed, duration, and brightness, while additional effects are triggered by Match Start, Kill, Respawn, and Victory. *Game mode works with customized lighting profiles tied to...
User Manual
Page 3
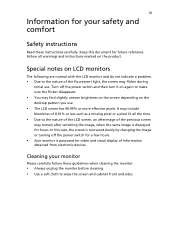
... for video and visual display of the fluorescent light, the screen may flicker during initial use . • The LCD screen has 99.99% or more effective pixels. Keep this case, the screen is recovered slowly by changing the image or turning off the power switch and then turn it on again to the nature of the LCD screen, an afterimage of the previous screen may find slightly uneven brightness on the screen...
... for video and visual display of the fluorescent light, the screen may flicker during initial use . • The LCD screen has 99.99% or more effective pixels. Keep this case, the screen is recovered slowly by changing the image or turning off the power switch and then turn it on again to the nature of the LCD screen, an afterimage of the previous screen may find slightly uneven brightness on the screen...
User Manual
Page 4
... the following power supplies: Manufacturer: Delta Electronics Inc., Model: ADP-280BB B Using electrical power • This product should be placed near you. These openings must not be blocked by placing the product on a bed, sofa, rug or other purposes. • Your device uses one of time listening to music at high volume. • Avoid turning up the volume to prevent...
... the following power supplies: Manufacturer: Delta Electronics Inc., Model: ADP-280BB B Using electrical power • This product should be placed near you. These openings must not be blocked by placing the product on a bed, sofa, rug or other purposes. • Your device uses one of time listening to music at high volume. • Avoid turning up the volume to prevent...
User Manual
Page 5
... wall outlet and refer servicing to qualified service personnel when: • the power cord or plug is damaged, cut or frayed • liquid was exposed to replace the power cord set . Unplug this product yourself, as opening or removing covers may interfere with the performance of all servicing to dangerous voltage points or other risks. Also, make sure that the total rating of this product. • Use...
... wall outlet and refer servicing to qualified service personnel when: • the power cord or plug is damaged, cut or frayed • liquid was exposed to replace the power cord set . Unplug this product yourself, as opening or removing covers may interfere with the performance of all servicing to dangerous voltage points or other risks. Also, make sure that the total rating of this product. • Use...

User Manual
Page 6
...For more information and help when recycling, please go to environmental protection and views recycling, in damage and will often require extensive work by the operating instructions, since improper adjustment of our other controls may contain small parts. vi Note: Adjust only those controls that are often, ... to identify and provide the best working procedures to reduce the environmental impact of the company's top priorities in any area with a potentially explosive atmosphere are covered by a qualified technician to restore the product to turn off your vehicle engine. They...
...For more information and help when recycling, please go to environmental protection and views recycling, in damage and will often require extensive work by the operating instructions, since improper adjustment of our other controls may contain small parts. vi Note: Adjust only those controls that are often, ... to identify and provide the best working procedures to reduce the environmental impact of the company's top priorities in any area with a potentially explosive atmosphere are covered by a qualified technician to restore the product to turn off your vehicle engine. They...

User Manual
Page 7
... • stand up and walk around regularly to carpal tunnel syndrome, tendonitis, tenosynovitis or other musculoskeletal disorders. Observe the following tips: • refrain from Sleep mode by adjusting the viewing angle of the monitor, using a footrest, or raising your company's health and safety department. The following symptoms may lead to remove the strain on the recorded image and does...
... • stand up and walk around regularly to carpal tunnel syndrome, tendonitis, tenosynovitis or other musculoskeletal disorders. Observe the following tips: • refrain from Sleep mode by adjusting the viewing angle of the monitor, using a footrest, or raising your company's health and safety department. The following symptoms may lead to remove the strain on the recorded image and does...

User Manual
Page 9
TABLE OF CONTENTS UNPACKING 1 REMOVING THE STAND ARM FOR WALL MOUNT 2 ATTACHING THE BASE 3 SCREEN POSITION ADJUSTMENT 4 CONNECTING THE POWER CORD 6 SAFETY PRECAUTION 6 CLEANING YOUR MONITOR 6 POWER SAVING 7 DDC...7 CONNECTOR PIN ASSIGNMENT 8 Standard Timing Table 9 INSTALLATION 10 USER CONTROLS 11 TROUBLESHOOTING 22
TABLE OF CONTENTS UNPACKING 1 REMOVING THE STAND ARM FOR WALL MOUNT 2 ATTACHING THE BASE 3 SCREEN POSITION ADJUSTMENT 4 CONNECTING THE POWER CORD 6 SAFETY PRECAUTION 6 CLEANING YOUR MONITOR 6 POWER SAVING 7 DDC...7 CONNECTOR PIN ASSIGNMENT 8 Standard Timing Table 9 INSTALLATION 10 USER CONTROLS 11 TROUBLESHOOTING 22
User Manual
Page 15
... U.S.): Use a Cord Set consisting of H05VV-F cord and plug rated 10 A, 250 V. No user-adjustment is required. Plug one end of the AC power cord to the adapter, and plug the other light sources may reflect on the power cord to avoid damage to the cable. Do not expose the monitor to rain, excessive moisture, or dust. Do not cover the ventilation slots or openings of the monitor. SAFETY...
... U.S.): Use a Cord Set consisting of H05VV-F cord and plug rated 10 A, 250 V. No user-adjustment is required. Plug one end of the AC power cord to the adapter, and plug the other light sources may reflect on the power cord to avoid damage to the cable. Do not expose the monitor to rain, excessive moisture, or dust. Do not cover the ventilation slots or openings of the monitor. SAFETY...
User Manual
Page 16
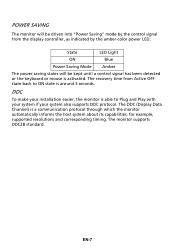
.... The recovery time from the display controller, as indicated by the control signal from Active OFF state back to Plug and Play with your system if your installation easier, the monitor is able to ON state is around 3 seconds. The monitor supports DDC2B standard. State LED Light ON Blue Power Saving Mode Amber The power saving states will be kept until a control signal has been detected or the keyboard...
.... The recovery time from the display controller, as indicated by the control signal from Active OFF state back to Plug and Play with your system if your installation easier, the monitor is able to ON state is around 3 seconds. The monitor supports DDC2B standard. State LED Light ON Blue Power Saving Mode Amber The power saving states will be kept until a control signal has been detected or the keyboard...
User Manual
Page 19
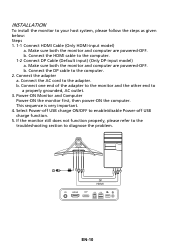
... troubleshooting section to the adapter. Power-ON Monitor and Computer Power-ON the monitor first, then power-ON the computer. Connect the AC cord to diagnose the problem. b. b. INSTALLATION To install the monitor to the computer. 1-2 Connect DP Cable (Default input) (Only DP-input model) a. Make sure both the monitor and computer are powered-OFF. Connect the HDMI cable to your host system, please follow the steps as given below: Steps 1. 1-1 Connect HDMI Cable (Only HDMI-input model) a. Make sure both the monitor...
... troubleshooting section to the adapter. Power-ON Monitor and Computer Power-ON the monitor first, then power-ON the computer. Connect the AC cord to diagnose the problem. b. b. INSTALLATION To install the monitor to the computer. 1-2 Connect DP Cable (Default input) (Only DP-input model) a. Make sure both the monitor and computer are powered-OFF. Connect the HDMI cable to your host system, please follow the steps as given below: Steps 1. 1-1 Connect HDMI Cable (Only HDMI-input model) a. Make sure both the monitor...

User Manual
Page 20
Press to highlight the desired function. EN-11 Press to activate the OSD menu, then use it again to toggle input sources. Press it as a directional key to activate user defined hotkey function. Amber indicates standby/power saving mode. Press to enter a selection. Item 1 Power button/indicator 2 Hotkey 1, 2 buttons 3 Input button 4 Navi/OK button Description Turns the monitor on . USER CONTROLS Base Controls 1 2 3 4 1 No. Blue indicates power on /off.
Press to highlight the desired function. EN-11 Press to activate the OSD menu, then use it again to toggle input sources. Press it as a directional key to activate user defined hotkey function. Amber indicates standby/power saving mode. Press to enter a selection. Item 1 Power button/indicator 2 Hotkey 1, 2 buttons 3 Input button 4 Navi/OK button Description Turns the monitor on . USER CONTROLS Base Controls 1 2 3 4 1 No. Blue indicates power on /off.

User Manual
Page 21
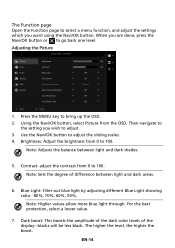
... open the OSD. Menu Turn Modes on -screen display) can be used for more information). Mode 2. Adjusting the OSD settings Note: The following page: Main Page The default function for general reference only. Press the MENU key to your LCD Monitor. EN-12 Brightness 3. You can use the Hot Key Assignment function to set these buttons to open the Modes control and select which user-defined profile to use (please see the OSD section for adjusting the settings...
... open the OSD. Menu Turn Modes on -screen display) can be used for more information). Mode 2. Adjusting the OSD settings Note: The following page: Main Page The default function for general reference only. Press the MENU key to your LCD Monitor. EN-12 Brightness 3. You can use the Hot Key Assignment function to set these buttons to open the Modes control and select which user-defined profile to use (please see the OSD section for adjusting the settings...
User Manual
Page 23
... Picture from 0 to adjust. 3. Brightness: Adjust the brightness from 0 to go back one level. For the best protection, select a lower value. 7. Adjusting the Picture 1. Dark boost: This boosts the amplitude of the dark color levels of difference between light and dark shades. 5. EN-14 Then navigate to the setting you want using the Navi/OK button. Contrast: adjust the contrast from the OSD. Blue Light: filter out blue light by adjusting different Blue Light...
... Picture from 0 to adjust. 3. Brightness: Adjust the brightness from 0 to go back one level. For the best protection, select a lower value. 7. Adjusting the Picture 1. Dark boost: This boosts the amplitude of the dark color levels of difference between light and dark shades. 5. EN-14 Then navigate to the setting you want using the Navi/OK button. Contrast: adjust the contrast from the OSD. Blue Light: filter out blue light by adjusting different Blue Light...
User Manual
Page 24
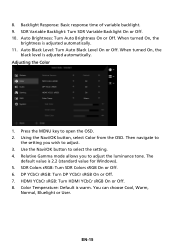
... Off. 6. Auto Brightness: Turn Auto Brightness On or Off. You can choose Cool, Warm, Normal, Bluelight or User. When turned On, the black level is 2.2 (standard value for Windows). 5. Adjusting the Color 1. Using the Navi/OK button, select Color from the OSD. DP YCbCr sRGB: Turn DP YCbCr sRGB On or Off. 7. Then navigate to the setting you to open the OSD. 2. The default value is adjusted automatically. Auto Black Level: Turn Auto Black Level On...
... Off. 6. Auto Brightness: Turn Auto Brightness On or Off. You can choose Cool, Warm, Normal, Bluelight or User. When turned On, the black level is 2.2 (standard value for Windows). 5. Adjusting the Color 1. Using the Navi/OK button, select Color from the OSD. DP YCbCr sRGB: Turn DP YCbCr sRGB On or Off. 7. Then navigate to the setting you to open the OSD. 2. The default value is adjusted automatically. Auto Black Level: Turn Auto Black Level On...

User Manual
Page 26
... by the panel specification. * This function allows you wish to adjust any sliding scales. 4. Press the MENU key to reset the maximum refresh rate in the NVIDIA Control Panel after rebooting. If nothing is displayed, disconnect the DisplayPort™ cable and use the monitor's on the screen for shooting games. Aim point: Show an Aim point on -screen display to the display, and possibly, in flicker or other...
... by the panel specification. * This function allows you wish to adjust any sliding scales. 4. Press the MENU key to reset the maximum refresh rate in the NVIDIA Control Panel after rebooting. If nothing is displayed, disconnect the DisplayPort™ cable and use the monitor's on the screen for shooting games. Aim point: Show an Aim point on -screen display to the display, and possibly, in flicker or other...

User Manual
Page 27
... 80%. 7. Refresh rate num: Display the panel's current refresh rate on the screen. 8. If the OSD Lock message remains, please check whether the Navi/OK button is used to adjust. 3. Adjusting the OSD 1. Use the Navi/OK button to open the OSD. 2. To remove the OSD Lock message, press and hold the Navi/OK button continuously for 3 seconds until the message disappears. Using the Navi/OK button, select OSD from being pressed accidentally. Language: Set the OSD menu language. 5. OSD Timeout: Adjust the...
... 80%. 7. Refresh rate num: Display the panel's current refresh rate on the screen. 8. If the OSD Lock message remains, please check whether the Navi/OK button is used to adjust. 3. Adjusting the OSD 1. Use the Navi/OK button to open the OSD. 2. To remove the OSD Lock message, press and hold the Navi/OK button continuously for 3 seconds until the message disappears. Using the Navi/OK button, select OSD from being pressed accidentally. Language: Set the OSD menu language. 5. OSD Timeout: Adjust the...

User Manual
Page 31
... LCD monitor for servicing, please check the troubleshooting list below to see if you can self-diagnose the problem. (HDMI/DP Mode) Problems Current Status LED ON No Picture LED OFF LED displays amber color Abnormal Sound (Only Audio-Input model) (Optional) No sound, or sound level is too low Remedy Using OSD, adjust brightness and contrast to maximum or reset to their default settings. Check the power switch. Check if AC power cord is properly connected to the monitor. Check if video signal cable is properly connected...
... LCD monitor for servicing, please check the troubleshooting list below to see if you can self-diagnose the problem. (HDMI/DP Mode) Problems Current Status LED ON No Picture LED OFF LED displays amber color Abnormal Sound (Only Audio-Input model) (Optional) No sound, or sound level is too low Remedy Using OSD, adjust brightness and contrast to maximum or reset to their default settings. Check the power switch. Check if AC power cord is properly connected to the monitor. Check if video signal cable is properly connected...


