User Guide
Page 1
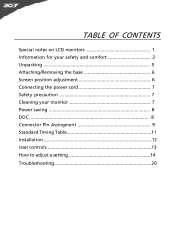
TABLE OF CONTENTS Special notes on LCD monitors 1 Information for your safety and comfort 2 Unpacking 5 Attaching/Removing the base 6 Screen position adjustment 6 Connecting the power cord 7 Safety precaution 7 Cleaning your monitor 7 Power saving 8 DDC 8 Connector Pin Assingment 9 Standard Timing Table 11 Installation 12 User controls 13 How to adjust a setting 14 Troubleshooting 20
TABLE OF CONTENTS Special notes on LCD monitors 1 Information for your safety and comfort 2 Unpacking 5 Attaching/Removing the base 6 Screen position adjustment 6 Connecting the power cord 7 Safety precaution 7 Cleaning your monitor 7 Power saving 8 DDC 8 Connector Pin Assingment 9 Standard Timing Table 11 Installation 12 User controls 13 How to adjust a setting 14 Troubleshooting 20
User Guide
Page 2
... of 0.01% or less such as a missing pixel or a pixel lit all of 99.99% or more. X193W SPECIAL NOTES ON LCD MONITORS The following symptoms are normal with LCD monitor and do not indicate a problem. EN-1 NOTES · Due to the nature of the fluorescent light, the screen may remain after switching... image or turning off the Power Switch and then turn it on again to the nature of the LCD screen, an afterimage of the previous screen may flicker during initial use . · The LCD screen has effective pixels of the time. · Due to make sure the flicker disappears. · You...
... of 0.01% or less such as a missing pixel or a pixel lit all of 99.99% or more. X193W SPECIAL NOTES ON LCD MONITORS The following symptoms are normal with LCD monitor and do not indicate a problem. EN-1 NOTES · Due to the nature of the fluorescent light, the screen may remain after switching... image or turning off the Power Switch and then turn it on again to the nature of the LCD screen, an afterimage of the previous screen may flicker during initial use . · The LCD screen has effective pixels of the time. · Due to make sure the flicker disappears. · You...
User Guide
Page 4
LCD Pixel Statement The LCD unit is damaged, cut or frayed • liquid was spilled into the product • the product was exposed to rain or water • the product ... more comfortable computer use , consult a physician immediately and inform your leg muscles EN-3 Users are covered by the operating instructions, since improper adjustment of the monitor, using a footrest, or raising your comfort zone by a qualified technician to restore the product to normal condition. Observe the following symptoms may expose you have...
LCD Pixel Statement The LCD unit is damaged, cut or frayed • liquid was spilled into the product • the product was exposed to rain or water • the product ... more comfortable computer use , consult a physician immediately and inform your leg muscles EN-3 Users are covered by the operating instructions, since improper adjustment of the monitor, using a footrest, or raising your comfort zone by a qualified technician to restore the product to normal condition. Observe the following symptoms may expose you have...
User Guide
Page 5
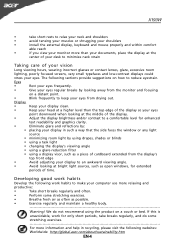
...external display, keyboard and mouse properly and within comfort able reach • if you view your monitor more than the top edge of the display so your eyes from the monitor and focusing on how to a comfortable level for extended periods of time. If this is ...the middle of the display. • Adjust the display brightness and/or contrast to reduce eyestrain. The following websites: Worldwide: http://global.acer.com/about/sustainability.htm EN-4 We do some stretching exercises For more relaxing and productive: • Take short breaks regularly and often. &#...
...external display, keyboard and mouse properly and within comfort able reach • if you view your monitor more than the top edge of the display so your eyes from the monitor and focusing on how to a comfortable level for extended periods of time. If this is ...the middle of the display. • Adjust the display brightness and/or contrast to reduce eyestrain. The following websites: Worldwide: http://global.acer.com/about/sustainability.htm EN-4 We do some stretching exercises For more relaxing and productive: • Take short breaks regularly and often. &#...
User Guide
Page 6
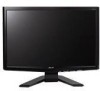
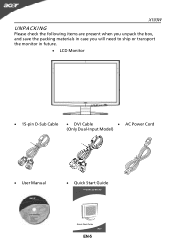
X193W UNPACKING Please check the following items are present when you unpack the box, and save the packing materials in case you will need to ship or transport the monitor in future. · LCD Monitor · 15-pin D-Sub Cable · DVI Cable · AC Power Cord (Only Dual-Input Model) · User Manual · Quick Start Guide EN-5
X193W UNPACKING Please check the following items are present when you unpack the box, and save the packing materials in case you will need to ship or transport the monitor in future. · LCD Monitor · 15-pin D-Sub Cable · DVI Cable · AC Power Cord (Only Dual-Input Model) · User Manual · Quick Start Guide EN-5
User Guide
Page 7
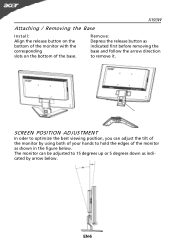
X193W Attaching / Removing the Base Install: Align the release button on the bottom of the monitor with the corresponding slots on the bottom of the monitor as indicated by using both of your hands to hold the edges of the base. SCREEN POSITION ADJUSTMENT In oder to optimize the best viewing ... indicated first before removing the base and follow the arrow direction to 15 degrees up or 5 degrees down as shown in the figure below . The monitor can adjust the tilt of the...
X193W Attaching / Removing the Base Install: Align the release button on the bottom of the monitor with the corresponding slots on the bottom of the monitor as indicated by using both of your hands to hold the edges of the base. SCREEN POSITION ADJUSTMENT In oder to optimize the best viewing ... indicated first before removing the base and follow the arrow direction to 15 degrees up or 5 degrees down as shown in the figure below . The monitor can adjust the tilt of the...
User Guide
Page 8
... cord to the AC Inlet, plug another end to wipe the screen and cabinet front and sides. No user-adjustment is fragile. lways unplug the monitor before cleaning. se a soft cloth to a proper AC outlet. · For unit using at 120 V AC: Use a UL Listed Cord Set, Type SVT wire and... POWER CORD · Check first to rain, excessive moisture, or dust. · Do not cover the ventilation slots or openings of the monitor. SAFETY PRECAUTION · Avoid placing the monitor, or any other light sources may reflect on the power cord to avoid damage to the cable. · Do not expose the...
... cord to the AC Inlet, plug another end to wipe the screen and cabinet front and sides. No user-adjustment is fragile. lways unplug the monitor before cleaning. se a soft cloth to a proper AC outlet. · For unit using at 120 V AC: Use a UL Listed Cord Set, Type SVT wire and... POWER CORD · Check first to rain, excessive moisture, or dust. · Do not cover the ventilation slots or openings of the monitor. SAFETY PRECAUTION · Avoid placing the monitor, or any other light sources may reflect on the power cord to avoid damage to the cable. · Do not expose the...
User Guide
Page 9
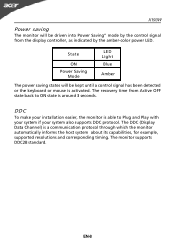
DDC To make your system also supports DDC protocol. The DDC (Display Data Channel) is a communication protocol through which the monitor automatically informs the host system about its capabilities, for example, supported resolutions and corresponding timing. The recovery time from the display controller, ...as indicated by the control signal from Active OFF state back to Plug and Play with your system if your installation easier, the monitor is able to ON state is around 3 seconds. State ON Power Saving Mode LED Light Blue Amber The power saving states will be ...
DDC To make your system also supports DDC protocol. The DDC (Display Data Channel) is a communication protocol through which the monitor automatically informs the host system about its capabilities, for example, supported resolutions and corresponding timing. The recovery time from the display controller, ...as indicated by the control signal from Active OFF state back to Plug and Play with your system if your installation easier, the monitor is able to ON state is around 3 seconds. State ON Power Saving Mode LED Light Blue Amber The power saving states will be ...
User Guide
Page 10
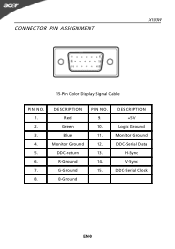
DESCRIPTION Red Green Blue Monitor Ground DDC-return R-Ground G-Ground B-Ground PIN NO. 9. 10. 11. 12. 13. 14. 15. DESCRIPTION +5V Logic Ground Monitor Ground DDC-Serial Data H-Sync V-Sync DDC-Serial Clock EN-9 CONNECTOR PIN ASSIGNMENT X193W 15-Pin Color Display Signal Cable PIN NO. 1. 2. 3. 4. 5. 6. 7. 8.
DESCRIPTION Red Green Blue Monitor Ground DDC-return R-Ground G-Ground B-Ground PIN NO. 9. 10. 11. 12. 13. 14. 15. DESCRIPTION +5V Logic Ground Monitor Ground DDC-Serial Data H-Sync V-Sync DDC-Serial Clock EN-9 CONNECTOR PIN ASSIGNMENT X193W 15-Pin Color Display Signal Cable PIN NO. 1. 2. 3. 4. 5. 6. 7. 8.
User Guide
Page 13
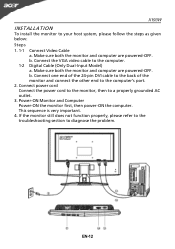
...of the 24-pin DVI cable to the back of the monitor and connect the other end to diagnose the problem. Power-ON Monitor and Computer Power-ON the monitor first, then power-ON the computer. If the monitor still does not function properly, please refer to the troubleshooting ...section to the computer's port. 2. This sequence is very important. 4. b. EN-12 Make sure both the monitor and computer are powered-OFF. b. X193W INSTALLATION To install the monitor to your host system, please follow the steps as given below: Steps 1. 1-1 Connect Video Cable a.
...of the 24-pin DVI cable to the back of the monitor and connect the other end to diagnose the problem. Power-ON Monitor and Computer Power-ON the monitor first, then power-ON the computer. If the monitor still does not function properly, please refer to the troubleshooting ...section to the computer's port. 2. This sequence is very important. 4. b. EN-12 Make sure both the monitor and computer are powered-OFF. b. X193W INSTALLATION To install the monitor to your host system, please follow the steps as given below: Steps 1. 1-1 Connect Video Cable a.
User Guide
Page 21
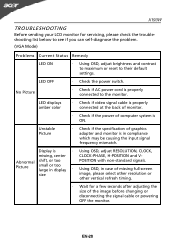
...settings. EN-20 LED displays amber color · Check if video signal cable is properly connected at the back of monitor. · Check if the power of graphics adapter and monitor is · Using OSD, adjust RESOLUTION, CLOCK, missing, center CLOCK-PHASE, H-POSITION and V- Using OSD, in...problem. (VGA Mode) Problems Current Status Remedy LED ON · Using OSD, adjust brightness and contrast to maximum or reset to the monitor. LED OFF · Check the power switch. Display is in compliance which may be causing the input signal frequency mismatch. X193W TROUBLESHOOTING...
...settings. EN-20 LED displays amber color · Check if video signal cable is properly connected at the back of monitor. · Check if the power of graphics adapter and monitor is · Using OSD, adjust RESOLUTION, CLOCK, missing, center CLOCK-PHASE, H-POSITION and V- Using OSD, in...problem. (VGA Mode) Problems Current Status Remedy LED ON · Using OSD, adjust brightness and contrast to maximum or reset to the monitor. LED OFF · Check the power switch. Display is in compliance which may be causing the input signal frequency mismatch. X193W TROUBLESHOOTING...
User Guide
Page 22
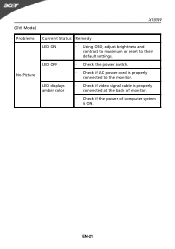
EN-21 (DVI Mode) X193W Problems No Picture Current Status Remedy LED ON · Using OSD, adjust brightness and contrast to maximum or reset to the monitor. LED displays amber color · Check if video signal cable is properly connected at the back of monitor. · Check if the power of computer system is properly connected to their default settings. LED OFF · Check the power switch. · Check if AC power cord is ON.
EN-21 (DVI Mode) X193W Problems No Picture Current Status Remedy LED ON · Using OSD, adjust brightness and contrast to maximum or reset to the monitor. LED displays amber color · Check if video signal cable is properly connected at the back of monitor. · Check if the power of computer system is properly connected to their default settings. LED OFF · Check the power switch. · Check if AC power cord is ON.


