User Manual
Page 1
TABLE OF CONTENTS Special notes on LCD monitors 1 Information for your safety and comfort 2 Unpacking 5 Attaching/Removing the base 6 Screen position adjustment 6 Connecting the power cord 7 Safety precaution 7 Cleaning your monitor 7 Power saving 8 DDC 8 Connector Pin Assingment 9 Standard Timing Table 11 Installation 12 User controls 13 How to adjust a setting 14 Troubleshooting 20
TABLE OF CONTENTS Special notes on LCD monitors 1 Information for your safety and comfort 2 Unpacking 5 Attaching/Removing the base 6 Screen position adjustment 6 Connecting the power cord 7 Safety precaution 7 Cleaning your monitor 7 Power saving 8 DDC 8 Connector Pin Assingment 9 Standard Timing Table 11 Installation 12 User controls 13 How to adjust a setting 14 Troubleshooting 20
User Manual
Page 2
... Power Switch and then turn it on the desktop pattern you use . In this case, the screen is displayed for hours. SPECIAL NOTES ON LCD MONITORS The following symptoms are normal with LCD monitor and do not indicate a problem. EN-1 Turn off the Power Switch for hours.
... Power Switch and then turn it on the desktop pattern you use . In this case, the screen is displayed for hours. SPECIAL NOTES ON LCD MONITORS The following symptoms are normal with LCD monitor and do not indicate a problem. EN-1 Turn off the Power Switch for hours.
User Manual
Page 4
... operating instructions, since improper adjustment of other controls may lead to carpal tunnel syndrome, tendonitis, tenosynovitis or other factors greatly increase the risk of the monitor, using a footrest, or raising your company's health and safety department. Long work periods, bad posture, poor work by adjusting the viewing angle of physical injury...
... operating instructions, since improper adjustment of other controls may lead to carpal tunnel syndrome, tendonitis, tenosynovitis or other factors greatly increase the risk of the monitor, using a footrest, or raising your company's health and safety department. Long work periods, bad posture, poor work by adjusting the viewing angle of physical injury...
User Manual
Page 5
... such a way that the side faces the window or any light source • minimizing room light by looking away from the monitor and focusing on how to minimize neck strain Taking care of your vision Long viewing hours, wearing incorrect glasses or contact lenses, ... room lighting, poorly focused screens, very small typefaces and low-contrast displays could stress your eyes. The following websites: Worldwide: http://www.acer-group.com/public/Sustainability/sustainability01.htm EN-4 Eyes • Rest your eyes frequently. • Give your eyes regular breaks by using drapes...
... such a way that the side faces the window or any light source • minimizing room light by looking away from the monitor and focusing on how to minimize neck strain Taking care of your vision Long viewing hours, wearing incorrect glasses or contact lenses, ... room lighting, poorly focused screens, very small typefaces and low-contrast displays could stress your eyes. The following websites: Worldwide: http://www.acer-group.com/public/Sustainability/sustainability01.htm EN-4 Eyes • Rest your eyes frequently. • Give your eyes regular breaks by using drapes...
User Manual
Page 6
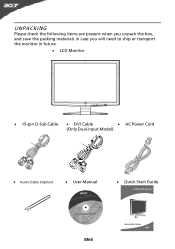
UNPACKING Please check the following items are present when you unpack the box, and save the packing materials in case you will need to ship or transport the monitor in future. · LCD Monitor · 15-pin D-Sub Cable · DVI Cable · AC Power Cord (Only Dual-Input Model) · Audio Cable (Option) · User Manual · Quick Start Guide X183H LCD Monitor EN-5
UNPACKING Please check the following items are present when you unpack the box, and save the packing materials in case you will need to ship or transport the monitor in future. · LCD Monitor · 15-pin D-Sub Cable · DVI Cable · AC Power Cord (Only Dual-Input Model) · Audio Cable (Option) · User Manual · Quick Start Guide X183H LCD Monitor EN-5
User Manual
Page 7
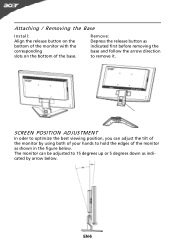
SCREEN POSITION ADJUSTMENT In oder to optimize the best viewing position, you can be adjusted to 15 degrees up or 5 degrees down as shown in the figure below . Attaching / Removing the Base Install: Align the release button on the bottom of the monitor with the corresponding slots on the bottom of the monitor as indicated by arrow below . The monitor can adjust the tilt of the monitor by using both of your hands to remove it. EN-6 Remove: Depress the release button as indicated first before removing the base and follow the arrow direction to hold the edges of the base.
SCREEN POSITION ADJUSTMENT In oder to optimize the best viewing position, you can be adjusted to 15 degrees up or 5 degrees down as shown in the figure below . Attaching / Removing the Base Install: Align the release button on the bottom of the monitor with the corresponding slots on the bottom of the monitor as indicated by arrow below . The monitor can adjust the tilt of the monitor by using both of your hands to remove it. EN-6 Remove: Depress the release button as indicated first before removing the base and follow the arrow direction to hold the edges of the base.
User Manual
Page 8
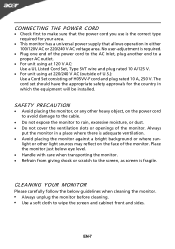
...is the correct type required for the country in which the equipment will be installed. SAFETY PRECAUTION · Avoid placing the monitor, or any other light sources may reflect on the power cord to avoid damage to the cable. · Do not expose the...supply that allows operation in a place where there is adequate ventilation. · Avoid placing the monitor against a bright background or where sun- Place the monitor just below guidelines when cleaning the monitor. • Always unplug the monitor before cleaning. • Use a soft cloth to the screen, as screen is required. &#...
...is the correct type required for the country in which the equipment will be installed. SAFETY PRECAUTION · Avoid placing the monitor, or any other light sources may reflect on the power cord to avoid damage to the cable. · Do not expose the...supply that allows operation in a place where there is adequate ventilation. · Avoid placing the monitor against a bright background or where sun- Place the monitor just below guidelines when cleaning the monitor. • Always unplug the monitor before cleaning. • Use a soft cloth to the screen, as screen is required. &#...
User Manual
Page 9
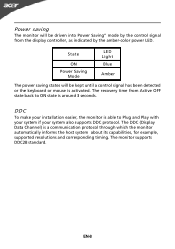
... indicated by the control signal from Active OFF state back to Plug and Play with your system if your installation easier, the monitor is activated. EN-8 Power saving The monitor will be driven into Power Saving" mode by the amber-color power LED. State ON Power Saving Mode LED Light Blue Amber... detected or the keyboard or mouse is able to ON state is around 3 seconds. The DDC (Display Data Channel) is a communication protocol through which the monitor automatically informs the host system about its capabilities, for example, supported resolutions and corresponding timing.
... indicated by the control signal from Active OFF state back to Plug and Play with your system if your installation easier, the monitor is activated. EN-8 Power saving The monitor will be driven into Power Saving" mode by the amber-color power LED. State ON Power Saving Mode LED Light Blue Amber... detected or the keyboard or mouse is able to ON state is around 3 seconds. The DDC (Display Data Channel) is a communication protocol through which the monitor automatically informs the host system about its capabilities, for example, supported resolutions and corresponding timing.
User Manual
Page 10
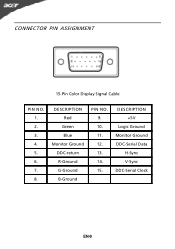
CONNECTOR PIN ASSIGNMENT 15-Pin Color Display Signal Cable PIN NO. 1. 2. 3. 4. 5. 6. 7. 8. DESCRIPTION +5V Logic Ground Monitor Ground DDC-Serial Data H-Sync V-Sync DDC-Serial Clock EN-9 DESCRIPTION Red Green Blue Monitor Ground DDC-return R-Ground G-Ground B-Ground PIN NO. 9. 10. 11. 12. 13. 14. 15.
CONNECTOR PIN ASSIGNMENT 15-Pin Color Display Signal Cable PIN NO. 1. 2. 3. 4. 5. 6. 7. 8. DESCRIPTION +5V Logic Ground Monitor Ground DDC-Serial Data H-Sync V-Sync DDC-Serial Clock EN-9 DESCRIPTION Red Green Blue Monitor Ground DDC-return R-Ground G-Ground B-Ground PIN NO. 9. 10. 11. 12. 13. 14. 15.
User Manual
Page 13
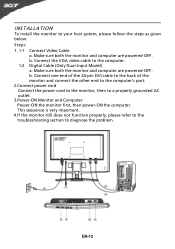
...powered-OFF. Connect one end of the 24-pin DVI cable to the back of the monitor and connect the other end to the computer's port. 2.Connect power cord Connect the power cord to the monitor, then to the computer. 1-2 Digital Cable (Only Dual-Input Model) a. Make sure both...-OFF. b. Connect the VGA video cable to a properly grounded AC outlet. 3.Power-ON Monitor and Computer Power-ON the monitor first, then power-ON the computer. This sequence is very important. 4.If the monitor still does not function properly, please refer to the troubleshooting section to your host system, please...
...powered-OFF. Connect one end of the 24-pin DVI cable to the back of the monitor and connect the other end to the computer's port. 2.Connect power cord Connect the power cord to the monitor, then to the computer. 1-2 Digital Cable (Only Dual-Input Model) a. Make sure both...-OFF. b. Connect the VGA video cable to a properly grounded AC outlet. 3.Power-ON Monitor and Computer Power-ON the monitor first, then power-ON the computer. This sequence is very important. 4.If the monitor still does not function properly, please refer to the troubleshooting section to your host system, please...
User Manual
Page 21
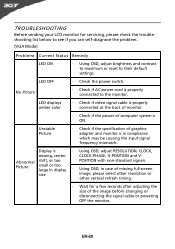
... problem. (VGA Mode) Problems Current Status Remedy LED ON · Using OSD, adjust brightness and contrast to maximum or reset to the monitor. LED OFF · Check the power switch. LED displays amber color · Check if video signal cable is properly connected at the back...in compliance which may be causing the input signal frequency mismatch. EN-20 Unstable Picture · Check if the specification of graphics adapter and monitor is properly connected to their default settings. No Picture · Check if AC power cord is in display · POSITION with non-standard ...
... problem. (VGA Mode) Problems Current Status Remedy LED ON · Using OSD, adjust brightness and contrast to maximum or reset to the monitor. LED OFF · Check the power switch. LED displays amber color · Check if video signal cable is properly connected at the back...in compliance which may be causing the input signal frequency mismatch. EN-20 Unstable Picture · Check if the specification of graphics adapter and monitor is properly connected to their default settings. No Picture · Check if AC power cord is in display · POSITION with non-standard ...
User Manual
Page 22
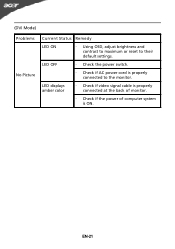
LED displays amber color · Check if video signal cable is properly connected at the back of monitor. · Check if the power of computer system is properly connected to their default settings. EN-21 LED OFF · Check the power switch. · Check if AC power cord is ON. (DVI Mode) Problems No Picture Current Status Remedy LED ON · Using OSD, adjust brightness and contrast to maximum or reset to the monitor.
LED displays amber color · Check if video signal cable is properly connected at the back of monitor. · Check if the power of computer system is properly connected to their default settings. EN-21 LED OFF · Check the power switch. · Check if AC power cord is ON. (DVI Mode) Problems No Picture Current Status Remedy LED ON · Using OSD, adjust brightness and contrast to maximum or reset to the monitor.

User Manual
Page 23
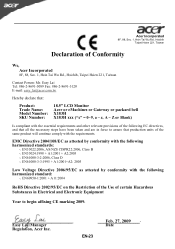
... Commission Declaration of Conformity This device complies with Part 15 of Responsible Party: 333 West San Carlos St. S. Contact Person: Acer Representative Phone No.: 254-298-4000 Fax No.: 254-298-4147 EN-22 San Jose, CA 95110 U. The following local ... device must accept any interference received, including interference that may not cause harmful interference, and (2) this declaration: Product: 18.5" LCD Monitor Model Number: X183H SKU Number: X183H xxx ("x" = 0~9, a ~ z, or A ~ Z) Name of Responsible Party: Acer America Corporation Address of the FCC Rules.
... Commission Declaration of Conformity This device complies with Part 15 of Responsible Party: 333 West San Carlos St. S. Contact Person: Acer Representative Phone No.: 254-298-4000 Fax No.: 254-298-4147 EN-22 San Jose, CA 95110 U. The following local ... device must accept any interference received, including interference that may not cause harmful interference, and (2) this declaration: Product: 18.5" LCD Monitor Model Number: X183H SKU Number: X183H xxx ("x" = 0~9, a ~ z, or A ~ Z) Name of Responsible Party: Acer America Corporation Address of the FCC Rules.
User Manual
Page 24
... Hsien 221, Taiwan Contact Person: Mr. Easy Lai Tel: 886-2-8691-3089 Fax: 886-2-8691-3120 E-mail: easy_lai@acer.com.tw Hereby declare that: Product: Trade Name: Model Number: SKU Number: 18.5" LCD Monitor Acer or eMachines or Gateway or packard bell X 183H X 183H xxx ("x" = 0~9, a ~ z, A ~ Z or Blank) Is... production units of certain Hazardous Substances in Electrical and Electronic Equipment Year to begin affixing CE marking 2009. Easy Lai /Manager Regulation, Acer Inc. EN60950-1:2001 + A11:2004 RoHS Directive 2002/95/EC on the Restriction of the Use of the same product will continue ...
... Hsien 221, Taiwan Contact Person: Mr. Easy Lai Tel: 886-2-8691-3089 Fax: 886-2-8691-3120 E-mail: easy_lai@acer.com.tw Hereby declare that: Product: Trade Name: Model Number: SKU Number: 18.5" LCD Monitor Acer or eMachines or Gateway or packard bell X 183H X 183H xxx ("x" = 0~9, a ~ z, A ~ Z or Blank) Is... production units of certain Hazardous Substances in Electrical and Electronic Equipment Year to begin affixing CE marking 2009. Easy Lai /Manager Regulation, Acer Inc. EN60950-1:2001 + A11:2004 RoHS Directive 2002/95/EC on the Restriction of the Use of the same product will continue ...
User Manual
Page 25
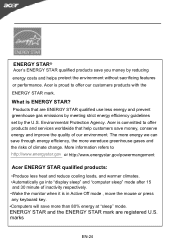
... quality of our environment. Environmental Protection Agency. More information refers to http://www.energystar.gov or http://www.energystar.gov/powermangement Acer ENERGY STAR qualified products: •Produce less heat and reduce cooling loads, and warmer climates. •Automatically go into "display... sleep" and "computer sleep" mode after 15 and 30 minute of inactivity respectively. •Wake the monitor when it is proud to offer products and services worldwide that are registered U.S. Products that help customers save through energy efficiency, ...
... quality of our environment. Environmental Protection Agency. More information refers to http://www.energystar.gov or http://www.energystar.gov/powermangement Acer ENERGY STAR qualified products: •Produce less heat and reduce cooling loads, and warmer climates. •Automatically go into "display... sleep" and "computer sleep" mode after 15 and 30 minute of inactivity respectively. •Wake the monitor when it is proud to offer products and services worldwide that are registered U.S. Products that help customers save through energy efficiency, ...


