
User Guide
Page 1
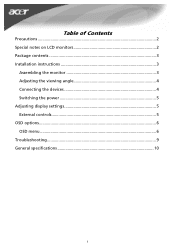
Table of Contents Precautions ...2 Special notes on LCD monitors 2 Package contents 3 Installation instructions 3 Assembling the monitor 3 Adjusting the viewing angle 4 Connecting the devices 4 Switching the power 5 Adjusting display settings 5 External controls 5 OSD options...6 OSD menu ...6 Troubleshooting 9 General specifications 10 1
Table of Contents Precautions ...2 Special notes on LCD monitors 2 Package contents 3 Installation instructions 3 Assembling the monitor 3 Adjusting the viewing angle 4 Connecting the devices 4 Switching the power 5 Adjusting display settings 5 External controls 5 OSD options...6 OSD menu ...6 Troubleshooting 9 General specifications 10 1

User Guide
Page 2
... be recycled and re-integrated. y When cleaning this monitor, disconnect it can lead to injury or death through the appropriate agency by reviewing the information provided below: Worldwide:http://global.acer.com/about protecting the environment, and firmly believes that is always lit). &#.... • The LCD screen has effective pixels of radiators, cookers, open fires, etc. y Do not allow sharp objects such as the monitor requires ventilation. A cloth slightly moistened with the device: • Due to make the flicker disappear. • You may include blemishes of overheating...
... be recycled and re-integrated. y When cleaning this monitor, disconnect it can lead to injury or death through the appropriate agency by reviewing the information provided below: Worldwide:http://global.acer.com/about protecting the environment, and firmly believes that is always lit). &#.... • The LCD screen has effective pixels of radiators, cookers, open fires, etc. y Do not allow sharp objects such as the monitor requires ventilation. A cloth slightly moistened with the device: • Due to make the flicker disappear. • You may include blemishes of overheating...
User Guide
Page 3
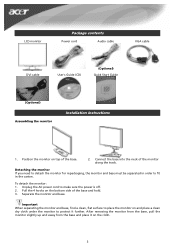
... up and away from the base and place it further. Connect the base into the neck of the base. 2. To detach the monitor: 1. Position the monitor on the bottom side of the base and hold. 3. Unplug the AC power cord to fit in order to make sure the power is off. ...2. Pull the 4 hooks on top of the monitor along the track. Detaching the monitor If you need to detach the monitor for repackaging, the monitor and base must be separated in the carton. Separate the monitor and base. Important When separating the monitor and base, find a clean, flat surface to place the...
... up and away from the base and place it further. Connect the base into the neck of the base. 2. To detach the monitor: 1. Position the monitor on the bottom side of the base and hold. 3. Unplug the AC power cord to fit in order to make sure the power is off. ...2. Pull the 4 hooks on top of the monitor along the track. Detaching the monitor If you need to detach the monitor for repackaging, the monitor and base must be separated in the carton. Separate the monitor and base. Important When separating the monitor and base, find a clean, flat surface to place the...

User Guide
Page 4
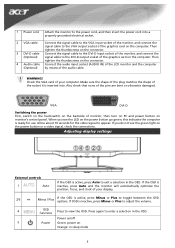
Connecting the devices Caution: Make sure that the computer and the monitor are both disconnected from -5 - 20°. NOTES • Do not touch the LCD screen when you change the angle. Adjusting the viewing angle The viewing angle of the monitor ranges from the power supply. 4 It may cause damage or break the LCD screen. • Careful attention is required not to catch your fingers or hands when you change the angle.
Connecting the devices Caution: Make sure that the computer and the monitor are both disconnected from -5 - 20°. NOTES • Do not touch the LCD screen when you change the angle. Adjusting the viewing angle The viewing angle of the monitor ranges from the power supply. 4 It may cause damage or break the LCD screen. • Careful attention is required not to catch your fingers or hands when you change the angle.
User Guide
Page 5
...a selection in the OSD. Then tighten the thumbscrews on the connector. 4 Audio cable Connect the audio input socket (AUDIO IN) of the LCD monitor and the computer (Optional) by means of the graphics card on the power button go green, this indicates the computer is active, press Minus or... a selection in sleep mode 5 Then tighten the thumbscrews on Orange: in the OSD. Check the VGA card of your computer. 1 Power cord Attach the monitor to the power cord, and then insert the power cord into . Power on/off 5 Power Green: power on the connector. 3 DVI-D cable Connect the...
...a selection in the OSD. Then tighten the thumbscrews on the connector. 4 Audio cable Connect the audio input socket (AUDIO IN) of the LCD monitor and the computer (Optional) by means of the graphics card on the power button go green, this indicates the computer is active, press Minus or... a selection in sleep mode 5 Then tighten the thumbscrews on Orange: in the OSD. Check the VGA card of your computer. 1 Power cord Attach the monitor to the power cord, and then insert the power cord into . Power on/off 5 Power Green: power on the connector. 3 DVI-D cable Connect the...
User Guide
Page 9
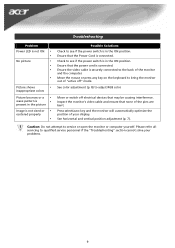
...display. Check to see if the power switch is securely connected to bring the monitor out of your problems. 9 See color adjustment (p. 8) to service or open the monitor or computer yourself. Ensure that none of the monitor and the computer. Move the mouse or press any key on the keyboard ...to the back of the pins are bent. Inspect the monitor's video cable and ensure that the Power Cord is in the ON position. Press select/auto key and the monitor will automatically optimize the position of "active off electrical devices that the power cord...
...display. Check to see if the power switch is securely connected to bring the monitor out of your problems. 9 See color adjustment (p. 8) to service or open the monitor or computer yourself. Ensure that none of the monitor and the computer. Move the mouse or press any key on the keyboard ...to the back of the pins are bent. Inspect the monitor's video cable and ensure that the Power Cord is in the ON position. Press select/auto key and the monitor will automatically optimize the position of "active off electrical devices that the power cord...


