User Guide
Page 1
Table of Contents Precautions ...2 Special notes on LCD monitors 2 Package contents 3 Installation instructions 3 Assembling the monitor 3 Adjusting the viewing angle 4 Connecting the devices 4 Switching the power 5 Adjusting display settings 5 External controls 5 OSD options...6 OSD menu ...6 Troubleshooting 9 General specifications 10 1
Table of Contents Precautions ...2 Special notes on LCD monitors 2 Package contents 3 Installation instructions 3 Assembling the monitor 3 Adjusting the viewing angle 4 Connecting the devices 4 Switching the power 5 Adjusting display settings 5 External controls 5 OSD options...6 OSD menu ...6 Troubleshooting 9 General specifications 10 1

User Guide
Page 2
.... Keep liquids away from the electrical socket to the nature of the monitor. If such objects touch the screen, the LCD panel may be recycled and re-integrated. Furthermore, industrial technology products contain materials that can be permanently scratched. Turning the LCD monitor off the power switch and then turn it from the display screen, including sprays. We strongly encourage you encounter a problem, please check the "Troubleshooting...
.... Keep liquids away from the electrical socket to the nature of the monitor. If such objects touch the screen, the LCD panel may be recycled and re-integrated. Furthermore, industrial technology products contain materials that can be permanently scratched. Turning the LCD monitor off the power switch and then turn it from the display screen, including sprays. We strongly encourage you encounter a problem, please check the "Troubleshooting...
User Guide
Page 3
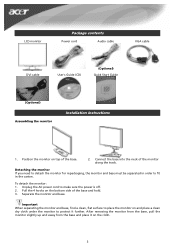
... the cloth. 3 To detach the monitor: 1. Unplug the AC power cord to fit in order to make sure the power is off. 2. After removing the monitor from the base, pull the monitor slightly up and away from the base and place it further. Separate the monitor and base. Connect the base into the neck of the base and hold. 3. LCD monitor Package contents Power cord Audio cable VGA cable DVI cable User's Guide (CD) (Optional) Quick Start Guide (Optional) Assembling the monitor Installation instructions 1.
... the cloth. 3 To detach the monitor: 1. Unplug the AC power cord to fit in order to make sure the power is off. 2. After removing the monitor from the base, pull the monitor slightly up and away from the base and place it further. Separate the monitor and base. Connect the base into the neck of the base and hold. 3. LCD monitor Package contents Power cord Audio cable VGA cable DVI cable User's Guide (CD) (Optional) Quick Start Guide (Optional) Assembling the monitor Installation instructions 1.

User Guide
Page 4
Adjusting the viewing angle The viewing angle of the monitor ranges from the power supply. 4 Connecting the devices Caution: Make sure that the computer and the monitor are both disconnected from -5 - 20°. NOTES • Do not touch the LCD screen when you change the angle. It may cause damage or break the LCD screen. • Careful attention is required not to catch your fingers or hands when you change the angle.
Adjusting the viewing angle The viewing angle of the monitor ranges from the power supply. 4 Connecting the devices Caution: Make sure that the computer and the monitor are both disconnected from -5 - 20°. NOTES • Do not touch the LCD screen when you change the angle. It may cause damage or break the LCD screen. • Careful attention is required not to catch your fingers or hands when you change the angle.
User Guide
Page 5
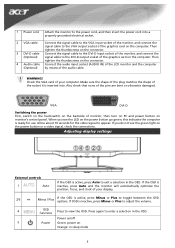
... card on the power button or a video signal, check the connections. If the OSD is inactive, press Auto and the monitor will automatically optimize the position, focus, and clock of the audio cable. When you do not see the LED on the power button go green, this indicates the computer is active, press Minus or Plus to toggle between the OSD options. Then tighten the thumbscrews on monitor's control panel. VGA DVI-D Switching the power First, switch...
... card on the power button or a video signal, check the connections. If the OSD is inactive, press Auto and the monitor will automatically optimize the position, focus, and clock of the audio cable. When you do not see the LED on the power button go green, this indicates the computer is active, press Minus or Plus to toggle between the OSD options. Then tighten the thumbscrews on monitor's control panel. VGA DVI-D Switching the power First, switch...
User Guide
Page 6
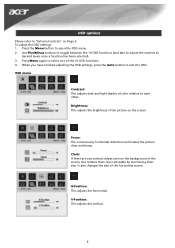
... 5. V-Position: This adjusts the vertical. 6 When you have finished adjusting the OSD settings, press the Auto button to desired levels once a function has been selected). 3. Brightness: This adjusts the brightness of the 10 OSD functions. 4. Use Plus/Minus buttons to toggle between the 10 OSD functions (and also to adjust the controls to exit the OSD. Press the Menu button to each other. OSD menu Contrast: This adjusts dark and light shades of color relative to open...
... 5. V-Position: This adjusts the vertical. 6 When you have finished adjusting the OSD settings, press the Auto button to desired levels once a function has been selected). 3. Brightness: This adjusts the brightness of the 10 OSD functions. 4. Use Plus/Minus buttons to toggle between the 10 OSD functions (and also to adjust the controls to exit the OSD. Press the Menu button to each other. OSD menu Contrast: This adjusts dark and light shades of color relative to open...
User Guide
Page 7
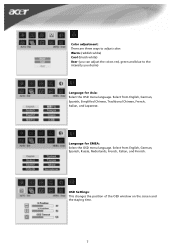
Select from English, German, Spanish, Simplified Chinese, Traditional Chinese, French, Italian, and Japanese. OSD Settings: This changes the position of the OSD window on the screen and the staying time. 7 Language for Asia: Select the OSD menu language. Select from English, German, Spanish, Russia, Nederlands, French, Italian, and Finnish. Color adjustment: There are three ways to adjust color: Warm (reddish white) Cool (bluish white) User (you can adjust the colors red, green and blue to the intensity you desire) Language for EMEA: Select the OSD menu language.
Select from English, German, Spanish, Simplified Chinese, Traditional Chinese, French, Italian, and Japanese. OSD Settings: This changes the position of the OSD window on the screen and the staying time. 7 Language for Asia: Select the OSD menu language. Select from English, German, Spanish, Russia, Nederlands, French, Italian, and Finnish. Color adjustment: There are three ways to adjust color: Warm (reddish white) Cool (bluish white) User (you can adjust the colors red, green and blue to the intensity you desire) Language for EMEA: Select the OSD menu language.
User Guide
Page 8
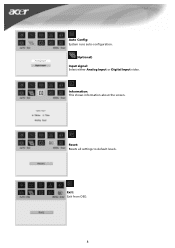
Exit: Exit from OSD. 8 Information: This shows information about the screen. Auto Config: System runs auto-configuration. (Optional) Input signal: Select either Analog Input or Digital Input video. Reset: Resets all settings to default levels.
Exit: Exit from OSD. 8 Information: This shows information about the screen. Auto Config: System runs auto-configuration. (Optional) Input signal: Select either Analog Input or Digital Input video. Reset: Resets all settings to default levels.
User Guide
Page 9
... " mode. See horizontal and vertical position adjustment (p. 7). Caution: Do not attempt to bring the monitor out of the monitor and the computer. Ensure the video cable is securely connected to adjust RGB color. See color adjustment (p. 8) to the back of "active off electrical devices that none of your problems. 9 Press select/auto key and the monitor will automatically optimize the position of the pins are bent. Troubleshooting Problem Power LED is not ON y y No picture y y y y Picture...
... " mode. See horizontal and vertical position adjustment (p. 7). Caution: Do not attempt to bring the monitor out of the monitor and the computer. Ensure the video cable is securely connected to adjust RGB color. See color adjustment (p. 8) to the back of "active off electrical devices that none of your problems. 9 Press select/auto key and the monitor will automatically optimize the position of the pins are bent. Troubleshooting Problem Power LED is not ON y y No picture y y y y Picture...
User Guide
Page 10
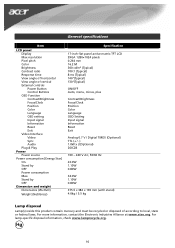
... Analog 0.7 V / Digital TMDS (Optional) TTL (+ / -) 1.0W x 2(Optional) DDC2B 100 - 240 V AC, 50/60 Hz 22.0W 1.10W 0.80W 34.0W 1.10W 0.80W 375.5 x 382 x 190 mm (with stand) 4.0kg / 5.5 kg Lamp disposal Lamp(s) inside this product contain mercury and must be recycled or disposed of vertical External controls Power Button Control Buttons OSD Function Contrast/Brightness Focus/Clock Position Color Language OSD setting Input signal Information Reset Exit Video Interface Video Sync Audio Plug & Play Power Power source Power...
... Analog 0.7 V / Digital TMDS (Optional) TTL (+ / -) 1.0W x 2(Optional) DDC2B 100 - 240 V AC, 50/60 Hz 22.0W 1.10W 0.80W 34.0W 1.10W 0.80W 375.5 x 382 x 190 mm (with stand) 4.0kg / 5.5 kg Lamp disposal Lamp(s) inside this product contain mercury and must be recycled or disposed of vertical External controls Power Button Control Buttons OSD Function Contrast/Brightness Focus/Clock Position Color Language OSD setting Input signal Information Reset Exit Video Interface Video Sync Audio Plug & Play Power Power source Power...

