

User Manual (3D)
Page 3
If you have connected your projector to a DVD or Blu-ray player, please read sections "Using DLP 3D / NVIDIA 3DTV Play technology" on , you turn off , otherwise the image may not be shown a reminder that 3D is a power switch on one of inactivity. Note: Suggest to use Acer DLP 3D glasses to support 144Hz sync signal for instructions how to view 3D content, you have connected your glasses...
If you have connected your projector to a DVD or Blu-ray player, please read sections "Using DLP 3D / NVIDIA 3DTV Play technology" on , you turn off , otherwise the image may not be shown a reminder that 3D is a power switch on one of inactivity. Note: Suggest to use Acer DLP 3D glasses to support 144Hz sync signal for instructions how to view 3D content, you have connected your glasses...

User Manual (3D)
Page 4
... side of LED projectors. Select the 3D section (the sixth menu option) on the projector remote control to the NVIDIA 3DTV Play website: www.nvidia.com/3dtv. To download software and use an NVIDIA 3DTV Play ready projector with DLP glasses, refer to open the OSD. Note: Blu-ray 3D content over an HDMI 1.4a or later connection, this will need to set refresh rate...
... side of LED projectors. Select the 3D section (the sixth menu option) on the projector remote control to the NVIDIA 3DTV Play website: www.nvidia.com/3dtv. To download software and use an NVIDIA 3DTV Play ready projector with DLP glasses, refer to open the OSD. Note: Blu-ray 3D content over an HDMI 1.4a or later connection, this will need to set refresh rate...

User Manual
Page 5
.... • Locations where temperatures may become excessively high, such as opening or removing covers may contain small parts. At least 50cm clearance from the wall outlet and refer servicing to qualified service personnel when: • the power cord or plug is on the projector first and then signal sources. • Do not place the product in damage and will often require extensive work by a qualified...
.... • Locations where temperatures may become excessively high, such as opening or removing covers may contain small parts. At least 50cm clearance from the wall outlet and refer servicing to qualified service personnel when: • the power cord or plug is on the projector first and then signal sources. • Do not place the product in damage and will often require extensive work by a qualified...

User Manual
Page 6
... the projector lens with any object when the projector is capable of displaying inverted images for changing the lamp, when lamp warning message displays. • Do not attempt to disassemble this case contact your local dealer or Acer service center when you . • Do not stand the projector on the remote control. • Do not operate lamps beyond the rated lamp life. Please contact your local dealer or Acer service center for ceiling mount installation. vi...
... the projector lens with any object when the projector is capable of displaying inverted images for changing the lamp, when lamp warning message displays. • Do not attempt to disassemble this case contact your local dealer or Acer service center when you . • Do not stand the projector on the remote control. • Do not operate lamps beyond the rated lamp life. Please contact your local dealer or Acer service center for ceiling mount installation. vi...

User Manual
Page 8
... or Acer service center for changing the lamp, when lamp warning message displays. • When switching the projector off the product before disconnecting power. • Turn on the projector first and then the signal sources. • Do not use lens cap when projector is on. Warning: • Do not look into the projector's lens when the lamp is in this happens, the projector will detect the life of time. Don't: • Block the slots and openings...
... or Acer service center for changing the lamp, when lamp warning message displays. • When switching the projector off the product before disconnecting power. • Turn on the projector first and then the signal sources. • Do not use lens cap when projector is on. Warning: • Do not look into the projector's lens when the lamp is in this happens, the projector will detect the life of time. Don't: • Block the slots and openings...
User Manual
Page 11
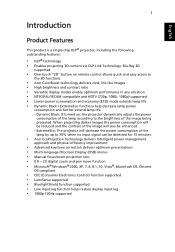
... a single-chip DLP® projector, including the following outstanding features: • DLP® technology • Enables projecting 3D content via DLP Link Technology: Blu-Ray 3D supported • One-touch "3D" button on , the projector dynamically adjusts the power consumption of the lamp according to the 3D functions • Acer ColorBoost technology delivers vivid, life-like images • High brightness and contrast ratio • Versatile display modes enable...
... a single-chip DLP® projector, including the following outstanding features: • DLP® technology • Enables projecting 3D content via DLP Link Technology: Blu-Ray 3D supported • One-touch "3D" button on , the projector dynamically adjusts the power consumption of the lamp according to the 3D functions • Acer ColorBoost technology delivers vivid, life-like images • High brightness and contrast ratio • Versatile display modes enable...

User Manual
Page 13
... Focus ring 2 Lens cap 6 Projection lens 3 Power key and Power indicator LED 7 Remote control receiver 4 IR remote sensor Rear side 1 2 3 4 5 6 7 89 10 11 11 Note: Connector interface is subject to model's specifications. # Description 1 HDMI connector 2 HDMI (MHL) connector 3 DC 5V output (service) 4 Analog RGB signal/HDTV/ component video input connector 5 Monitor loop-through output connector (from VGA IN 1 only) # Description 6 RS232 connector 7 Composite video input connector 8 Audio input connector Audio output connector 9 Kensington™ lock port 10 Power...
... Focus ring 2 Lens cap 6 Projection lens 3 Power key and Power indicator LED 7 Remote control receiver 4 IR remote sensor Rear side 1 2 3 4 5 6 7 89 10 11 11 Note: Connector interface is subject to model's specifications. # Description 1 HDMI connector 2 HDMI (MHL) connector 3 DC 5V output (service) 4 Analog RGB signal/HDTV/ component video input connector 5 Monitor loop-through output connector (from VGA IN 1 only) # Description 6 RS232 connector 7 Composite video input connector 8 Audio input connector Audio output connector 9 Kensington™ lock port 10 Power...

User Manual
Page 16
Use this button to hide screen image; press again to display the image. 17 HDMI/MHL To change source to HDMI™ (or MHL). (for the model with HDMI™ or MHL connector) 18 ZOOM IN/ZOOM Zooms the projector display in the "Setting" > "Security" OSD. 22 MUTE Mutes or unmutes the projector's volume. This function is only available when connected to a computer via a mini USB cable. 9 COMPONENT (No function) 10 MEDIA Opens MEDIA...
Use this button to hide screen image; press again to display the image. 17 HDMI/MHL To change source to HDMI™ (or MHL). (for the model with HDMI™ or MHL connector) 18 ZOOM IN/ZOOM Zooms the projector display in the "Setting" > "Security" OSD. 22 MUTE Mutes or unmutes the projector's volume. This function is only available when connected to a computer via a mini USB cable. 9 COMPONENT (No function) 10 MEDIA Opens MEDIA...

User Manual
Page 20
... turn on the projector or the Source Selection function is "Auto"). • If the screen displays "No Signal", please make sure the signal cables are securely connected. English 10 Turning the Projector On/Off Turning On the Projector 1 Ensure that the power cord and signal cable are securely connected. • If you turn blue. 3 Turn on your source (computer, notebook, video player, etc.). The Power LED will light red. 2 Turn on the projector by pressing (POWER) on the control panel or remote control, and the Power indicator LED...
... turn on the projector or the Source Selection function is "Auto"). • If the screen displays "No Signal", please make sure the signal cables are securely connected. English 10 Turning the Projector On/Off Turning On the Projector 1 Ensure that the power cord and signal cable are securely connected. • If you turn blue. 3 Turn on your source (computer, notebook, video player, etc.). The Power LED will light red. 2 Turn on the projector by pressing (POWER) on the control panel or remote control, and the Power indicator LED...

User Manual
Page 25
... is displayed on the screen or when the projector searches for input signal. 1 Turn on the projector by pressing remote control. (POWER) on the control panel or 2 Press "MENU" on the control panel or remote control to launch the OSD for projector installation and maintenance. English 15 User Controls Installation Menu The Installation menu provides an Onscreen Display (OSD) for projector installation and maintenance. 3 The background pattern acts as a guide to adjusting the calibration and alignment settings, such as screen size and distance, focus and...
... is displayed on the screen or when the projector searches for input signal. 1 Turn on the projector by pressing remote control. (POWER) on the control panel or 2 Press "MENU" on the control panel or remote control to launch the OSD for projector installation and maintenance. English 15 User Controls Installation Menu The Installation menu provides an Onscreen Display (OSD) for projector installation and maintenance. 3 The background pattern acts as a guide to adjusting the calibration and alignment settings, such as screen size and distance, focus and...

User Manual
Page 28
... the Display Mode menu. Available when User 1/User 2/User 3 is enabled. • Education: For education environment. • User 1/User 2/User 3: Memorize user's settings. The below OSD items can use one of the picture. Controls the degree of difference between the lightest and darkest parts of the display modes as a starting point and customize the settings. 18 English Display Mode Color Profile Wall Color Brightness Contrast There are several choices, including White, Light Yellow, Light Blue, Pink and Dark Green.
... the Display Mode menu. Available when User 1/User 2/User 3 is enabled. • Education: For education environment. • User 1/User 2/User 3: Memorize user's settings. The below OSD items can use one of the picture. Controls the degree of difference between the lightest and darkest parts of the display modes as a starting point and customize the settings. 18 English Display Mode Color Profile Wall Color Brightness Contrast There are several choices, including White, Light Yellow, Light Blue, Pink and Dark Green.

User Manual
Page 30
... or retailer from black and white to digital converter black level value. Saturation: Adjusts a video image from whom you purchased the projector. Note: "Saturation" and "Tint" functions are near 100%. (Video sources only) • Film Mode: Sets the image optimized to 24-frame True Film mode for technicians and installers to use these standards to your preferred mode name in the Display Mode menu. English 20 Advanced Rename...
... or retailer from black and white to digital converter black level value. Saturation: Adjusts a video image from whom you purchased the projector. Note: "Saturation" and "Tint" functions are near 100%. (Video sources only) • Film Mode: Sets the image optimized to 24-frame True Film mode for technicians and installers to use these standards to your preferred mode name in the Display Mode menu. English 20 Advanced Rename...

User Manual
Page 31
.../1080p/WUXGA models): The image will be scaled to "On". Position (Horizontal Position) This function is unavailable when Auto Keystone is set to fit the screen and displayed using a 4:3 ratio. • 16:9: The image will be displayed making full use of image. • Desktop • Ceiling: Turns the image upside down for WXGA/1080p/WUXGA models): Keeps the original signal aspect ratio and zooms in by 1.333 times. mounted projection. Automatically adjusts image distortion caused...
.../1080p/WUXGA models): The image will be scaled to "On". Position (Horizontal Position) This function is unavailable when Auto Keystone is set to fit the screen and displayed using a 4:3 ratio. • 16:9: The image will be displayed making full use of image. • Desktop • Ceiling: Turns the image upside down for WXGA/1080p/WUXGA models): Keeps the original signal aspect ratio and zooms in by 1.333 times. mounted projection. Automatically adjusts image distortion caused...

User Manual
Page 32
... HDMI image data to correct it . It reduces input to move the image up. When Display Mode is HDMI. Note: "HDMI Color Range" and "HDMI Scan Info" are not supported under video or HDMI mode. to correct it . After turned on, performing Auto Keystone or adjusting the following settings will deactivate this function will be automatically turned on the HDMI image. If you experience a vertical flickering bar in the projected image, use this function to move the image...
... HDMI image data to correct it . It reduces input to move the image up. When Display Mode is HDMI. Note: "HDMI Color Range" and "HDMI Scan Info" are not supported under video or HDMI mode. to correct it . After turned on, performing Auto Keystone or adjusting the following settings will deactivate this function will be automatically turned on the HDMI image. If you experience a vertical flickering bar in the projected image, use this function to move the image...
User Manual
Page 33
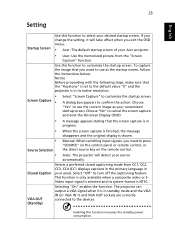
... default startup screen of your Acer projector. • User: Use the memorized picture from CC1, CC2, CC3, CC4 (CC1 displays captions in the primary language in standby mode and the VGA IN (or VGA IN 1) and VGA OUT sockets are correctly connected to customize the startup screen. To capture the image that you need to use as your desired startup screen. Choose "Yes" to press "SOURCE" on the control panel or remote control...
... default startup screen of your Acer projector. • User: Use the memorized picture from CC1, CC2, CC3, CC4 (CC1 displays captions in the primary language in standby mode and the VGA IN (or VGA IN 1) and VGA OUT sockets are correctly connected to customize the startup screen. To capture the image that you need to use as your desired startup screen. Choose "Yes" to press "SOURCE" on the control panel or remote control...

User Manual
Page 35
..., the projector will shut down automatically. Both "User Password" and "Administrator Password" can set timeout function. • Press to select timeout duration. • The range is from 10 to 990 minutes. • When time is up or change "User Password". • Use the numerical keys on the remote control to set up , the projector will request you to enter the password again. • The factory default setting of "Timeout...
..., the projector will shut down automatically. Both "User Password" and "Administrator Password" can set timeout function. • Press to select timeout duration. • The range is from 10 to 990 minutes. • When time is up or change "User Password". • Use the numerical keys on the remote control to set up , the projector will request you to enter the password again. • The factory default setting of "Timeout...

User Manual
Page 36
... projector. English 26 Security Reset Administrator Password You can enter "Administrator Password" when the "Enter Administrator Password" or "Enter Password" dialogue box displays. • Press to change "Administrator Password". • The factory default of "Administrator Password" is lost, please contact your local Acer service center. If you forget your administrator password, do the following to retrieve the administrator password: • Enter the unique 6-digit "Universal Password" which is locked...
... projector. English 26 Security Reset Administrator Password You can enter "Administrator Password" when the "Enter Administrator Password" or "Enter Password" dialogue box displays. • Press to change "Administrator Password". • The factory default of "Administrator Password" is lost, please contact your local Acer service center. If you forget your administrator password, do the following to retrieve the administrator password: • Enter the unique 6-digit "Universal Password" which is locked...

User Manual
Page 37
... ECO Mode High Altitude Turn Off Mode Auto Shutdown (Minutes) Menu Display Time (Seconds) AC Power On Control Panel Lock Choose "On" to dim the projector lamp, which will be set to "Off". Choose "Off" to return to turn off the projector with fan cooling process by pressing "MENU". Choose "On" to turn the projector on, press and hold "POWER" on the control panel for 3 seconds. • Full Lock: Disables all keys on the control panel to operate...
... ECO Mode High Altitude Turn Off Mode Auto Shutdown (Minutes) Menu Display Time (Seconds) AC Power On Control Panel Lock Choose "On" to dim the projector lamp, which will be set to "Off". Choose "Off" to return to turn off the projector with fan cooling process by pressing "MENU". Choose "On" to turn the projector on, press and hold "POWER" on the control panel for 3 seconds. • Full Lock: Disables all keys on the control panel to operate...

User Manual
Page 43
... popping sound. Go to "Image" > "Auto Keystone" or "Image" > "Manual Keystone" to open the OSD menu. If this happens, the projector will burn out and may make adjustments. 11 Image is too small • Adjust the zoom lever on the top of the screen. • Press the Keystone correction keys on the control panel or remote control until the lamp module has been replaced. To replace the lamp, contact your local dealer or Acer service center...
... popping sound. Go to "Image" > "Auto Keystone" or "Image" > "Manual Keystone" to open the OSD menu. If this happens, the projector will burn out and may make adjustments. 11 Image is too small • Adjust the zoom lever on the top of the screen. • Press the Keystone correction keys on the control panel or remote control until the lamp module has been replaced. To replace the lamp, contact your local dealer or Acer service center...

User Manual
Page 45
35 LED & Alarm Definition Listing LED Messages English Message Standby (Power cord plugged in) Power on Lamp retry Turning off (Cooling state) Turning off (Cooling completed) Firmware download Error (Thermal failure) Error (Fan lock failure) Power LED Red Blue V -- --- Error (Color wheel -- failure) V V V Quick flashing TEMP LED Red -- --- -- -- V --- V V Quick flashing --- V LAMP LED Red -- --- -- -- Error (Lamp breakdown) -- Quick flashing V V Quick flashing -- -- V -- -- V --
35 LED & Alarm Definition Listing LED Messages English Message Standby (Power cord plugged in) Power on Lamp retry Turning off (Cooling state) Turning off (Cooling completed) Firmware download Error (Thermal failure) Error (Fan lock failure) Power LED Red Blue V -- --- Error (Color wheel -- failure) V V V Quick flashing TEMP LED Red -- --- -- -- V --- V V Quick flashing --- V LAMP LED Red -- --- -- -- Error (Lamp breakdown) -- Quick flashing V V Quick flashing -- -- V -- -- V --


