User Manual
Page 24
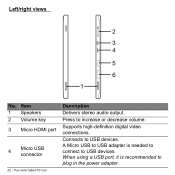
Item 1 Speakers 2 Volume key 3 Micro HDMI port 4 Micro USB connector 22 - Supports high-definition digital video connections. Connects to increase or decrease volume. Press to USB devices. A Micro USB to USB adapter is recommended to USB devices. When using a USB port, it is needed to connect to plug in the power adapter. Your Acer tablet PC tour Description Delivers stereo audio output. Left/right views 2 3 4 5 6 1 No.
Item 1 Speakers 2 Volume key 3 Micro HDMI port 4 Micro USB connector 22 - Supports high-definition digital video connections. Connects to increase or decrease volume. Press to USB devices. A Micro USB to USB adapter is recommended to USB devices. When using a USB port, it is needed to connect to plug in the power adapter. Your Acer tablet PC tour Description Delivers stereo audio output. Left/right views 2 3 4 5 6 1 No.

User Manual
Page 33
... certain models. Single cable implementation allows tidy setup and fast connection. Use the HDMI Micro port on your computer to HDMI adapter is an industry-supported, uncompressed, all-digital audio/video interface. HDMI MICRO HDMI (High-Definition Multimedia Interface) is only included with high-end audio and video equipment. HDMI provides...
... certain models. Single cable implementation allows tidy setup and fast connection. Use the HDMI Micro port on your computer to HDMI adapter is an industry-supported, uncompressed, all-digital audio/video interface. HDMI MICRO HDMI (High-Definition Multimedia Interface) is only included with high-end audio and video equipment. HDMI provides...

User Manual
Page 45
... faster charge time. You can continue to a mains power outlet. BATTERY PACK The computer uses an embedded battery pack that you should follow: 1. Your computer supports charge-in-use a battery pack for the day. Connect the AC adapter and fully charge the battery. Battery pack - 43
... faster charge time. You can continue to a mains power outlet. BATTERY PACK The computer uses an embedded battery pack that you should follow: 1. Your computer supports charge-in-use a battery pack for the day. Connect the AC adapter and fully charge the battery. Battery pack - 43

User Manual
Page 53
... in the flap located inside the front cover of the ITW passport. Always have an Acer-authorized ITW service site, you can still get in this passport thoroughly. Please visit www.acer.com. An ITW passport comes with our offices worldwide. Read this handy booklet. Frequently ...need to know about the ITW program. Place your ITW passport on hand, especially when you travel, to receive the benefits from our support centers. Requesting service International Travelers Warranty (ITW) Your computer is in contact with your computer. The printer does not work Check the following...
... in the flap located inside the front cover of the ITW passport. Always have an Acer-authorized ITW service site, you can still get in this passport thoroughly. Please visit www.acer.com. An ITW passport comes with our offices worldwide. Read this handy booklet. Frequently ...need to know about the ITW program. Place your ITW passport on hand, especially when you travel, to receive the benefits from our support centers. Requesting service International Travelers Warranty (ITW) Your computer is in contact with your computer. The printer does not work Check the following...

User Manual
Page 54
If there are required to provide the following information available when you call Acer for online service, and please be at your computer, write them down as they appear on the screen (or the number and sequence in the ... type: Serial number: Date of purchase: 52 - Frequently asked questions You are error messages or beeps reported by your computer when you call. With your support, we can reduce the amount of beeps).
If there are required to provide the following information available when you call Acer for online service, and please be at your computer, write them down as they appear on the screen (or the number and sequence in the ... type: Serial number: Date of purchase: 52 - Frequently asked questions You are error messages or beeps reported by your computer when you call. With your support, we can reduce the amount of beeps).

User Manual
Page 61
For more information? Tap Check for Windows updates? Where can I check for updates now. Swipe the right-hand edge of the screen inwards and tap Settings > Change PC settings > Windows Updates. How do I get more information please visit the following pages: • Windows 8 tutorials: www.acer.com/windows8-tutorial • Support FAQs: www.acer.com/support Frequently asked questions - 59
For more information? Tap Check for Windows updates? Where can I check for updates now. Swipe the right-hand edge of the screen inwards and tap Settings > Change PC settings > Windows Updates. How do I get more information please visit the following pages: • Windows 8 tutorials: www.acer.com/windows8-tutorial • Support FAQs: www.acer.com/support Frequently asked questions - 59

User Manual
Page 71
... it completes burning it with a permanent marker. Remove the disc from the drive and mark it . 3. To reinstall software and drivers that product's documentation or support Web site. 2. If only one or two items of software or hardware have stopped working correctly, the problem may be solved by reinstalling the software...
... it completes burning it with a permanent marker. Remove the disc from the drive and mark it . 3. To reinstall software and drivers that product's documentation or support Web site. 2. If only one or two items of software or hardware have stopped working correctly, the problem may be solved by reinstalling the software...

User Manual
Page 75
... saves them as restore points. Note: For more information about using Microsoft System Restore, from Start, type 'Help' and then click Help and Support in the list of the Acer Resource Center. 3. Returning to complete the installation. 2. Repeat this step for the item you want to install, then follow the onscreen prompts...
... saves them as restore points. Note: For more information about using Microsoft System Restore, from Start, type 'Help' and then click Help and Support in the list of the Acer Resource Center. 3. Returning to complete the installation. 2. Repeat this step for the item you want to install, then follow the onscreen prompts...
