
User Manual (3D)
Page 3
... you do not wish to view 3D content, you need 3D glasses to change the battery. In order to the documentation that 3D is a power switch on and how to support 144Hz sync signal for instructions how to turn them on one of inactivity. Before you can press, and an LED that indicates if the glasses are turned on page 4. Note: Refer...
... you do not wish to view 3D content, you need 3D glasses to change the battery. In order to the documentation that 3D is a power switch on and how to support 144Hz sync signal for instructions how to turn them on one of inactivity. Before you can press, and an LED that indicates if the glasses are turned on page 4. Note: Refer...

User Manual (3D)
Page 4
.... Note: Blu-ray 3D content over an HDMI 1.4a or later connection, this will need to purchase additional software. 4 Ensure you will be set automatically. 2 Press the menu button on most of the window. Note: Please refer to open the OSD. English 4 Using DLP 3D / NVIDIA 3DTV Play technology Requires DLP 3D glasses. Note: You may need to set refresh rate which the 3D content requires.
.... Note: Blu-ray 3D content over an HDMI 1.4a or later connection, this will need to purchase additional software. 4 Ensure you will be set automatically. 2 Press the menu button on most of the window. Note: Please refer to open the OSD. English 4 Using DLP 3D / NVIDIA 3DTV Play technology Requires DLP 3D glasses. Note: You may need to set refresh rate which the 3D content requires.

User Manual (3D)
Page 7
... supports 3D playback, you have a DVD or Blu-ray player that 3D options are on and the video uses 24p before turning on pages 4-6. Watching 3D DVD or Blu-ray content If you can watch 3D DVD content using any of the available input formats. Older connections should check the resolution is set the viewing method by going to View > Viewing Method > Software pageflipping. 2 Open...
... supports 3D playback, you have a DVD or Blu-ray player that 3D options are on and the video uses 24p before turning on pages 4-6. Watching 3D DVD or Blu-ray content If you can watch 3D DVD content using any of the available input formats. Older connections should check the resolution is set the viewing method by going to View > Viewing Method > Software pageflipping. 2 Open...
User Manual
Page 3
...as possible. Keep this product on a bed, sofa, rug or other similar surface. • This product should never be blocked by unplugging all warnings and instructions marked on a vibrating surface. Follow all power cords from the wall outlet before removing the power supply unit from ... instructions carefully. Caution for cleaning. Use a damp cloth for plug as they may touch dangerous voltage points or short-out parts that the power outlet you need to disconnect power to the equipment, be blocked or covered. If the product falls, it could result in installation ...
...as possible. Keep this product on a bed, sofa, rug or other similar surface. • This product should never be blocked by unplugging all warnings and instructions marked on a vibrating surface. Follow all power cords from the wall outlet before removing the power supply unit from ... instructions carefully. Caution for cleaning. Use a damp cloth for plug as they may touch dangerous voltage points or short-out parts that the power outlet you need to disconnect power to the equipment, be blocked or covered. If the product falls, it could result in installation ...
User Manual
Page 5
...turn off before turning main power off the main power abruptly or unplug the projector during operation. Warning! The bright may become excessively high, such as inside of your dealer for inspection. • Do not face the projector lens to the sun. At least 50cm clearance from walls and free... switching the projector off, suggest to turn off . Consult your projector. The best way is on the projector first and then signal sources • Do not place the product in damage and will often require extensive work by the operating instructions, since improper adjustment ...
...turn off before turning main power off the main power abruptly or unplug the projector during operation. Warning! The bright may become excessively high, such as inside of your dealer for inspection. • Do not face the projector lens to the sun. At least 50cm clearance from walls and free... switching the projector off, suggest to turn off . Consult your projector. The best way is on the projector first and then signal sources • Do not place the product in damage and will often require extensive work by the operating instructions, since improper adjustment ...
User Manual
Page 6
... Onscreen display "Management" menu after replacing the lamp module. • Do not attempt to become heated and deformed or even cause a fire. The only user serviceable part is under operation as this could cause it would cause dramatical decrease of lamp life or severe safety concern of system malfunction. 6° 6° Only use acer ceiling mount kit for ceiling mount installation...
... Onscreen display "Management" menu after replacing the lamp module. • Do not attempt to become heated and deformed or even cause a fire. The only user serviceable part is under operation as this could cause it would cause dramatical decrease of lamp life or severe safety concern of system malfunction. 6° 6° Only use acer ceiling mount kit for ceiling mount installation...

User Manual
Page 9
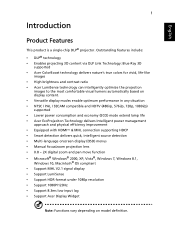
... Getting Started 13 Connecting the Projector 13 Turning the Projector On/Off 15 Turning on the Projector 15 Turning the projector off 16 Adjusting the Projected Image 17 Adjusting the Height of Projected Image 17 How to get a preferred image size by adjusting distance and zoom 18 User Controls 27 Installation menu 27 Onscreen Display (OSD) Menus 28 Color 29 Image 33 Setting 36 Management 39 Audio 41 3D 41 Language 42 Appendices 43 Troubleshooting...
... Getting Started 13 Connecting the Projector 13 Turning the Projector On/Off 15 Turning on the Projector 15 Turning the projector off 16 Adjusting the Projected Image 17 Adjusting the Height of Projected Image 17 How to get a preferred image size by adjusting distance and zoom 18 User Controls 27 Installation menu 27 Onscreen Display (OSD) Menus 28 Color 29 Image 33 Setting 36 Management 39 Audio 41 3D 41 Language 42 Appendices 43 Troubleshooting...
User Manual
Page 11
... with HDMI™ & MHL connection supporting HDCP • Smart detection delivers quick, intelligent source detection • Multi-language onscreen display (OSD) menus • Manual focus/zoom projection lens • 0.8 ~ 2X digital zoom and pan move function • Microsoft® Windows® 2000, XP, Vista®, Windows 7, Windows 8.1, Windows 10, Macintosh® OS compliant • Support MHL V2.1 signal display • Support LumiSense • Support HDR format under 1080p resolution • Support...
... with HDMI™ & MHL connection supporting HDCP • Smart detection delivers quick, intelligent source detection • Multi-language onscreen display (OSD) menus • Manual focus/zoom projection lens • 0.8 ~ 2X digital zoom and pan move function • Microsoft® Windows® 2000, XP, Vista®, Windows 7, Windows 8.1, Windows 10, Macintosh® OS compliant • Support MHL V2.1 signal display • Support LumiSense • Support HDR format under 1080p resolution • Support...

User Manual
Page 19
..." to select 3D models. 8 SOURCE Changes the active source. 9 MODE Chooses a display mode. 10 KEYSTONE Adjusts the image to compensate for distortion caused by tilting the projector. 11 BACK STOP Returns to display the image. For computer mode only. 9 English # Icon Function Description 3 MUTE To turn on/off the video. Press "HIDE" to hide the image, press again to the previous operation. This 12 VGA connector supports analog RGB, YPbPr (480p/576p...
..." to select 3D models. 8 SOURCE Changes the active source. 9 MODE Chooses a display mode. 10 KEYSTONE Adjusts the image to compensate for distortion caused by tilting the projector. 11 BACK STOP Returns to display the image. For computer mode only. 9 English # Icon Function Description 3 MUTE To turn on/off the video. Press "HIDE" to hide the image, press again to the previous operation. This 12 VGA connector supports analog RGB, YPbPr (480p/576p...

User Manual
Page 25
... remote control to switch between inputs. The Power indicator LED will flash red. 2 Turn on the projector by pressing "Power" button on your source automatically. • If the screen displays "Lock" and "Source" icons, it means the projector is locked onto a specific source type and there is no such type of input signal detected. • If the screen displays "No Signal", please make sure the signal cables are securely connected. The projector will turn blue. 3 Turn on the control panel or remote control, and the Power...
... remote control to switch between inputs. The Power indicator LED will flash red. 2 Turn on the projector by pressing "Power" button on your source automatically. • If the screen displays "Lock" and "Source" icons, it means the projector is locked onto a specific source type and there is no such type of input signal detected. • If the screen displays "No Signal", please make sure the signal cables are securely connected. The projector will turn blue. 3 Turn on the control panel or remote control, and the Power...

User Manual
Page 37
... a submenu for feature setting. English 27 User Controls Installation menu The installation menu provides an onscreen display (OSD) for projector installation and maintenance. 3 The background pattern acts as a guide to adjusting the calibration and alignment settings, such as screen size and distance, focus and more . 1 Turn on the projector by pressing "Power" button on the control pad. 2 Press the "MENU" button on the remote control to launch the OSD for projector installation and maintenance. Use the up and...
... a submenu for feature setting. English 27 User Controls Installation menu The installation menu provides an onscreen display (OSD) for projector installation and maintenance. 3 The background pattern acts as a guide to adjusting the calibration and alignment settings, such as screen size and distance, focus and more . 1 Turn on the projector by pressing "Power" button on the control pad. 2 Press the "MENU" button on the remote control to launch the OSD for projector installation and maintenance. Use the up and...

User Manual
Page 38
... the remote control or control panel, the screen will automatically save the new settings. The OSD menu will close and the projector will return to the actual OSD of the following OSD settings may not be adjusted in the main menu. Please refer to the main menu. • To exit OSD, press "BACK" on the remote control or control panel. Using the OSD menus • To open the OSD menu, press "MENU" on model definition. English 28 Onscreen Display (OSD...
... the remote control or control panel, the screen will automatically save the new settings. The OSD menu will close and the projector will return to the actual OSD of the following OSD settings may not be adjusted in the main menu. Please refer to the main menu. • To exit OSD, press "BACK" on the remote control or control panel. Using the OSD menus • To open the OSD menu, press "MENU" on model definition. English 28 Onscreen Display (OSD...
User Manual
Page 40
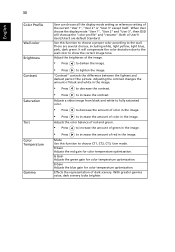
... the current "User 1", "User 2" or "User 3" except itself. Use this function to the wall. There are default Standard. Mode Use this function to choose a proper color according to choose CT1, CT2, CT3, User mode. R Gain Adjusts the red gain for color temperature optimization. English 30 Color Profile Wall color Brightness Contrast Saturation Tint Color Temperature Gamma User can choose all the display mode setting as reference setting of the picture. Adjusting the contrast changes the amount of color in the image. • Press...
... the current "User 1", "User 2" or "User 3" except itself. Use this function to the wall. There are default Standard. Mode Use this function to choose a proper color according to choose CT1, CT2, CT3, User mode. R Gain Adjusts the red gain for color temperature optimization. English 30 Color Profile Wall color Brightness Contrast Saturation Tint Color Temperature Gamma User can choose all the display mode setting as reference setting of the picture. Adjusting the contrast changes the amount of color in the image. • Press...

User Manual
Page 41
..., including white, light yellow, light blue, pink, dark green. White Peaking Increases the brightness of red and green. Position/HDMI Scan Info/Tracking/Digital Zoom function will calibrate and optimize the projection image according to make the projected screen smoothly without any lag. Advanced 31 Ind. Ind. Saturation Adjusts the selected color to its factory default settings. Gain Adjusts the selected color's contrast. There are near 100%. (video sources only) Film Mode Sets the image optimized to -life images. The ISF input password will...
..., including white, light yellow, light blue, pink, dark green. White Peaking Increases the brightness of red and green. Position/HDMI Scan Info/Tracking/Digital Zoom function will calibrate and optimize the projection image according to make the projected screen smoothly without any lag. Advanced 31 Ind. Ind. Saturation Adjusts the selected color to its factory default settings. Gain Adjusts the selected color's contrast. There are near 100%. (video sources only) Film Mode Sets the image optimized to -life images. The ISF input password will...
User Manual
Page 43
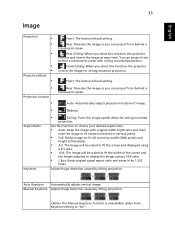
... under Auto Keystone setting to choose your desired aspect ratio. • Auto: Keep the image with ceiling mounted projection. Front: The factory default setting. • Projection Location Rear: Reverses the image so you can project from behind a translucent screen. Manual Keystone Adjust image distortion caused by tilting projection. English 33 Image Projection • • • • • Projection Mode • Front: The factory default setting. Auto Keystone Automatically adjusts vertical image. Rear: Reverses the image so...
... under Auto Keystone setting to choose your desired aspect ratio. • Auto: Keep the image with ceiling mounted projection. Front: The factory default setting. • Projection Location Rear: Reverses the image so you can project from behind a translucent screen. Manual Keystone Adjust image distortion caused by tilting projection. English 33 Image Projection • • • • • Projection Mode • Front: The factory default setting. Auto Keystone Automatically adjusts vertical image. Rear: Reverses the image so...

User Manual
Page 44
... rectangular on HDMI image. V. Frequency "Frequency" changes the projector's refresh rate to match the frequency of an image that you experience an unstable or flickering image, use this function to move the image right. Note 1: "H. V. Manually adjusts the shape and size of your computer's graphics card. Adjusts the sharpness of the projector with the graphics card. to make the necessary adjustments. If you can see a vertical flickering bar in the projected image, use this function...
... rectangular on HDMI image. V. Frequency "Frequency" changes the projector's refresh rate to match the frequency of an image that you experience an unstable or flickering image, use this function to move the image right. Note 1: "H. V. Manually adjusts the shape and size of your computer's graphics card. Adjusts the sharpness of the projector with the graphics card. to make the necessary adjustments. If you can see a vertical flickering bar in the projected image, use this function...

User Manual
Page 46
..." to use the current image as the startup screen, follow the instructions below. 36 English Setting Startup Screen Screen Capture Source Selection Closed Caption DC 5V Out VGA OUT (Standby) HDMI CEC Use this function to 4:3. Selects a preferred closed captioning mode from "Screen Capture" function. Default is "Off". To capture the image that you exit the OSD menu. • Acer: The default startup screen of your Acer projector. • User: Use memorize picture from CC1...
..." to use the current image as the startup screen, follow the instructions below. 36 English Setting Startup Screen Screen Capture Source Selection Closed Caption DC 5V Out VGA OUT (Standby) HDMI CEC Use this function to 4:3. Selects a preferred closed captioning mode from "Screen Capture" function. Default is "Off". To capture the image that you exit the OSD menu. • Acer: The default startup screen of your Acer projector. • User: Use memorize picture from CC1...
User Manual
Page 49
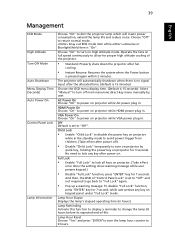
... the system when the Power button is pressed again within 2 minutes. 39 English Management ECO Mode High Altitude Turn Off Mode Auto Shutdown Menu Display Time (Seconds) Auto Power On Control Panel Lock Lamp Information Choose "On" to dim the projector lamp which will automatically shutdown when there is no signal input after the allocated time. (default is 15 minutes) Choose the OSD menu display time. (Default is 15 seconds). Operate...
... the system when the Power button is pressed again within 2 minutes. 39 English Management ECO Mode High Altitude Turn Off Mode Auto Shutdown Menu Display Time (Seconds) Auto Power On Control Panel Lock Lamp Information Choose "On" to dim the projector lamp which will automatically shutdown when there is no signal input after the allocated time. (default is 15 minutes) Choose the OSD menu display time. (Default is 15 seconds). Operate...
User Manual
Page 53
...", open the "Control Panel", and then double-click the "Display" icon. Please refer to the "Replacing the Lamp" section. • Make sure you experience a problem with your Acer projector, refer to WUXGA-RB (1920 x 1200). • Click the "Advanced Properties" button. Image Problems and Solutions # Problem Solution 1 No image appears • Connected as described in the "Getting Started" onscreen section. • Ensure none of the monitor display...
...", open the "Control Panel", and then double-click the "Display" icon. Please refer to the "Replacing the Lamp" section. • Make sure you experience a problem with your Acer projector, refer to WUXGA-RB (1920 x 1200). • Click the "Advanced Properties" button. Image Problems and Solutions # Problem Solution 1 No image appears • Connected as described in the "Getting Started" onscreen section. • Ensure none of the monitor display...

User Manual
Page 54
... card to adjust the aspect ratio. Refer to the or flickering "Image" section for more information. • Check and reconfigure the display mode of your computer. • Press the toggle output settings. Set up the display format to 16:9 (wide) aspect ratio on your computer. 6 Image has vertical • Use "Frequency" to get a preferred image size by adjusting distance and zoom" section for more information. • Change the display color depth settings...
... card to adjust the aspect ratio. Refer to the or flickering "Image" section for more information. • Check and reconfigure the display mode of your computer. • Press the toggle output settings. Set up the display format to 16:9 (wide) aspect ratio on your computer. 6 Image has vertical • Use "Frequency" to get a preferred image size by adjusting distance and zoom" section for more information. • Change the display color depth settings...


