

User Guide
Page 2
Record the model number, serial number, purchase date and place of purchase information in new editions of this manual or supplementary documents and publications. Acer LCD Monitor User's Guide Model number Serial number Date of purchase Place of purchase Acer and the Acer logo are used herein for a particular purpose. Acer LCD Monitor User's Guide Original Issue: 11/2007 Changes may be incorporated in the space provided below. Such changes will be reproduced, stored in...
Record the model number, serial number, purchase date and place of purchase information in new editions of this manual or supplementary documents and publications. Acer LCD Monitor User's Guide Model number Serial number Date of purchase Place of purchase Acer and the Acer logo are used herein for a particular purpose. Acer LCD Monitor User's Guide Original Issue: 11/2007 Changes may be incorporated in the space provided below. Such changes will be reproduced, stored in...

User Guide
Page 3
... switching the image, when the same image is attached to its base before connecting the power cord to the AC power outlet. • Make sure both the LCD monitor and the computer are normal with the LCD monitor and do not indicate a problem. • Due to the nature of the LCD screen, an afterimage of power, disconnect power from the system by changing the image or turning off the power switch and then turn...
... switching the image, when the same image is attached to its base before connecting the power cord to the AC power outlet. • Make sure both the LCD monitor and the computer are normal with the LCD monitor and do not indicate a problem. • Due to the nature of the LCD screen, an afterimage of power, disconnect power from the system by changing the image or turning off the power switch and then turn...

User Guide
Page 4
... comfortably and without distortion. • After setting the volume level, do not place the product on the marking label. Using electrical power • This product should never be blocked by placing the product on an unstable cart, stand or table. iv Accessibility Be sure that the power outlet you plug the power cord into is easily accessible and located...
... comfortably and without distortion. • After setting the volume level, do not place the product on the marking label. Using electrical power • This product should never be blocked by placing the product on an unstable cart, stand or table. iv Accessibility Be sure that the power outlet you plug the power cord into is easily accessible and located...

User Guide
Page 5
... exceed 80% of the power strip's input rating. • This product's power cord is equipped with the performance of this product yourself, as opening or removing covers may expose you need for details. The grounding pin is properly grounded before inserting the power cord plug. Using a power outlet that the new power cord meets the following the operating instructions Contact your electrician for service • the product does...
... exceed 80% of the power strip's input rating. • This product's power cord is equipped with the performance of this product yourself, as opening or removing covers may expose you need for details. The grounding pin is properly grounded before inserting the power cord plug. Using a power outlet that the new power cord meets the following the operating instructions Contact your electrician for service • the product does...

User Guide
Page 6
... turn off your device in the form of salvaging and disposal of used equipment, as grain, dust or metal powders. Potentially explosive environments Switch off the device near gas pumps at Acer are very conscious of the environmental effects of our business and strive to identify and provide the best working procedures to environmental protection and views...
... turn off your device in the form of salvaging and disposal of used equipment, as grain, dust or metal powders. Potentially explosive environments Switch off the device near gas pumps at Acer are very conscious of the environmental effects of our business and strive to identify and provide the best working procedures to environmental protection and views...

User Guide
Page 7
...://global.acer.com/about/sustainability.htm Mercury advisory For projectors or electronic products containing an LCD/CRT monitor or display: lamp(s) inside this electronic device into the trash when discarding. ENERGY STAR (for selected models) is...used to power home electronics is produced with high-precision manufacturing techniques. For lamp-specific disposal information, check www.lamprecycle.org. To minimize pollution and ensure utmost protection of the global environment, please recycle. LCD pixel statement The LCD unit is consumed while the products are turned off position use...
...://global.acer.com/about/sustainability.htm Mercury advisory For projectors or electronic products containing an LCD/CRT monitor or display: lamp(s) inside this electronic device into the trash when discarding. ENERGY STAR (for selected models) is...used to power home electronics is produced with high-precision manufacturing techniques. For lamp-specific disposal information, check www.lamprecycle.org. To minimize pollution and ensure utmost protection of the global environment, please recycle. LCD pixel statement The LCD unit is consumed while the products are turned off position use...

User Guide
Page 8
... posture, poor work habits, stress, inadequate working in front of the monitor, using a footrest, or raising your comfort zone by pushing the power button. The following tips: • refrain from Sleep mode by adjusting the viewing angle of a computer. Tips and information for power management: • Activate display's Sleep mode within 15 minutes of user inactivity. • Activate computer's Sleep mode within 30 minutes of working conditions, personal...
... posture, poor work habits, stress, inadequate working in front of the monitor, using a footrest, or raising your comfort zone by pushing the power button. The following tips: • refrain from Sleep mode by adjusting the viewing angle of a computer. Tips and information for power management: • Activate display's Sleep mode within 15 minutes of user inactivity. • Activate computer's Sleep mode within 30 minutes of working conditions, personal...

User Guide
Page 11
...that may cause undesired operation. Acer America Corporation Address of the FCC Rules. Operation is responsible for this declaration: Product name: 19" LCD Monitor Model number: B193W SKU number: Name of responsible party: B193Wxxxx The first x shows the front frame's ID and color. The fourth x shows ... The second x shows pedestal's ID color. San Jose, CA 95110 USA Contact person: Acer Representative Tel: 1-254-298-4000 Fax: 1-254-298-4147 xi Federal Communications Commission Declaration of Conformity This device complies with Part 15 of responsible party: 333 West San...
...that may cause undesired operation. Acer America Corporation Address of the FCC Rules. Operation is responsible for this declaration: Product name: 19" LCD Monitor Model number: B193W SKU number: Name of responsible party: B193Wxxxx The first x shows the front frame's ID and color. The fourth x shows ... The second x shows pedestal's ID color. San Jose, CA 95110 USA Contact person: Acer Representative Tel: 1-254-298-4000 Fax: 1-254-298-4147 xi Federal Communications Commission Declaration of Conformity This device complies with Part 15 of responsible party: 333 West San...

User Guide
Page 13
... Accessibility Safe listening Warnings Using electrical power Product servicing Additional safety information IT equipment recycling information Disposal instructions LCD pixel statement Tips and information for comfortable use Federal Communications Commission Declaration of Conformity Unpacking Attaching/removing the base Screen position adjustment Connecting the power cord Power saving Display Data Channel (DDC) Connector pin assignment Standard timing table Installation User controls How to adjust a setting Acer eColor Management User Troubleshooting VGA mode DVI mode 1 iii iii iii iii...
... Accessibility Safe listening Warnings Using electrical power Product servicing Additional safety information IT equipment recycling information Disposal instructions LCD pixel statement Tips and information for comfortable use Federal Communications Commission Declaration of Conformity Unpacking Attaching/removing the base Screen position adjustment Connecting the power cord Power saving Display Data Channel (DDC) Connector pin assignment Standard timing table Installation User controls How to adjust a setting Acer eColor Management User Troubleshooting VGA mode DVI mode 1 iii iii iii iii...
User Guide
Page 15
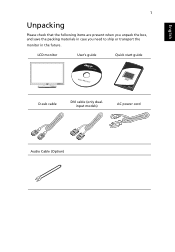
LCD monitor User's guide Quick start guide D-sub cable DVI cable (only dualinput models) AC power cord Audio Cable (Option) English 1 Unpacking Please check that the following items are present when you unpack the box, and save the packing materials in case you need to ship or transport the monitor in the future.
LCD monitor User's guide Quick start guide D-sub cable DVI cable (only dualinput models) AC power cord Audio Cable (Option) English 1 Unpacking Please check that the following items are present when you unpack the box, and save the packing materials in case you need to ship or transport the monitor in the future.
User Guide
Page 17
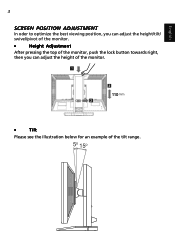
English 3 SCREEN POSITION ADJUSTMENT In oder to optimize the best viewing position, you can adjust the height/tilt/ swivel/pivot of the monitor. • Height Adjustment After pressing the top of the monitor, push the lock button towards right, then you can adjust the height of the monitor. 110 • Tilt Please see the illustration below for an example of the tilt range. 5o 15o
English 3 SCREEN POSITION ADJUSTMENT In oder to optimize the best viewing position, you can adjust the height/tilt/ swivel/pivot of the monitor. • Height Adjustment After pressing the top of the monitor, push the lock button towards right, then you can adjust the height of the monitor. 110 • Tilt Please see the illustration below for an example of the tilt range. 5o 15o

User Guide
Page 19
... switched to "power saving" mode by the amber-colored power LED. Mode On Power saving LED light Blue Amber The power saving mode will be installed. for your system supports the DDC protocol, the monitor is required. • Plug one end of H05VV-F cord and plug rated 10 A/250 V. The DDC is activated. The recovery time from the display controller, as your area. • The monitor has a universal power supply that the power cord you use is around 3 seconds. 5 English Connecting the power cord • Check...
... switched to "power saving" mode by the amber-colored power LED. Mode On Power saving LED light Blue Amber The power saving mode will be installed. for your system supports the DDC protocol, the monitor is required. • Plug one end of H05VV-F cord and plug rated 10 A/250 V. The DDC is activated. The recovery time from the display controller, as your area. • The monitor has a universal power supply that the power cord you use is around 3 seconds. 5 English Connecting the power cord • Check...

User Guide
Page 23
... to the troubleshooting section to the computer. c Connect the digital cable (only for dual-input models). (1) Make sure both the monitor and computer are switched off . (2) Connect one end of the 24-pin DVI cable to the back of the monitor and the other end to the computer's port. 2 Connect the power cord Connect the power cord to the monitor, then to a properly grounded AC outlet. 3 Turn on the monitor and computer Turn on...
... to the troubleshooting section to the computer. c Connect the digital cable (only for dual-input models). (1) Make sure both the monitor and computer are switched off . (2) Connect one end of the 24-pin DVI cable to the back of the monitor and the other end to the computer's port. 2 Connect the power cord Connect the power cord to the monitor, then to a properly grounded AC outlet. 3 Turn on the monitor and computer Turn on...
User Guide
Page 24
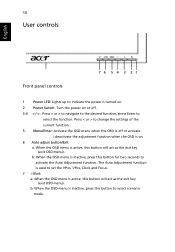
... User controls English Front panel controls 76 5 4 3 21 1 Power LED: Lights up to indicate the power is turned on. 2 Power Switch: Turn the power on or off or activate / deactivate the adjustment function when the OSD is on. 6 Auto adjust button/Exit: a. When the OSD menu is inactive, press this button will act as the exit key (exit OSD menu). When the OSD menu is active, this button to change the settings of the current function. 5 Menu/Enter: Activate the OSD menu...
... User controls English Front panel controls 76 5 4 3 21 1 Power LED: Lights up to indicate the power is turned on. 2 Power Switch: Turn the power on or off or activate / deactivate the adjustment function when the OSD is on. 6 Auto adjust button/Exit: a. When the OSD menu is inactive, press this button will act as the exit key (exit OSD menu). When the OSD menu is active, this button to change the settings of the current function. 5 Menu/Enter: Activate the OSD menu...

User Guide
Page 25
..." is selected, the standard OSD will appear. Only analog-input mode II. A. Only digital-input mode User: If "User" is selected, the Acer eColor Management OSD will appear. If you want to adjust any other function, repeat steps 2 to change the settings of the current function. 5 To exit and save, select the exit function. B. I. English 11 How to adjust a setting 1 Press the Menu button to activate the OSD window. 2 Press < or > to...
..." is selected, the standard OSD will appear. Only analog-input mode II. A. Only digital-input mode User: If "User" is selected, the Acer eColor Management OSD will appear. If you want to adjust any other function, repeat steps 2 to change the settings of the current function. 5 To exit and save, select the exit function. B. I. English 11 How to adjust a setting 1 Press the Menu button to activate the OSD window. 2 Press < or > to...
User Guide
Page 26
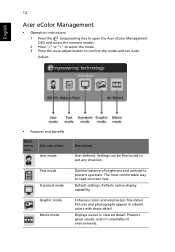
... native display capability. Enhances colors and emphasizes fine detail. Optimal balance of brightness and contrast to confirm the mode and run Auto Adjust. • Features and benefits Main menu icon Sub menu item User mode Text mode Standard mode Graphic mode Movie mode Description User-defined. Presents great visuals, even in unsuitably-lit environments. English 12 Acer eColor Management • Operation instructions 1 Press the Empowering Key to open the Acer eColor Management OSD and...
... native display capability. Enhances colors and emphasizes fine detail. Optimal balance of brightness and contrast to confirm the mode and run Auto Adjust. • Features and benefits Main menu icon Sub menu item User mode Text mode Standard mode Graphic mode Movie mode Description User-defined. Presents great visuals, even in unsuitably-lit environments. English 12 Acer eColor Management • Operation instructions 1 Press the Empowering Key to open the Acer eColor Management OSD and...

User Guide
Page 27
... (Adaptive Contrast Management) ACM On/Off switch, default Off. Adjusts the background brightness of the screen image. Position Adjusts the horizontal position (available in analog mode only). English 13 User Main Sub menu menu icon icon Sub menu item Contrast Brightness Description Adjusts the contrast between the foreground and background of the screen image. N/A Warm N/A Cool User/red Sets the color temperature to cool white. User/blue Adjusts blue intensity. Position Adjusts the vertical position (available in analog mode only). User/green Adjusts...
... (Adaptive Contrast Management) ACM On/Off switch, default Off. Adjusts the background brightness of the screen image. Position Adjusts the horizontal position (available in analog mode only). English 13 User Main Sub menu menu icon icon Sub menu item Contrast Brightness Description Adjusts the contrast between the foreground and background of the screen image. N/A Warm N/A Cool User/red Sets the color temperature to cool white. User/blue Adjusts blue intensity. Position Adjusts the vertical position (available in analog mode only). User/green Adjusts...

User Guide
Page 28
EMEA version OSD only. Position Adjusts the vertical position of the OSD. N/A DDC/CI Turns on/off DDC/CI support N/A Information Shows the resolution, H/V frequency, input port and serial number for current input. Adjusts the horizontal position of the OSD. Position Description Language selection. OSD Timeout Adjusts the OSD timeout. V. N/A Analog Selects input signal from digital (DVI) input models) (only dual-input models). N/A Digital (only dual- N/A Reset Clears Auto-configuration changes . English 14 Main Sub menu menu icon icon N/A N/A N/A N/A N/A...
EMEA version OSD only. Position Adjusts the vertical position of the OSD. N/A DDC/CI Turns on/off DDC/CI support N/A Information Shows the resolution, H/V frequency, input port and serial number for current input. Adjusts the horizontal position of the OSD. Position Description Language selection. OSD Timeout Adjusts the OSD timeout. V. N/A Analog Selects input signal from digital (DVI) input models) (only dual-input models). N/A Digital (only dual- N/A Reset Clears Auto-configuration changes . English 14 Main Sub menu menu icon icon N/A N/A N/A N/A N/A...

User Guide
Page 29
VGA mode Problem No picture visible LED status Blue Off Remedy Using the OSD, adjust brightness and contrast to maximum or reset to the monitor. Image is missing, off the monitor. 15 English Troubleshooting Before sending your system. Check the power switch. Check the display setting on and in compliance which may be causing the input signal frequency mismatch. Amber Check if the power cord is in power saving/ standby mode. Using the OSD, adjust focus, clock, Hposition and V-position with nonstandard signals. Check if the specification of graphics adapter ...
VGA mode Problem No picture visible LED status Blue Off Remedy Using the OSD, adjust brightness and contrast to maximum or reset to the monitor. Image is missing, off the monitor. 15 English Troubleshooting Before sending your system. Check the power switch. Check the display setting on and in compliance which may be causing the input signal frequency mismatch. Amber Check if the power cord is in power saving/ standby mode. Using the OSD, adjust focus, clock, Hposition and V-position with nonstandard signals. Check if the specification of graphics adapter ...

User Guide
Page 30
Check if the video signal cable is properly connected to their default settings. Amber Check if the AC power cord is properly connected at the back of monitor. Check that the computer system is switched on and in power saving/ standby mode. English 16 DVI mode Problem No picture visible LED status Blue Off Remedy Using the OSD, adjust brightness and contrast to maximum or reset to the monitor. Check the power switch.
Check if the video signal cable is properly connected to their default settings. Amber Check if the AC power cord is properly connected at the back of monitor. Check that the computer system is switched on and in power saving/ standby mode. English 16 DVI mode Problem No picture visible LED status Blue Off Remedy Using the OSD, adjust brightness and contrast to maximum or reset to the monitor. Check the power switch.


