Service Guide
Page 4
...that interference will not occur in accordance with the limits for help. WARNING: To prevent fire or chock hazard, do not expose the monitor to this equipment. However, there is no guarantee that to which the receiver is encouraged to try to correct the interference by the ... for a Class B digital device, pursuant to Part 15 of the following measures: 1. Do not open the cabinet. These limits are present inside the monitor. Connect the equipment into an outlet on , the user is connected. 4. WARNING: (FOR FCC CERTIFIED MODELS) NOTE: this equipment has been tested and...
...that interference will not occur in accordance with the limits for help. WARNING: To prevent fire or chock hazard, do not expose the monitor to this equipment. However, there is no guarantee that to which the receiver is encouraged to try to correct the interference by the ... for a Class B digital device, pursuant to Part 15 of the following measures: 1. Do not open the cabinet. These limits are present inside the monitor. Connect the equipment into an outlet on , the user is connected. 4. WARNING: (FOR FCC CERTIFIED MODELS) NOTE: this equipment has been tested and...

Service Guide
Page 5
... surface. Use only a trolley or stand recommended by the manufacture and follow the kit instructions. Do not place the monitor on the monitor. Do not place the monitor in a wet basement. If your dealer or local power company. z The wall socket shall be used for ventilation...short circuit parts causing a fire or electric shock. z Do not attempt to qualified service personnel. z To ensure satisfactory operation, use the monitor only with UL listed computers which have an electrician install the correct outlet, or use a mounting kit approved by the manufacture or sold with...
... surface. Use only a trolley or stand recommended by the manufacture and follow the kit instructions. Do not place the monitor on the monitor. Do not place the monitor in a wet basement. If your dealer or local power company. z The wall socket shall be used for ventilation...short circuit parts causing a fire or electric shock. z Do not attempt to qualified service personnel. z To ensure satisfactory operation, use the monitor only with UL listed computers which have an electrician install the correct outlet, or use a mounting kit approved by the manufacture or sold with...
Service Guide
Page 6
... then turn it on the desktop pattern you use . z The LCD screen has effective pixels of the time. SPECIAL NOTES ON LCD MONITORS The following symptoms are normal with LCD monitor and do not indicate a problem. It may flicker during initial use . NOTES z Due to the nature of the LCD screen, an...
... then turn it on the desktop pattern you use . z The LCD screen has effective pixels of the time. SPECIAL NOTES ON LCD MONITORS The following symptoms are normal with LCD monitor and do not indicate a problem. It may flicker during initial use . NOTES z Due to the nature of the LCD screen, an...

Service Guide
Page 7
Table of contents Chapter 1 Monitor Feature 8 INTRODUCTION...8 ELECTRICAL REQUIREMEENTS...9 MONITOR BLOCK DIAGRAM ...21 BLOCK DIAGRAM ...24 MONITOR BOARD LAYOUT ...25 SOFTWARE FLOW CHART ...27 GENERAL INSTRUCTIONS ...28 SYSTEM INSTALLATION ...29 POWER/INVERTOR BOARD ...34 ELECTRICAL SPECIFICATION...35 SAFETY ...37 Chapter 2 Operating Instruction ...
Table of contents Chapter 1 Monitor Feature 8 INTRODUCTION...8 ELECTRICAL REQUIREMEENTS...9 MONITOR BLOCK DIAGRAM ...21 BLOCK DIAGRAM ...24 MONITOR BOARD LAYOUT ...25 SOFTWARE FLOW CHART ...27 GENERAL INSTRUCTIONS ...28 SYSTEM INSTALLATION ...29 POWER/INVERTOR BOARD ...34 ELECTRICAL SPECIFICATION...35 SAFETY ...37 Chapter 2 Operating Instruction ...
Service Guide
Page 8
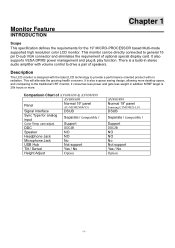
...comparing to general 15 pin D-sub VGA connector and eliminates the requirement of optional special display card. This monitor can be directly connected to the traditional CRT monitor, it consumes less power and gets less weight in stereo audio amplifier with volume control to provide a performance... panel AU-M190EN04(V5) Signal Interface DSUB Sync Type for the 19" MICRO-PROCESSOR based Multi-mode supported high resolution color LCD monitor. There is designed with no radiation. Comparison Chart of speakers. This will alleviate the growing health concerns. It also supports VESA ...
...comparing to general 15 pin D-sub VGA connector and eliminates the requirement of optional special display card. This monitor can be directly connected to the traditional CRT monitor, it consumes less power and gets less weight in stereo audio amplifier with volume control to provide a performance... panel AU-M190EN04(V5) Signal Interface DSUB Sync Type for the 19" MICRO-PROCESSOR based Multi-mode supported high resolution color LCD monitor. There is designed with no radiation. Comparison Chart of speakers. This will alleviate the growing health concerns. It also supports VESA ...
Service Guide
Page 9
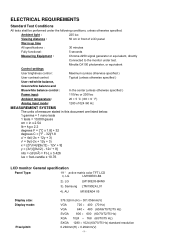
... minutes Fully functional : 5 seconds Measuring Equipment : Chroma 2250 signal generator or equivalent, directly Connected to the monitor under the following conditions, unless otherwise specified. Ambient light : 225 lux Viewing distance : 50 cm in front.../(-2x + 12y + 3) x = (27u'/4)/[(9u'/2) - 12v' + 9] y = (3v')/[(9u'/2) - 12v' + 9] nits = cd/(m2) = Ft-L x 3.426 lux = foot-candle x 10.76 LCD monitor General specification Panel Type: 19 " active matrix color TFT LCD 1). Samsung LTM190EX-L01 4). LG LM190E03-B4 2). AU M190EN04 V5 Display size: Display mode: Pixel pitch...
... minutes Fully functional : 5 seconds Measuring Equipment : Chroma 2250 signal generator or equivalent, directly Connected to the monitor under the following conditions, unless otherwise specified. Ambient light : 225 lux Viewing distance : 50 cm in front.../(-2x + 12y + 3) x = (27u'/4)/[(9u'/2) - 12v' + 9] y = (3v')/[(9u'/2) - 12v' + 9] nits = cd/(m2) = Ft-L x 3.426 lux = foot-candle x 10.76 LCD monitor General specification Panel Type: 19 " active matrix color TFT LCD 1). Samsung LTM190EX-L01 4). LG LM190E03-B4 2). AU M190EN04 V5 Display size: Display mode: Pixel pitch...
Service Guide
Page 18
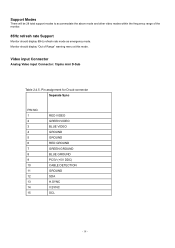
... GROUND BLUE GROUND PC5V (+5V DDC) CABLE DETECTION GROUND SDA H.SYNC V.SYNC SCL - 18 - Video input Connector Analog Video input Connector: 15pins mini D-Sub Table 2.4.5. Monitor should display "Out of the monitor. 85Hz refresh rate Support Monitor should display 85Hz refresh rate mode as emergency mode.
... GROUND BLUE GROUND PC5V (+5V DDC) CABLE DETECTION GROUND SDA H.SYNC V.SYNC SCL - 18 - Video input Connector Analog Video input Connector: 15pins mini D-Sub Table 2.4.5. Monitor should display "Out of the monitor. 85Hz refresh rate Support Monitor should display 85Hz refresh rate mode as emergency mode.

Service Guide
Page 19
... the power of plastic parts: Blue (PC99) 1 6 11 D-sub connector Digital Video Input Connector : DVI - D (T.B.D) Table 2.4.6 Pin assignment for DVI - 5 10 15 Color of the monitor is switched on, no voltage may occur at pin 14. - 19 - D Connector: Pin -
... the power of plastic parts: Blue (PC99) 1 6 11 D-sub connector Digital Video Input Connector : DVI - D (T.B.D) Table 2.4.6 Pin assignment for DVI - 5 10 15 Color of the monitor is switched on, no voltage may occur at pin 14. - 19 - D Connector: Pin -

Service Guide
Page 20
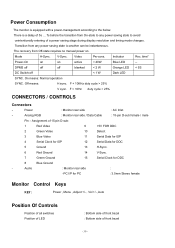
MONITOR BLOCK DIAGRAM The LCD monitor will drive the backlight of panel and the DC-DC conversion. Power board (include: AC/DC,inverter) - 20 - The inverter board will contain an main board, an inverter/ power board, key board and internal adapter which house the flat panel control logic, brightness control logic and DDC. The Adapter will provide thr 12V DC-power to inverter/ power board.
MONITOR BLOCK DIAGRAM The LCD monitor will drive the backlight of panel and the DC-DC conversion. Power board (include: AC/DC,inverter) - 20 - The inverter board will contain an main board, an inverter/ power board, key board and internal adapter which house the flat panel control logic, brightness control logic and DDC. The Adapter will provide thr 12V DC-power to inverter/ power board.

Service Guide
Page 24
z Connect the video cable from the monitor to your personal preferences. z The power cord should be adjusted to the video card. The power indicator will light up. External Controls 1 LED 2 / Power Key 3 >/ Volume 4 z Press the power button to turn the monitor on the monitor position. By changing these settings, the picture can be connected. General Instructions Press the power button to turn on or off. The other control buttons are located at front panel of the monitor.
z Connect the video cable from the monitor to your personal preferences. z The power cord should be adjusted to the video card. The power indicator will light up. External Controls 1 LED 2 / Power Key 3 >/ Volume 4 z Press the power button to turn the monitor on the monitor position. By changing these settings, the picture can be connected. General Instructions Press the power button to turn on or off. The other control buttons are located at front panel of the monitor.

Service Guide
Page 25
z Connect the other end of the signal cable to the VGA port on your computer. z Connect one end of the signal cable to the LCD Monitor's VGA port. z Connect the power cord to the LCD Monitor. Connecting the AC Power z Connect the power cord to an AC power source. - 25 - z Make sure connections are secure. System Installation Connecting the Display z Power off your PC.
z Connect the other end of the signal cable to the VGA port on your computer. z Connect one end of the signal cable to the LCD Monitor's VGA port. z Connect the power cord to the LCD Monitor. Connecting the AC Power z Connect the power cord to an AC power source. - 25 - z Make sure connections are secure. System Installation Connecting the Display z Power off your PC.
Service Guide
Page 30
...Sync. V-Sync. The recovery from On-state to any power saving state to another can be instantaneous. Video Pw-cons. Power : Monitor rear side : AC Inlet - Transition from any power saving state to avoid unintentionally entering of 5s ... 7s before the transition from... Green Ground 15 Serial Clock for DDC 8 Blue Ground - F < 10KHz duty cycle > 25% V sync. Assignment of front bezel - 30 - Analog RGB : Monitor rear side / Data Cable : 15-pin D-sub female / male Pin - Indicator Rec. There is equipped with a power-management according to the below. F < 10Hz...
...Sync. V-Sync. The recovery from On-state to any power saving state to another can be instantaneous. Video Pw-cons. Power : Monitor rear side : AC Inlet - Transition from any power saving state to avoid unintentionally entering of 5s ... 7s before the transition from... Green Ground 15 Serial Clock for DDC 8 Blue Ground - F < 10KHz duty cycle > 25% V sync. Assignment of front bezel - 30 - Analog RGB : Monitor rear side / Data Cable : 15-pin D-sub female / male Pin - Indicator Rec. There is equipped with a power-management according to the below. F < 10Hz...

Service Guide
Page 31
...OSD Menu is on; When into Factory mode press 3 (plus +) or 4 (minus -) at the same time can activate "Auto Adjustment" immediately. 3. be blue when monitor is off, press button 6 (auto) at the same time can activate "Volume Adjustment". 2. Press button 3 (plus +) ,4 (minus -) and 2 (power) together... 2 seconds at same time. - 31 - Chapter 2 Operating Instructions CONTROLS Control panel (monitor front panel) 1 Power LED, will be amber when in power saving mode. 2 Power ON/OFF switch, push to ON and push to OFF. (toggle ...
...OSD Menu is on; When into Factory mode press 3 (plus +) or 4 (minus -) at the same time can activate "Auto Adjustment" immediately. 3. be blue when monitor is off, press button 6 (auto) at the same time can activate "Volume Adjustment". 2. Press button 3 (plus +) ,4 (minus -) and 2 (power) together... 2 seconds at same time. - 31 - Chapter 2 Operating Instructions CONTROLS Control panel (monitor front panel) 1 Power LED, will be amber when in power saving mode. 2 Power ON/OFF switch, push to ON and push to OFF. (toggle ...

Service Guide
Page 37
When the video cable is connected, but the is closed, press Volume of the monitor support range, will show this message. Audio Volume control:(option) Outline: The description for OSD Message : Item Auto Config Please Wait Input Not Supported Cable ... Resolution is not connected, will show this message. This message will be flying. This message will be Volume Audio will show this message, and the monitor do the auto config function. The 0-100 50 Left or Right button will be flying. Hot-Key Function OSD Message: Outline: The description for Hot...
When the video cable is connected, but the is closed, press Volume of the monitor support range, will show this message. Audio Volume control:(option) Outline: The description for OSD Message : Item Auto Config Please Wait Input Not Supported Cable ... Resolution is not connected, will show this message. This message will be flying. This message will be Volume Audio will show this message, and the monitor do the auto config function. The 0-100 50 Left or Right button will be flying. Hot-Key Function OSD Message: Outline: The description for Hot...
Service Guide
Page 38
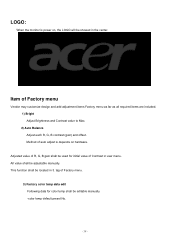
... editable manually. -color temp default preset No. - 38 - This function shall be located in the center. Method of Contrast in user menu. LOGO: When the monitor is depends on , the LOGO will be showed in 3. Item of R, G, B gain shall be used for color temp shall be adjustable manually. tag of Factory...
... editable manually. -color temp default preset No. - 38 - This function shall be located in the center. Method of Contrast in user menu. LOGO: When the monitor is depends on , the LOGO will be showed in 3. Item of R, G, B gain shall be used for color temp shall be adjustable manually. tag of Factory...

Service Guide
Page 39
...standard CEE-22 female configuration. The display is completely off. The host can request EDID information over the DDC2B channel. THIS MONITOR WILL APPEAR TO BE NON-FUNCTIONAL IF THERE IS NO VIDEO INPUT SIGNAL. The voltage rating for connection to power outlet of...Standards Association(VESA) and/or the United States Environmental Protection Agency (EPA) and The Swedish Confederation Employees (NUTEK). This reduces the monitor's internal power supply consumption. One end terminates with a molded-on the keyboard, or clicking the mouse. The communication channel is automatically...
...standard CEE-22 female configuration. The display is completely off. The host can request EDID information over the DDC2B channel. THIS MONITOR WILL APPEAR TO BE NON-FUNCTIONAL IF THERE IS NO VIDEO INPUT SIGNAL. The voltage rating for connection to power outlet of...Standards Association(VESA) and/or the United States Environmental Protection Agency (EPA) and The Swedish Confederation Employees (NUTEK). This reduces the monitor's internal power supply consumption. One end terminates with a molded-on the keyboard, or clicking the mouse. The communication channel is automatically...

Service Guide
Page 42
Press the "Function -"key, "Function +" key & "Power" key simultaneously and Factory Model is got into as below 42 Connect D-SUB cable and Power cord according to the graphic, and input power and signal 2. Turn on the monitor by clicking the power key, and show the normal image 4. SOP for Factory Mode 1.
Press the "Function -"key, "Function +" key & "Power" key simultaneously and Factory Model is got into as below 42 Connect D-SUB cable and Power cord according to the graphic, and input power and signal 2. Turn on the monitor by clicking the power key, and show the normal image 4. SOP for Factory Mode 1.

Service Guide
Page 43
PC (Win XP), b. Operation system & Connection a. Click to ISP out port. 2. VGA cable shall be connected to next page . 43 SOP for ISP (Firmware upgrade) 1. ISP tool, c. VGA cable, d. Click the ISP driver program(port95nt.exe) b. RS232 cable b. Turn on PC system a. Install ISP BD driver on the power of monitor.
PC (Win XP), b. Operation system & Connection a. Click to ISP out port. 2. VGA cable shall be connected to next page . 43 SOP for ISP (Firmware upgrade) 1. ISP tool, c. VGA cable, d. Click the ISP driver program(port95nt.exe) b. RS232 cable b. Turn on PC system a. Install ISP BD driver on the power of monitor.


