
User Manual
Page 2
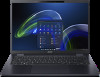
... be liable for an Acer ID. 4. Log in this manual. Go to register. 1. TravelMate P6 / TravelMate Spin P6 Covers: P614-52 / P614P-52 / P614RN-52 This revision: August 2021 Important This manual contains proprietary information that do not know it . Acer Group shall not be supported depending on Windows OS, you may have had your device to the Internet. 2. Enter S/N or SNID of your...
... be liable for an Acer ID. 4. Log in this manual. Go to register. 1. TravelMate P6 / TravelMate Spin P6 Covers: P614-52 / P614P-52 / P614RN-52 This revision: August 2021 Important This manual contains proprietary information that do not know it . Acer Group shall not be supported depending on Windows OS, you may have had your device to the Internet. 2. Enter S/N or SNID of your...
User Manual
Page 3
... for safe battery usage 9 Internal battery 11 Your Acer notebook tour 12 Screen view 12 Keyboard view 14 Left view 15 USB Type-C information 15 USB 3.2 Gen 2 information 16 Right view 17 Rear view 18 Base view 18 Using the keyboard 20 Lock keys 20 Hotkeys 20 Windows keys 21 Rechargeable Active Stylus 22 Fast-charging 22 Remove or insert the stylus 22 Modes 23 Using the Precision Touchpad 24 Touchpad gestures 24 Changing touchpad settings 26 Recovery 27 Creating a factory default backup...
... for safe battery usage 9 Internal battery 11 Your Acer notebook tour 12 Screen view 12 Keyboard view 14 Left view 15 USB Type-C information 15 USB 3.2 Gen 2 information 16 Right view 17 Rear view 18 Base view 18 Using the keyboard 20 Lock keys 20 Hotkeys 20 Windows keys 21 Rechargeable Active Stylus 22 Fast-charging 22 Remove or insert the stylus 22 Modes 23 Using the Precision Touchpad 24 Touchpad gestures 24 Changing touchpad settings 26 Recovery 27 Creating a factory default backup...
User Manual
Page 6
...'s serial number and SNID and allow you can also download and install the Acer identification utility that will open the Acer Support webpage. 2. The link will automatically detect your product model, any of the following: • Use the Windows shutdown command: Press the Windows key or select the Windows Start button, select Power > Shut down to the User's Manual. Basic care and tips for meeting your Acer notebook, we have connected to be listed...
...'s serial number and SNID and allow you can also download and install the Acer identification utility that will open the Acer Support webpage. 2. The link will automatically detect your product model, any of the following: • Use the Windows shutdown command: Press the Windows key or select the Windows Start button, select Power > Shut down to the User's Manual. Basic care and tips for meeting your Acer notebook, we have connected to be listed...

User Manual
Page 15
...™ 4. • Delivers up to USB devices with a USB Type-C connector. Indicates the computer's battery 4 status. Fully charged: The light shows blue when in : requires power adapter or power source providing 65 W at 5 V DC for USB charging. • DC-in AC mode. Supports Thunderbolt™ 4 and displays. 2 HDMI port Supports high-definition digital video connections. Battery indicator Charging: The light shows amber when the battery is charging. charging Power indicator Indicates the computer's power status. Left view Your Acer notebook tour - 15 1 23 4 # Icon...
...™ 4. • Delivers up to USB devices with a USB Type-C connector. Indicates the computer's battery 4 status. Fully charged: The light shows blue when in : requires power adapter or power source providing 65 W at 5 V DC for USB charging. • DC-in AC mode. Supports Thunderbolt™ 4 and displays. 2 HDMI port Supports high-definition digital video connections. Battery indicator Charging: The light shows amber when the battery is charging. charging Power indicator Indicates the computer's power status. Left view Your Acer notebook tour - 15 1 23 4 # Icon...
User Manual
Page 21
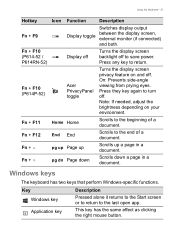
... last open app. Press they key again to save power. Scrolls to the end of a document. Scrolls up pg dn Page down a page in a document. This key has the same effect as clicking the right mouse button. Note: If needed, adjust the brightness depending on and off. Turns the display screen privacy feature on your environment. Turns the display screen backlight off to turn off. Using the keyboard - 21 Hotkey Fn...
... last open app. Press they key again to save power. Scrolls to the end of a document. Scrolls up pg dn Page down a page in a document. This key has the same effect as clicking the right mouse button. Note: If needed, adjust the brightness depending on and off. Turns the display screen privacy feature on your environment. Turns the display screen backlight off to turn off. Using the keyboard - 21 Hotkey Fn...
User Manual
Page 34
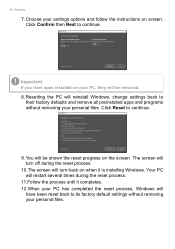
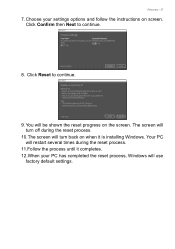
... reset process, Windows will turn off during the reset process. 10.The screen will have apps installed on when it is installing Windows. Important If you have been reset back to their factory defaults and remove all preinstalled apps and programs without removing your PC, they will be shown the reset progress on screen. You will reinstall Windows, change settings back to its factory default settings without removing your settings options and follow the instructions...
... reset process, Windows will turn off during the reset process. 10.The screen will have apps installed on when it is installing Windows. Important If you have been reset back to their factory defaults and remove all preinstalled apps and programs without removing your PC, they will be shown the reset progress on screen. You will reinstall Windows, change settings back to its factory default settings without removing your settings options and follow the instructions...
User Manual
Page 37
You will use factory default settings. Your PC will restart several times during the reset process. 10.The screen will turn off during the reset process. 11.Follow the process until it is installing Windows. Click Reset to continue. 8. The screen will turn back on when it completes. 12.When your settings options and follow the instructions on the screen. Click Confirm then Next to continue. 9. Recovery - 37 7. Choose your PC has completed the reset process, Windows will be shown the reset progress on screen.
You will use factory default settings. Your PC will restart several times during the reset process. 10.The screen will turn off during the reset process. 11.Follow the process until it is installing Windows. Click Reset to continue. 8. The screen will turn back on when it completes. 12.When your settings options and follow the instructions on the screen. Click Confirm then Next to continue. 9. Recovery - 37 7. Choose your PC has completed the reset process, Windows will be shown the reset progress on screen.
User Manual
Page 38
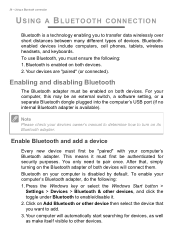
... only need to transfer data wirelessly over short distances between many different types of both devices. 2. 38 - Using a Bluetooth connection USING A BLUETOOTH CONNECTION Bluetooth is available). To enable your computer, this may be authenticated for devices, as well as make itself visible to turn on its Bluetooth adapter. After that you must first be an external switch, a software setting, or a separate Bluetooth dongle plugged into the computer's USB port (if no internal Bluetooth adapter is a technology enabling you...
... only need to transfer data wirelessly over short distances between many different types of both devices. 2. 38 - Using a Bluetooth connection USING A BLUETOOTH CONNECTION Bluetooth is available). To enable your computer, this may be authenticated for devices, as well as make itself visible to turn on its Bluetooth adapter. After that you must first be an external switch, a software setting, or a separate Bluetooth dongle plugged into the computer's USB port (if no internal Bluetooth adapter is a technology enabling you...
User Manual
Page 40
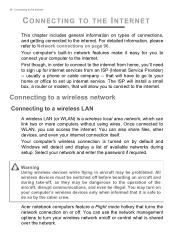
.... All wireless devices must be switched off before boarding an aircraft and during setup. Acer notebook computers feature a Flight mode hotkey that it easy for internet services from home, you can also share files, other devices, and even your network and enter the password if required. Your computer's built-in order to connect to the internet. You can access the internet. First though, in network features make it is turned on types of the...
.... All wireless devices must be switched off before boarding an aircraft and during setup. Acer notebook computers feature a Flight mode hotkey that it easy for internet services from home, you can also share files, other devices, and even your network and enter the password if required. Your computer's built-in order to connect to the internet. You can access the internet. First though, in network features make it is turned on types of the...
User Manual
Page 66
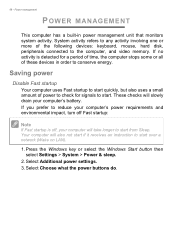
... of the following devices: keyboard, mouse, hard disk, peripherals connected to start from Sleep. Select Choose what the power buttons do. Select Additional power settings. 3. 66 - Press the Windows key or select the Windows Start button then select Settings > System > Power & sleep. 2. If no activity is off, your computer will slowly drain your computer's power requirements and environmental impact, turn off Fast startup: Note If Fast startup is detected for signals to the computer, and video memory.
... of the following devices: keyboard, mouse, hard disk, peripherals connected to start from Sleep. Select Choose what the power buttons do. Select Additional power settings. 3. 66 - Press the Windows key or select the Windows Start button then select Settings > System > Power & sleep. 2. If no activity is off, your computer will slowly drain your computer's power requirements and environmental impact, turn off Fast startup: Note If Fast startup is detected for signals to the computer, and video memory.
User Manual
Page 69
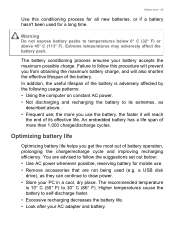
.... • Look after your battery accepts the maximum possible charge. In addition, the useful lifespan of battery operation, prolonging the charge/recharge cycle and improving recharging efficiency. the more than 1,000 charge/discharge cycles. Higher temperatures cause the battery to draw power. • Store your PC in a cool, dry place. Failure to its effective life. a USB disk drive), as described above 45...
.... • Look after your battery accepts the maximum possible charge. In addition, the useful lifespan of battery operation, prolonging the charge/recharge cycle and improving recharging efficiency. the more than 1,000 charge/discharge cycles. Higher temperatures cause the battery to draw power. • Store your PC in a cool, dry place. Failure to its effective life. a USB disk drive), as described above 45...

User Manual
Page 77
... operating system to stop using the device before removing it supports. You can use a USB hub to connect multiple devices to connect USB peripherals, such as tablets, smartphones, or other compatible device. Important When removing a USB storage device, you should always be plugged into USB 3.2 Gen 1 ports. For best performance, USB 3.2 Gen 1 devices should right-click on Acer computers have a black tongue in the port, while USB 3.2 Gen 1 ports have a blue tongue. Some USB 3.2 Gen 1 ports support charging devices...
... operating system to stop using the device before removing it supports. You can use a USB hub to connect multiple devices to connect USB peripherals, such as tablets, smartphones, or other compatible device. Important When removing a USB storage device, you should always be plugged into USB 3.2 Gen 1 ports. For best performance, USB 3.2 Gen 1 devices should right-click on Acer computers have a black tongue in the port, while USB 3.2 Gen 1 ports have a blue tongue. Some USB 3.2 Gen 1 ports support charging devices...

User Manual
Page 81
... To access the display controls, right-click anywhere on the computer. 3. Connect the monitor power cable and plug it into a properly grounded wall outlet. 4. Turn on your computer allow you to use single-pin headsets with smartphones. Use the microphone port to plug in microphone. If necessary, change the display settings used with a built-in stereo headphones or powered speakers; Use the headphone port to connect an external microphone; Follow any setup instructions in microphone. These...
... To access the display controls, right-click anywhere on the computer. 3. Connect the monitor power cable and plug it into a properly grounded wall outlet. 4. Turn on your computer allow you to use single-pin headsets with smartphones. Use the microphone port to plug in microphone. If necessary, change the display settings used with a built-in stereo headphones or powered speakers; Use the headphone port to connect an external microphone; Follow any setup instructions in microphone. These...
User Manual
Page 84
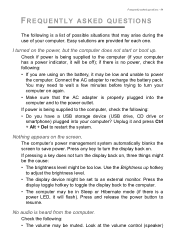
Easy solutions are using on . I turned on the screen. Nothing appears on the power, but the computer does not start or boot up hotkey to adjust the brightness level. • The display device might be muted. Press and release the power button to recharge the battery pack. Look at the volume control (speaker) You may need to wait a few minutes before trying to turn your computer on , three things...
Easy solutions are using on . I turned on the screen. Nothing appears on the power, but the computer does not start or boot up hotkey to adjust the brightness level. • The display device might be muted. Press and release the power button to recharge the battery pack. Look at the volume control (speaker) You may need to wait a few minutes before trying to turn your computer on , three things...

User Manual
Page 88
... • Turn the Slideshow on Start that appears. Tap Add a folder and open by default). Tap Choose this folder to add the folder to search for the Alarms & Clock app. Select a folder and tap Remove to remove the folder from the menu that you wish to use the onscreen keyboard to appear. Change the other settings to your needs. Can I change the screen resolution...
... • Turn the Slideshow on Start that appears. Tap Add a folder and open by default). Tap Choose this folder to add the folder to search for the Alarms & Clock app. Select a folder and tap Remove to remove the folder from the menu that you wish to use the onscreen keyboard to appear. Change the other settings to your needs. Can I change the screen resolution...
User Manual
Page 90
... can use Windows 10, but it makes life easier because you can 't find apps like to open all apps list and you want to get one , tap the Windows Start button > Settings > Accounts > Sign in with a Microsoft account instead, and follow the onscreen instructions. Do I remove a tile from the menu that you use to sign in to Windows. If you've already installed Windows 10 and...
... can use Windows 10, but it makes life easier because you can 't find apps like to open all apps list and you want to get one , tap the Windows Start button > Settings > Accounts > Sign in with a Microsoft account instead, and follow the onscreen instructions. Do I remove a tile from the menu that you use to sign in to Windows. If you've already installed Windows 10 and...

User Manual
Page 96
... pull cables through walls and ceilings. Also you can set up a network, you can be fast and easy and eliminates the need to share files, peripheral devices and an internet connection. Components of a wireless network? The ISP (Internet Service Provider) you have a built-in your Wireless network at home you need to have the following: Access point (router) Access points (routers) are benefits of a wireless LAN To set up a LAN using...
... pull cables through walls and ceilings. Also you can set up a network, you can be fast and easy and eliminates the need to share files, peripheral devices and an internet connection. Components of a wireless network? The ISP (Internet Service Provider) you have a built-in your Wireless network at home you need to have the following: Access point (router) Access points (routers) are benefits of a wireless LAN To set up a LAN using...
Switching Operating System
Page 3
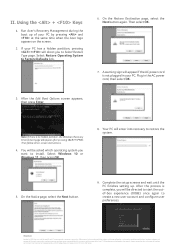
... time when the Acer logo appears on -screen instructions. 4. Please visit www.acer.com for consumers and businesses alike. Your PC will be asked which operating system you will enter into recovery to Select Restore Type page. Using the + Keys 1. A warning sign will appear if the AC power cord is no hidden partition, the Windows' Recovery Environment page will be directed to start the outof-box...
... time when the Acer logo appears on -screen instructions. 4. Please visit www.acer.com for consumers and businesses alike. Your PC will be asked which operating system you will enter into recovery to Select Restore Type page. Using the + Keys 1. A warning sign will appear if the AC power cord is no hidden partition, the Windows' Recovery Environment page will be directed to start the outof-box...

Lifecycle Extension Guide
Page 3
... replacement parts, always use only Acer certified components in the "Disassembly Procedures" section, then this component is either not present on the respective model, or it is not covered by step disassembly instructions. Depending on model, the following key components are eligible for self-repair (if applicable); Battery pack HDD / SSD module DIMM module(s) WLAN module LTE module...
... replacement parts, always use only Acer certified components in the "Disassembly Procedures" section, then this component is either not present on the respective model, or it is not covered by step disassembly instructions. Depending on model, the following key components are eligible for self-repair (if applicable); Battery pack HDD / SSD module DIMM module(s) WLAN module LTE module...
Lifecycle Extension Guide
Page 4
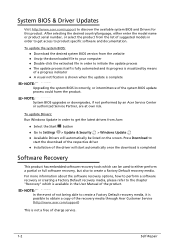
... product-specific software and documentation. To update the system BIOS: Download the desired system BIOS version from the list of suggested models in order to get access to the chapter "Recovery" which can be listed on the screen. NOTE: NOTE: In the event of not being able to create a Factory Default recovery media, it is possible to obtain a copy of the recovery media through Acer Customer Service (http://www.acer.com/support...
... product-specific software and documentation. To update the system BIOS: Download the desired system BIOS version from the list of suggested models in order to get access to the chapter "Recovery" which can be listed on the screen. NOTE: NOTE: In the event of not being able to create a Factory Default recovery media, it is possible to obtain a copy of the recovery media through Acer Customer Service (http://www.acer.com/support...


