TravelMate C310 Service Guide
Page 6
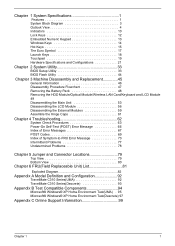
... View 4 Indicators 10 Lock Keys 12 Embedded Numeric Keypad 13 Windows Keys 14 Hot Keys 15 The Euro Symbol 17 Launch Keys 18 Touchpad 19 Hardware Specifications and Configurations 21 Chapter 2 System Utility 33 BIOS Setup Utility 33 BIOS Flash Utility 44 Chapter 3 Machine Disassembly and Replacement 45 General Information 46 Disassembly Procedure Flowchart 47 Removing the Battery Pack 48 Removing the HDD Module/Optical Module/Wireless LAN Card/Keyboard and LCD Module 49 Disassembling the Main Unit 53 Disassembling the LCD Module 56 Disassembling the External Modules 59...
... View 4 Indicators 10 Lock Keys 12 Embedded Numeric Keypad 13 Windows Keys 14 Hot Keys 15 The Euro Symbol 17 Launch Keys 18 Touchpad 19 Hardware Specifications and Configurations 21 Chapter 2 System Utility 33 BIOS Setup Utility 33 BIOS Flash Utility 44 Chapter 3 Machine Disassembly and Replacement 45 General Information 46 Disassembly Procedure Flowchart 47 Removing the Battery Pack 48 Removing the HDD Module/Optical Module/Wireless LAN Card/Keyboard and LCD Module 49 Disassembling the Main Unit 53 Disassembling the LCD Module 56 Disassembling the External Modules 59...

TravelMate C310 Service Guide
Page 7
... best settings for your display and conserves power Multimedia T T T 16-bit high-fidelity AC'97 stereo audio with the user in stereo speakers Swappaple type for large-audience presentations Light Sensing background luminance detection - panel automatically adjusts screen brightness S-video for output to 2GB T PCI Bus Master Enhanced-IDE hard disk (PATA only) T Advanced Configuration Power Interface (ACPI) power management system Display T T T T T T T T T 14.1" Thin-Film Transistor (TFT) liquid-crystal display (LCD) supporting...
... best settings for your display and conserves power Multimedia T T T 16-bit high-fidelity AC'97 stereo audio with the user in stereo speakers Swappaple type for large-audience presentations Light Sensing background luminance detection - panel automatically adjusts screen brightness S-video for output to 2GB T PCI Bus Master Enhanced-IDE hard disk (PATA only) T Advanced Configuration Power Interface (ACPI) power management system Display T T T T T T T T T 14.1" Thin-Film Transistor (TFT) liquid-crystal display (LCD) supporting...

TravelMate C310 Service Guide
Page 21
... Touchpad toggle Display the Power Options Properties used by the computer (function available if supported by operating system). Puts the computer in the hot key combination. Switches display output between the display screen, external monitor (if connected) and both the display screen and external monitor. Fn-w Volume up Increases the speaker volume. Press any key to access most of the computer's controls like sreen brightness, volume output. To activate hot keys, press and hold the Fn key before pressing the other key in Sleep mode...
... Touchpad toggle Display the Power Options Properties used by the computer (function available if supported by operating system). Puts the computer in the hot key combination. Switches display output between the display screen, external monitor (if connected) and both the display screen and external monitor. Fn-w Volume up Increases the speaker volume. Press any key to access most of the computer's controls like sreen brightness, volume output. To activate hot keys, press and hold the Fn key before pressing the other key in Sleep mode...
TravelMate C310 Service Guide
Page 27
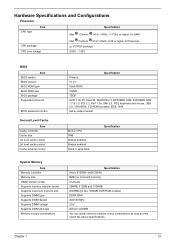
.../2 keyboard and mouse, USB 2.0, VGA BIOS, CD-ROM bootable, IEEE 1394 Set by setup manual Built-in CPU 1MB Always enabled Always enabled Fixed in write-back Specification System Memory Item Memory controller Memory size DIMM socket number Supports memory size per socket Supports maximum memory size Supports DIMM type Supports DIMM Speed Supports DIMM voltage Supports DIMM package Memory module combinations Specification Alviso 915GM+ and ICH6-M 0MB (no on-board memory) 2 sockets 256MB, 512MB and 1024MB 2048MB (by two 1024MB DDR RAM module...
.../2 keyboard and mouse, USB 2.0, VGA BIOS, CD-ROM bootable, IEEE 1394 Set by setup manual Built-in CPU 1MB Always enabled Always enabled Fixed in write-back Specification System Memory Item Memory controller Memory size DIMM socket number Supports memory size per socket Supports maximum memory size Supports DIMM type Supports DIMM Speed Supports DIMM voltage Supports DIMM package Memory module combinations Specification Alviso 915GM+ and ICH6-M 0MB (no on-board memory) 2 sockets 256MB, 512MB and 1024MB 2048MB (by two 1024MB DDR RAM module...

TravelMate C310 Service Guide
Page 43
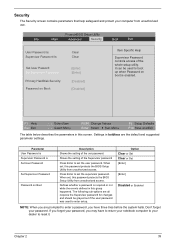
... in LCD only mode. Settings in this screen. Parameter System Time System Date System Memory Extended Memory VGA Memory Quiet Boot Power on external video port. Determines if Customer Logo will have Option: Enabled or Disabled "Press Change Boot Device" or not during user's quite boot. Disabled: Customer Logo is not displayed, and Summary Screen is disabled or enabled. If any display device is not allowed to disable or auto. Option: Auto or Both Indicates that whether the notebook can boot from LAN...
... in LCD only mode. Settings in this screen. Parameter System Time System Date System Memory Extended Memory VGA Memory Quiet Boot Power on external video port. Determines if Customer Logo will have Option: Enabled or Disabled "Press Change Boot Device" or not during user's quite boot. Disabled: Customer Logo is not displayed, and Summary Screen is disabled or enabled. If any display device is not allowed to disable or auto. Option: Auto or Both Indicates that whether the notebook can boot from LAN...
TravelMate C310 Service Guide
Page 45
...changes and should be used to boot up when Password on Boot: Clear Clear [Enter] [Enter] [Disabled] [Disabled] Item Specific Help Supervisor Password controls access of the uer password. When set , this screen. Press Enter to reset it. Option Clear or Set Clear or Set [Enter] [Enter] Disabled or Enabled NOTE: When you are the default and suggested parameter settings. If you may have three tries before the system halts. Defines whether a password is Set User Password Set Supervisor Password Password on Boot Description Shows the setting of the whole setup utility...
...changes and should be used to boot up when Password on Boot: Clear Clear [Enter] [Enter] [Disabled] [Disabled] Item Specific Help Supervisor Password controls access of the uer password. When set , this screen. Press Enter to reset it. Option Clear or Set Clear or Set [Enter] [Enter] Disabled or Enabled NOTE: When you are the default and suggested parameter settings. If you may have three tries before the system halts. Defines whether a password is Set User Password Set Supervisor Password Password on Boot Description Shows the setting of the whole setup utility...

TravelMate C310 Service Guide
Page 46
... opt to save the changes and exit the BIOS Setup Utility. IMPORTANT:Be very careful when typing your password because the characters do not appear on boot parameter. 5. Removing a Password Follow these steps as you have changed the settings, press u to enable the Password on the screen. 3. Type the current password in the Enter New Password and Confirm New Password fields. After setting the password, the computer sets the User Password parameter to "Clear". 4. If desired, you...
... opt to save the changes and exit the BIOS Setup Utility. IMPORTANT:Be very careful when typing your password because the characters do not appear on boot parameter. 5. Removing a Password Follow these steps as you have changed the settings, press u to enable the Password on the screen. 3. Type the current password in the Enter New Password and Confirm New Password fields. After setting the password, the computer sets the User Password parameter to "Clear". 4. If desired, you...
TravelMate C310 Service Guide
Page 49
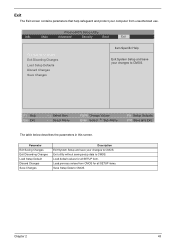
... changes to CMOS. Load default values for all SETUP item. F1 Help Esc Exit ↑ ↓ Select Item ← → Select Menu F5/F6 Change Values Enter Select 4 Sub-Menu F9 Setup Defaults F10 Save and Exit The table below describes the parameters in this screen. Main Advanced Security Boot Exit Exit Saving Changes Exit Dicarding Changes Load Setup Defaults Discard Changes Save Changes Item Specific Help Exit System Setup...
... changes to CMOS. Load default values for all SETUP item. F1 Help Esc Exit ↑ ↓ Select Item ← → Select Menu F5/F6 Change Values Enter Select 4 Sub-Menu F9 Setup Defaults F10 Save and Exit The table below describes the parameters in this screen. Main Advanced Security Boot Exit Exit Saving Changes Exit Dicarding Changes Load Setup Defaults Discard Changes Save Changes Item Specific Help Exit System Setup...

TravelMate C310 Service Guide
Page 53
... Covers HDD Drive Optical Drive Optical Device Board ODD Connector M2L4*2 Touchpad Upper Assembly Toucpad Cover Touchpad Scroll Key Touchpad Button M2L8*3 M2L4*4 Keyboard Support Plate Middle Cover Memory (upgrade) Memory/ MDC board Inverter M2L4.5*2 RTC Battery Button Board M2L4.5*2 Wireless LAN Card Disconnect Bluetooth M2.5L5*4 LCD Module LED Board M2L4.5*2 Main Antenna M2L4.5*2 M2.5L6*2 M2L6*12 Lower case left cover Lower Assembly M2L4*2 Lower case right cover LCD/w cable, brakets M2L3*8 for CMO LCD Brackets LCD M2L4*1 Main Board Assembly LCD Panel LCD Coaxial Cable...
... Covers HDD Drive Optical Drive Optical Device Board ODD Connector M2L4*2 Touchpad Upper Assembly Toucpad Cover Touchpad Scroll Key Touchpad Button M2L8*3 M2L4*4 Keyboard Support Plate Middle Cover Memory (upgrade) Memory/ MDC board Inverter M2L4.5*2 RTC Battery Button Board M2L4.5*2 Wireless LAN Card Disconnect Bluetooth M2.5L5*4 LCD Module LED Board M2L4.5*2 Main Antenna M2L4.5*2 M2.5L6*2 M2L6*12 Lower case left cover Lower Assembly M2L4*2 Lower case right cover LCD/w cable, brakets M2L3*8 for CMO LCD Brackets LCD M2L4*1 Main Board Assembly LCD Panel LCD Coaxial Cable...

TravelMate C310 Service Guide
Page 56
... cap, erecat the LCD module as picture shows. 4. Removing the Keyboard 1. Removing the LCD Module 1. Both methods are workable. 5. Turn the keyboard over and disconnect the keyboard cable then remove the keyboard. Press down the LCD module as picture shows. 50 Chapter 3 NOTE: Hinge caps disassembling SOP (step2-step7) is located on the top of the mainboard. Remove the screw holding the keyboard. 2. You can remove the optional memory here. You can...
... cap, erecat the LCD module as picture shows. 4. Removing the Keyboard 1. Removing the LCD Module 1. Both methods are workable. 5. Turn the keyboard over and disconnect the keyboard cable then remove the keyboard. Press down the LCD module as picture shows. 50 Chapter 3 NOTE: Hinge caps disassembling SOP (step2-step7) is located on the top of the mainboard. Remove the screw holding the keyboard. 2. You can remove the optional memory here. You can...

TravelMate C310 Service Guide
Page 76
... devices Initialize all video adapters in system QuietBoot start (optional) Shadow video BIOS ROM Display BIOS copyright notice Display CPU type and speed Initialize EISA board Test keyboard Set key click if enabled Test for unexpected interrupts Initialize POST display service Display prompt "Press F2 to enter SETUP" Disable CPU cache Test RAM between 512 and 640 KB Test extended memory Test extended memory address lines Jump to User Patch1 Configure advanced cache registers Initialize Multi Processor APIC Enable external and CPU caches Setup...
... devices Initialize all video adapters in system QuietBoot start (optional) Shadow video BIOS ROM Display BIOS copyright notice Display CPU type and speed Initialize EISA board Test keyboard Set key click if enabled Test for unexpected interrupts Initialize POST display service Display prompt "Press F2 to enter SETUP" Disable CPU cache Test RAM between 512 and 640 KB Test extended memory Test extended memory address lines Jump to User Patch1 Configure advanced cache registers Initialize Multi Processor APIC Enable external and CPU caches Setup...

TravelMate C310 Service Guide
Page 77
... menu Clear screen (optional) Check virus and backup reminders Try to UserPatch2 Build MPTABLE for multi-processor boards Install CD ROM for boot Clear huge ES segment register Fixup Multi Processor table Search for option ROMs. One long, two short beeps on checksum failure. Check for SMART drive (optional) Shadow option ROMs Set up Power Management Initialize security engine (optional) Enable hardware interrupts Determine number of ATA and SCSI drives Set time of ATA drives (optional) Initialize hard-disk controllers...
... menu Clear screen (optional) Check virus and backup reminders Try to UserPatch2 Build MPTABLE for multi-processor boards Install CD ROM for boot Clear huge ES segment register Fixup Multi Processor table Search for option ROMs. One long, two short beeps on checksum failure. Check for SMART drive (optional) Shadow option ROMs Set up Power Management Initialize security engine (optional) Enable hardware interrupts Determine number of ATA and SCSI drives Set time of ATA drives (optional) Initialize hard-disk controllers...

TravelMate C310 Service Guide
Page 79
... LCD cable LCD cable LCD Main board Indicator-Related Symptoms Symptom / Error Indicator incorrectly remains off or on . Action in Sequence Power-Related Symptoms Symptom / Error Power shuts down during operation The system cannot power-on , but system Main board runs correctly HDD/CD-ROM active indicators cannot work HDD/CD-ROM drive Device driver Main board Action in Sequence First, plug a monitor to CRT port. Battery pack AC adapter See if the thermal module is too dark LCD brightness cannot be adjusted Unreadable LCD screen...
... LCD cable LCD cable LCD Main board Indicator-Related Symptoms Symptom / Error Indicator incorrectly remains off or on . Action in Sequence Power-Related Symptoms Symptom / Error Power shuts down during operation The system cannot power-on , but system Main board runs correctly HDD/CD-ROM active indicators cannot work HDD/CD-ROM drive Device driver Main board Action in Sequence First, plug a monitor to CRT port. Battery pack AC adapter See if the thermal module is too dark LCD brightness cannot be adjusted Unreadable LCD screen...

TravelMate C310 Service Guide
Page 80
... close switch in Windows XP Hard disk drive Main board Driver of the portable computer. Action in Sequence PCMCIA slot assembly Main board PCMCIA slot assembly Check if the PCMCIA slot is damaged. Action in Sequence Power option in upper case Main board Chapter 4 74 System can 't be inserted or ejected Action in Sequence Enter BIOS Setup Utility to execute "Load Default Settings" then reboot system. Battery pack Main board ODD/HDD/FDD/RAM module Main board...
... close switch in Windows XP Hard disk drive Main board Driver of the portable computer. Action in Sequence PCMCIA slot assembly Main board PCMCIA slot assembly Check if the PCMCIA slot is damaged. Action in Sequence Power option in upper case Main board Chapter 4 74 System can 't be inserted or ejected Action in Sequence Enter BIOS Setup Utility to execute "Load Default Settings" then reboot system. Battery pack Main board ODD/HDD/FDD/RAM module Main board...

TravelMate C310 Service Guide
Page 81
... charge battery). External display does not work . Reconnect hard disk/CD-ROM drives/FDD or other peripherals. Action in Sequence Enter BIOS Setup Utility to execute "Load Setup defaults", then reboot system. Main board Peripheral-Related Symptoms Symptom / Error System configuration does not match the installed devices. Printer driver Printer cable Printer Main board Enter BIOS Setup Utility to execute "Load Default Settings" then reboot the system. USB does not work . Run printer self-test. Touchpad board Main board 75 Chapter 4 Main board Battery fuel gauge in Windows...
... charge battery). External display does not work . Reconnect hard disk/CD-ROM drives/FDD or other peripherals. Action in Sequence Enter BIOS Setup Utility to execute "Load Setup defaults", then reboot system. Main board Peripheral-Related Symptoms Symptom / Error System configuration does not match the installed devices. Printer driver Printer cable Printer Main board Enter BIOS Setup Utility to execute "Load Default Settings" then reboot the system. USB does not work . Run printer self-test. Touchpad board Main board 75 Chapter 4 Main board Battery fuel gauge in Windows...
TravelMate C310 Service Guide
Page 83
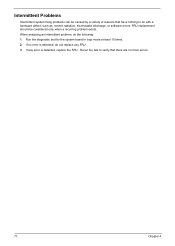
..., replace the FRU. Run the diagnostic test for the system board in loop mode at least 10 times. 2. If no more errors. 77 Chapter 4 If any FRU. 3. Rerun the test to verify that have nothing to do the following: 1. When analyzing an intermittent problem, do with a hardware defect, such as: cosmic radiation, electrostatic discharge, or software errors. Intermittent Problems...
..., replace the FRU. Run the diagnostic test for the system board in loop mode at least 10 times. 2. If no more errors. 77 Chapter 4 If any FRU. 3. Rerun the test to verify that have nothing to do the following: 1. When analyzing an intermittent problem, do with a hardware defect, such as: cosmic radiation, electrostatic discharge, or software errors. Intermittent Problems...
TravelMate C310 User's Guide
Page 3
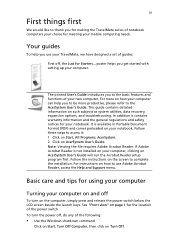
... screen to the AcerSystem User's Guide. Follow the instructions on Turn Off. For more productive, please refer to complete the installation. To turn on how to use your computer. Your guides To help you get started with setting up your TravelMate, we have designed a set of guides: First off , do any of the power switch. See "Front view" on such subjects as system utilities, data recovery, expansion options, and troubleshooting...
... screen to the AcerSystem User's Guide. Follow the instructions on Turn Off. For more productive, please refer to complete the installation. To turn on how to use your computer. Your guides To help you get started with setting up your TravelMate, we have designed a set of guides: First off , do any of the power switch. See "Front view" on such subjects as system utilities, data recovery, expansion options, and troubleshooting...

TravelMate C310 User's Guide
Page 15
...-on -LAN ready WLAN: Intel® PRO/Wireless 2200BG network connection (dual-band 802.11b/g) Wi-Fi® CERTIFIED™ solution, supporting Acer SignalUp wireless technology WPAN: integrated Bluetooth® 124-pin Acer ezDock connector Three USB 2.0 ports IEEE 1394 port External display (VGA) port S-video/TV-out port 4-in-1 card reader (MS/MS PRO/MMC/SD) Type II PC Card slot Infrared (FIR) port Ethernet (RJ-45) port Modem (RJ-11) port Microphone/line-in jack Headphones/speaker...
...-on -LAN ready WLAN: Intel® PRO/Wireless 2200BG network connection (dual-band 802.11b/g) Wi-Fi® CERTIFIED™ solution, supporting Acer SignalUp wireless technology WPAN: integrated Bluetooth® 124-pin Acer ezDock connector Three USB 2.0 ports IEEE 1394 port External display (VGA) port S-video/TV-out port 4-in-1 card reader (MS/MS PRO/MMC/SD) Type II PC Card slot Infrared (FIR) port Ethernet (RJ-45) port Modem (RJ-11) port Microphone/line-in jack Headphones/speaker...

TravelMate C310 User's Guide
Page 29
... to recharge the battery pack. - Connect the AC adaptor to the computer. Press + (increase) to adjust the brightness level. • The display device might be set to an external monitor. Press the display toggle hotkey + to toggle the display back to resume. Press and release the power switch to the computer. • If the Sleep indicator is lit, the computer is in the external USB floppy drive? Right-click...
... to recharge the battery pack. - Connect the AC adaptor to the computer. Press + (increase) to adjust the brightness level. • The display device might be set to an external monitor. Press the display toggle hotkey + to toggle the display back to resume. Press and release the power switch to the computer. • If the Sleep indicator is lit, the computer is in the external USB floppy drive? Right-click...

TravelMate C310 User's Guide
Page 39
... to a meeting room. Then close and latch the display cover to disconnect your computer from external accessories: 1 Save any open files. 2 Remove any media, floppy disks or compact disks, from the drive(s). 3 Shut down the computer: Click on Start, Turn Off Computer, then click on Turn Off (Windows XP). English 31 Taking your notebook PC with your computer. You can put the computer in Sleep mode.
... to a meeting room. Then close and latch the display cover to disconnect your computer from external accessories: 1 Save any open files. 2 Remove any media, floppy disks or compact disks, from the drive(s). 3 Shut down the computer: Click on Start, Turn Off Computer, then click on Turn Off (Windows XP). English 31 Taking your notebook PC with your computer. You can put the computer in Sleep mode.


